- 水滴状TabBar背景的实现
- 自定义TabBar布局和事件的实现
https://github.com/yuanzj/CustomTabBar
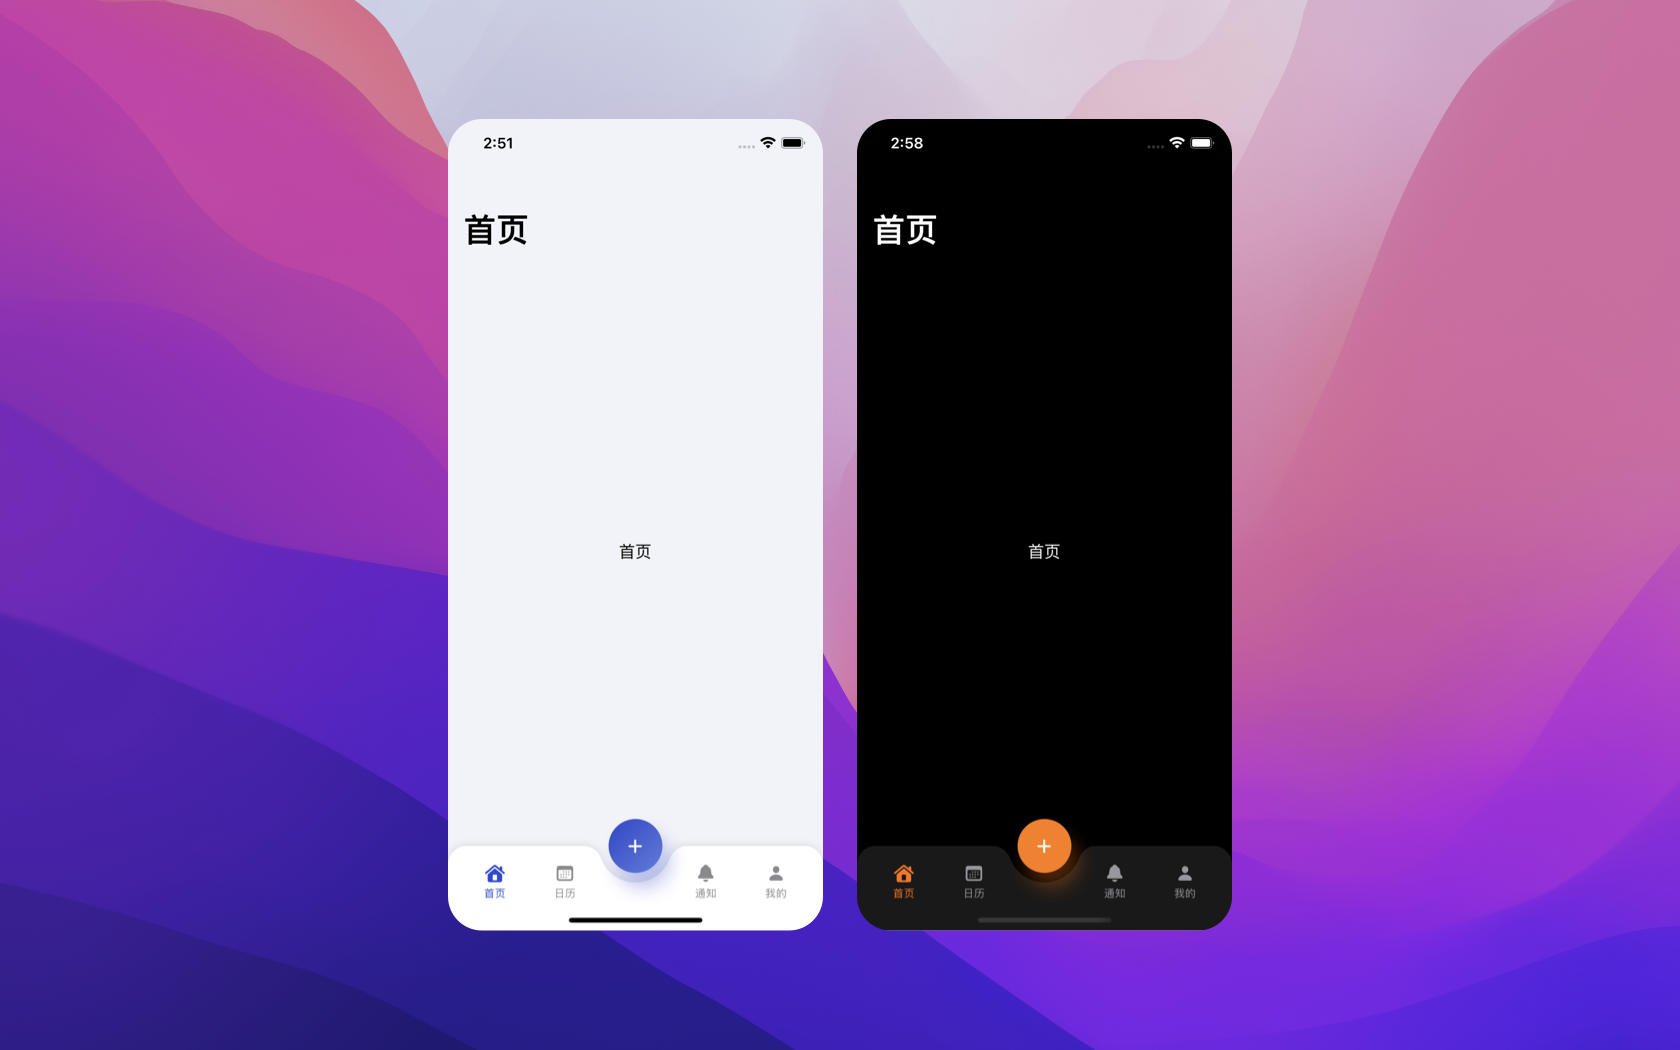
遇到效果图中中间带有水滴凹槽的TabBar背景我们可以让设计提供相应的背景图片,可是使用背景图片在不同的设备下会遇到图片拉伸适配问题。
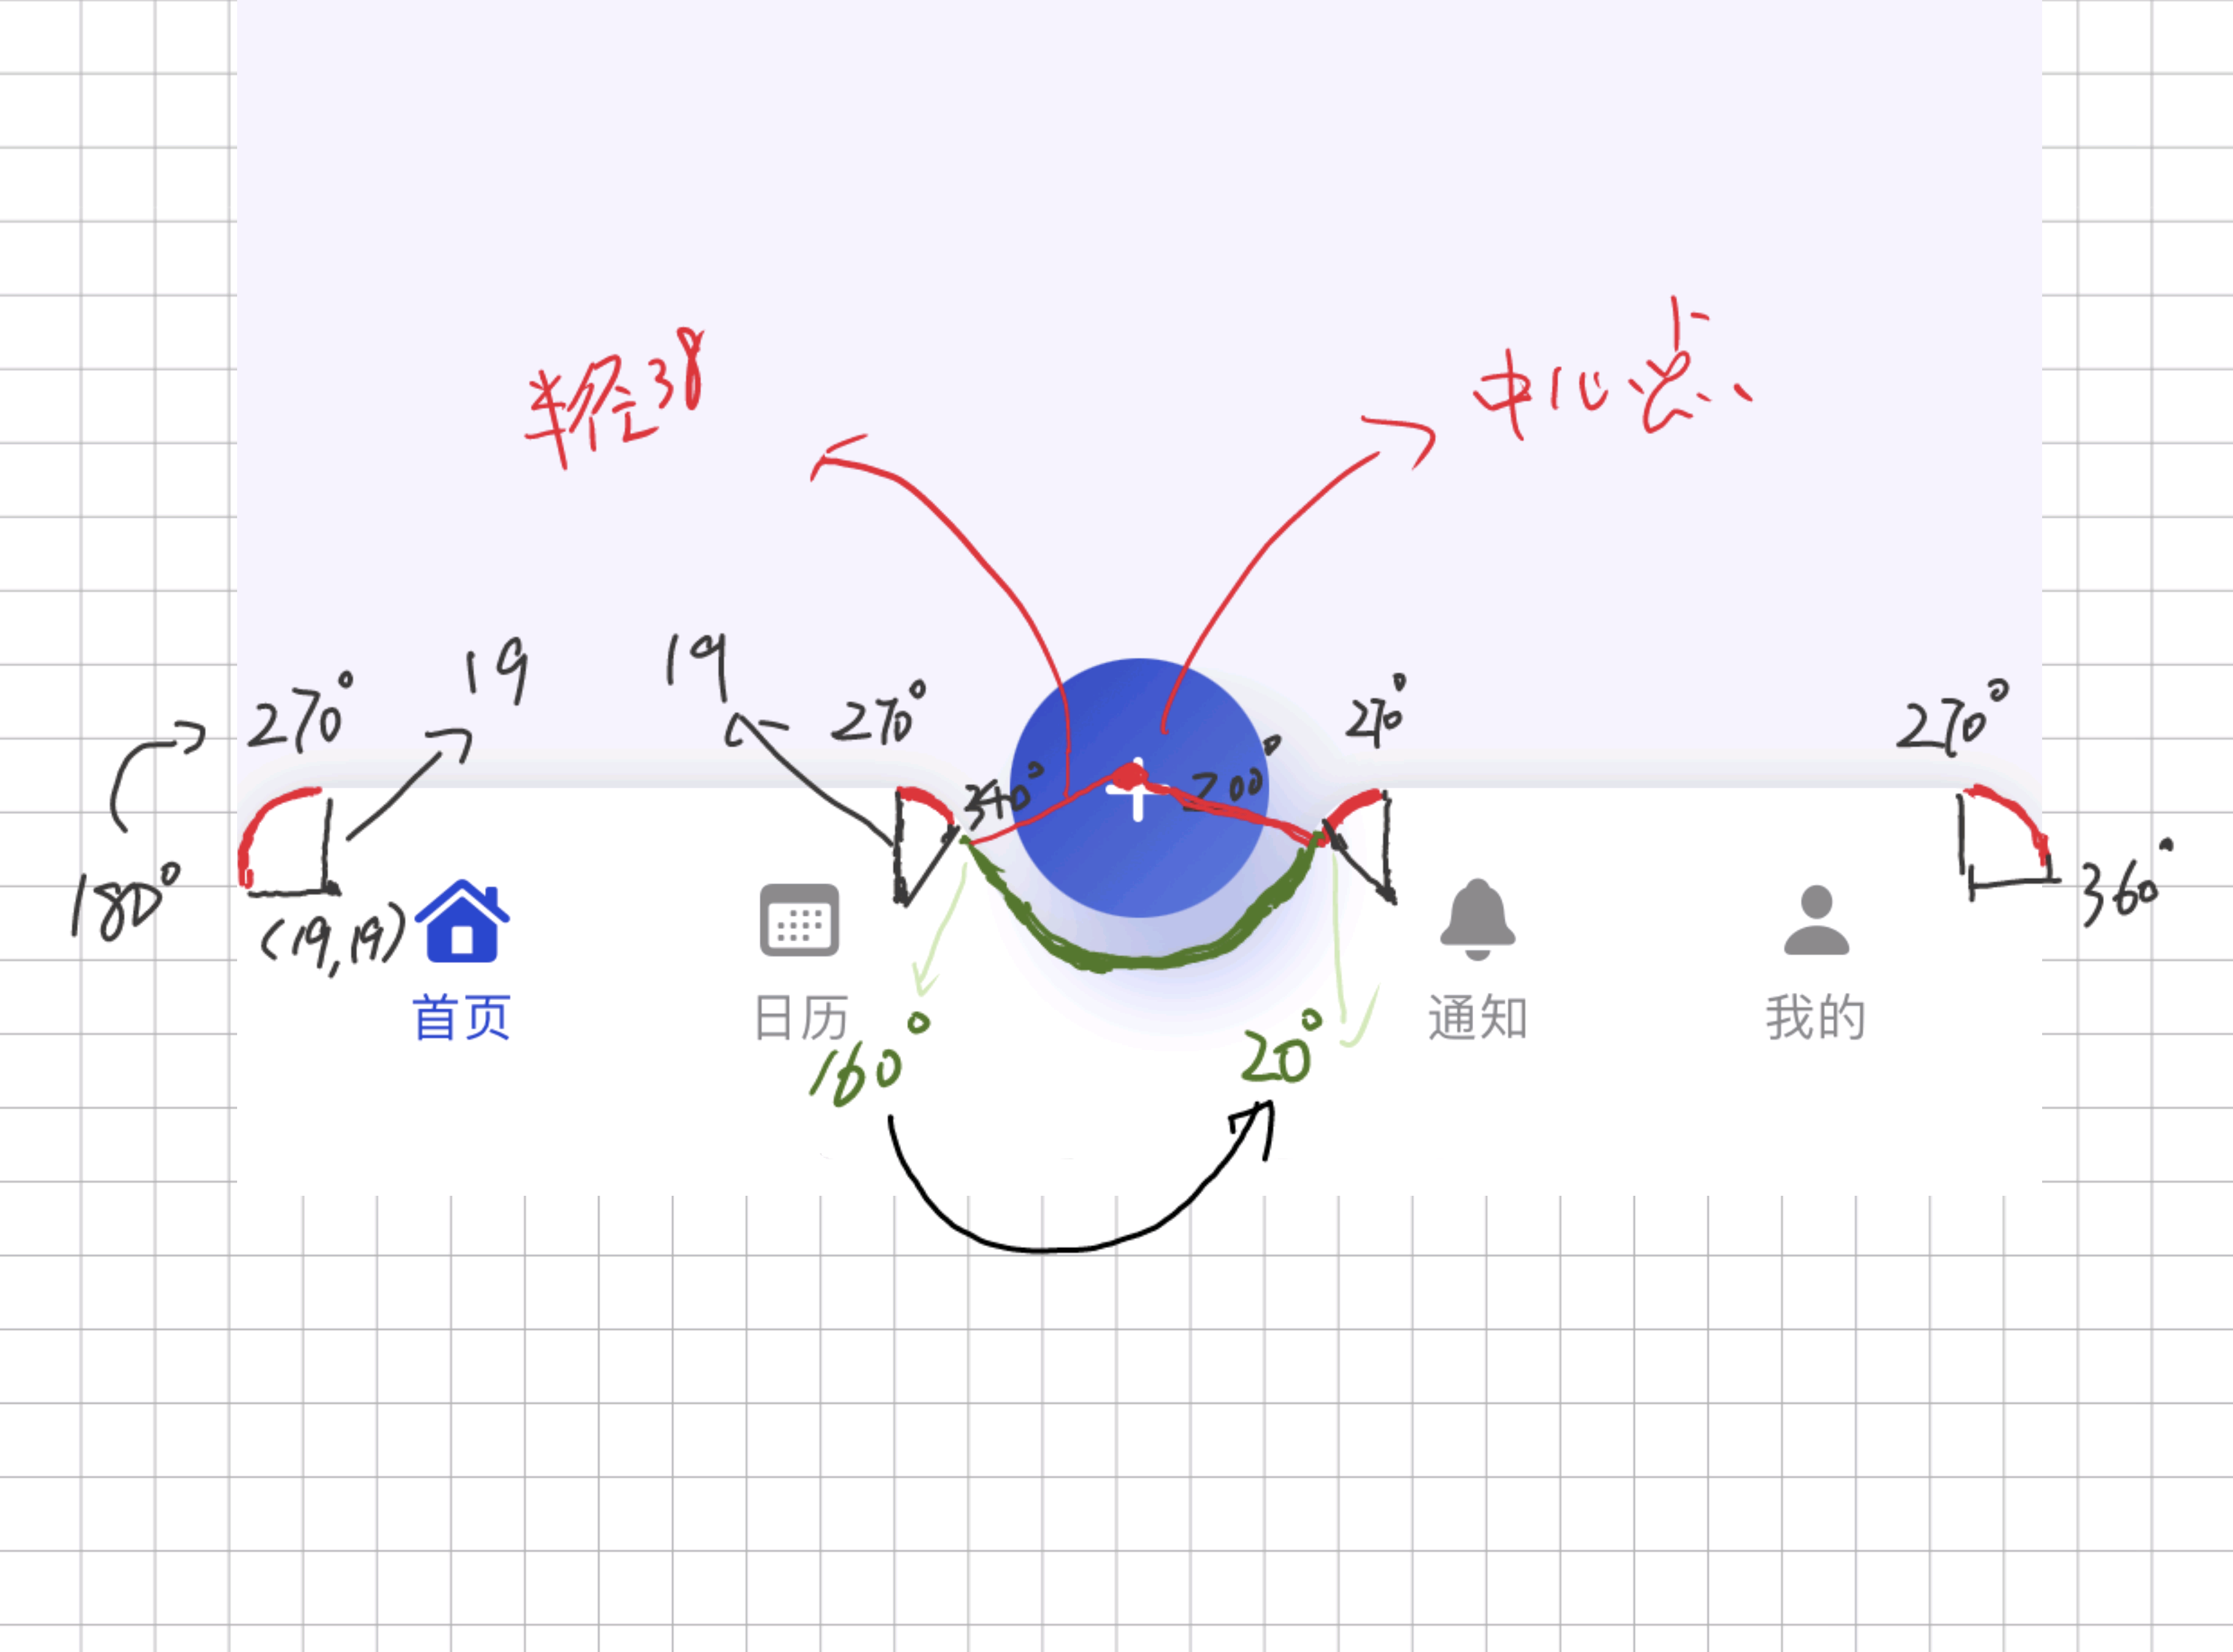
在SwiftUI中我们可以使用Shape画出这样图形完美解决使用图片产生的问题。
在介绍如何画出上述图形前先介绍需要用的两个方法。
- 画直线
mutating func addLine(to p: [CGPoint])比较简单这里不做赘述。
- 画弧线
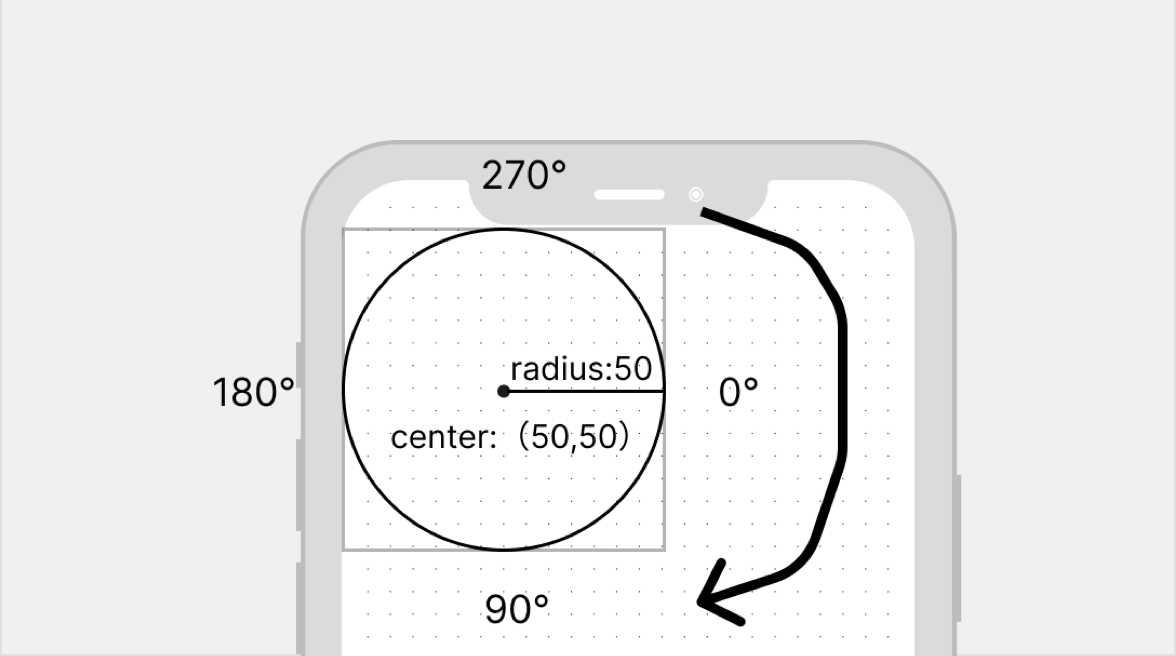
mutating func addArc(center: [CGPoint], radius: [CGFloat], startAngle: [Angle], endAngle: [Angle], clockwise: [Bool], transform: [CGAffineTransform]- center:画圆弧的中心点
- radius:画圆弧的半径
- startAngle:开始角度
- endAngle:介绍角度
- clockwise:顺时针方向(缺省为true 时钟逆时针方向,一般设置为fase调整为时钟顺时针)
clockwise为fase时,对应的角度和旋转方向如上图所示
var radius = 38.0

func path(in rect: CGRect) -> Path {

	var path = Path()

	let v = radius * 2
	// 移动到0,0点
	path.move(to: CGPoint(x: 0, y: 0))
	// 画左上角90°圆弧
	path.addArc(center: CGPoint(x: radius/2, y: radius/2), radius: radius/2, startAngle: Angle(degrees: 180), endAngle: Angle(degrees: 180+90), clockwise: false)
	// 画中间水滴左边70°圆弧
	path.addArc(center: CGPoint(x: ((rect.size.width / 2) - radius) - radius + v * 0.04 + radius/2, y: radius/2), radius: radius/2, startAngle: Angle(degrees: 270), endAngle: Angle(degrees: 270+70), clockwise: false)
	// 画中间水滴圆弧
	path.addArc(center: CGPoint(x: rect.size.width / 2, y: 0), radius: v/2, startAngle: Angle(degrees: 160), endAngle: Angle(degrees: 20), clockwise: true)
	// 画中间水滴右边70°圆弧
	path.addArc(center: CGPoint(x: (rect.size.width - ((rect.size.width / 2) - radius)) - v * 0.04 + radius/2, y: radius/2), radius: radius/2, startAngle: Angle(degrees: 200), endAngle: Angle(degrees: 200+70), clockwise: false)
	// 画右上角90°圆弧
	path.addArc(center: CGPoint(x: rect.size.width - radius/2, y: radius/2), radius: radius/2, startAngle: Angle(degrees: 270), endAngle: Angle(degrees: 270+90), clockwise: false)
	// 画上边线
	path.addLine(to: CGPoint(x: rect.size.width, y: 0))
	// 画右边线
	path.addLine(to: CGPoint(x: rect.size.width, y: rect.size.height))
	// 画下边线
	path.addLine(to: CGPoint(x: 0, y: rect.size.height))
	// 自动闭合图形

	return path

}var bottomBar: some View {
HStack(spacing: 0) {
Spacer()
ForEach(tabItems) { tabItem in
Button(action: {
// 点击Tab菜单切换显示内容
if tabItem.type == .TabType {
withAnimation(.easeInOut) {
selectedTab = tabItem.tab!
}
} else {
// 点击中间新增按钮
showingAlert = true
}
}) {
if tabItem.type == .TabType {
// Tab菜单按钮
VStack(spacing: 0) {
Image(systemName: tabItem.icon)
.symbolVariant(.fill)
.font(.body.bold())
.frame(width: 44, height: 29)
Text(tabItem.text)
.font(.caption2)
.lineLimit(1)
}
} else {
// 中间凸起添加按钮
Image(systemName: "plus")
.symbolVariant(.fill)
.font(.body.bold())
.frame(width: 56, height: 56)
.foregroundColor(Color.white)
.background(Circle()
.fill(LinearGradient(gradient: Gradient(colors: [Color("FloatingButtonTopLeft"), Color("FloatingButtonBottomRight")]), startPoint: .topLeading, endPoint: .bottomTrailing))
.shadow(color: Color.accentColor.opacity(0.3), radius: 10, x: 8, y: 16))
.offset(y: -35)
}
}
// Tab选中颜色
.foregroundColor(selectedTab == tabItem.tab ? .accentColor : .secondary)
.frame(maxWidth: .infinity)
Spacer()
}
}
.frame(height: 88, alignment: .top)
.padding(.horizontal, 8)
.padding(.top, 14)
}Group {
switch selectedTab {
case .home:
HomeView()
case .calendar:
CalendarView()
case .notifications:
NotificationsView()
case .profile:
ProfileView()
}
}
.frame(maxWidth: .infinity, maxHeight: .infinity)
.padding(.bottom, 88.0)Group可以将Modifier应用到其包裹的所有View。


