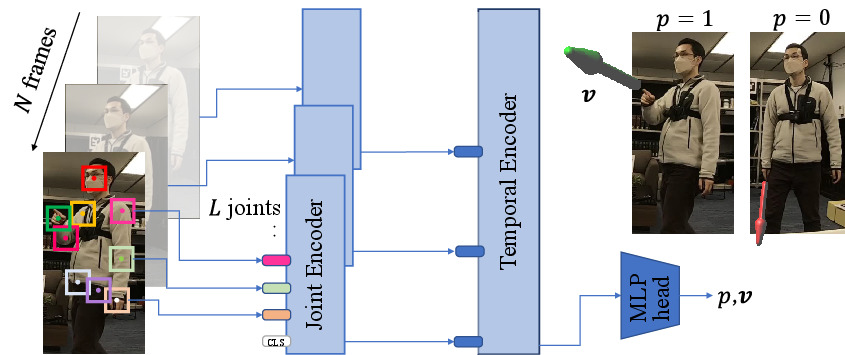
This repository provides an implementation of our paper DeePoint: Visual Pointing Recognition and Direction Estimation in ICCV 2023. If you use our code and data please cite our paper.
Please note that this is research software and may contain bugs or other issues – please use it at your own risk. If you experience major problems with it, you may contact us, but please note that we do not have the resources to deal with all issues.
@InProceedings{Nakamura_2023_ICCV,
	author    = {Shu Nakamura and Yasutomo Kawanishi and Shohei Nobuhara and Ko Nishino},
	title     = {DeePoint: Visual Pointing Recognition and Direction Estimation},
	booktitle = {Proceedings of the IEEE/CVF International Conference on Computer Vision (ICCV)},
	month     = {October},
	year      = {2023},
}
We tested our code with python3.10 with external libraries including:
numpyopencv-pythonopencv-contrib-pythontorchtorchvisionpytorch-lightning
Please refer to environment/pip_freeze.txt for the specific versions we used.
You can also use singularity to replicate our environment:
singularity build environment/deepoint.sif environment/deepoint.def
singularity run --nv environment/deepoint.sifYou can download the pretrained model from here.
Download it and save the file as models/weight.ckpt.
You can apply the model on your video and visualize the result by running the script below.
python src/demo.py movie=./demo/example.mp4 lr=l ckpt=./models/weight.ckpt
- The video has to contain one person within the frame and the person had better shows the whole body in the frame.
- You need to specify the pointing hand (left or right) for visualization.
- Since this script uses OpenGL (
PyOpenGLandglfw) to draw an 3D arrow, you need to have an window system for this to work.- We use the script that were used in Gaze360 for drawing 3D arrows.
You can download the DP Dataset from Google Drive. link
The DP Dataset is distributed under the Creative Commons Attribution-Noncommercial 4.0 International License (CC BY-NC 4.0).
After downloading the dataset, follow the instructions in data/README.md.
The structure of data directory then should look like below:
deepoint
├── data
│   ├── README.md
│   ├── mount_frames.sh
│   ├── frames
│   │   ├── 2023-01-17-livingroom
│   │   └── ...
│   ├── labels
│   │   ├── 2023-01-17-livingroom
│   │   └── ...
│   └── keypoints
│       ├── collected_json.pickle
│       └── triangulation.pickle
└── ...
After downloading the dataset, run
python src/main.py task=train
to train the model. Refer to conf/model for configurations of the model.
After training, you can evaluate the model by running:
python src/main.py task=test ckpt=./path/to/the/model.ckpt

