Version 0.3.0
This project serves as a template to help newer developers/traders start taking advantage of delta-neutral arbitrage opportunities between various perps platforms. Current version focuses on Synthetix vs HMX pairs, detecting and executing upon the opportunities that it finds. HMX is on Arbitrum and Synthetix v3 is on Base, so you'll need some funds on both exchanges.
Given that the repo is under active development, it is recommended that you run the bot on testnet for a while first to ensure that the configuration is correct before putting any capital at stake.
(No fees will be charged for running this bot, but if you happen to be inclined to charity the address is 0x7D8127Da2E23c5b371Ee436303BDCCe1c252afb1)
All code contained within this repository is distrubuted freely under the MIT License
As mentioned above, this repository is under active development and has not yet been ran extensively in production. By cloning or forking the code and running it locally, you understand that you are running in-development code, and take on all responsibility for any loss of funds that are incurred via user error, as-of-yet-undiscovered bugs, or any other concievable reason. You should be comfortable running, interacting with and debugging the bot on testnet before considering any runs with real capital. This project is for educational purposes only. Any interested party should not construe any information or other material found in this repository as legal, tax, investment, financial, or other advice. Nothing contained here constitutes a solicitation, recommendation, endorsement, or offer by the repository creator, the Synthetix Protocol, or any third party service provider to buy or sell any securities or other financial instruments in the US, nor in any other jurisdiction in which such solicitation or offer would be unlawful under the securities laws of said jurisdiction. Under no circumstances will the repository creator or the Synthetix Protocol be held responsible or liable in any way for any claims, damages, losses, expenses, costs, or liabilities whatsoever, including, without limitation, any direct or indirect damages for loss of profits.
In order to start running the bot, some beginner/intermediate programming knowledge is required.
This isn't ideal of course, the plan is to have a user-friendly interface from which one can control everything and see their profit and loss, historical trades etc; this is coming, but won't be here for a while as there is currently only one active developer.
If you're newer to programming and want to have a go anyway, don't be afraid to ask chatGPT to explain errors and help you along; this should be your first port of call. If there's an error or you encounter unexpected behaviour within the project repo itself, please provide screenshots of the error and what you ran that caused said error in the telegram chat (linked at bottom of readme).
This repo is designed to be open source and as such we welcome any who may be interested in contributing to the codebase. To reach out, join the Telegram chat linked at the bottom of the README.
To start, first clone the repo to your local machine using either:
git clone git@github.com:50shadesofgwei/SynthetixFundingRateArbitrage.git if you have SSH keys set up on linked github account
or alternatively
git clone https://github.com/50shadesofgwei/SynthetixFundingRateArbitrage.git
if you don't.
You will need the git package installed on you machine for this.
Next you'll want to navigate to the project directory using cd SynthetixFundingRateArbitrage, then install project dependencies with pip install -r requirements.txt.
To make sure you can run the project's commands directly from your terminal, run pip install -e ..
After this, navigate to the .env file and input the necessary values. You will need:
- An Alchemy API key (Base + Arbitrum)
- The relevant chainId (Base Mainnet: 8453, Base Testnet: 84532)
- Your wallet address and Private Key (For security reasons you should create a new wallet to use here)
Some recommended values for the following vars are as follows:
TRADE_LEVERAGE=5DELTA_BOUND=0.03PERCENTAGE_CAPITAL_PER_TRADE=50
The vars:
DEFAULT_TRADE_DURATION_HOURS=8andDEFAULT_TRADE_SIZE_USD=250are there for determining the most profitable opportinity. The actual size of your trades will be determined by how much collateral is in your accounts, the leverage factor, and the percentage capital per trade.
Trade Leverage specifies the leverage applied to the collateral amount on each trade. Setting this value too high will result in positions being liquidated, so keeping a relatively small cap is a good idea.
Delta Bound calculates the maximum delta on a trade pair before it will be cancelled by the health checker. The delta between positions will in most cases be 0.0, so this is mostly a failsafe.
Percentage Capital Per Trade specifies the amount of available capital to be used on each trade that is executed. This is derived by checking how much available collateral there is on each exchange, then taking the smaller value and calculating (smallerValue/100)*PERCANTAGE_CAPITAL_PER_TRADE. Higher values for this will of course make the trade sizes larger, and therefore will mean having to rebalance the collateral between exchanges more frequently.
In addition, you can choose which tokens to target/exclude from the searching algorithm via navigating to APICaller.master.MasterUtils.py, where you will find an array that looks like this:
TARGET_TOKENS = [
    {"token": "BTC", "is_target": True},
    {"token": "ETH", "is_target": True},
]
To include/exclude a token, simply replace True with False and vice versa. The above example targets both BTC and ETH, but if for the sake of argument we only wanted to target ETH, we'd edit the array to look like the following:
TARGET_TOKENS = [
    {"token": "BTC", "is_target": False},
    {"token": "ETH", "is_target": True},
]
The bot will now only target ETH opportunities.
To switch between which exchanges are targeted, there is a similar array:
TARGET_EXCHANGES = [
    {"exchange": "Synthetix", "is_target": True},
    {"exchange": "HMX", "is_target": True},
]
It's currently recommended that you run with exchanges Synthetix and HMX. Note that some additional steps are required before executing trades, namely that a Synthetix perps account will have to be created and have some collateral deployed. The code for this is found in the next section.
To start executing some test trades, first you will need to mint some fUSDC on Base sepolia (you can do that here by calling deposit_eth with some testnet Eth and '0xc43708f8987Df3f3681801e5e640667D86Ce3C30' as the token_address argument).
After you have some fUSDC, you can call the collateral deposit function by running the deploy-collateral command in the CLI. Once you click enter it will ask you for the amount to deposit. Amount is denominated in USD, so to deposit 100 USDC, you'd enter the command as follows:
deploy-collateral 100
For the Binance side, you will have to create an account and set of API keys here, and use these keys in the .env file. Additionally, whether the Binance client is set to testnet or live trading is determined upon initialisation of the Binance clients. By default they will target testnet and look like so:
self.client = Client(api_key, api_secret, base_url="https://testnet.binancefuture.com")To switch to live trading, simply remove the final argument like so:
self.client = Client(api_key, api_secret)As of version 0.3.0, there are Binance clients initialised in the following files. Make sure all are configured uniformly. - BinanceCaller.py - BinancePositionController.py - BinancePositionMonitor.py
The bot can be controlled via the CLI using the following commands:
is-position-opendeploy-collateral-synthetix [amount]deploy-collateral-hmx [token_address] [amount]project-run(Run this command to start the bot after setup is finished)project-run-demo(This will search for available opportunities but not execute on them)close-position-pair [symbol]
A high level walkthrough can be found via following this link: Watch here
As of version 0.2.1, the impact of a potential trade on funding velocity is now taken into consideration when assessing the profitability of a position - maker/taker fees are also taken into account, and 8 new markets have been added to the searcher algorithm (by default, all will be selected). More markets will be added in future releases as they amass sufficient liquidity.
To estimate the profit for a trade we start with the Synthetix half - the trade details are generated by the MatchingEngine module and passed to CheckProfitability.py, where the user's BASE_TRADE_SIZE_USD is multiplied by their TRADE_LEVERAGE to find the total dollar value of the position. The market price of the asset is then called, and the dollar value converted into the amount of the asset in question which is halved, giving us the trade size per trade leg and finally we adjust for the side (long or short) of each trade and factor in the expected price impact.
Now that we have the size of the position we are going to place on Synthetix, the next step is to calculate the effect that our trade will have on the funding velocity of the respective market. To do this, we use the skew value in our opportunity object along with the our trade size, and pass these as arguments to a helper function that will return the funding velocity after our trade is placed:
@staticmethod
    def calculate_new_funding_velocity(symbol: str, current_skew: float, trade_size: float) -> float:
        try:
            market_data = MarketDirectory.get_market_params(symbol)
            c = market_data['max_funding_velocity'] / market_data['skew_scale']
            new_skew = current_skew + trade_size
            new_funding_velocity = c * new_skew
            return new_funding_velocity
        except Exception as e:
            raise ValueError(f"GlobalUtils - Failed to calculate new funding velocity for {symbol}: {e}")
Funding velocity is defined as the product of the formula
(If this is a bit abstract, there's a good blog post that you can find here with some more intuitive explanations)
So to calculate the new funding velocity we solve for the above function by grabbing the market details from the MarketDirectory class, which will be of type:
'ETH': {
        'market_id': 100,
        'symbol': 'ETH',
        'max_funding_velocity': 9,
        'skew_scale': 350000,
        'maker_fee': 0.000001,
        'taker_fee': 0.0005
    }
from which we calculate our constant factor and our new funding velocity.
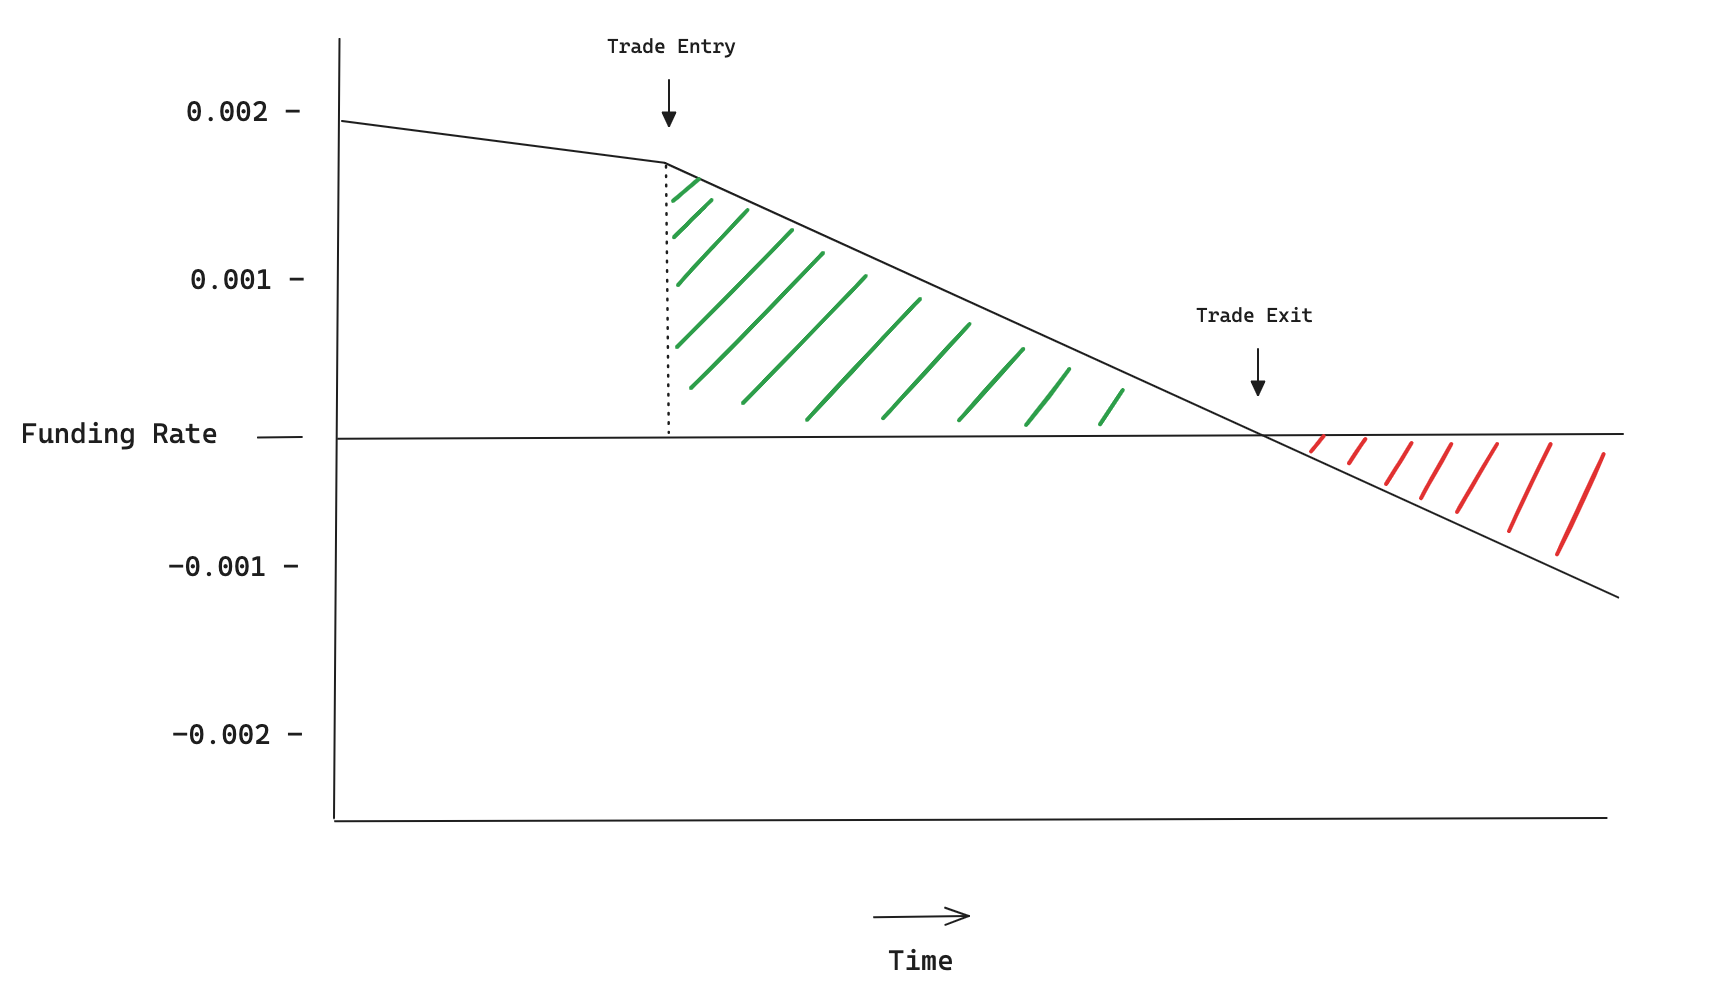
Now that we have our funding velocity, we have to do some further calculations to give us an estimate of how long it will take before the funding rate turns against our trade. Fundamentally, the velocity figure shows us where the funding rate will be in 24 hours' time assuming no other trades are placed within that period. To visualise this, we can illustrate the funding rate over time on a chart like so:
 Where the green shaded area is our profit, and the funding velocity is represented by the gradient of the funding rate value over time. As we can see, once our trade is placed a new funding rate velocity is calculated and the gradient of the line changes; in this example there is already a negative funding velocity (funding rate is headed downwards), and our short trade increases the rate at which this change is occuring. You can visualise the profit as the sum of the green shaded area.
New module introduced in v0.2.0 - fetches, parses, and runs backdated strategies on any asset in the TARGET_TOKENS enum. Some helper functions are included, mainly to abstract away the process of calling the MarketProxy contract for historical funding rate data. This is done in one call, and sorted by asset + block number before being written to local storage in the relevant JSON file. Upon analysis, this data is parsed into pandas DataFrames which makes running the tests easier - The current model runs for one asset at a time, entering a position when the discrepancy in funding rates rises above a given bound, and closes the position when it falls back below.
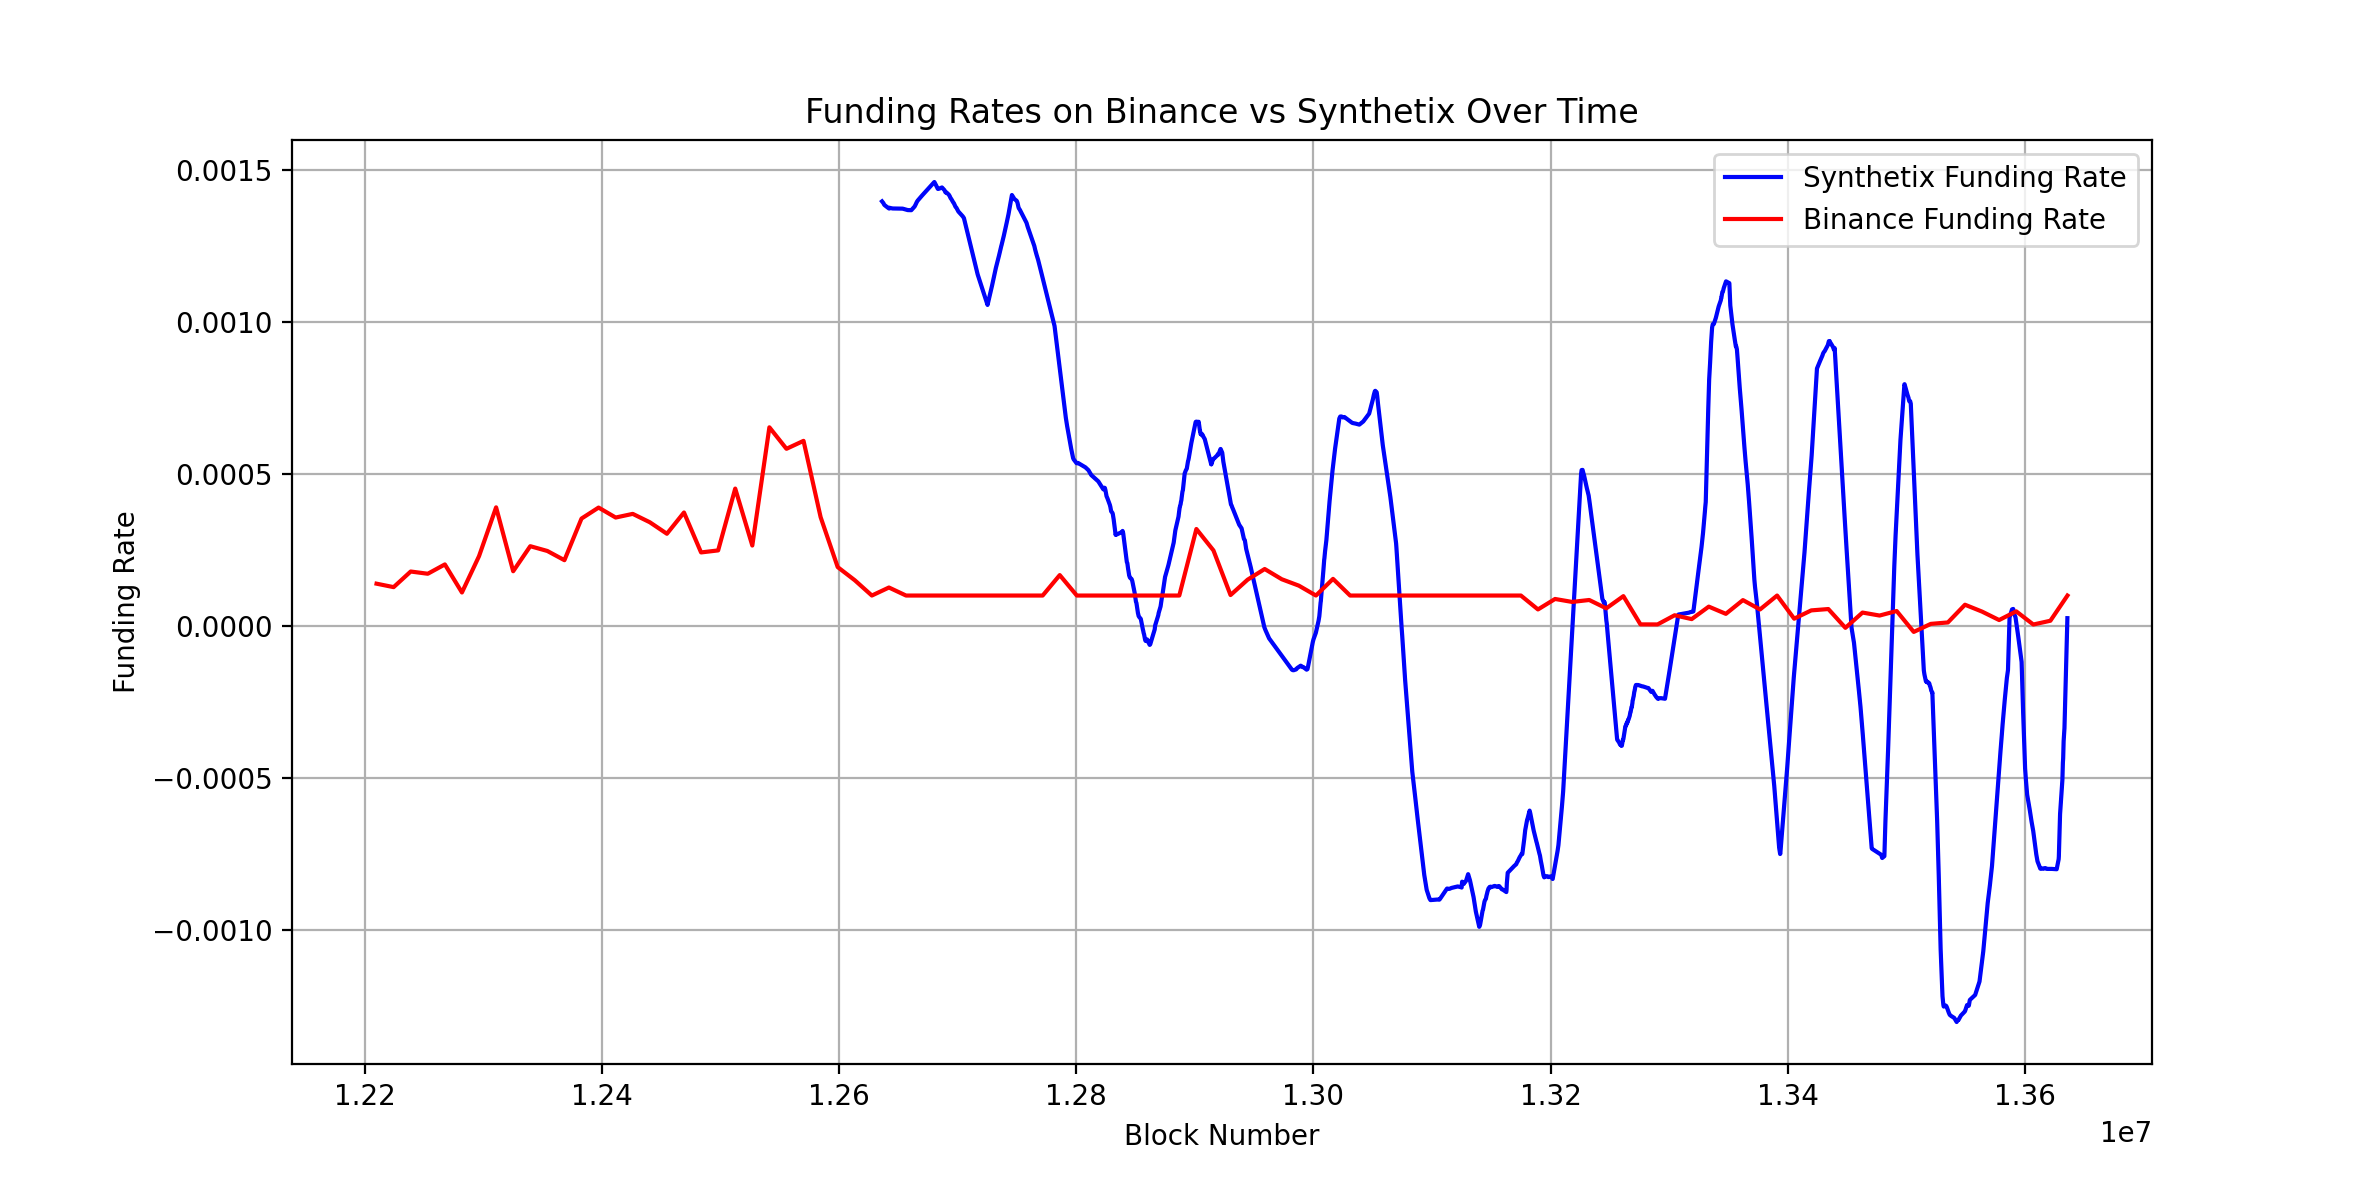
From some initial runs, we find a handful of useful results:
 First of all that the funding rate on the Synthetix market is much more volatile than the Binance equivalent, which tells us that we will in most cases be taking the Synthetic position as the 'yield farm' and the Binance position as the hedge.
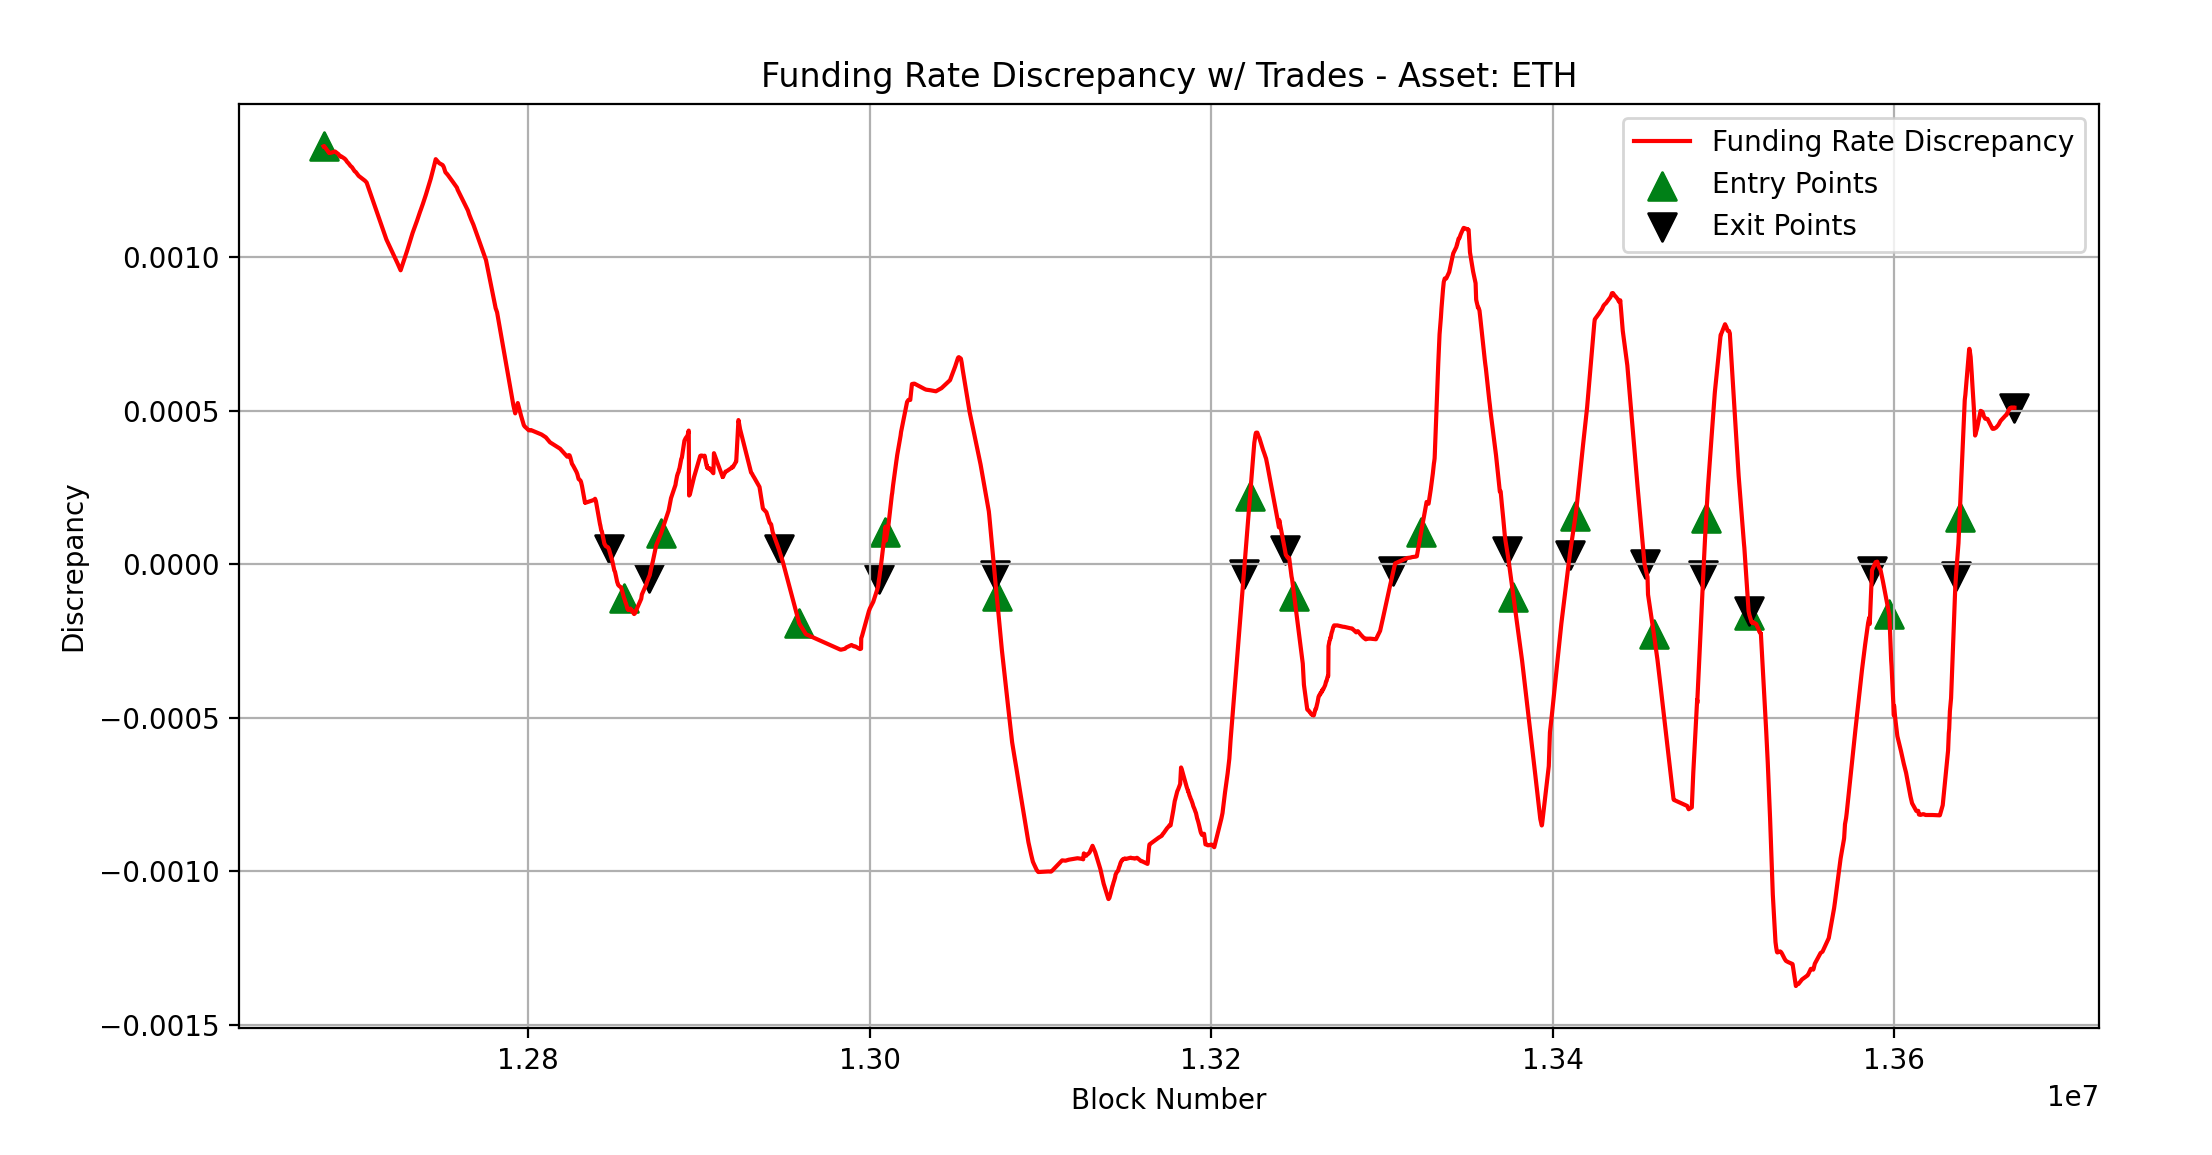
A visualisation of the strategy would look like the following:
 We see that the strategy is generally functioning well, but shows that there are many optimisations that we can make. Timing the trade to get out before the funding rate flips, and therefore avoiding some of the
 taker fees in favour of the lower maker fees. This part of the repo is free to play around with, and tinkering with strategies, leverage numbers, entry and exit conditions is highly encouraged.
The project is designed according to a modular, event-driven architecture where functionality is grouped together into like kind sub-classes, instances of which are then contained in a master class which itself is contained within the main class. To illustrate, let's look at the APICaller module contains all logic for calling funding rate data from the relevant APIs. This module contains two sub-classes SynthetixCaller and BinanceCaller, where all the logic for interacting with the respective APIs is stored in the corresponding sub-class. Then an instance of each class is stored within the MasterCaller class, which contains all functions that require access to both of these APIs, an example being reading and identifying funding rate discrepancies between the two.
This inheritance structure is repeated with the Master modules, an instance of each being created in the Main class. The Main class therefore contains instances of the following:
- MasterCaller
- MatchingEngine
- MasterPositionMonitor
- MasterPositionController
- TradeLogger
Cross-module communication is handled via event emitters and listeners, a directory of which can be found in GlobalUtils.py. Upon confirmation of execution, trades are logged to a database with each side (SNX/HMX) having its own entry, and are linked via a shared UUID. Upon closing, the entries are updated with relevant PnL, accrued funding and reason for close.
Version 0.3.0
Shutdown
If you're running an instance of the bot and shut it down mid-trade, the positions won't close automatically; you'll have to close them manually either via the respective UIs or by using the CLI command:
close-position-pair with the desired symbol as the argument, e.g. close-position-pair ETH.
Slippage
In its current form, the bot uses market orders for both sides of each trade. For Synthetix this is mandated by the smart contracts but for the Binance side, there is a possibility that one could tighten the profit margins on each trade by using limit orders instead of market orders. The slippage is especially pronounced on Binance testnet because there's such little liquidity and therefore the bid/ask spread is very large, which also makes backtesting and + test PnL calculations harder to run off of testnet data.
HMX also uses market price.
Moving Collateral <> Exchanges
In current implementation, anyone running the bot over longer periods of time (or using really high leverage) will have to manually rebalance collateral across exchanges after a couple of trades due to the PnL imbalancing collateral amounts. If one wanted to maximise size on every trade, they would do this often.
Any further questions please join the telegram chat at https://t.me/+ualID7ueKuJjMWJk


