Welcome to LangGraph 101 for TypeScript!
This repository contains TypeScript/JavaScript versions of the LangGraph 101 tutorials, teaching you the fundamentals of building agents with LangChain v1 and LangGraph v1. This is a condensed version of LangChain Academy, and is intended to be run in a session with a LangChain engineer. If you're interested in going into more depth, or working through a tutorial on your own, check out LangChain Academy here! LangChain Academy has helpful pre-recorded videos from one of our LangChain engineers.
Workshop Format: This workshop is designed to be run through the /agents folder using LangGraph Studio. Each agent builds upon previous concepts, creating a progressive learning experience that you can visualize and interact with in real-time.
At LangChain, we aim to make it easy to build LLM applications. One type of LLM application you can build is an agent. There's a lot of excitement around building agents because they can automate a wide range of tasks that were previously impossible.
In practice though, it is incredibly difficult to build systems that reliably execute on these tasks. As we've worked with our users to put agents into production, we've learned that more control is often necessary. You might need an agent to always call a specific tool first or use different prompts based on its state.
To tackle this problem, we've built LangGraph — a framework for building agent and multi-agent applications. Separate from the LangChain package, LangGraph's core design philosophy is to help developers add better precision and control into agent workflows, suitable for the complexity of real-world systems.
git clone https://github.com/langchain-ai/langgraph-101-ts.git
cd langgraph-101-tsCreate a .env file in the project root with your API keys:
# Copy the example file (if it exists) or create a new .env file
cp .env.example .env
Then add your API Keys
If you run into issues acquiring the necessary API keys due to any restrictions (ex. corporate policy), contact your LangChain representative and we'll find a work-around!
Ensure you have Node.js (v20+) and pnpm installed:
# Install pnpm if you haven't already
npm install -g pnpm

# Install all project dependencies
pnpm installLangGraph Studio is a visual IDE for developing and debugging LangGraph applications. To run the workshop agents:
pnpm langgraphjs devThis command will:
- Start the LangGraph API server at
http://localhost:2024 - Automatically open LangGraph Studio in your browser
- Watch for changes in your TypeScript files and hot-reload
- Load all 6 workshop agents defined in
langgraph.json
Studio Options:
- Use
--port <number>to change the default port - Use
--tunnelif you're using Safari (which blocks localhost connections) - Use
--no-browserto skip automatically opening the browser
Once Studio is running, you'll see all workshop agents available in the sidebar. Start with "LG101 Agent" and progress through the numbered agents (00-05) to follow the workshop curriculum.
This workshop contains 6 agents in the /agents folder, each demonstrating progressively more advanced LangGraph concepts. Work through them in order for the best learning experience.
Concepts: Basic agent creation, tools, and simple workflows
A simple weather agent that introduces fundamental LangGraph concepts:
- Creating an agent with
createAgent() - Defining and using tools with the
tool()function - Exporting graphs for LangGraph Studio
Try it: Ask about the weather in different cities and watch how the agent calls the weather API.
Concepts: StateGraph, custom nodes, conditional edges, database integration
A specialized subagent for music catalog queries:
- Manual graph construction with
StateGraph - Custom state management with Zod schemas
- Multiple database tools (search by artist, genre, song)
- Conditional edges based on tool calls
- Memory stores (
MemorySaver,InMemoryStore)
Try it: Search for songs by artist, browse by genre, or check if specific tracks are available.
Concepts: Simplified agent creation for specific domains
A specialized subagent for invoice and billing queries:
- Using
createAgent()for simpler graph creation - Domain-specific tool design
- Database queries with customer context
Try it: Look up invoices by date or price, find employee information for transactions.
Concepts: Multi-agent coordination, tool delegation
A supervisor agent that coordinates between specialized subagents:
- Delegating tasks to subagents using tools
- Routing queries to the appropriate specialist
- Combining responses from multiple agents
- State sharing between agents
Try it: Ask mixed queries like "What songs does AC/DC have, and what are my recent invoices?" and watch how the supervisor routes to different subagents.
Concepts: Human-in-the-loop, customer verification, interrupts
Adds security through customer identity verification:
- Human-in-the-loop workflows with
interrupt() - Customer verification using email, phone, or ID
- Database lookups for authentication
- Conditional routing based on verification state
- Multi-step workflows with state persistence
Try it: Start a conversation and see how the agent asks for identification before processing requests.
Concepts: Long-term memory, personalization, memory management
The complete system with customer preferences and memory:
- Long-term memory storage with
InMemoryStore - Extracting and storing user preferences
- Memory-aware tool calling
- Personalized responses based on history
- Memory creation and updates
Try it: Share your music preferences across multiple conversations and see how the agent remembers and uses them.
The /images folder contains architecture diagrams for each agent pattern. Reference these while working through the agents to understand the workflow structure visually.
Once you've built and experimented with the agents in LangGraph Studio, you can measure their performance using automated evaluations. The /evals folder contains ready-to-run evaluation scripts.
Evaluations help you:
- Catch bugs: Identify when agents don't work as expected
- Compare versions: See if changes improved or degraded performance
- Build confidence: Ensure agents are ready for production
The evaluation scripts test 4 different aspects of agent behavior:
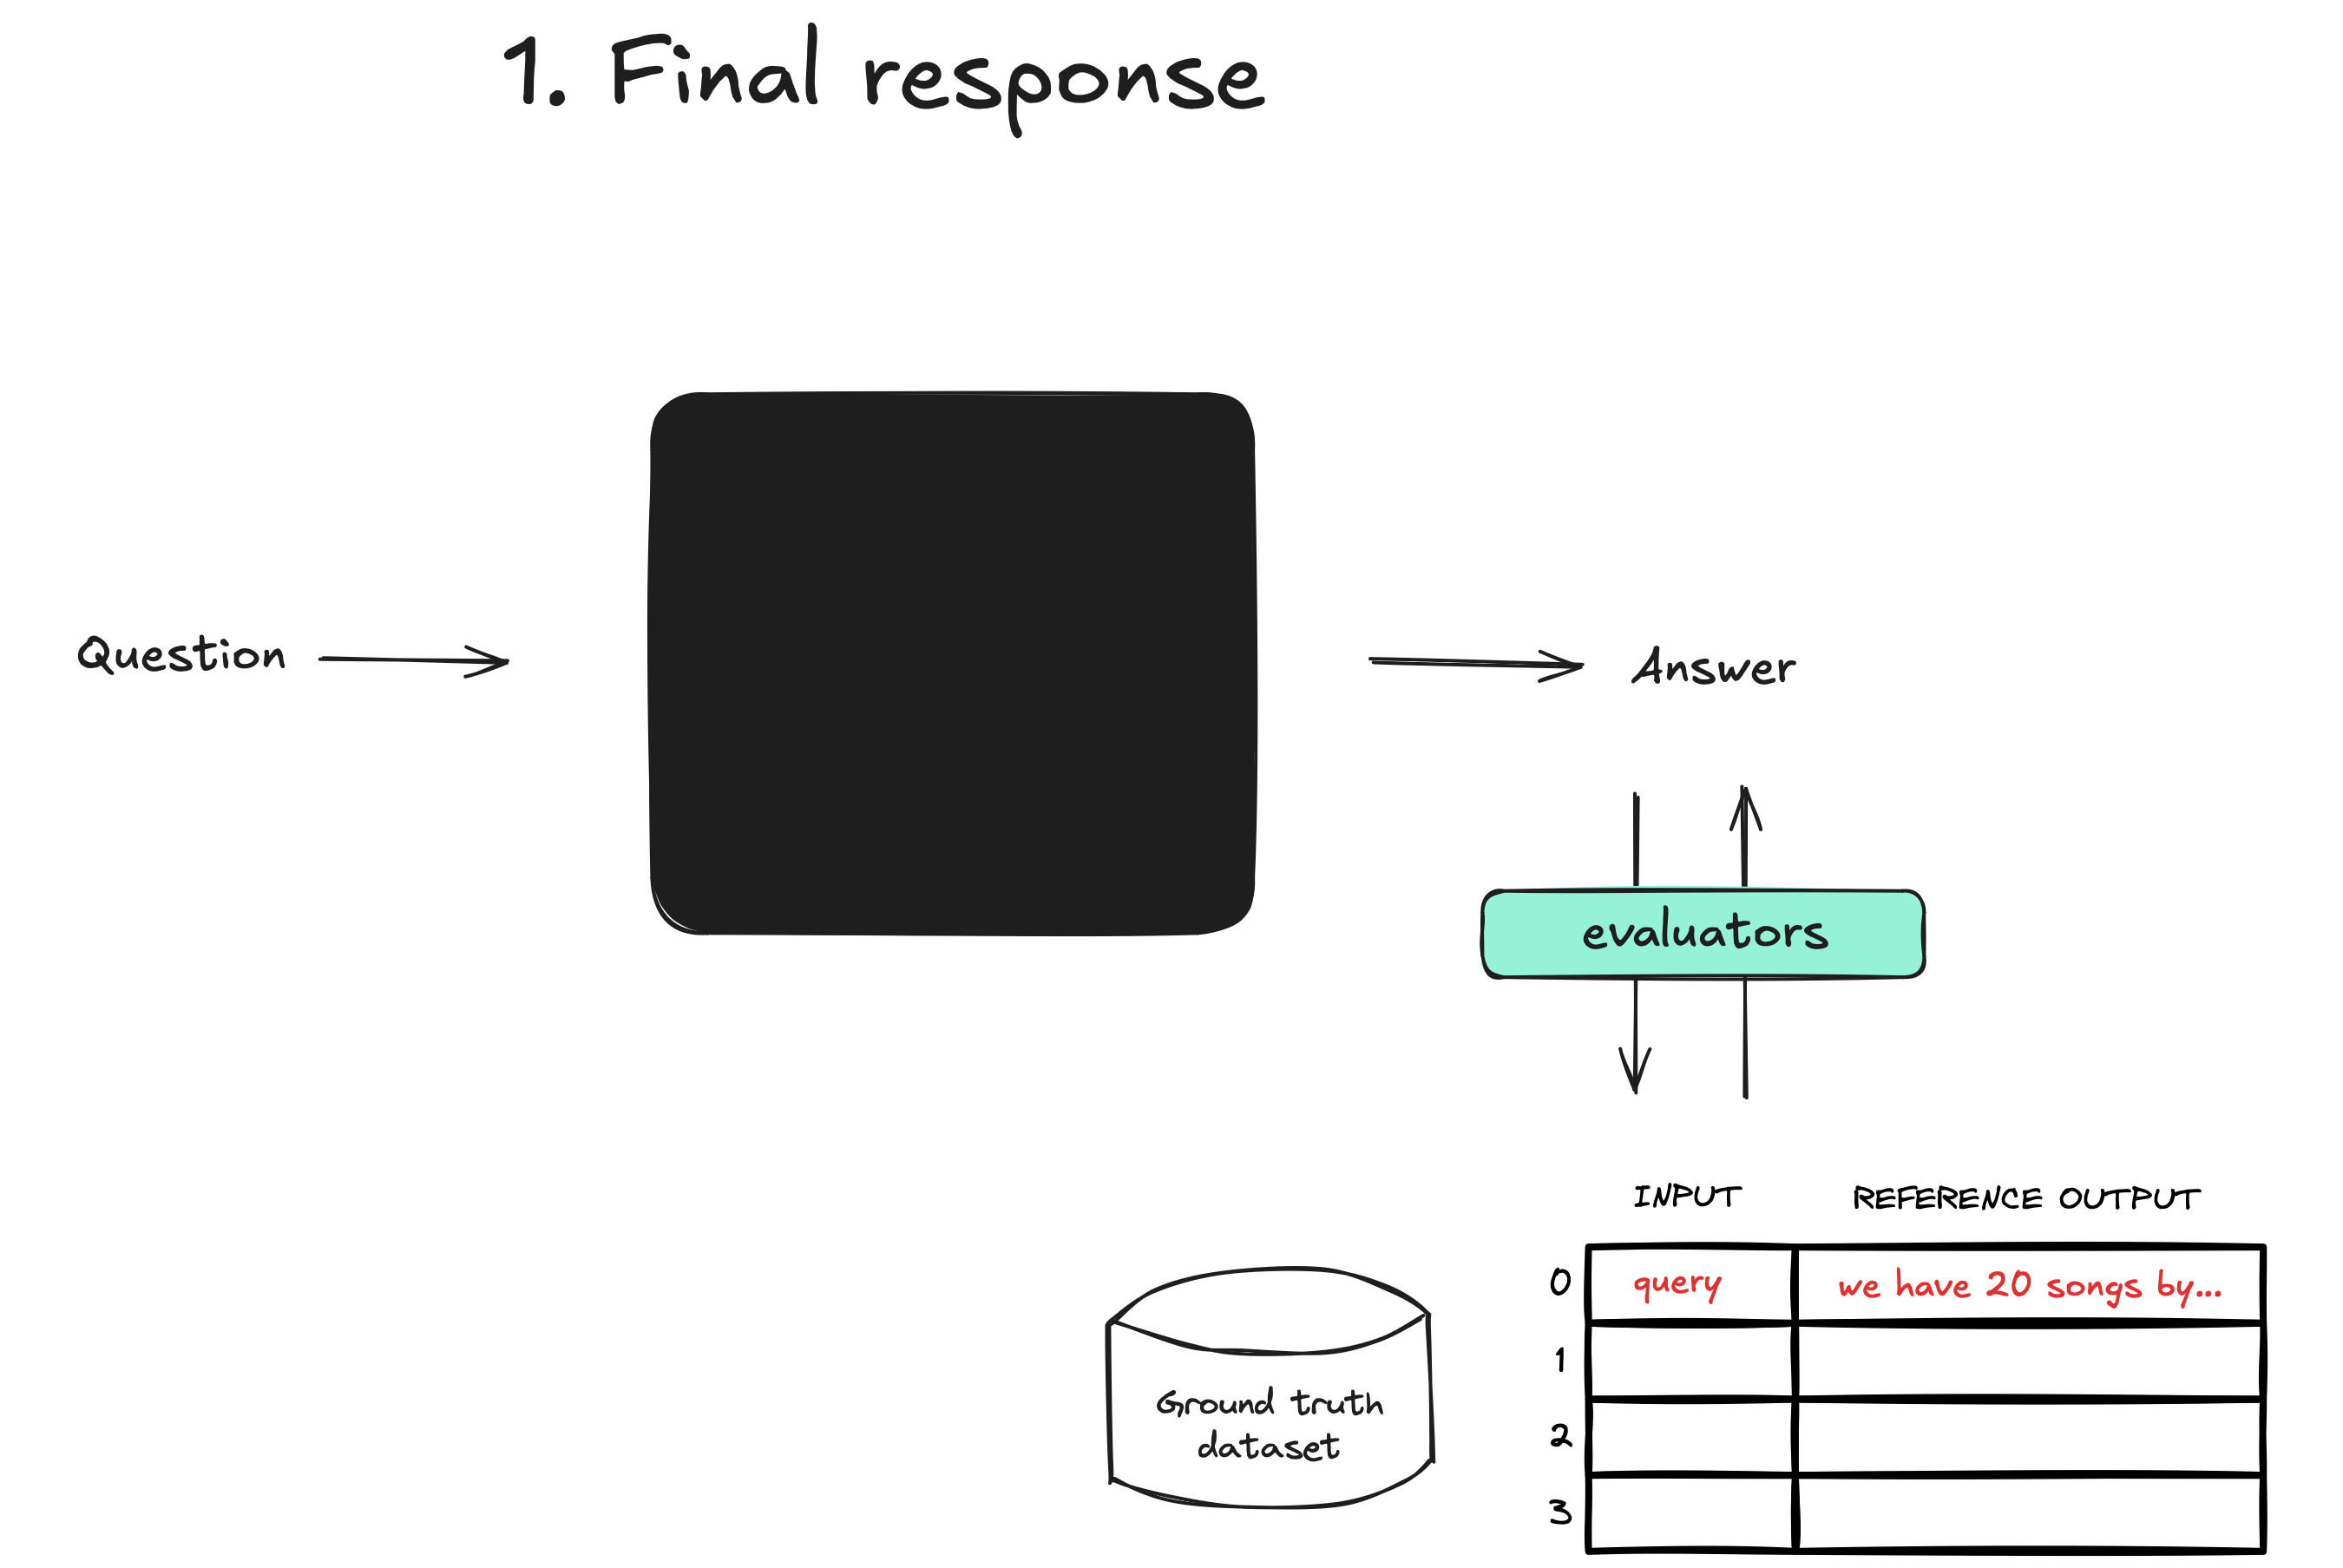
1. Final Response (01-final-response.ts) - Does the agent give the right final answer?
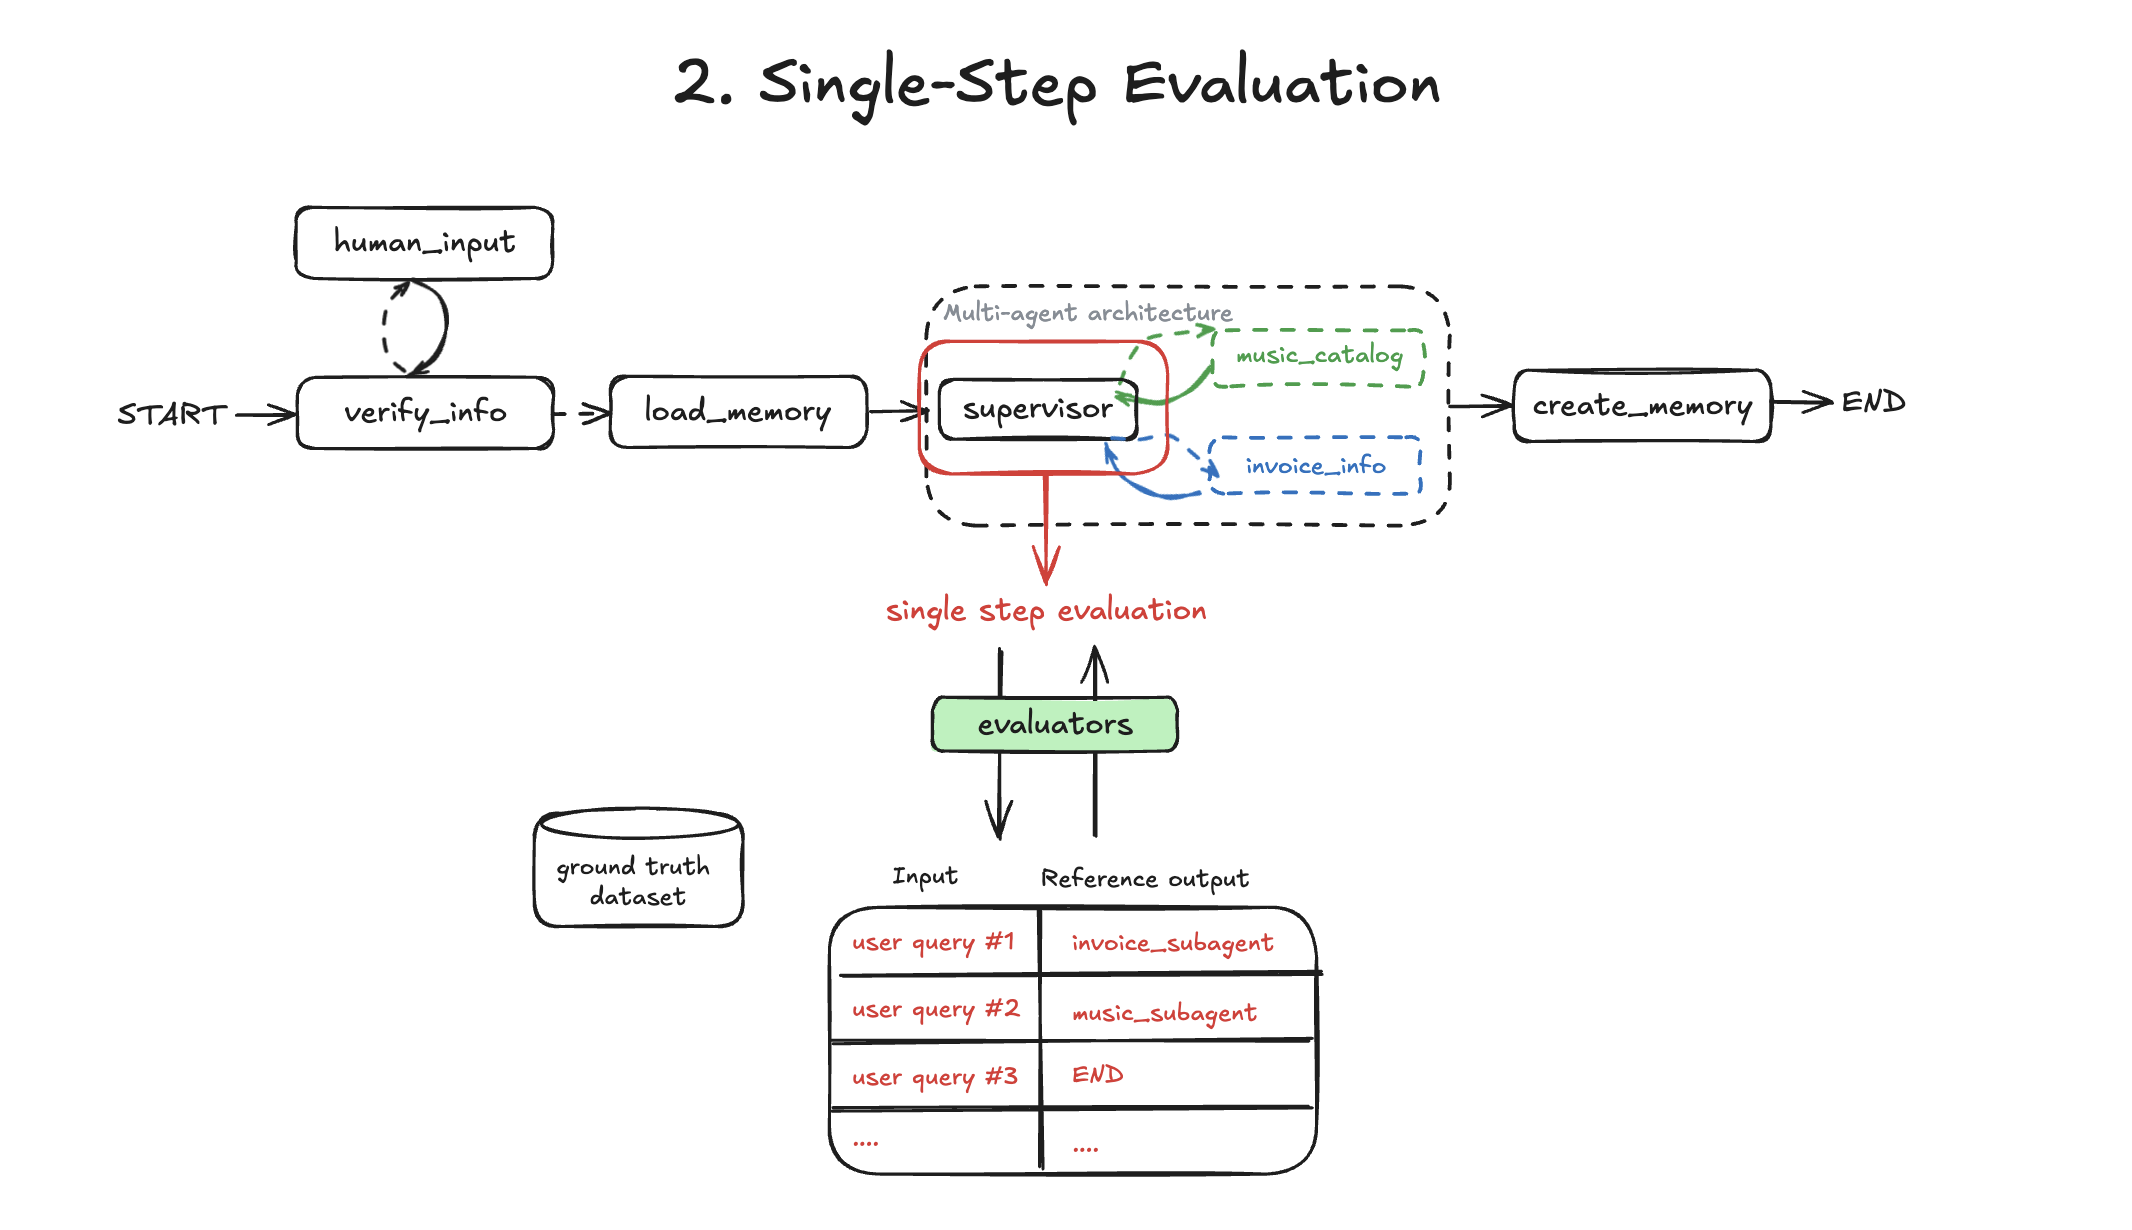
2. Single-Step (02-single-step.ts) - Does the supervisor route to the correct subagent?
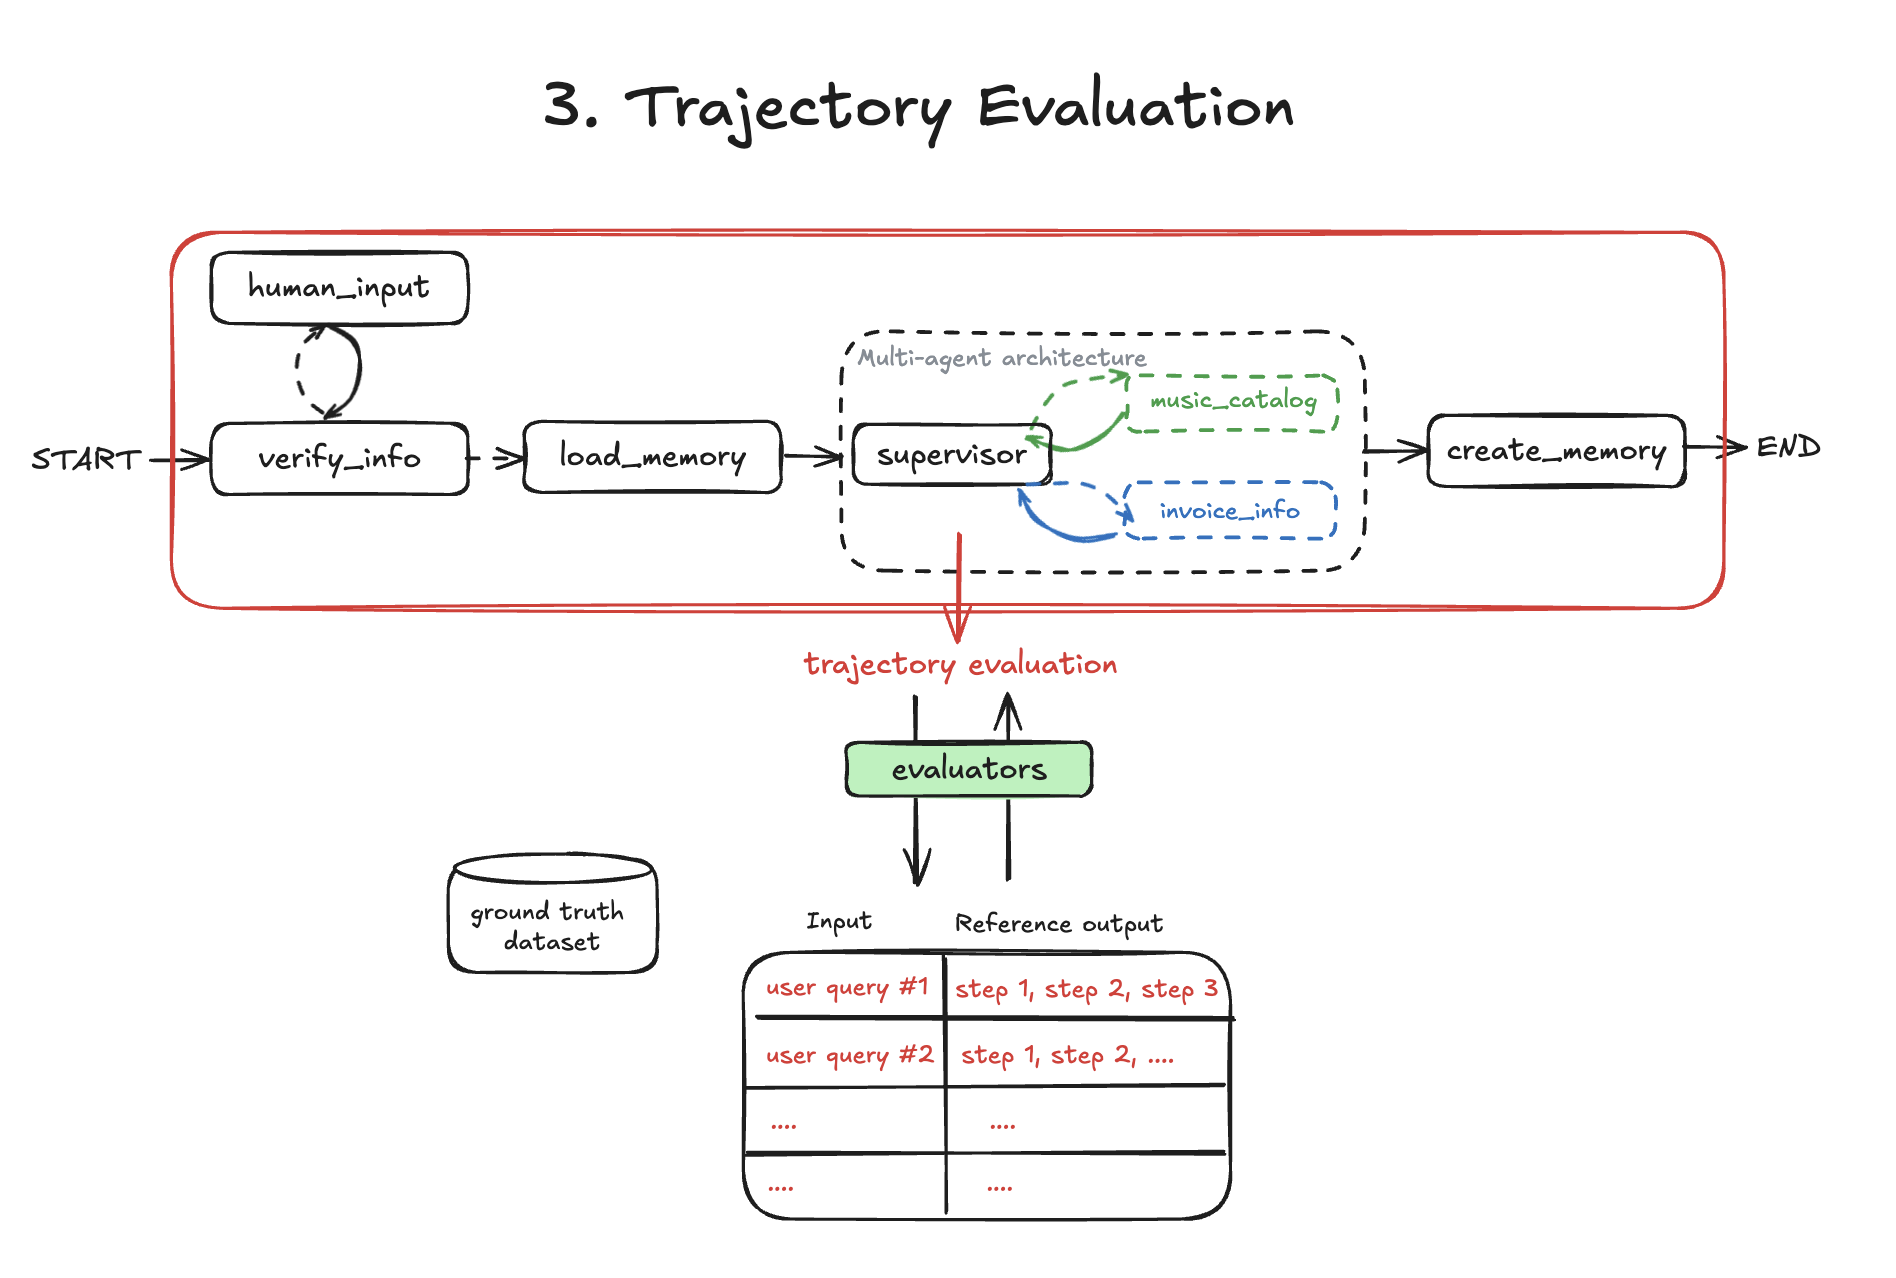
3. Trajectory (03-trajectory.ts) - Does the agent call the right sequence of tools?
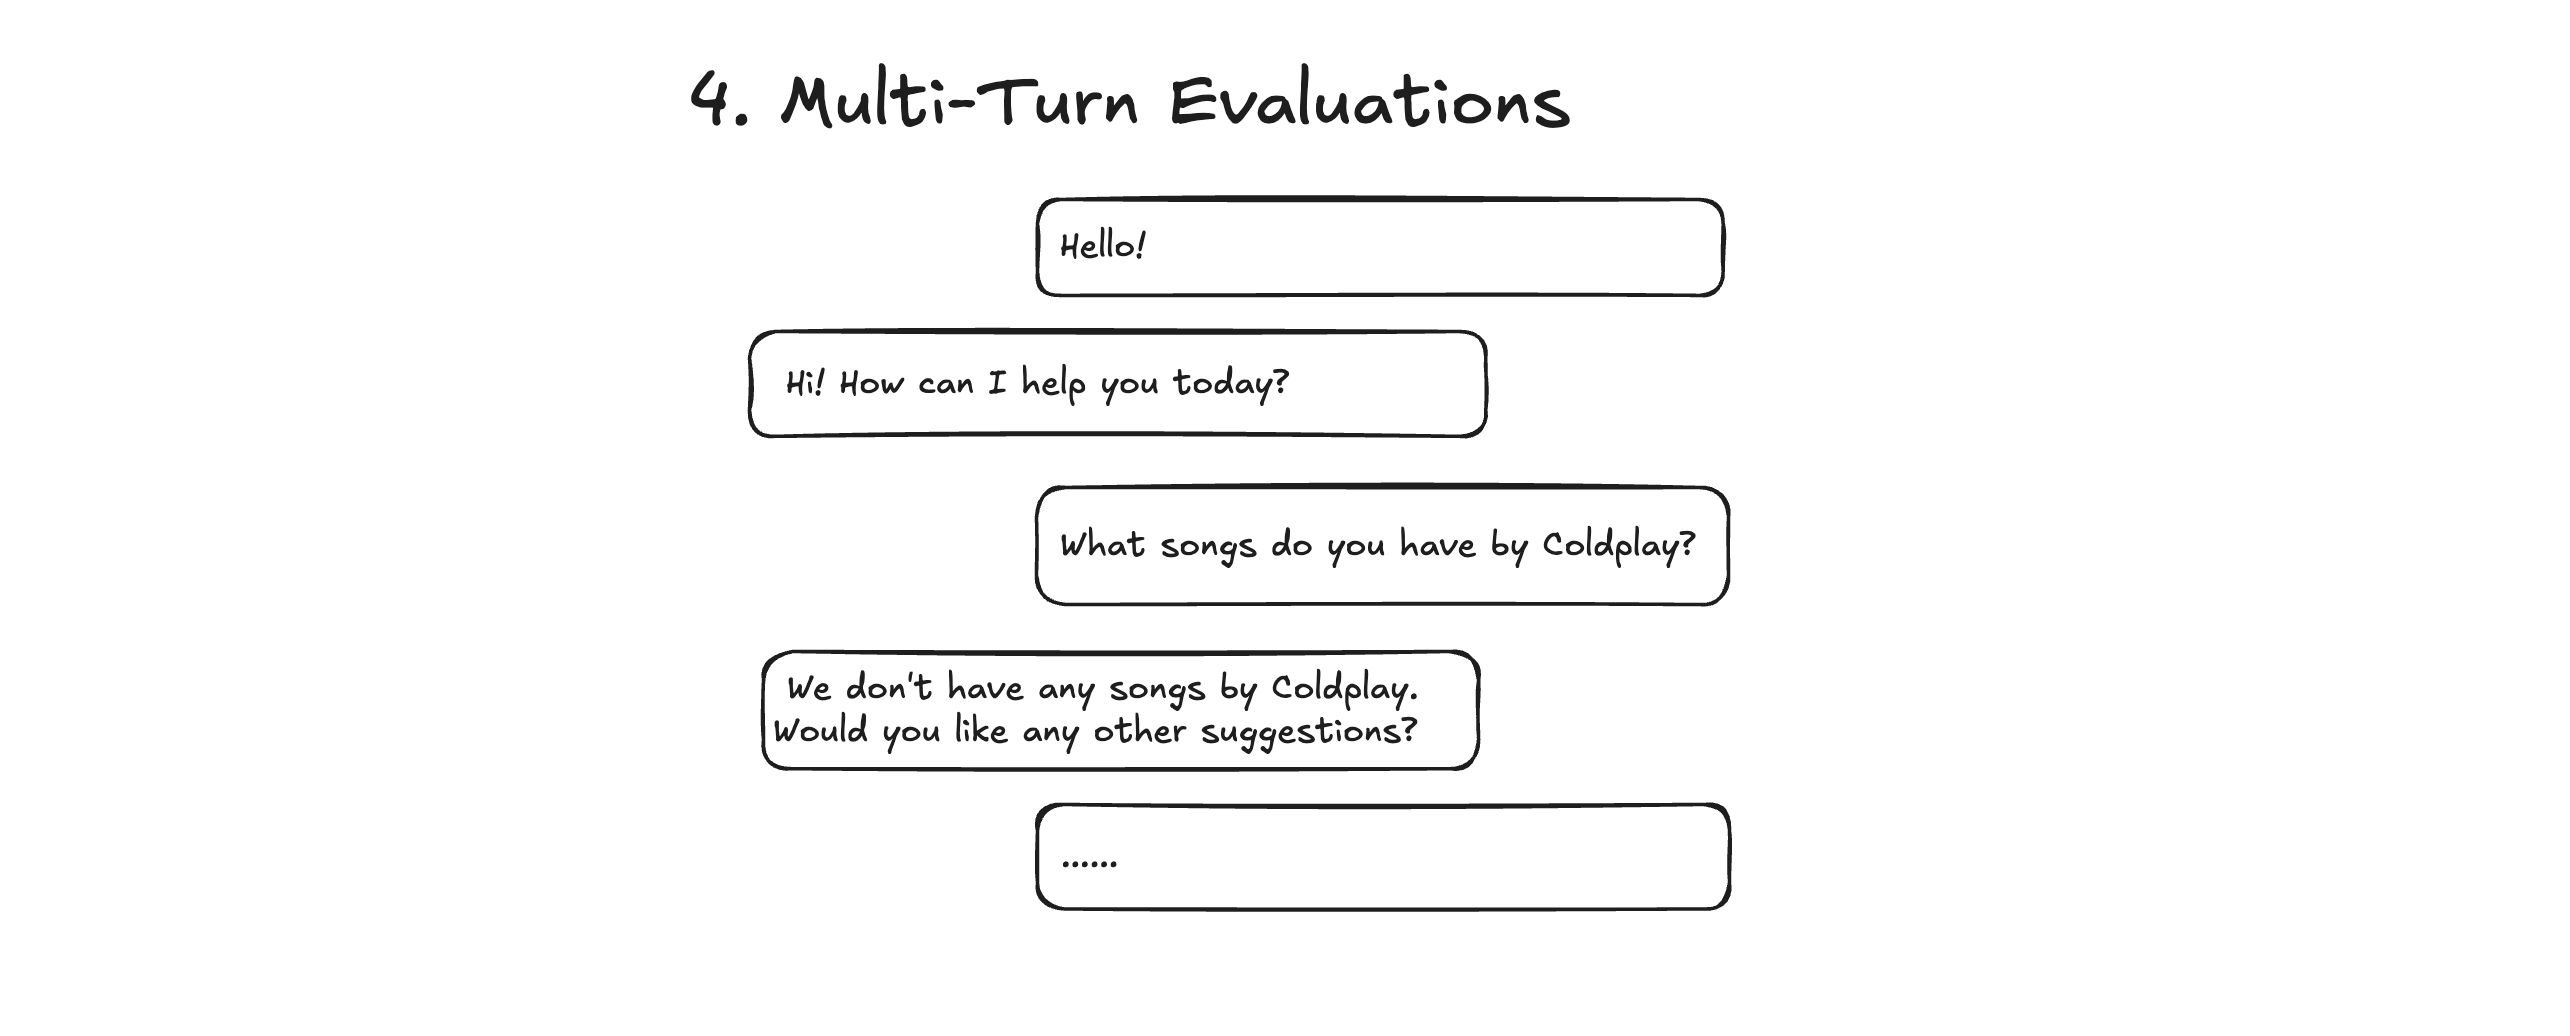
4. Multi-Turn (04-multi-turn.ts) - Does the agent handle full conversations well?
Each evaluation is a standalone script you can run:
npx tsx evals/01-final-response.ts
npx tsx evals/02-single-step.ts
npx tsx evals/03-trajectory.ts
npx tsx evals/04-multi-turn.ts
Prerequisites:
- Add
LANGSMITH_API_KEYto your.envfile (get one free at smith.langchain.com) - Run
pnpm installto ensure all dependencies are installed
After each evaluation completes, you'll get a LangSmith URL where you can view detailed results, compare runs, and see execution traces.
📖 Learn more: See the full evaluations documentation for details on customizing evaluations and creating your own.
All agents use a shared model configuration defined in agents/utils.ts. To switch from OpenAI to a different provider, you only need to modify one line in that file.
-
Set environment variables in your
.envfile:AZURE_OPENAI_API_KEY=your-azure-key AZURE_OPENAI_ENDPOINT=your-azure-endpoint AZURE_OPENAI_API_VERSION=2024-02-15-preview
-
In
agents/utils.ts, replace thedefaultModelline:export const defaultModel = await initChatModel("azure_openai:gpt-4o", { azureOpenAIApiKey: process.env.AZURE_OPENAI_API_KEY, azureOpenAIApiInstanceName: "your-instance-name", azureOpenAIApiDeploymentName: "your-deployment-name", azureOpenAIApiVersion: process.env.AZURE_OPENAI_API_VERSION, });
-
Set environment variable in your
.envfile:ANTHROPIC_API_KEY=your-anthropic-key
-
In
agents/utils.ts, replace thedefaultModelline:export const defaultModel = await initChatModel("anthropic:claude-3-5-sonnet-20241022", { apiKey: process.env.ANTHROPIC_API_KEY, });
-
Set environment variables in your
.envfile:AWS_REGION=us-east-1 AWS_ACCESS_KEY_ID=your-access-key AWS_SECRET_ACCESS_KEY=your-secret-key
-
In
agents/utils.ts, replace thedefaultModelline:export const defaultModel = await initChatModel("bedrock:anthropic.claude-3-5-sonnet-20241022-v2:0", { region: process.env.AWS_REGION || "us-east-1", credentials: { accessKeyId: process.env.AWS_ACCESS_KEY_ID, secretAccessKey: process.env.AWS_SECRET_ACCESS_KEY, }, });
Note: These examples are also documented as comments in agents/utils.ts for easy reference.


