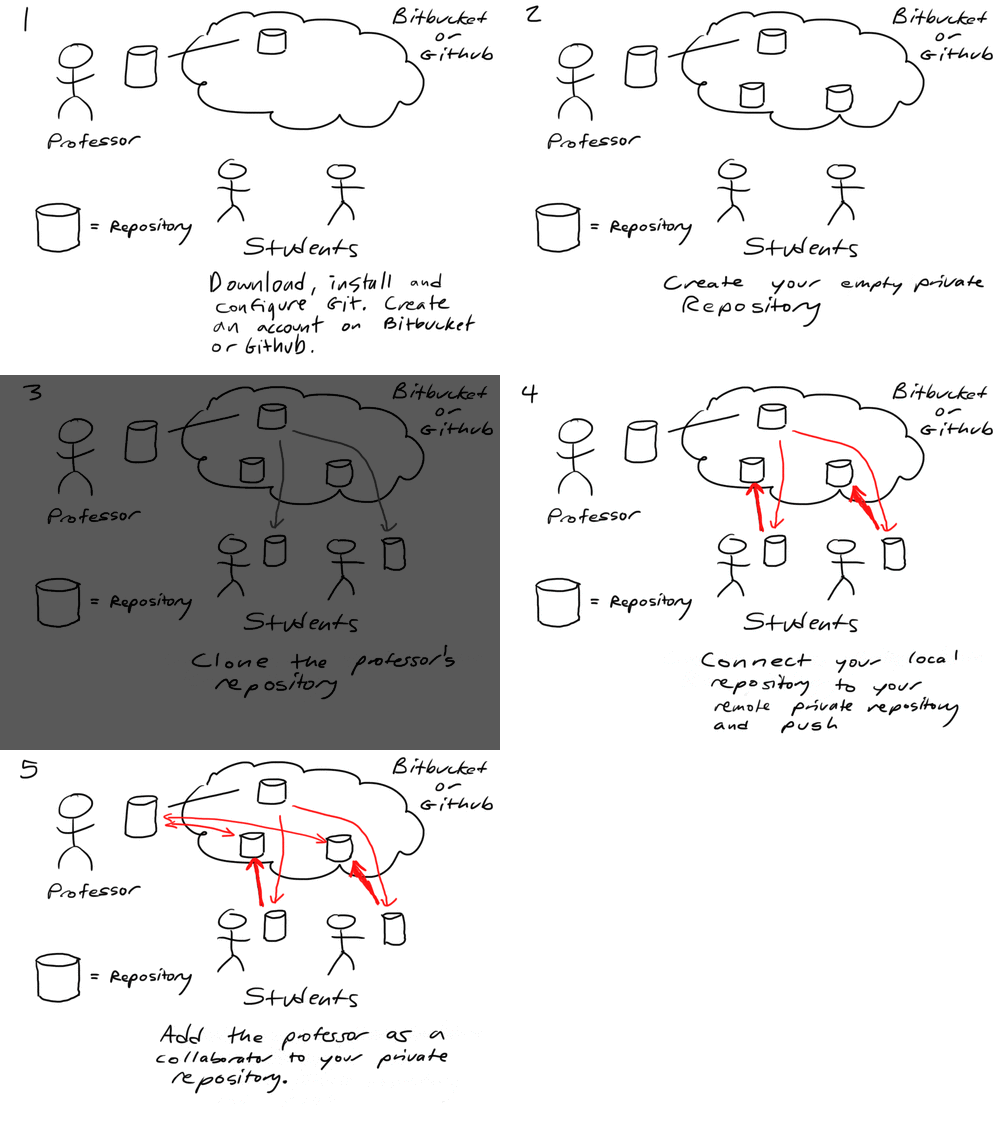
-
Download and install Git. (Also, TortoiseGit on Windows.)
During installation, always click Next, Continue or Finish, but in the Git install, be sure to first select Run Git and included Unix tools from the Windows Command Prompt when it is an option.
-
Configure Git.
In Windows, open Git Bash: Start -> All Programs -> Git -> Git Bash. In Linux/Mac OSX, open Terminal.
git config --global user.name "Joey Lawrance" # Use your name git config --global user.email lawrancej@wit.edu # Use your email -
Create a Bitbucket or Github account. Use your @wit.edu email address.
Note: Bitbucket will automatically give you private repositories necessary for submitting work. If you use Github, you should first request private repositories; otherwise, you can create a public repository now and make it private later once you get private repository access.
-
Email me your user name and tell me which service you're using.
-
Optional Set up your Gravatar with your @wit.edu email address (that way, people can associate your user name with your face).
-
Optional Set up SSH keys (that way, you won't need to type in your password when pushing repositories).
Create a public/private keypair.
ssh-keygen -t rsa # Just press enter until it's doneCopy the public key to the clipboard.
 cat ~/.ssh/id_rsa.pub > /dev/clipboard # On Windows
 cat ~/.ssh/id_rsa.pub | pbcopy         # On Mac OS X
 cat ~/.ssh/id_rsa.pub | xclip          # On Linux
Paste your public SSH key into the key field in Bitbucket or Github (On Bitbucket, navigate to your user -> Manage account -> SSH keys). For the title, use a nickname for your machine.
-
Create a new private repository called Compilers on Bitbucket or Github.
-
Click on Watch (or the eye icon on Bitbucket) to automatically receive notification of course repository updates (I will not email the class every time add hints to assignments).
-
Clone the course repository. Please do not fork.
 git clone https://bitbucket.org/lawrancej/compilers.git
  - or -
 git clone https://github.com/lawrancej/Compilers.git
When you press enter, you should see something like this:
Cloning into 'compilers'... remote: Counting objects: 12, done. remote: Compressing objects: 100% (10/10), done. remote: Total 12 (delta 1), reused 0 (delta 0) Unpacking objects: 100% (12/12), done. -
Go into the repository you just cloned.
cd compilers -
Connect your local repository to your private repository.
Copy the HTTPS .git repository URL from Bitbucket or Github. (To use SSH repository URLs, set up SSH keys first.)
git remote -v git remote add me url.to.private.repo.goes.here.git git push -u me master -
Reload your private repository on Bitbucket or Github to verify everything pushed over properly.
-
Add me as a collaborator to your private repository (otherwise, I can't see what you submit).
On Bitbucket, go to your private repository, click the gear icon, and select Access management. Enter
lawrancejunder Users and select Admin. Click Add.On Github, go to your private repository, click Settings, click Collaborators. Enter
lawrancej. Click Add.
-
Check the status of your repository.
git statusUntracked files are not in version control. Changes not staged for commit are revisions that are not yet recorded into a commit. Changes to be committed are staged, but not yet recorded into a commit.
-
Review your changes.
git diffUse this information to decide how to proceed.
-
Add files to git as necessary.
git add new.file.here another.file.here -
Record your changes into a commit.
git commit -m "Completed lab 1." -
When you are ready to submit work, push it to your private repository.
git push me master
I will post new material frequently. Pull (fetch and merge) to receive updates.
git pull origin master
Occasionally, this command won't work because we made conflicting changes. To fix a merge conflict, look for conflict markers and revise as necessary. This command makes it easier:
git mergetool
If you want to keep only my changes, checkout their version.
git checkout --theirs some.file.goes.here
If you want to keep only your changes, checkout our version.
git checkout --ours some.file.goes.here
If you are thoroughly confused, examine the complete history to see what's going on.
gitk --all &
Note: Even though you have removed conflict markers, you must still add files to git and commit as usual to resolve the merge conflict.
