Auth0 is an authentication broker that supports social identity providers as well as enterprise identity providers such as Active Directory, LDAP, Google Apps and Salesforce.
- Integrates your Android app with Auth0.
- Provides a beautiful native UI to log your users in.
- Provides support for Social Providers (Facebook, Twitter, etc.), Enterprise Providers (AD, LDAP, etc.) and Username & Password.
- Passwordless authentication using SMS and Email.
Android API level 15+ is required in order to use Lock's UI.
If you'll create your own API and just call Auth0 API via the com.auth0.android:core:1.15.+, the minimum required API level is 9.
##Install
Lock is available both in Maven Central and JCenter. To start using Lock add these lines to your build.gradle dependencies file:
compile 'com.auth0.android:lock:1.15.+'Once it's installed, you'll need to configure LockActivity in yourAndroidManifest.xml, inside the application tag:
<!--Auth0 Lock-->
<activity
  android:name="com.auth0.lock.LockActivity"
  android:theme="@style/Lock.Theme"
  android:screenOrientation="portrait"
  android:launchMode="singleTask">
  <intent-filter>
    <action android:name="android.intent.action.VIEW"/>
    <category android:name="android.intent.category.DEFAULT"/>
    <category android:name="android.intent.category.BROWSABLE"/>
    <data android:scheme="a0<INSERT_YOUR_APP_CLIENT_ID>" android:host="@string/auth0_domain"/>
  </intent-filter>
</activity>
<meta-data android:name="com.auth0.lock.client-id" android:value="@string/auth0_client_id"/>
<meta-data android:name="com.auth0.lock.domain-url" android:value="@string/auth0_domain"/>
<!--Auth0 Lock End-->
The value
@string/auth0_client_idis your application's clientID and@string/auth0_domainis your tenant's domain in Auth0, both values can be found in your app's settings. The final value ofandroid:schememust be in lowercase
Also, you'll need to add Internet permission to your application:
<uses-permission android:name="android.permission.INTERNET"/>Finally, before you use any Lock functionality you need to configure the Lock instance.
One way to do it would be in your Application subclass (the one that extends from android.app.Application), as seen in the following example:
public class MyApplication extends Application {

  public void onCreate() {
    super.onCreate();

    /** Set up Lock */
    LockContext.configureLock(
      new Lock.Builder()
        .loadFromApplication(this)
        /** Other configuration goes here */
        .closable(true)
      );
  }

}
You can check here for more configuration options
LockActivity will handle Email/Password, Enterprise & Social authentication based on your Application's connections enabled in your Auth0's Dashboard.
When a user authenticates successfully, LockActivity will send an Action using LocalBroadcastManager and then finish itself (by calling finish()). The activity that is interested in receiving this Action (in this case the one that will show Lock) needs to register a listener in the LocalBroadcastManager:
// This activity will show Lock
public class HomeActivity extends Activity {

  private LocalBroadcastManager broadcastManager;

  private BroadcastReceiver authenticationReceiver = new BroadcastReceiver() {
    @Override
    public void onReceive(Context context, Intent intent) {
      UserProfile profile = intent.getParcelableExtra("profile");
      Token token = intent.getParcelableExtra("token");
      Log.i(TAG, "User " + profile.getName() + " logged in");
    }
  };

  @Override
  protected void onCreate(Bundle savedInstanceState) {
    super.onCreate(savedInstanceState);
    //Customize your activity

    broadcastManager = LocalBroadcastManager.getInstance(this);
    broadcastManager.registerReceiver(authenticationReceiver, new IntentFilter(Lock.AUTHENTICATION_ACTION));
  }

  @Override
  protected void onDestroy() {
    super.onDestroy();
    broadcastManager.unregisterReceiver(authenticationReceiver);
  }
}
Then just start LockActivity
Intent lockIntent = new Intent(this, LockActivity.class);
startActivity(lockIntent);
And you'll see our native login screen
By default all social authentication will be done using an external browser, if you want native integration please check our docs.
LockPasswordlessActivity authenticates users by sending them an Email or SMS (similar to how WhatsApp authenticates you). In order to be able to authenticate the user, your application must have the SMS/Email connection enabled and configured in your dashboard.
Also, if you would like to use passwordless with magic links, please read and follow all the steps mentioned in the magic link docs.
LockPasswordlessActivity is part of the library lock-passwordless and you can add it with this line in your build.gradle:
compile 'com.auth0.android:lock-passwordless:1.15.+'Then in your AndroidManifest.xml register the following activities:
    <!--Auth0 Lock Passwordless-->
    <activity
      android:name="com.auth0.lock.passwordless.LockPasswordlessActivity"
      android:theme="@style/Lock.Theme"
      android:label="@string/app_name"
      android:screenOrientation="portrait"
      android:launchMode="singleTask"/>
    <activity android:name="com.auth0.lock.passwordless.CountryCodeActivity" android:theme="@style/Lock.Theme"/>
    <!--Auth0 Lock Passwordless End-->
Just like LockActivity, when a user authenticates successfully, LockPasswordlessActivity will send an Action using LocalBroadcastManager and then finish itself (by calling finish()). The activity that is interested in receiving this Action (in this case the one that will show Lock) needs to register a listener in the LocalBroadcastManager:
// This activity will show Lock
public class HomeActivity extends Activity {
  private LocalBroadcastManager broadcastManager;

  private BroadcastReceiver authenticationReceiver = new BroadcastReceiver() {
    @Override
    public void onReceive(Context context, Intent intent) {
      UserProfile profile = intent.getParcelableExtra(Lock.AUTHENTICATION_ACTION_PROFILE_PARAMETER);
      Token token = intent.getParcelableExtra(Lock.AUTHENTICATION_ACTION_TOKEN_PARAMETER);
      Log.i(TAG, "User " + profile.getName() + " logged in");
    }
  };

  @Override
  protected void onCreate(Bundle savedInstanceState) {
    super.onCreate(savedInstanceState);
    //Customize your activity

    broadcastManager = LocalBroadcastManager.getInstance(this);
    broadcastManager.registerReceiver(authenticationReceiver, new IntentFilter(Lock.AUTHENTICATION_ACTION));
  }

  @Override
  protected void onDestroy() {
    super.onDestroy();
    broadcastManager.unregisterReceiver(authenticationReceiver);
  }
}
Then just start LockPasswordlessActivity especifying the passwordless type you want to use, so for Email
LockPasswordlessActivity.showFrom(MyActivity.this, LockPasswordlessActivity.MODE_EMAIL_CODE);or just for SMS
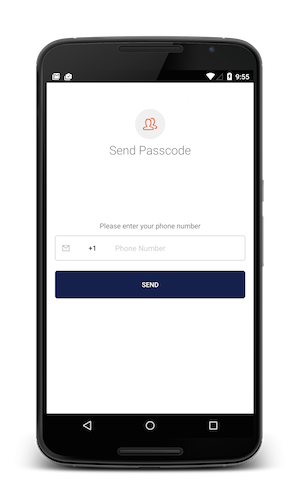
LockPasswordlessActivity.showFrom(MyActivity.this, LockPasswordlessActivity.MODE_SMS_CODE);and you'll see the SMS login screen
##Proguard In the proguard directory you can find the Proguard configuration for Lock and its dependencies. By default you should at least use the following files:
proguard-square-okhttp.proproguard-jackson-2.proproguard-square-otto.proproguard-lock.pro
and if you use Facebook or Google+ native integration, you'll need proguard-facebook.pro and proguard-google-play-services.pro respectively.
You specify several files in you application's build.gradle like this:
buildTypes {
  release {
    minifyEnabled true
    proguardFile '../proguard/proguard-facebook.pro' //facebook native auth
    proguardFile '../proguard/proguard-google-play-services.pro' //G+ native auth
    proguardFile '../proguard/proguard-square-okhttp.pro' //Auth0 core
    proguardFile '../proguard/proguard-jackson-2.pro' //Auth0 core
    proguardFile '../proguard/proguard-square-otto.pro' //Lock
    proguardFile '../proguard/proguard-lock.pro' //Lock
    //Add your app's specific proguard rules
  }
}Auth0 helps you to:
- Add authentication with multiple authentication sources, either social like Google, Facebook, Microsoft Account, LinkedIn, GitHub, Twitter, Box, Salesforce, amont others, or enterprise identity systems like Windows Azure AD, Google Apps, Active Directory, ADFS or any SAML Identity Provider.
- Add authentication through more traditional username/password databases.
- Add support for linking different user accounts with the same user.
- Support for generating signed Json Web Tokens to call your APIs and flow the user identity securely.
- Analytics of how, when and where users are logging in.
- Pull data from other sources and add it to the user profile, through JavaScript rules.
- Go to Auth0 and click Sign Up.
- Use Google, GitHub or Microsoft Account to login.
If you have found a bug or if you have a feature request, please report them at this repository issues section. Please do not report security vulnerabilities on the public GitHub issue tracker. The Responsible Disclosure Program details the procedure for disclosing security issues.
This project is licensed under the MIT license. See the LICENSE file for more info.


