Our project has evolved into a comprehensive system that leverages the lakehouse architecture, combining the best elements of data lakes and data warehouses for enterprise-level data storage and computation.
- This README will guide you through the process of building an ELT (Extract, Load, Transform) pipeline using Apache Spark and Airflow, orchestrated via Docker. We also introduce MinIO, a high-performance object storage service, into our stack to handle scalable, S3-compatible storage needs. This setup ensures a robust, scalable, and efficient data infrastructure.
Before starting the services, you need to pull the necessary Docker images. Run the following commands:
docker pull bde2020/spark-master:3.2.0-hadoop3.2
docker pull bde2020/spark-worker:3.2.0-hadoop3.2
docker pull minio/minio
docker pull apache/airflow:2.2.3-python3.7
docker pull postgres:9.5.3
docker pull dimeji/hadoop-namenode:latest
docker pull dimeji/hadoop-datanode:latest
docker pull dimeji/hive-metastore
docker pull jupyter/pyspark-notebook:spark-3.2.0
After running airflow-init & pulling the necessary images, you're ready to rock n roll.
- Run the following command to start the services:
docker compose -f docker-compose.lakehouse.yml -f docker-compose.yml up --build -d
Once you're done and you want to stop the services, you can do so with the following command:
docker-compose -f docker-compose.yml -f docker-compose.lakehouse.yml down --remove-orphans -v
If you are using Gitpod, you may need to modify the permissions for any file or directory that has permission issues. For example, to modify the permissions for the notebooks and logs directories, use the following commands:
sudo chmod -R 777 /workspace/docker-airflow-spark/notebooks/*
sudo chmod -R 777 /workspace/docker-airflow/*
sudo chmod -R 777 /workspace/docker-airflow-spark/docker-airflow/logs/*
| Docker Image | Docker Hub Link | Port | Service | Description |
|---|---|---|---|---|
| apache/airflow:2.2.3 | Link | 8088 | Airflow | Airflow is a platform created by the community to programmatically author, schedule and monitor workflows. |
| bde2020/spark-master:3.2.0-hadoop3.2 | Link | 8181 | Spark Master | Spark Master is the heart of the Spark application. It is the central coordinator that schedules tasks on worker nodes. |
| bde2020/spark-worker:3.2.0-hadoop3.2 | Link | 8081 | Spark Worker | Spark Worker is the node that runs the tasks assigned by the Spark Master. |
| jupyter/pyspark-notebook:spark-3.2.0 | Link | 8888 | Jupyter Notebook | Jupyter Notebook is an open-source web application that allows you to create and share documents that contain live code, equations, visualizations and narrative text. |
| postgres:9.5.3 | Link | 5432 | Postgres | PostgreSQL is a powerful, open source object-relational database system. |
| redis:latest | Link | 6379 | Redis | Redis is an open source (BSD licensed), in-memory data structure store, used as a database, cache, and message broker. |
| minio/minio | Link | 9091 | MinIO | MinIO is a High Performance Object Storage released under Apache License v2.0. It is API compatible with Amazon S3 cloud storage service. |
To check the status of the containers, run the following command:
docker ps
- In this scenario, we are going to schedule a dag file to create a table and insert data into it in PostgreSQL using the Postgres Operator.
- The DAG file we're executing is named
hello-postgresin our DAGs folder. - Our DAG file will have two simple tasks of using SQL query to create_table & insert_data into our 'test' database.
- After setting up our DAG, we need to configure the connection details in Airflow.
- Open the service in your browser at http://localhost:8085 and create a connection.
- Click on
Admin->Connectionsin the top bar. - Let's create a new one for our purpose.
Click on Create and fill in the necessary details:
- Conn Id :
oasis_con_postgres- the ID with which we can retrieve the connection details later on. - Conn Type :
Postgres- Select it from the dropdown menu. - Host :
oasispostgresdb- {defined in the yml file} - Schema :
airflow- the database name. - Login :
airflow- or whichever username you set in your docker-compose.yml file. - Password :
airflow- or whichever password you set in your docker-compose.yml file. - Posrt :
5432- the standard port for the database within the docker network.
Click on save: Creating the connection airflow to connect the Postgres DB.
- Head back to the Airflow UI, activate the DAG on the left and click on "Trigger DAG" on the right-hand side. DAG Succesful
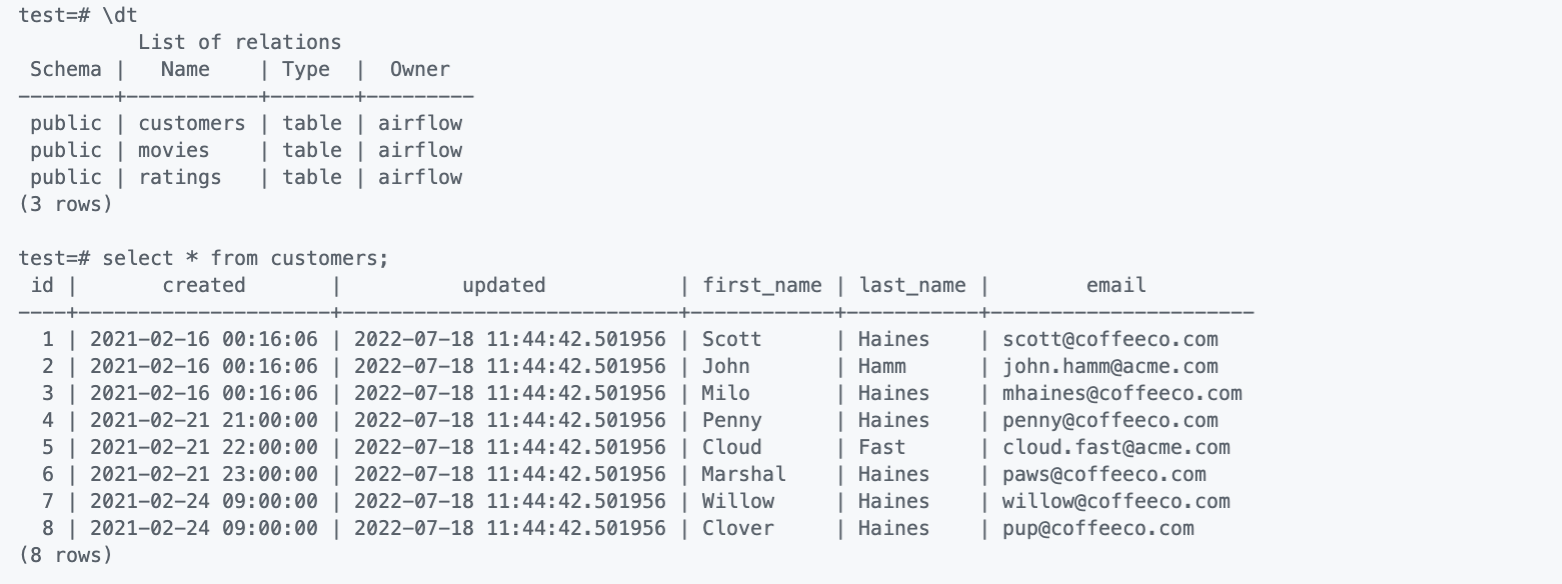
- A little sanity check to make sure the DAG is worked and our SQL tables have been populated.
- We're going to head into the postgres container
- Navigate to the
dockerdirectory: - Run the following command:
docker exec -it <postgres_container> psql -U airflow airflow
- After gaining acces, we can run a SQL query to validate the data has been inserted.
- Apache Spark is an open source - data processing engine for large datasets.
- It is highly scalable and enables users to perform large-scale data transformation and analysis. Also enables stream data analysis in real-time.
- The Spark architecture is a distributed processing framework, as shown below:
-
Go to the Spark webUI on http://localhost:8085
-
Click on
Admin->Connectionsin the top bar. -
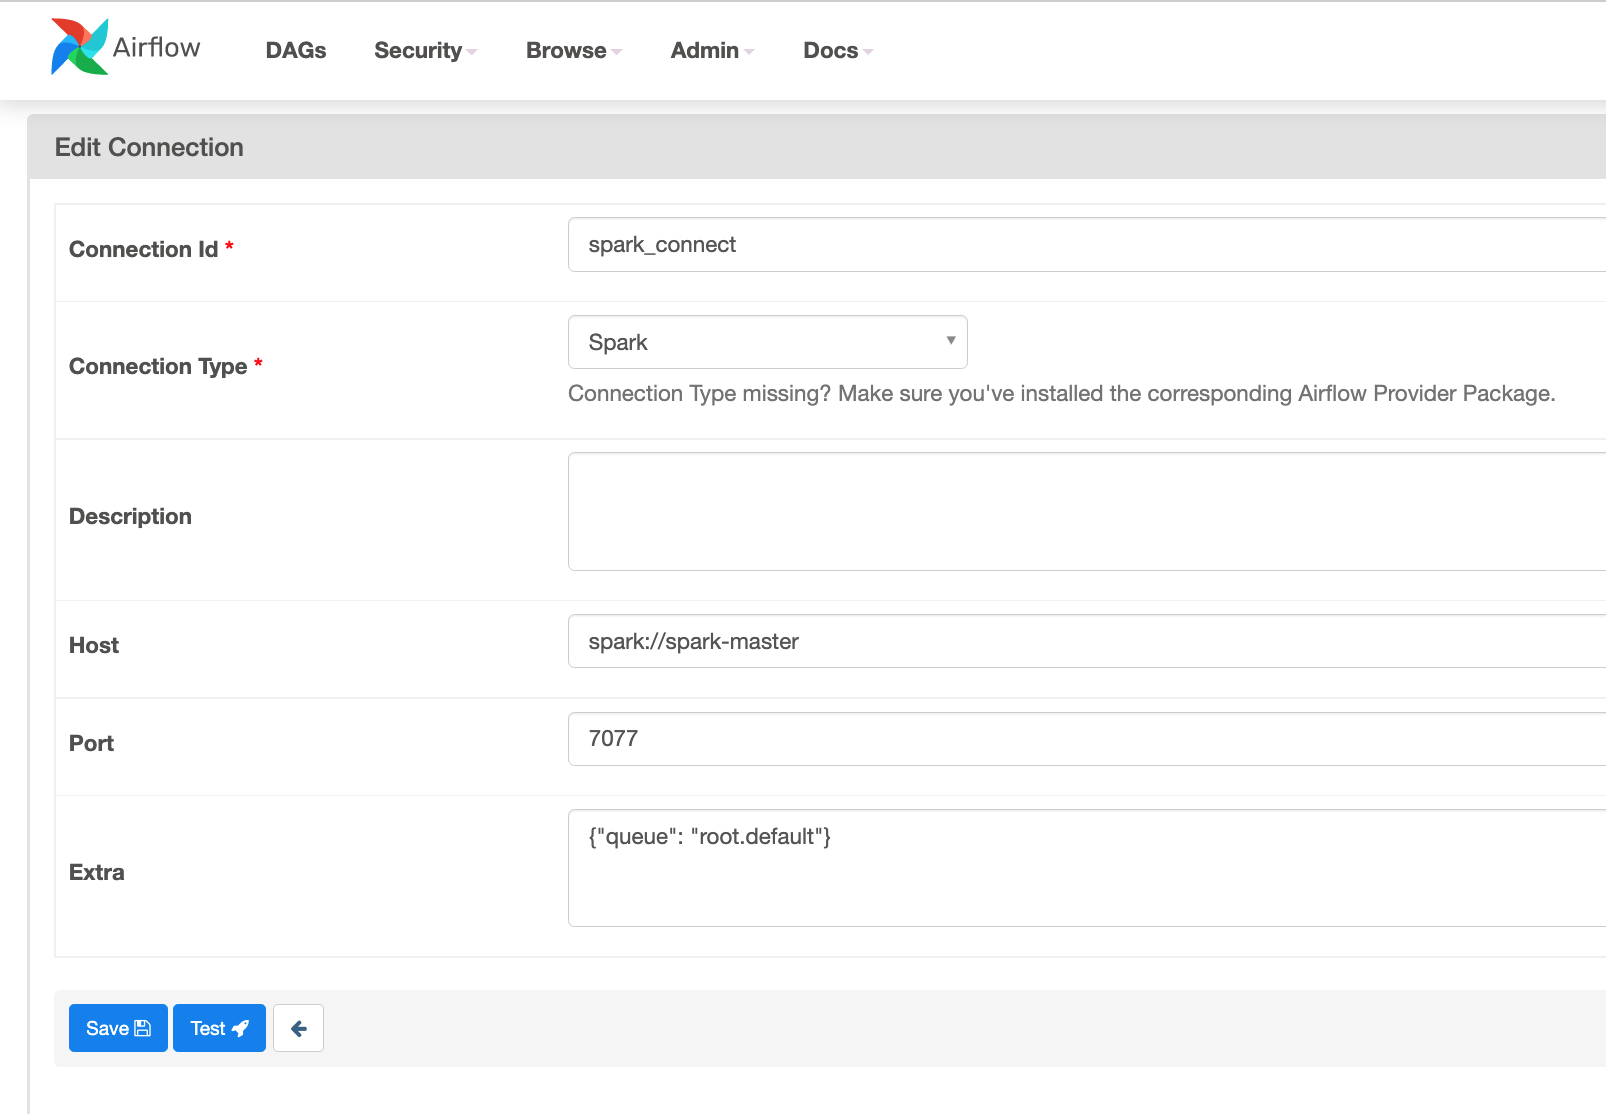
Click on
Add a new recordand input the following details:
- Conn Id:
spark_connect- This is the name of the connection. - Conn Type:
Spark- This is the type of connection. - Host:
spark://oasissparkm- This is the hostname of the Spark Master. - Port:
7077- This is the port of the Spark Master. - Extra:
{"queue": "root.default"}- This is the name of the queue that the Spark job will be submitted to.
- Save the connection settings.
-
Run the
SparkOperatorDemoDAG. -
After a couple minutes you should see the DAG run as successful.
- Check the DAG log for the result.
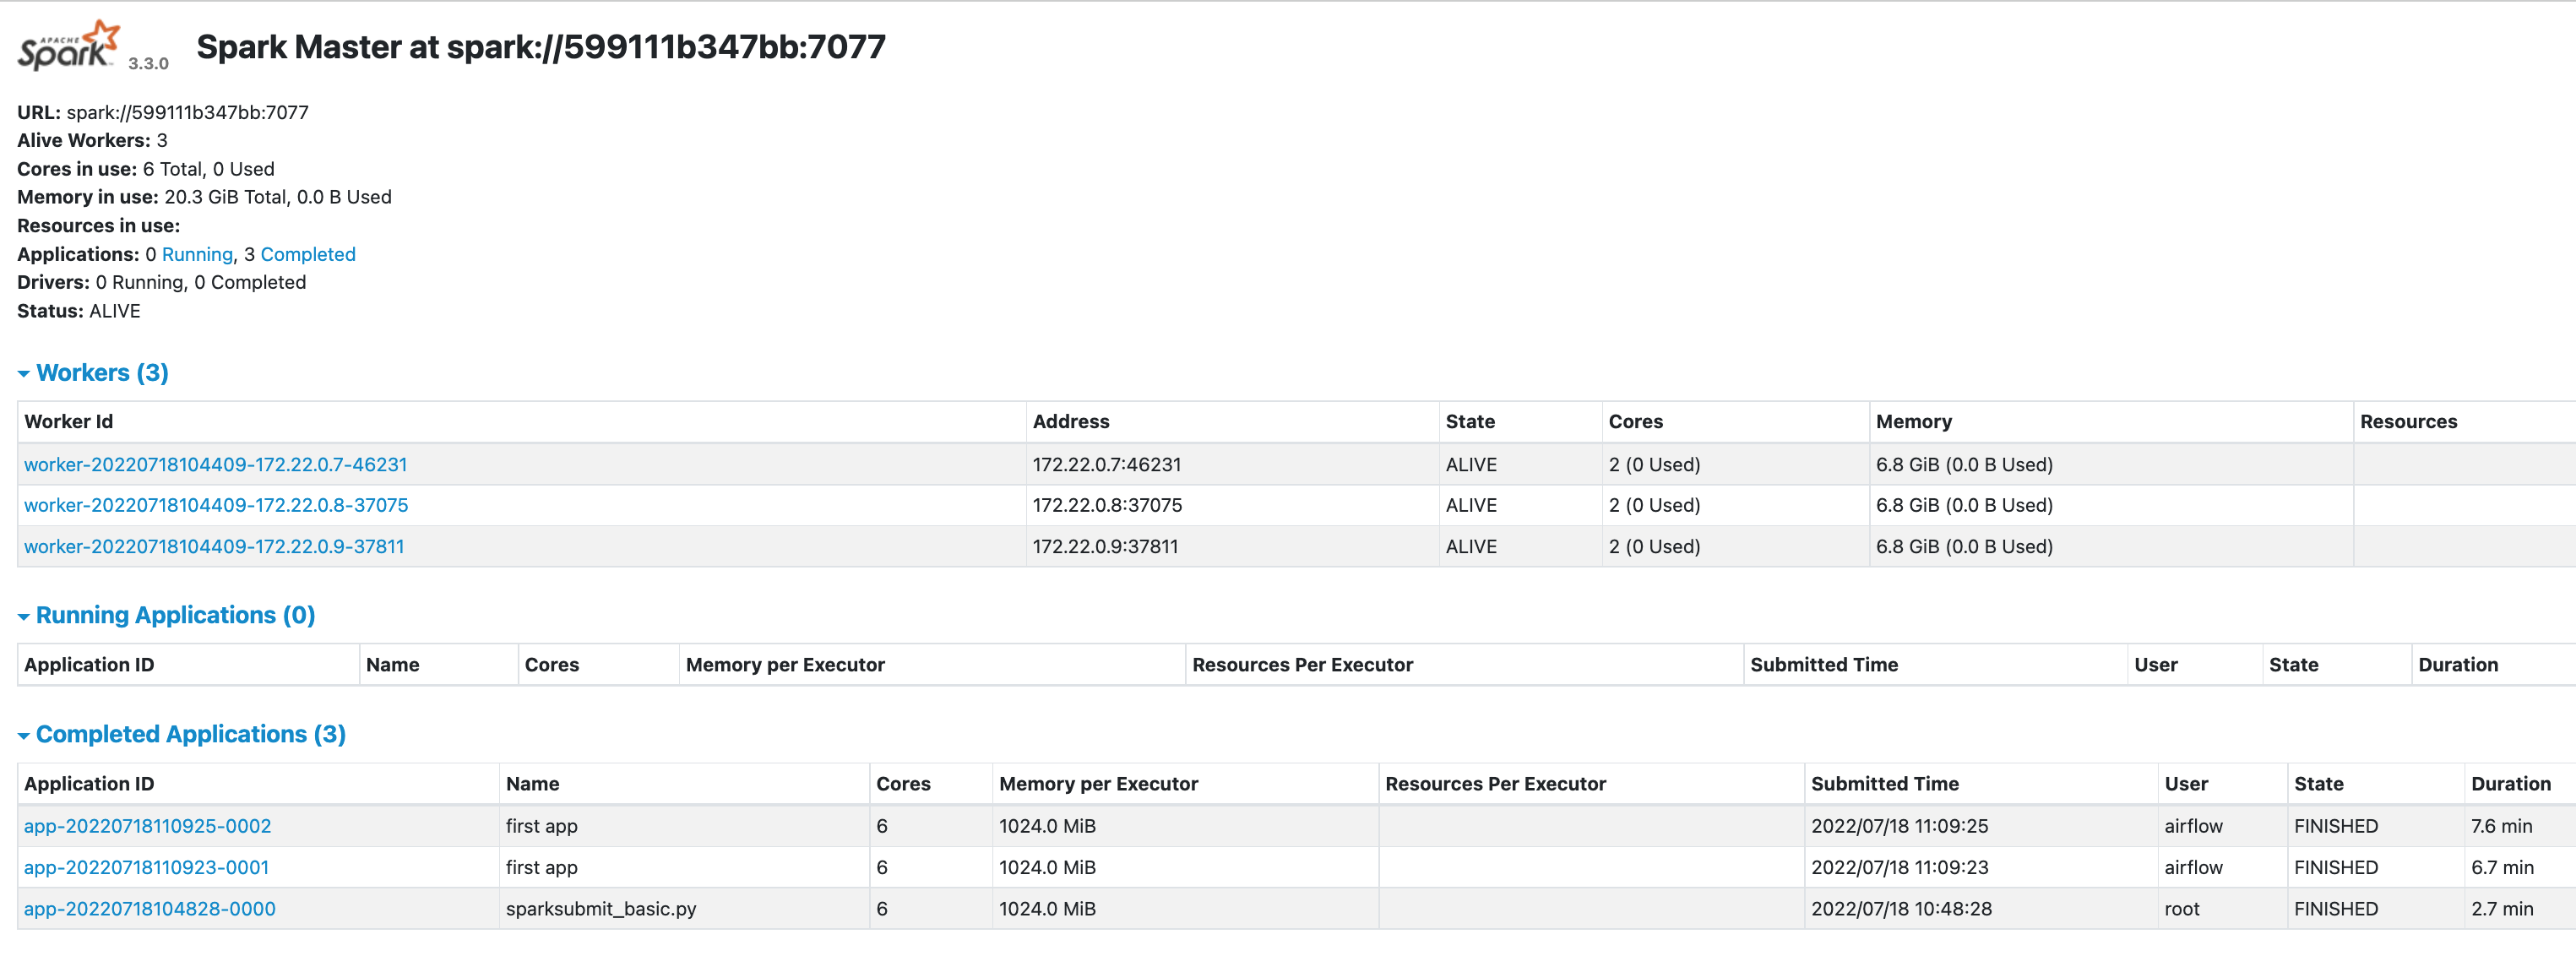
- Check the Spark UI http://localhost:8181 for the result of our DAG & Spark submit via terminal:
After starting the container, a URL with a token is generated. This URL is used to access the Jupyter notebook in your web browser.
You can find the URL with the token in the container logs. Use the following command to retrieve it:
docker logs $(docker ps -q --filter "ancestor=jupyter/pyspark-notebook:spark-3.2.0") 2>&1 | grep 'http://127.0.0.1' | tail -1Once the Docker container is up and running, you can query the dvdrental database using the psql command-line interface. Here are the steps:
- Access the PostgreSQL interactive terminal:
docker exec -it oasis-postgresdb psql -U airflow- List all databases:
\lYou should see dvdrental in the list of databases.
- Connect to the
dvdrentaldatabase:
\c dvdrental- List all tables in the
dvdrentaldatabase:
\dtYou should see a list of tables such as actor, address, category, etc.
- Query a table. For example, to select the first 5 rows from the
actortable:
SELECT * FROM actor LIMIT 5;You should see a table with the columns actor_id, first_name, last_name, and last_update, and the first 5 rows of data.
dvdrental=# SELECT * FROM actor LIMIT 5;
| actor_id | first_name | last_name | last_update |
|---|---|---|---|
| 1 | Penelope | Guiness | 2013-05-26 14:47:57.62 |
| 2 | Nick | Wahlberg | 2013-05-26 14:47:57.62 |
| 3 | Ed | Chase | 2013-05-26 14:47:57.62 |
| 4 | Jennifer | Davis | 2013-05-26 14:47:57.62 |
| 5 | Johnny | Lollobrigida | 2013-05-26 14:47:57.62 |
(5 rows)
- airflow-init:
- The initialization service. This sets up a database in the Airflow UI and creates users to login into the UI.
- You can add a user via the airflow command line interface (cli) by typing the following command
airflow users create -u <USERNAME> -f <FIRST> -l <LAST> -r <ROLE> -e <EMAIL>
When all the containers are running, you can experience system lag if your system is not able to handle the load. Monitoring the CPU and Memory utilization of the containers is crucial to maintaining good performance and a reliable system. To monitor the CPU and Memory utilization of the containers, we use the Docker command-line tool stats command, which gives us a live look at our containers resource utilization. We can use this tool to gauge the CPU, Memory, Network, and disk utilization of every running container.
docker stats
List Images:
$ docker images <repository_name>

List Containers:
$ docker container ls

Check container logs:
$ docker logs -f <container_name>

To build a Dockerfile after changing sth (run inside directoty containing Dockerfile):
$ docker build --rm -t <tag_name> .

Access container bash:
$ docker exec -it <container_name> bash

Remove Images & Containers:
$ docker system prune -a

Remove Volumes:
$ docker volume prune
Start Containers:
$ docker-compose -f <compose-file.yml> up -d

Stop Containers:
$ docker-compose -f <compose-file.yml> down --remove-orphans

Stop Containers & Remove Volumes:
$ docker-compose -f <compose-file.yml> down --remove-orphans -v
enter the Postgres Conatiner via CLI command :
docker exec -it postgres_container psql
Before starting Airflow for the first time, we need to prepare our environment. We need to add the Airflow USER to our .env file because some of the container’s directories that we mount, will not be owned by the root user. The directories are:
- ./dags - you can put your DAG files here.
- ./logs - contains logs from task execution and scheduler.
- ./plugins - you can put your custom plugins here.
mkdir -p ./dags ./logs ./plugins
chmod -R 777 ./dags ./logs ./plugins
echo -e "AIRFLOW_UID=$(id -u)" >> .env
echo -e "AIRFLOW_GID=0" >> .env
Assume we had a set of data that we wanted to use. However, this data is unclean, missing information, and inconsistent as with most data. One solution would be to have a program clean and transform this data so that:
- There is no missing information
- Data is consistent
- Data is fast to load into another program
- With smart devices, online communities, and E-Commerce, there is an abundance of raw, unfiltered data in today’s industry.
- However, most of it is squandered because it is difficult to interpret due to it being tangled. ETL pipelines are available to combat this by automating data collection and transformation so that analysts can use them for business insights.
- I will walk-through a step-by-step process to demonstrate how we can leverage
- an S3-Compatible Object Storage Minio and a Distributed SQL query engine Trino to achieve this.
- Minimal example to run Trino with Minio and the Hive standalone metastore on Docker.
Install s3cmd with:
sudo apt update
sudo apt install -y \
    s3cmd \
    openjdk-11-jre-headless  # Needed for trino-cli
Pull and run all services with:
docker-compose upConfigure s3cmd with (or use the minio.s3cfg configuration):
s3cmd --config minio.s3cfg --configureUse the following configuration for the s3cmd configuration when prompted:
Access Key: minio_access_key
Secret Key: minio_secret_key
Default Region [US]:
S3 Endpoint [s3.amazonaws.com]: localhost:9000
DNS-style bucket+hostname:port template for accessing a bucket [%(bucket)s.s3.amazonaws.com]: localhost:9000
Encryption password:
Path to GPG program [/usr/bin/gpg]:
Use HTTPS protocol [Yes]: no
To create a bucket and upload data to minio, type:
s3cmd --config minio.s3cfg mb s3://iris
s3cmd --config minio.s3cfg put data/iris.parq s3://iris
To list all object in all buckets, type:
s3cmd --config minio.s3cfg laUser-defined bridges provide automatic DNS resolution between containers, meaning one container will be able to “talk” to the other containers in the same network of docker containers. On a user-defined bridge network (like oasiscorp in our case), containers can resolve each other by name or alias. This is very practical as we won't have to manually look up and configure specific IP addresses.
https://airflow.apache.org/docs/apache-airflow/stable/start/docker.html


