Revise from a fork Natizyskunk/vscode-sftp forked from liximomo/vscode-sftp
Syncs your local directory with a remote server directory. Allows you to optionally edit upload a file to the remote directory after it saves locally. This allows you to edit more or less directly on the server similar to WinScp or other similar programs.
Very powerful, with smart features. Very simple, requires just three lines of config! Very fast, finished in a blink.
- Features
- Browser remote with Remote Explorer
- Diff local and remote
- Sync directory
- Upload/Download
- Upload on save
- File Watcher
- Multiple configs
- Switchable profiles
- Temp File support
- Commands
- Debug
- FAQ
- Select Extensions (Ctrl + Shift + X).
- Uninstall current sftp extension from @liximomo
- Install new extension directly from VS Code Marketplace : https://marketplace.visualstudio.com/items?itemName=Natizyskunk.sftp
- Voilà !
To install it just follow thoses steps from within VSCode :
- Select Extensions (Ctrl + Shift + X).
- Uninstall current sftp extension from @liximomo
- Open "More Action” menu(ellipsis on the top) and click “Install from VSIX…”.
- Locate VSIX file and select.
- Reload VSCode.
- Voilà !
If your latest files are on the server, you can start with an empty local folder, then download your project, and from that point sync.
- In
VS Code, open a local directory you wish to sync to the remote server (or create an empty directory that you wish to first download the contents of a remote server folder in order to edit locally). Ctrl+Shift+Pon Windows/Linux orCmd+Shift+Pon Mac open command palette, runSFTP: configcommand.- A basic configuration file will appear named
sftp.jsonunder the.vscodedirectory. Edit the parameters to match your setup.
For instance:
{
    "name": "Profile Name",
    "host": "name_of_remote_host",
    "protocol": "ftp",
    "port": 21,
    "secure": true,
    "username": "username",
    "remotePath": "/public_html/project",  <--- This is the path which will be downloaded if you "Download Project"
    "password": "password",
    "uploadOnSave": true
}
The password parameter is optional but if you don't add it, you will be constantly prompted for a password. Note that you must escape any backslashes and other special characters with a backslash.
There are other Example Configs below.
- Save and close the
sftp.jsonfile. Ctrl+Shift+Pon Windows/Linux orCmd+Shift+Pon Mac open command palette.- Type "sftp" and you'll now see a number of other comands.
- A good one to start with if you want to start with a remote folder is
SFTP: Download Project. This will download the directory shown in theremotePathsetting insftp.jsonto your local open directory. - Done - you can now edit locally and after each save it will upload to your remote file.
- Enjoy !
For detailed usage. Please go to wiki.
You can see the full config here.
{
  "host": "host",
  "username": "username",
  "remotePath": "/remote/workspace"
}{
"username": "username",
"password": "password",
"remotePath": "/remote/workspace/a",
"watcher": {
"files": "dist/*.{js,css}",
"autoUpload": false,
"autoDelete": false
},
"profiles": {
"dev": {
"host": "dev-host",
"remotePath": "/dev",
"uploadOnSave": true
},
"prod": {
"host": "prod-host",
"remotePath": "/prod"
}
},
"defaultProfile": "dev"
}Note: context and watcher are only available at root level.
Use SFTP: Set Profile to switch profile.
The context must not be same.
[
  {
    "name": "server1",
    "context": "project/build",
    "host": "host",
    "username": "username",
    "password": "password",
    "remotePath": "/remote/project/build"
  },
  {
    "name": "server2",
    "context": "project/src",
    "host": "host",
    "username": "username",
    "password": "password",
    "remotePath": "/remote/project/src"
  }
]
Note: name is required in this mode.
You can connect to a target server through a proxy with ssh protocol.
Note: Variable substitution is not working in a hop config.
local -> hop -> target
{
  "name": "target",
  "remotePath": "/path/in/target",

  // hop
  "host": "hopHost",
  "username": "hopUsername",
  "privateKeyPath": "/Users/localUser/.ssh/id_rsa", // The key file is assumed on the local.

  "hop": {
    // target
    "host": "targetHost",
    "username": "targetUsername",
    "privateKeyPath": "/Users/hopUser/.ssh/id_rsa", // The key file is assumed on the hop.
  }
}local -> hopa -> hopb -> target
{
  "name": "target",
  "remotePath": "/path/in/target",

  // hopa
  "host": "hopAHost",
  "username": "hopAUsername",
  "privateKeyPath": "/Users/hopAUsername/.ssh/id_rsa" // The key file is assumed on the local.

  "hop": [
    // hopb
    {
      "host": "hopBHost",
      "username": "hopBUsername",
      "privateKeyPath": "/Users/hopaUser/.ssh/id_rsa" // The key file is assumed on the hopa.
    },

    // target
    {
      "host": "targetHost",
      "username": "targetUsername",
      "privateKeyPath": "/Users/hopbUser/.ssh/id_rsa", // The key file is assumed on the hopb.
    }
  ]
}You can use remote to tell sftp to get the config from remote-fs.
In User Setting:
"remotefs.remote": {
  "dev": {
    "scheme": "sftp",
    "host": "host",
    "username": "username",
    "rootPath": "/path/to/somewhere"
  },
  "projectX": {
    "scheme": "sftp",
    "host": "host",
    "username": "username",
    "privateKeyPath": "/Users/xx/.ssh/id_rsa",
    "rootPath": "/home/foo/some/projectx"
  }
}
In sftp.json:
{
  "remote": "dev",
  "remotePath": "/home/xx/",
  "uploadOnSave": true,
  "ignore": [".vscode", ".git", ".DS_Store"]
}
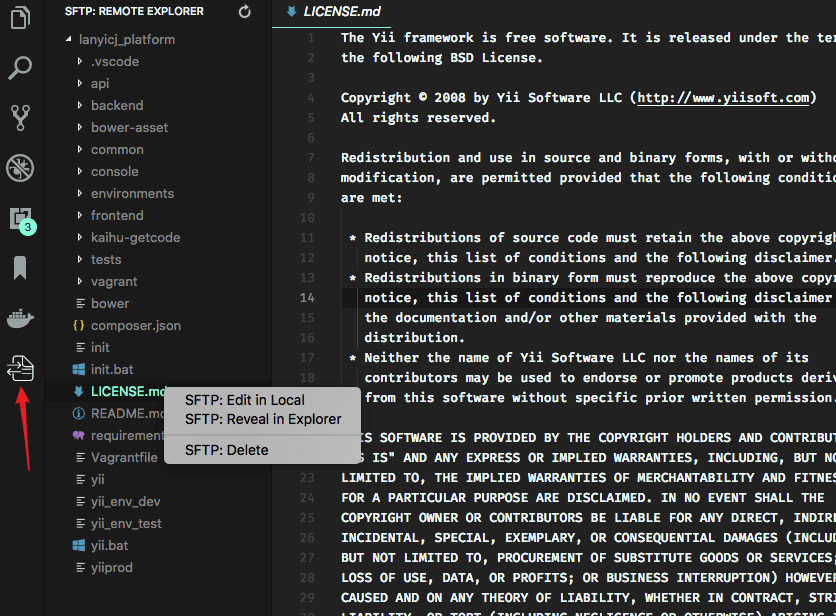
Remote Explorer lets you explore files in remote. You can open Remote Explorer by:
- Run Command
View: Show SFTP. - Click SFTP view in Activity Bar.
You can only view a files content with Remote Explorer. Run command SFTP: Edit in Local to edit it in local.
Note: You need to manually refresh the parent folder after you delete a file to make the explorer updated.
- Open User Settings.
- On Windows/Linux -
File > Preferences > Settings - On macOS -
Code > Preferences > Settings
- Set
sftp.debugtotrueand reload vscode. - View the logs in
View > Output > sftp.
You can see all the Frequently Asked Questions here.
