- Demonstrate viewing the DOM through Chrome DevTools
- Select an element with Chrome DevTools
- Delete an element with Chrome DevTools
- Demonstrate that the source is not changed when the DOM is
- Demonstrate opening the DevTools' JavaScript console
- Select an element with JavaScript
- Delete an element with JavaScript
- Storing node references in variables
We've read that updating the DOM will update the browser's rendered page. Let's try this out. We're going to change the DOM in two ways. First, we'll use Chrome's Developer Tools ("DevTools") and our mouse to remove an element from the DOM. Then we'll use the DevTools' JavaScript console to run JavaScript that does the same thing.

Let's head back to the Wikipedia page for Ada Lovelace. From this web page, look at the Chrome menu bar at the top of the page. Click on "View", then select "Developer", then "Developer Tools." This will open the Google Developer Tools. Click on the "Elements" tab. Here we see the DOM representation of the HTML source that was loaded into the browser.
Scroll through the Elements panel. You will see some HTML: head tags, body
tags, divs, etc. If the body element is collapsed, use the disclosure
triangle to expand it. Notice that you can mouse over different elements in the
Elements panel and see them highlighted in the browser window. We will continue
to drill down until we get can see the DOM element for the page title:
- locate the
divnested insidebodythat has aclassof "mw-page-container"; - within that
div, find the div with aclassof "mw-page-container-inner"; - within that
div, find thedivwith a class of "mw-content-container"; - within that
div, find themainelement with anidof "content"; - finally, within the
mainelement, find theheaderelement.
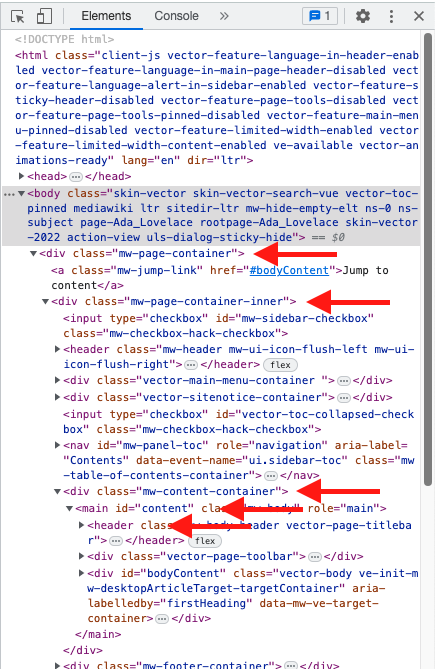
Next, locate the h1 element nested inside the "header" element. It should look
something like this:
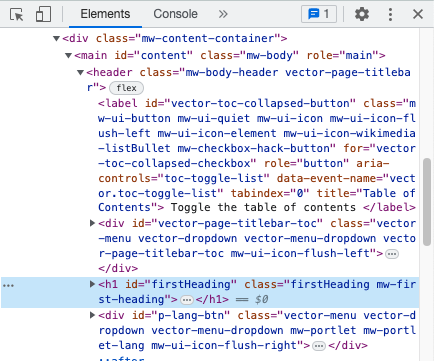
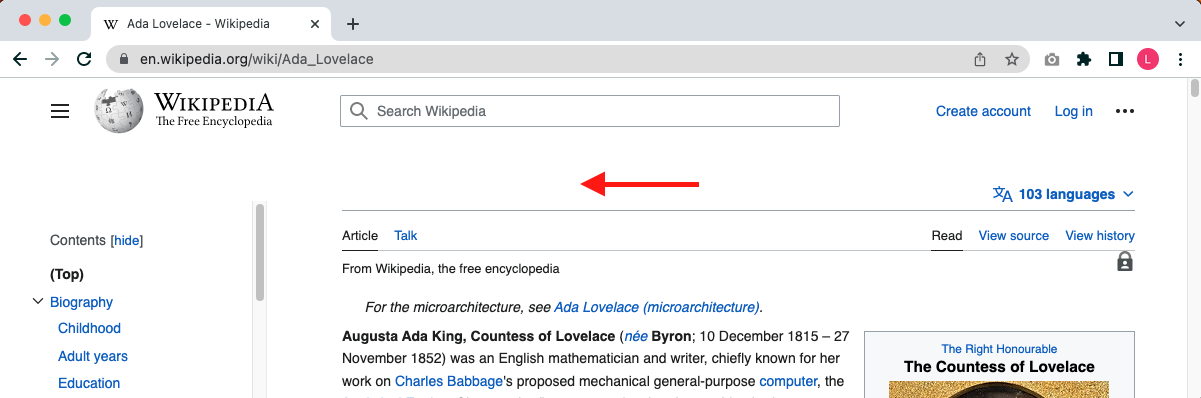
Click on the h1 element; you'll see that the title is now highlighted in the
rendered browser page. You've now selected an element with the DevTools.
Press the delete button on your keyboard. The element will vanish from the browser's rendered page.
View the page source. In the Chrome menu bar, click on "View", then select
"Developer", then "View Source." You will see that the HTML is just as it always
was, with the deleted element still present. (Note that the h1 element is
quite far down on the page. To find it more easily, you might want to search the
page for its id, "firstHeading".)
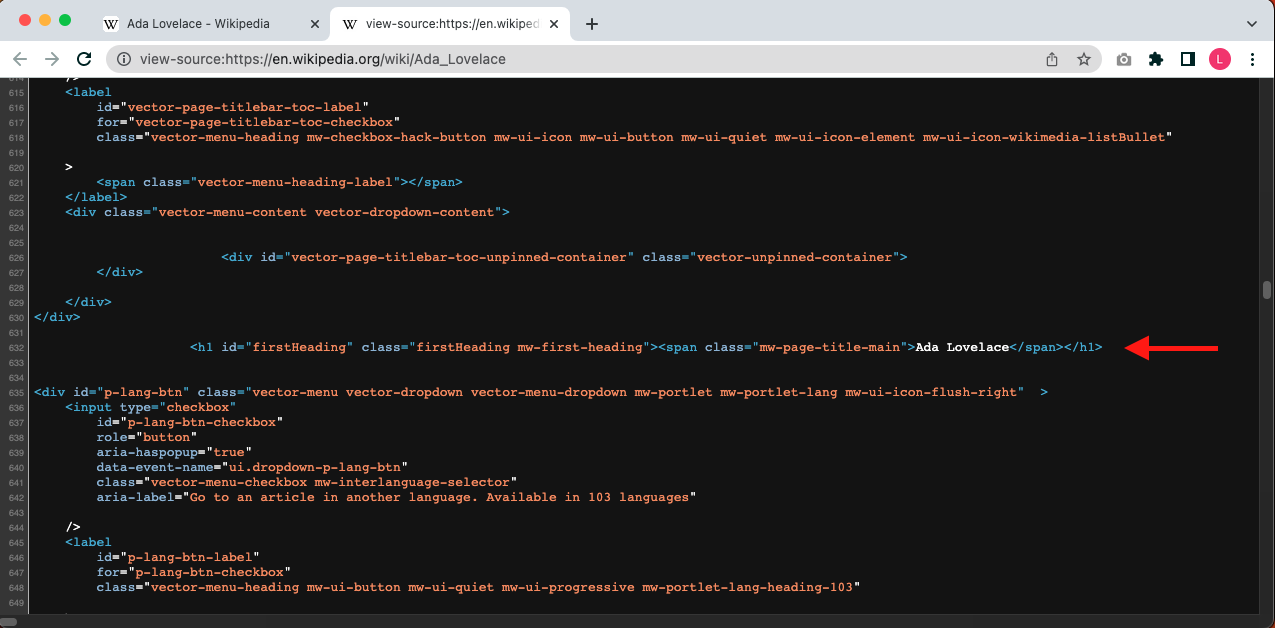
The changes in the DOM do not affect the HTML file on the server. When you think about it, that makes sense. If that were true then anyone could be changing carefully-written HTML. (Of course, in the case of Wikipedia, people can edit the content using Wikipedia's editor, but they aren't directly accessing the underlying HTML.)
The HTML, which lives on the server, is unchanged.
Refresh the page by going to "View" and choosing "Reload this Page." You will be reloading the DOM from the source. The page content will come back.
Above, we deleted an element by selecting it in the DevTools and pressing the delete key. We can accomplish the same thing using JavaScript.
In DevTools, click the Console tab. At the prompt, type the word document
and press "Enter." You'll get a #document returned. If you hover your mouse
over the element, you'll see the entire page highlighted in the browser window.
If you expand it, you'll see that it's the exact HTML that you saw in the
Elements tab.
Recall that document is an object; as such, it has properties and methods,
including a number of different methods that can be used to return elements.
Let's find or select an element by speaking JavaScript with the DOM.
In the Console type:
document.querySelector("h1");This will return something like this:
<h1 id="firstHeading" class="firstHeading mw-first-heading">
  ...
</h1>
Go ahead and click on that disclosure triangle to see more.
When we run document.querySelector('h1');, it returns the DOM node, which is
also a JavaScript object. This means that it, in turn, can have methods called
on it! This is called method chaining. Let's use method chaining to remove
our node from the DOM.
Now type:
document.querySelector("h1").remove();The heading is gone! We called document.querySelector('h1') to get the node;
we then used method chaining to call the remove() method on the node object.
We use dot notation to chain the calls.
Follow the same process we used earlier to verify that the source has not changed. To restore it, simply refresh the page (i.e. reload the DOM).
Query methods like querySelector() and the other methods we'll be learning
about are expressions: they return a value (specifically, a DOM node). As such,
we can save the results of the query into a variable. For example:
const header = document.querySelector("h1");We now have a reference to that node with a meaningful name; we can simply use
header any time we need to refer to our node, rather than always having to
look it up with document.querySelector().
You can perhaps imagine how, if we have a program that selects, creates, modifies, or removes a large number of nodes, using this approach will result in code that's easier to read, debug and maintain.
DOM programming is using JavaScript to:
- Ask the DOM to find or
selectan HTML element or elements in the rendered page - Remove the selected element(s) and/or insert new element(s)
- Adjust a property of the selected element(s)
In this lesson you just did all that stuff! Learning to duplicate what you can do in DevTools with JavaScript is DOM programming. The next lessons are going to give you more methods for selecting elements and changing them, but you just changed the DOM. High fives are in order.