An open-source implementation of DuckyScript3 with CircuitPython for Raspberry Pi Pico
This project aims to provide an open-source implementation of DuckyScript3, a scripting language used for automating tasks on USB Rubber Ducky devices. Its goal is to achieve a 1-to-1 implementation of DuckyScript3 targeting a Raspberry Pi Pico and Raspberry Pi Pico 2.
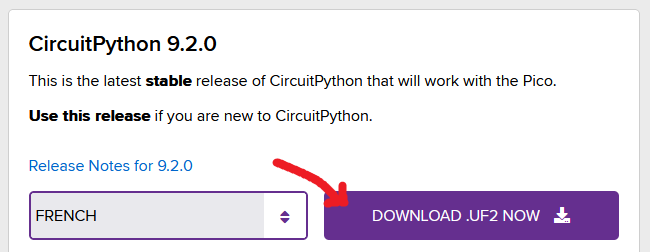
- Go to the CircuitPython website and download the
CircuitPython 9.2.0firmware for Raspberry Pi Pico 2 using the "DOWNLOAD .UF2 NOW" button.
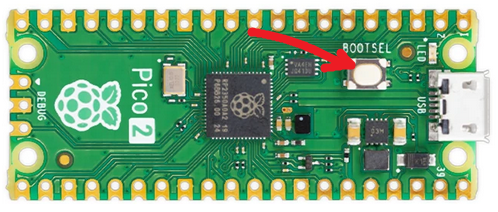
- Hold the BOOTSEL button on your Raspberry Pi Pico 2 and connect it to your computer using a USB cable. Once
RPI-RP2appears in the device manager, release the BOOTSEL button.
- Open your
RPI-RP2drive and drag and drop the downloaded.UF2file to the Raspberry Pi Pico 2.
- Once the Raspberry Pi Pico is restarted, it will appear as
CIRCUITPYin the device manager.
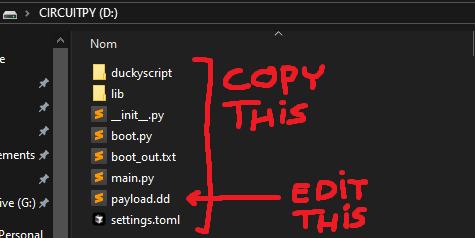
- Connect your Raspberry Pi Pico to your computer and copy/paste the content of the
rasper_duckyfolder to theCIRCUITPYdrive. - Edit the
payload.ddfile at the root of theCIRCUITPYdrive to change the payload.
- You can try it out with this simple script, which will open a PowerShell window and print "Hello, World!" 3 times, separated by a space:
DEFINE #COUNT 3

FUNCTION open_powershell()
    GUI R
    STRINGLN powershell
END_FUNCTION

FUNCTION hello_world()
    $x = 0
    WHILE ($x < #COUNT)
        DELAY 500
        STRING Hello, World!
        SPACE
        $x = $x + 1
    END_WHILE
END_FUNCTION

open_powershell()
DELAY 1000
hello_world()
To debug the script, connect to the Raspberry Pi Pico 2 using Putty or similar and use the serial console. I've seen ports up to COM8 on my computer so try them all until you find the correct one. Once connected, you should see the output of the script in the serial console.
I am not affiliated with Hak5 or USB Rubber Ducky in any way. This is a side project and I do it for fun.
There are some choices in the DuckyScript3 language that I dislike and may want to change in the future, maybe in a fork of this project. For example, in DuckyScript3 :
- Functions do not take parameters and can't return values
- Every variable is a global variable, no scoping is implemented, variables declared in functions will bleed into the global scope
- No mathematical operator precedence, requiring parenthesis for simple expressions (10 + 2 * 3 will be interpreted as (10 + 2) * 3)
- Variables can only be integers
- DELAY, STRING and STRINGLN don't accept variables
- No for loops, only WHILE loops are supported
- Need to declare variables before using them
- No BREAK or CONTINUE statements in loops
- Raspberry Pi Pico Support: Execute scripts on a Raspberry Pi Pico.
- Full test suite: Ensure the implementation is correct and reliable.
- Open Source: Contribute to the project and help me improve the implementation, please refer to the CONTRIBUTING.md file.
- Partial DuckyScript3 Syntax Support: See INSTRUCTIONS.md for the supported syntax.
- Additional features (not included in DuckyScript3 but nice to have):
- Keyboard layouts:
RD_KBD WIN FRfor French keyboard on Windows,RD_KBD MAC UKfor UK keyboard on Mac, etc. - Operators precedence:
10 + 2 * 3 / 4will be interpreted as10 + ((2 * 3) / 4) - No need for VAR: No need to declare variables before using them, just use them directly :
$x = 10is equivalent toVAR $x = 10 - Random character from a string:
RANDOM_CHAR_FROM aAzZ!#1,;:!()will type a random character from the given string
- Keyboard layouts:
- Complete the roadmap
- Derecursify parts of the parser to limit stack overflows
- Complete 1-to-1 DuckyScript3 implementation
-
WAIT_FOR_BUTTON_PRESS -
BUTTON_DEF -
LED_R/LED_G(only one green led on the Raspberry Pi Pico) -
RANDOM_LOWERCASE_LETTER,RANDOM_UPPERCASE_LETTER,RANDOM_LETTER,RANDOM_NUMBER,RANDOM_SPECIAL,RANDOM_CHAR -
HOLD/RELEASE -
RESTART_PAYLOAD/STOP_PAYLOAD
-
- Improve error handling and debugging features
- Custom backward compatible features
- Pass a variable to
DELAY - Pass a variable to
STRINGandSTRINGLN - Add support for
#comments - Prevent the user from shadowing a keyword with a
DEFINE - Add a
CONTINUEand aBREAKstatement to loops - Add a
PRINTstatement to debug scripts - Add a
RANDOM_CHAR_FROMinstruction to generate random characters from a given string
- Pass a variable to
- Custom backward incompatible features
- Scope variables
- Thanks to @hak5 for the original DuckyScript language.
- Thanks to @munificent for the crafting interpreters web book, which was a great help to understand how to implement a scripting language.
- Thanks to @dbisu for Pico-Ducky, which was the starting point for this project.
- Thanks to the Team behind CircuitPython for the amazing work on this firmware and their support.
- Thanks to the rest of the community for making this fun little project possible (AdaFruit, MicroPython, etc.).


