A Keras-based implementation of
- Wide Activation for Efficient and Accurate Image Super-Resolution (WDSR), winner of the NTIRE 2018 super-resolution challenge.
- Enhanced Deep Residual Networks for Single Image Super-Resolution (EDSR), winner of the NTIRE 2017 super-resolution challenge.
Create a new Conda environment with
conda env create -f environment-gpu.yml
if you have a GPU*). A CPU-only environment can be created with
conda env create -f environment-cpu.yml
Activate the environment with
source activate wdsr
*) It is assumed that appropriate CUDA and cuDNN versions for the current tensorflow-gpu version are already installed on your system.
Pre-trained models are available here. Each directory contains a model together with the training settings. All of them were trained with images 1-800 from the DIV2K training set using the specified downgrade operator. Random crops and transformations were made as described in the EDSR paper. Model performance is measured in dB PSNR on the DIV2K benchmark (images 801-900 of DIV2K validation set, RGB channels, without self-ensemble). See also section Training.
| Model | Scale | Residual blocks |
Downgrade | Parameters | PSNR | Training |
|---|---|---|---|---|---|---|
| wdsr-a-8-x2 1) | x2 | 8 | bicubic | 0.89M | 34.54 dB | settings |
| wdsr-a-16-x2 1) | x2 | 16 | bicubic | 1.19M | 34.68 dB | settings |
| edsr-16-x2 2) | x2 | 16 | bicubic | 1.37M | 34.64 dB | settings |
1) WDSR baseline(s), see also WDSR project page.
2) EDSR baseline, see also EDSR project page.
| Model | Scale | Residual blocks |
Downgrade | Parameters | PSNR | Training |
|---|---|---|---|---|---|---|
| wdsr-a-32-x2 | x2 | 32 | bicubic | 3.55M 1) | 34.80 dB | settings |
| wdsr-a-32-x4 | x4 | 32 | bicubic | 3.56M 1) | 29.17 dB | settings |
| wdsr-a-32-x2-q90 | x2 | 32 | bicubic + JPEG (90) 2) | 3.55M 1) | 32.12 dB | settings |
| wdsr-a-32-x4-q90 | x4 | 32 | bicubic + JPEG (90) 2) | 3.56M 1) | 27.63 dB | settings |
| wdsr-b-32-x2 | x2 | 32 | bicubic | 0.59M | 34.63 dB | settings |
1) For experimental WDSR-A models, an expansion ratio of 6 was used, increasing the number of parameters
compared to an expansion ratio of 4. Please note that the default expansion ratio is 4 when using one the of the
wdsr-a-* profiles with the --profile command line option for training. The default expansion ratio for WDSR-B
models is 6.
2) JPEG compression with quality 90 in addition to bicubic downscale. See also section
JPEG compression.
First, download the wdsr-a-32-x4 model. Assuming
that the path to the downloaded model is ~/Downloads/wdsr-a-32-x4-psnr-29.1736.h5, the following command super-resolves
images in directory ./demo with factor x4 and writes the results to directory ./output:
python demo.py -i ./demo -o ./output --model ~/Downloads/wdsr-a-32-x4-psnr-29.1736.h5
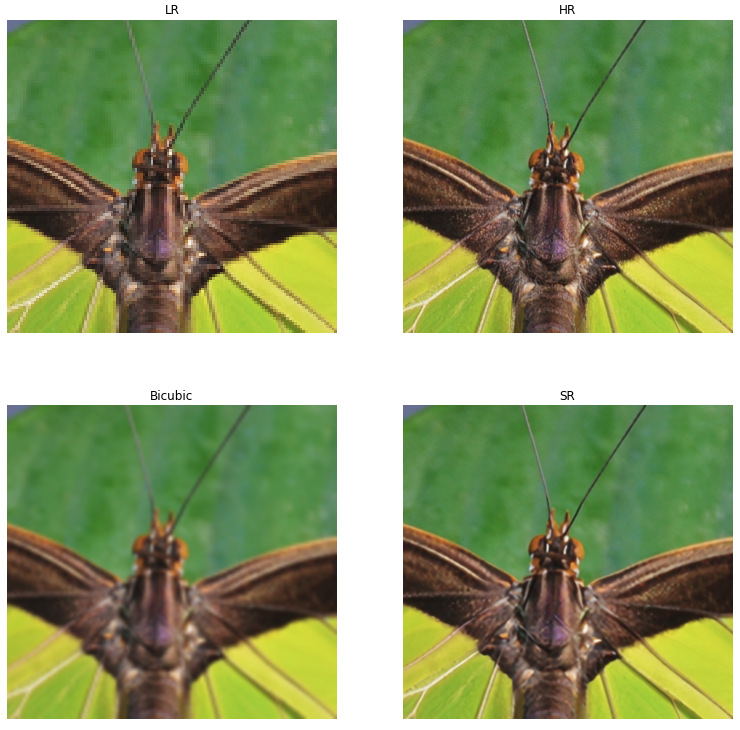
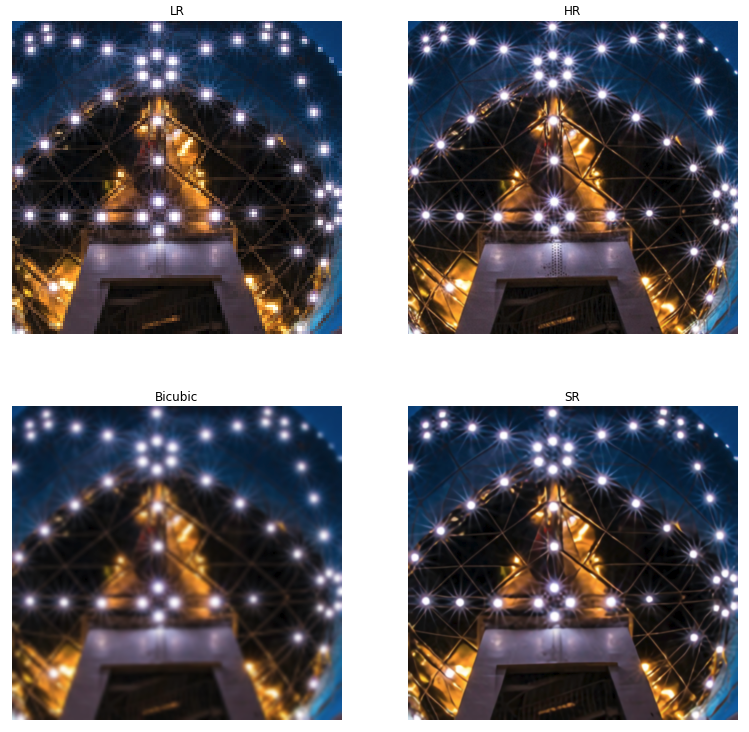
Below are figures that compare the super-resolution results (SR) with the corresponding low-resolution (LR) and high-resolution (HR) images and an x4 resize with bicubic interpolation. The demo images were cropped from images in the DIV2K validation set.
If you want to train and evaluate models, you must download the
DIV2K dataset and extract the downloaded archives to a directory of your
choice (DIV2K in the following example). The resulting directory structure should look like:
DIV2K
  DIV2K_train_HR
    DIV2K_train_LR_bicubic
      X2
      X3
      X4
    DIV2K_train_LR_unknown
      X2
      X3
      X4
    DIV2K_valid_HR
    DIV2K_valid_LR_bicubic
      ...
    DIV2K_valid_LR_unknown
      ...
You only need to download DIV2K archives for those downgrade operators (unknown, bicubic) and super-resolution scales (x2, x3, x4) that you'll actually use for training.
Before the DIV2K images can be used they must be converted to numpy arrays and stored in a separate location. Conversion
to numpy arrays dramatically reduces image loading times. Conversion can be done with the convert.py script:
python convert.py -i ./DIV2K -o ./DIV2K_BIN numpy
In this example, converted images are written to the DIV2K_BIN directory. You'll later refer to this directory with the
--dataset command line option.
There is experimental support for adding JPEG compression artifacts to LR images and training with these images. The
following commands convert bicubic downscaled DIV2K training and validation images to JPEG images with quality 90:
python convert.py -i ./DIV2K/DIV2K_train_LR_bicubic \
                  -o ./DIV2K/DIV2K_train_LR_bicubic_jpeg_90 \
                   --jpeg-quality 90 jpeg

python convert.py -i ./DIV2K/DIV2K_valid_LR_bicubic \
                  -o ./DIV2K/DIV2K_valid_LR_bicubic_jpeg_90 \
                   --jpeg-quality 90 jpeg
After having converted these JPEG images to numpy arrays, as described in the previous section, models can be trained
with the --downgrade bicubic_jpeg_90 option to additionally learn to recover from JPEG compression artifacts.
WDSR and EDSR models can be trained by running train.py with the command line options and profiles described in
train.py. For example, a WDSR-A baseline model with 8 residual blocks can be trained for scale x2 with
python train.py --dataset ./DIV2K_BIN --outdir ./output --profile wdsr-a-8 --scale 2
The --dataset option sets the location of the DIV2K dataset and the --output option the output directory (defaults
to ./output). Each training run creates a timestamped sub-directory in the specified output directory which contains
saved models, all command line options (default and user-defined) in an args.txt file as well as
TensorBoard logs. The scale factor is set with the
--scale option. The downgrade operator can be set with the --downgrade option. It defaults to bicubic and can
be changed to unknown.
By default, the model is validated against randomly cropped images from the DIV2K validation set. If you'd rather
want to evaluate the model against the full-sized DIV2K validation images (= benchmark) after each epoch you need
to set the --benchmark command line option. This however slows down training significantly and makes only sense
for smaller models. Alternatively, you can benchmark saved models later with bench.py as described in the section
Evaluation.
To train models for higher scales (x3 or x4) it is recommended to re-use the weights of a model pre-trained for a
smaller scale (x2). This can be done with the --pretrained-model option. For example,
python train.py --dataset ./DIV2K_BIN --outdir ./output --profile wdsr-a-8 --scale 4 \
    --pretrained-model ./output/20181016-063620/models/epoch-294-psnr-34.5394.h5
trains a WDSR-A baseline model with 8 residual blocks for scale x4 re-using the weights of model
epoch-294-psnr-34.5394.h5, a WDSR-A baseline model with the same number of residual blocks trained for scale x2.
For a more detailed overview of available command line options and profiles please take a look at train.py.
An alternative to the --benchmark training option is to evaluate saved models with bench.py and then select the
model with the highest PSNR. For example,
python bench.py -i ./output/20181016-063620/models -o bench.json
evaluates all models in directory ./output/20181016-063620/models and writes the results to bench.json. This JSON
file maps model filenames to evaluation PSNR. The bench.py script also writes the best model in terms of PSNR to stdout
at the end of evaluation:
Best PSNR = 34.5394 for model ./output/20181016-063620/models/epoch-294-psnr-37.4630.h5
The higher PSNR value in the model filename must not be confused with the value generated by bench.py. The PSNR value
in the filename was generated during training by validating against smaller, randomly cropped images which tends to yield
higher PSNR values.
The test suite can be run with
pytest tests
WDSR models are trained with weight normalization. This branch uses a
modified Adam optimizer. Branch
wip-conv2d-weight-norm instead uses a specialized
Conv2DWeightNorm layer and a default Adam
optimizer (experimental work inspired by the official WDSR Tensorflow
port). Current plan is to replace this layer with a default Conv2D layer and a Tensorflow WeightNorm wrapper
when the wrapper is officially available in a Tensorflow release.
- Official PyTorch implementation
- Official Torch implementation
- Tensorflow implementation by Josh Miller.
Code in this project requires the Keras Tensorflow backend.

