This project contains all information necesarry to run the open source ESDL MapEditor and ESSIM toolsuite on your local machine or cloud infrastructure.
This software stack consists of the following open source components with the link to their github repositories:
- ESDL MapEditor and ESSIM
- Contents
- What can I do with the MapEditor and ESSIM?
- What is ESDL?
- Features
- The architecture of the Toolsuite
- Setting up and running the software stack
- Prerequisites
- Steps to follow
- Step 1. Starting the software for the base infrastructure
- Step 2. Import the keycloak settings for the MapEditor
- Step 3. Creating user accounts
- Step 4. Configure role based access control for ESSIM dashboard
- Step 5. Create an API key in Grafana for the Panel Service
- Step 6. Start the MapEditor and ESSIM
- Step 7. Log in to the ESDL MapEditor
- Step 8. Upload some profiles
- ESDL MapEditor and ESSIM Tutorials
- Cloud deployment
- Details
- License
The ESDL MapEditor is a map based energy system editor. You can use it to create ESDL based energy system descriptions, that can then be simulated with a growing number of ESDL capable simulators. ESSIM is our ESDL based energy system simulator that gives insights in the hourly energy (im)balance of an energy system described in the ESDL language.

To get an impression of what the tools can do and how they look like, have look at the tutorials.
ESDL is a modelling language created to describe complete (hybrid) energy systems in one uniform format. It allows to describe information about the individual energy system components, how they are connected, how they are used (e.g. using energy production or consumption profiles), where they are physically located (on the map), what they cost (now and in future). Furthermore information about buildings in an area, energy potential, KPIs (on buildings, areas, or any assets) can be described. Possible applications are facilitating interoperability between different energy transition models and publishing open data on energy systems.
Click here for the ESDL documentation website
Click here for the ESDL class documentation website (a clickable ESDL model)
Click here for the ESDL github website
- Draw an energy system scenario by dragging and dropping energy assets on a map
- Connect components, set typical component characteristics (installed power, efficiencies, costs)
- Attach power or energy profiles to assets (demand and production profiles)
- Set control strategies (specifically needed for ESSIM simulations)
- Query external ESDL data sources, for example for solar or wind potential
- Visualize WMS layers with information that can be used to define your scenario
- Convert shapefiles into ESDL assets
- Query the boundary service for area borders (provinces, municipalities)
- Visualize results of simulations on the map (KPI dashboards, load animations, color areas based on KPI outcomes, load duration curves)
Click here for some more information on the ESDL MapEditor
- Simulates energy systems defined in ESDL and calculates energy balance over time
- Calculates optimal schedule of flexible producers and the effect of this schedule in terms of emissions, costs, load on the network
- Calculates schedules for conversion and storage in a similar manner
Click here for some more information on ESSIM
The architecture of the toolsuite provided is shown here (the gray components are open source solutions provided by others):

It consists of the following functionalities:
- ESDL MapEditor: map based scenario editor
- ESSIM: energy system simulator, to calculate hourly energy balance and give insights in effects of conversion and storage
- Identity & Access Management: using keycloak, an open-source IAM solution, it provides user management, roles, groups, organisations, authentication and authorisation, role based access control
- ESDL Drive: cloud storage for ESDL files, with access control at user, group or organisation level (supports versioning in the near future)
- Panel Service: service to create graphs from influxdb time series
- Boundary Service: service that gives boundary information for provinces, municipalities, neighbourhoods, and so on
- Grafana: open-source analytics & monitoring solution for every database
- InfluxDB: open-source time series database solution
- PostgresDB with PostGIS extension: open-source relational database management system
- MongoDB: open-source document-oriented database program (NoSQL)
Although the software was designed to run in a hosted environment somewhere in the cloud or in your in-company datacenter, the software can be run on a local laptop or PC as well. The following steps describe the installation process on a local machine. In the cloud deployment chapter we'll give some directions for cloud deployment
The current stack uses docker and docker-compose. The minimum versions required are currently:
| Software | Version |
|---|---|
| Docker engine | 19.03.12 |
| docker-compose | 1.26.2 |
NOTE: Macbook M1 users and users of the ARM64 architecture are experiencing difficulties when trying to install this software, because it is incompatible with the Intel x64 architecture we use on our servers and laptops. We are looking into creating multi-arch docker images but this is work in progress. For now: reach out to an Intel-based machine or VM to install this software.
- Step 1. Starting the software for the base infrastructure
- Step 2. Import the keycloak settings for the MapEditor
- Step 3. Creating user accounts
- Step 4. Configure role based access control for ESSIM dashboard
- Step 5. Create an API key in Grafana for the Panel Service
- Step 6. Start the MapEditor and ESSIM
- Step 7. Log in to the ESDL MapEditor
- Step 8. Upload some profiles
NOTE FOR WINDOWS USERS:
When cloning this repository using git for windows, file line endings are automatically converted from LF (Unix style) to CRLF (Windows style). This causes problems for the file BaseInfrastructure/postgres/init-database.sh as it is being mounted in one of the docker containers running linux. Please make sure that this file gets Unix style line endings, by converting it back using for example notepad++ or dos2unix, or configure git in such a way that it doesn't automatically convert line endings to windows style (Search for 'git autocrlf').
Start the base infrastructure (databases, grafana, pgadmin, ...)
cd BaseInfrastructure
docker-compose upExecute the following three commands from the BaseInfrastructure directory or follow detailed instructions here
Copy the configuration in the keycloak container.
docker cp keycloak/esdl-mapeditor-realm.json keycloak:/tmp/esdl-mapeditor-realm.jsonImport the configuration in Keycloak. When the import is successful and keycloak has started successfully, you can Ctrl-C out of the container.
The following line is only working in shells that accept the '\' (Windows cmd will not work):
docker exec -it keycloak /opt/jboss/keycloak/bin/standalone.sh \
  -Djboss.socket.binding.port-offset=100 \
  -Dkeycloak.profile.feature.upload_scripts=enabled \
  -Dkeycloak.migration.action=import \
  -Dkeycloak.migration.provider=singleFile \
  -Dkeycloak.migration.strategy=OVERWRITE_EXISTING \
  -Dkeycloak.migration.file=/tmp/esdl-mapeditor-realm.json
Windows users should copy this (long) line:
docker exec -it keycloak /opt/jboss/keycloak/bin/standalone.sh -Djboss.socket.binding.port-offset=100 -Dkeycloak.profile.feature.upload_scripts=enabled -Dkeycloak.migration.action=import -Dkeycloak.migration.provider=singleFile -Dkeycloak.migration.strategy=OVERWRITE_EXISTING -Dkeycloak.migration.file=/tmp/esdl-mapeditor-realm.jsonRestart the container to reload the ESDL-Mapeditor realm:
docker-compose restart keycloakUsing you webbrowser, go to http://localhost:8080 to open keycloak

Login with the admin credentials as specified in the docker-compose file

Once you're logged in, you should see the following screen

Click Users from the menu on the left

Click Add User and fill in the proper user credentials and click Save. Be sure to fill in an email address!

After clicking Save a number of tabs appear. Go to the Credentials tab and set the password of the newly created user

Go to the Attributes tab and add an attribute role with value essim, press Add and press Save

The ESSIM dashboard is a Grafana based solution for viewing simulation results. Grafana supports multiple roles: Viewer, Editor and Admin. If you want to give some users other roles than Viewer, add the roles Editor and/or Admin to keycloak and assign these roles to the appropriate user. When you don't do this, all users get the Viewer rights.
Go to the user that needs to become an Editor or Admin, go to the Role Mappings tab, at Client Roles select essim-dashboard and add the Editor or Admin role to the user.

Log in to Grafana, go to http://localhost:3000 and login with the credentials from the user with Admin rights you've just created.

Select the menu option 'API keys' in the settings menu.

Click the button 'New API key'

Fill in the details for the API key. Choose a name (e.g. 'panel-service') and make sure to give it the 'Admin' role.

Copy the generated API key.

Fill in this API key in the file .\ESDLMapEditor\panel-service.env (Replace the key that is already there).
GRAFANA_API_KEY=eyJrIjoiV3g0Z3pGUUxBNkhucXlySjhCRFczNXZwVXhiREhrRXciLCJuIjoicGFuZWwtc2VydmljZSIsImlkIjoxfQ==In another terminal window, start ESSIM:
cd ESSIM
docker-compose up
In yet another terminal window, start the ESDL MapEditor and accompanying services:
cd ESDLMapEditor
docker-compose up
To start ESDL Drive storage do the following in another terminal (or use -d option for each docker-compose command, to start in detached mode):
cd ESDLDrive
docker-compose upUsing your webbrowser go to http://localhost:8111

Press Start and log in using the credentials created in the previous step

You should see the following screen now:

If you're installing this toolsuite to run ESSIM simulations or any other application that requires timeseries data, you need to upload some profiles. For that purpose we've created a profile manager. In the repository there is an example dataset with profiles created from publically available data (NEDU profiles for electricity and gas usage and KNMI solar profile).
Click View and select Settings from the menu. The application settings dialog appears. Click Upload profiles. In the first drop down menu select:
- Personal profiles: to upload profiles that will become available only for the current user
- Standard profiles: to upload profiles that will become available for all users
- Project profiles for ...: to upload profiles related to a project, so that all project members can use these profiles
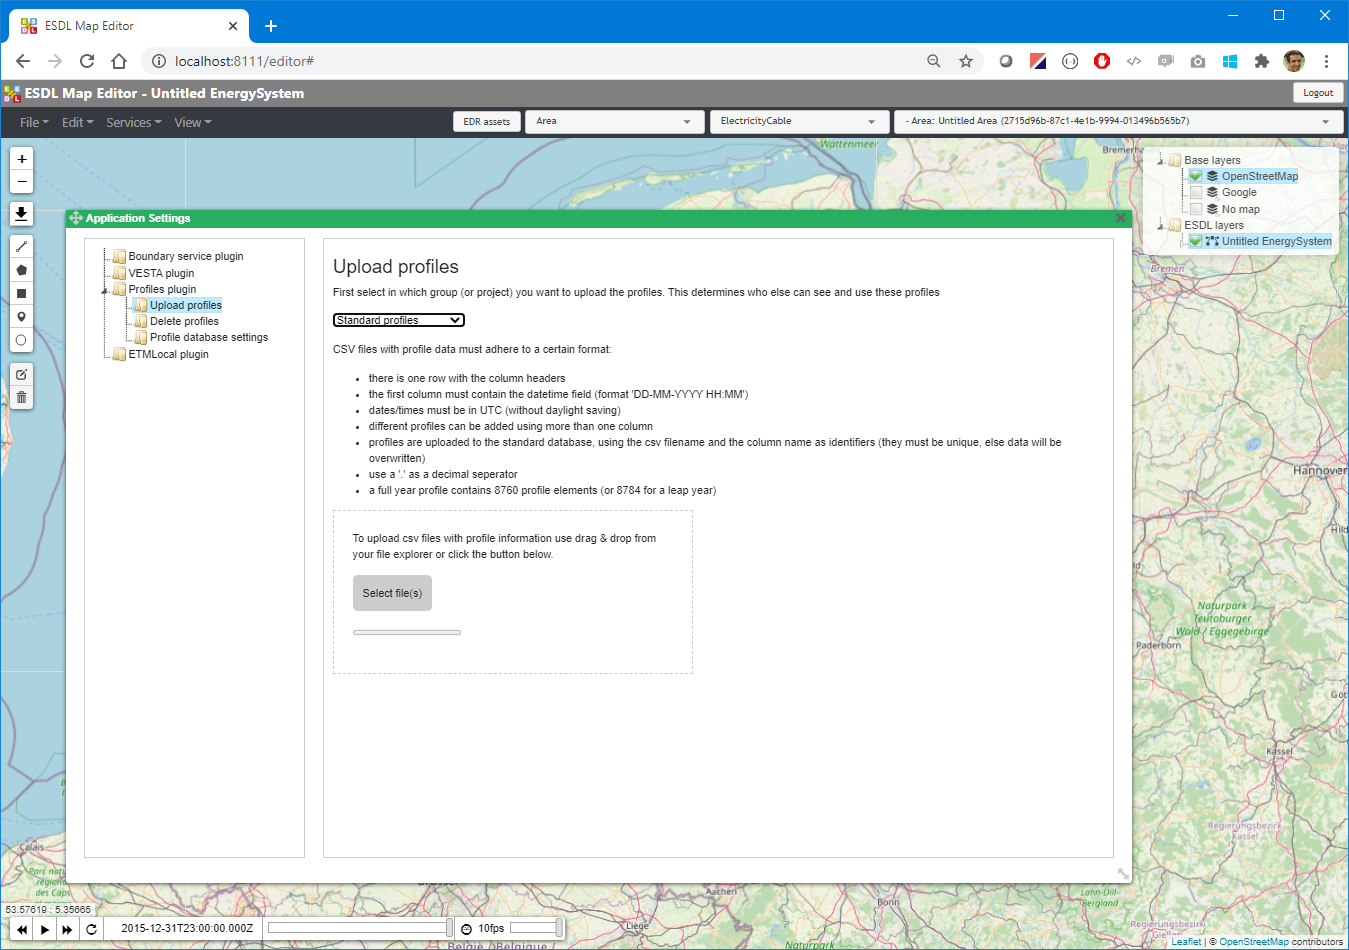

Drag the file .\Data\Profiles\standard_profiles.csv and drop it in the area indicated in the dialog. Depending on your local machine's regional settings (Use '.' or ',' as the decimal seperator) you might need to choose the other csv file in the same directory.

After the uploading is finished, click Profiles plugin in the menu on the left. On the right side a window appears where you can view and edit the settings of the profiles you've just uploaded.

The profiles can now be used in the simulations.
Please go here to find five different tutorials that explain how to work with the ESDL MapEditor and ESSIM
In order to run this software stack in a hosted environment, several services must be offered to the end-user:
- The MapEditor frontend: the main entry point for this software stack for end uses
- The ESSIM dashboard: to show ESSIM simulation results
- Keycloak (Identity & Access Management): to facilitate the login process
- The panel service: to visualize the profile data from within the MapEditor
Optionally the following services can be offered too:
- ESDL drive: although the functionality provided from within the MapEditor is more extensive
In our own hosted environment we use traefik as a reverse proxy in front on the above listed services, for two reasons:
- to terminate SSL traffic
- as a reverse proxy: to route HTTP traffic to the right container
Furthermore we use:
- docker swarm: to create a cluster of several virtual machines
- portainer: for container management
- docker registry: to locally push container images and make deployment in the swarm easier
The four (or five) services listed in the beginning of this chapter must be accessible via seperate domain names (using a local or global DNS server) or seperate IP addresses. As the essim dashboard and the panel service both use grafana as their frontend, they could be treated as the same service if that's desirable. We tried running the services using sub-paths (e.g. https://mycompany.com/mapeditor and https://mycompany.com/essim-dashboard) but we were not very successful to get everything up and running.
The following picture shows how a deployment with a reverse proxy

Required changes:
- In
BaseInfrastructure\docker-compose.yml- Find
GF_SERVER_ROOT_URL: changelocalhostto the domain name for the ESSIM dashboard - Find
GF_AUTH_SIGNOUT_REDIRECT_URL: change two (!) occurences oflocalhostto the domain name for keycloak - Find
GF_AUTH_GENERIC_OAUTH_AUTH_URL: changelocalhostto the domain name for keycloak
- Find
- In
BaseInfrastructure\keycloak\esdl-mapeditor-realm.json(or login to keycloak and change using their web-based management interface)- Replace all occurences of
localhost:portto the respective domain names
- Replace all occurences of
- In
ESDLMapeditor\mapeditor_open_source.env:- Find
PANEL_SERVICE_EXTERNAL_URL: replacelocalhostwith the domain name of the panel service
- Find
- (To be improved) Inside the MapEditor container, find the file
credentials\client_secrets_opensource.json- Replace all occurences of
localhostto the respective domain names (one for the mapeditor and 3 for keycloak)
- Replace all occurences of
| Service | Port | Environment variable |
|---|---|---|
| MapEditor | 8111 | MAPEDITOR_PORT |
| Grafana | 3000 | GRAFANA_PORT |
| Keycloak | 8080 | KEYCLOAK_PORT |
| PGAdmin | 5050 | PGADMIN_PORT |
| Service | Port | Environment variable |
|---|---|---|
| Mongo | 27017 | MONGO_PORT |
| InfluxDB | 8086 | INFLUXDB_PORT |
| PostgresDB | 5432 | POSTGRES_PORT |
| Service | Port | Environment variable |
|---|---|---|
| ESDL Drive | 9080 | - |
| ESDL Drive | 9443 (SSL-port) | - |
| Service | User | Password | Configured in | Comment |
|---|---|---|---|---|
| Keycloak | admin | admin | docker-compose.yml | |
| Grafana | admin | admin | docker-compose.yml | |
| InfluxDB | admin | admin | docker-compose.yml | |
| PostgresDB | postgres | password | docker-compose.yml | |
| PostgresDB | keycloak | password | init-database.sh | |
| PostgresDB | boundary_service | password | init-database.sh | |
| PostgresDB | drive | password | init-database.sh and ESDLDrive/docker-compose.yml | |
| PGAdmin | admin@admin.org | admin | docker-compose.yml |
...
The file .\BaseInfrastructure\postgres\init-databases.sh contains the initialization script for the postgres database.
ESDL Drive exists of 3 components: ESDL Drive (API), CDO-Server (ESDL -> Relational database mapper) and Postgres (Database).
ESDL Drive uses the Postgres database for storage of ESDL files. CDO-Server must be configured with the correct credentials to connect to Postgres database from the base infrastructure. This can be done in the docker-compose.yml of ESDLDrive. The database and 'drive' account are created in the init-databases.sh script
ESDL Drive (API) is secured by KeyCloak and needs some configuration, among others the URL of the ESDL-Mapeditor realm (both internal as external accessible by the browser). This is configuration is defined in ESDLDrive/docker-compose.yml. Environment variables defined in the YML file are used in server.xml which configures the Open Liberty server that is packaged in the container in /servers/hub.
ESDL Drive also needs the public key of the ESDL-Mapeditor realm, to verify the JWT tokens from Keycloak. For this setup the public key is already added in the public.p12 keystore, but if it is changed, edit the file in /server/hub/resources/security/public.p12 with the Java keytool.
=======
As ESDL is being updated frequently to support more use cases, the database schema of the ESDL Drive needs to be updated accordingly. This is currently a manual process. See the Data migration explanation for more information.
Users/Password/Database
MapEditor and ESSIM are distributed under the Apache 2.0 License.