给勺子教程-如何根据上网地理位置重新定向到不同最近的区域站点
引言:看过无数个不能用的鸡汤DEMO代码之后,我决定去打造一把能喝上汤的勺子。。。😭
Giving Spoon Tutorial - How to redirect to different nearest regional sites according to the geographic location of the Internet
一、业务需求:
1)美国的用户原来需要输入 https://us.haier.com 或者 https://www.haier.com/us
2)现在全球用户只需要用 https://www.haier.com 就可以自动转向当地的HAIER网站
3)以此类推,不但能够兼容美国的自动跳转,还能兼容欧洲、亚洲等多个大洲的自动跳转,提供自定制能力
4)最后能提供99%完成度的代码和教程,不想再费脑,一步操作搞定最佳
二、解决方案:
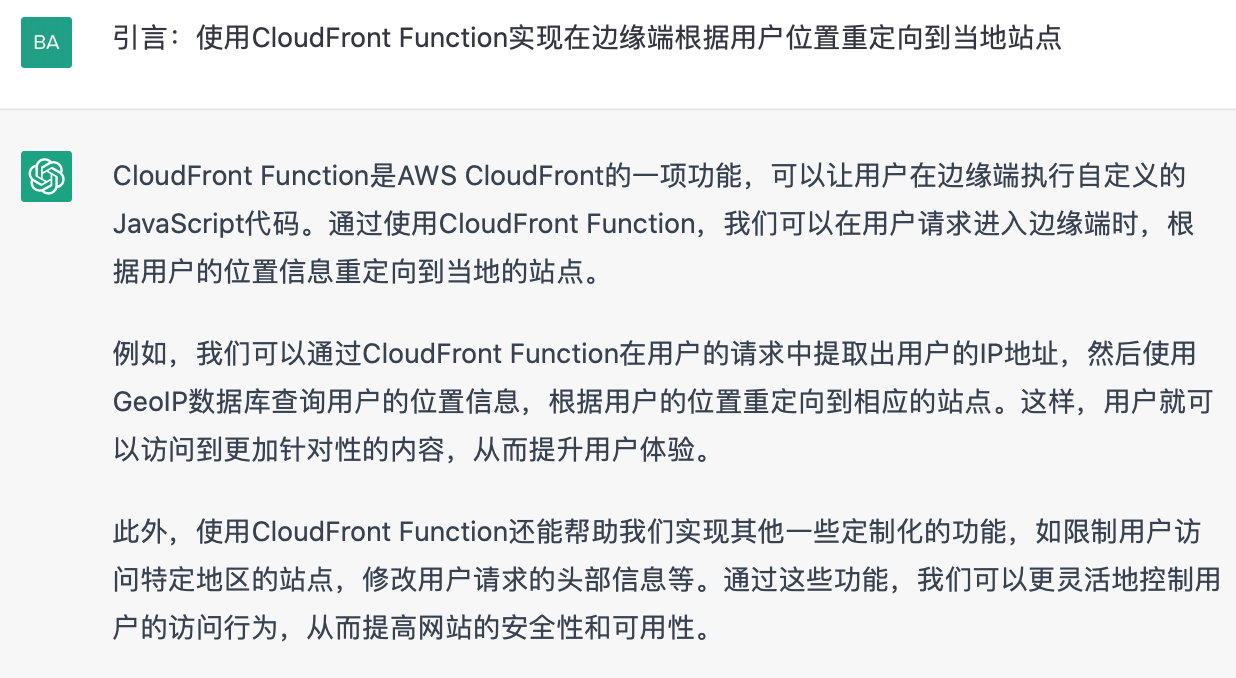
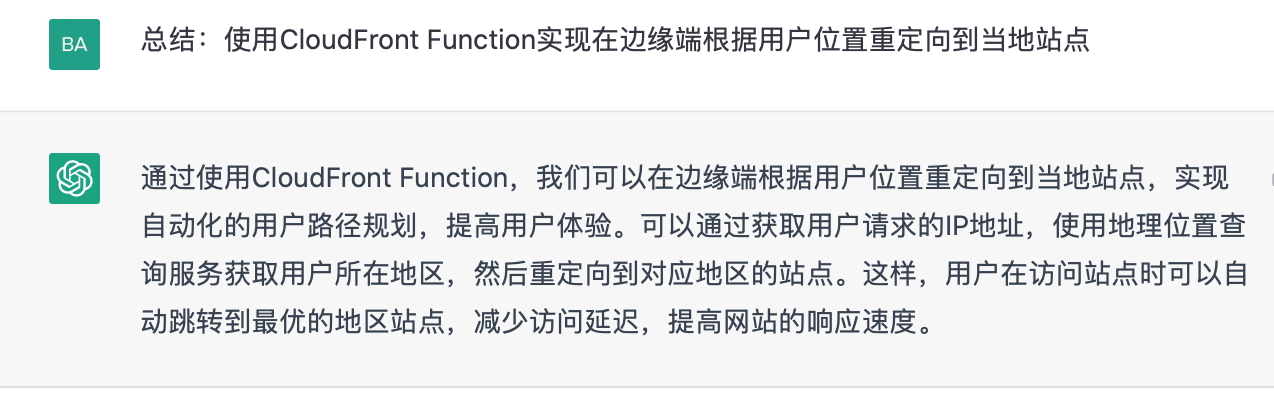
1)使用CloudFront Function,实现在边缘端根据用户位置重定向到当地站点 — CF重定向函数
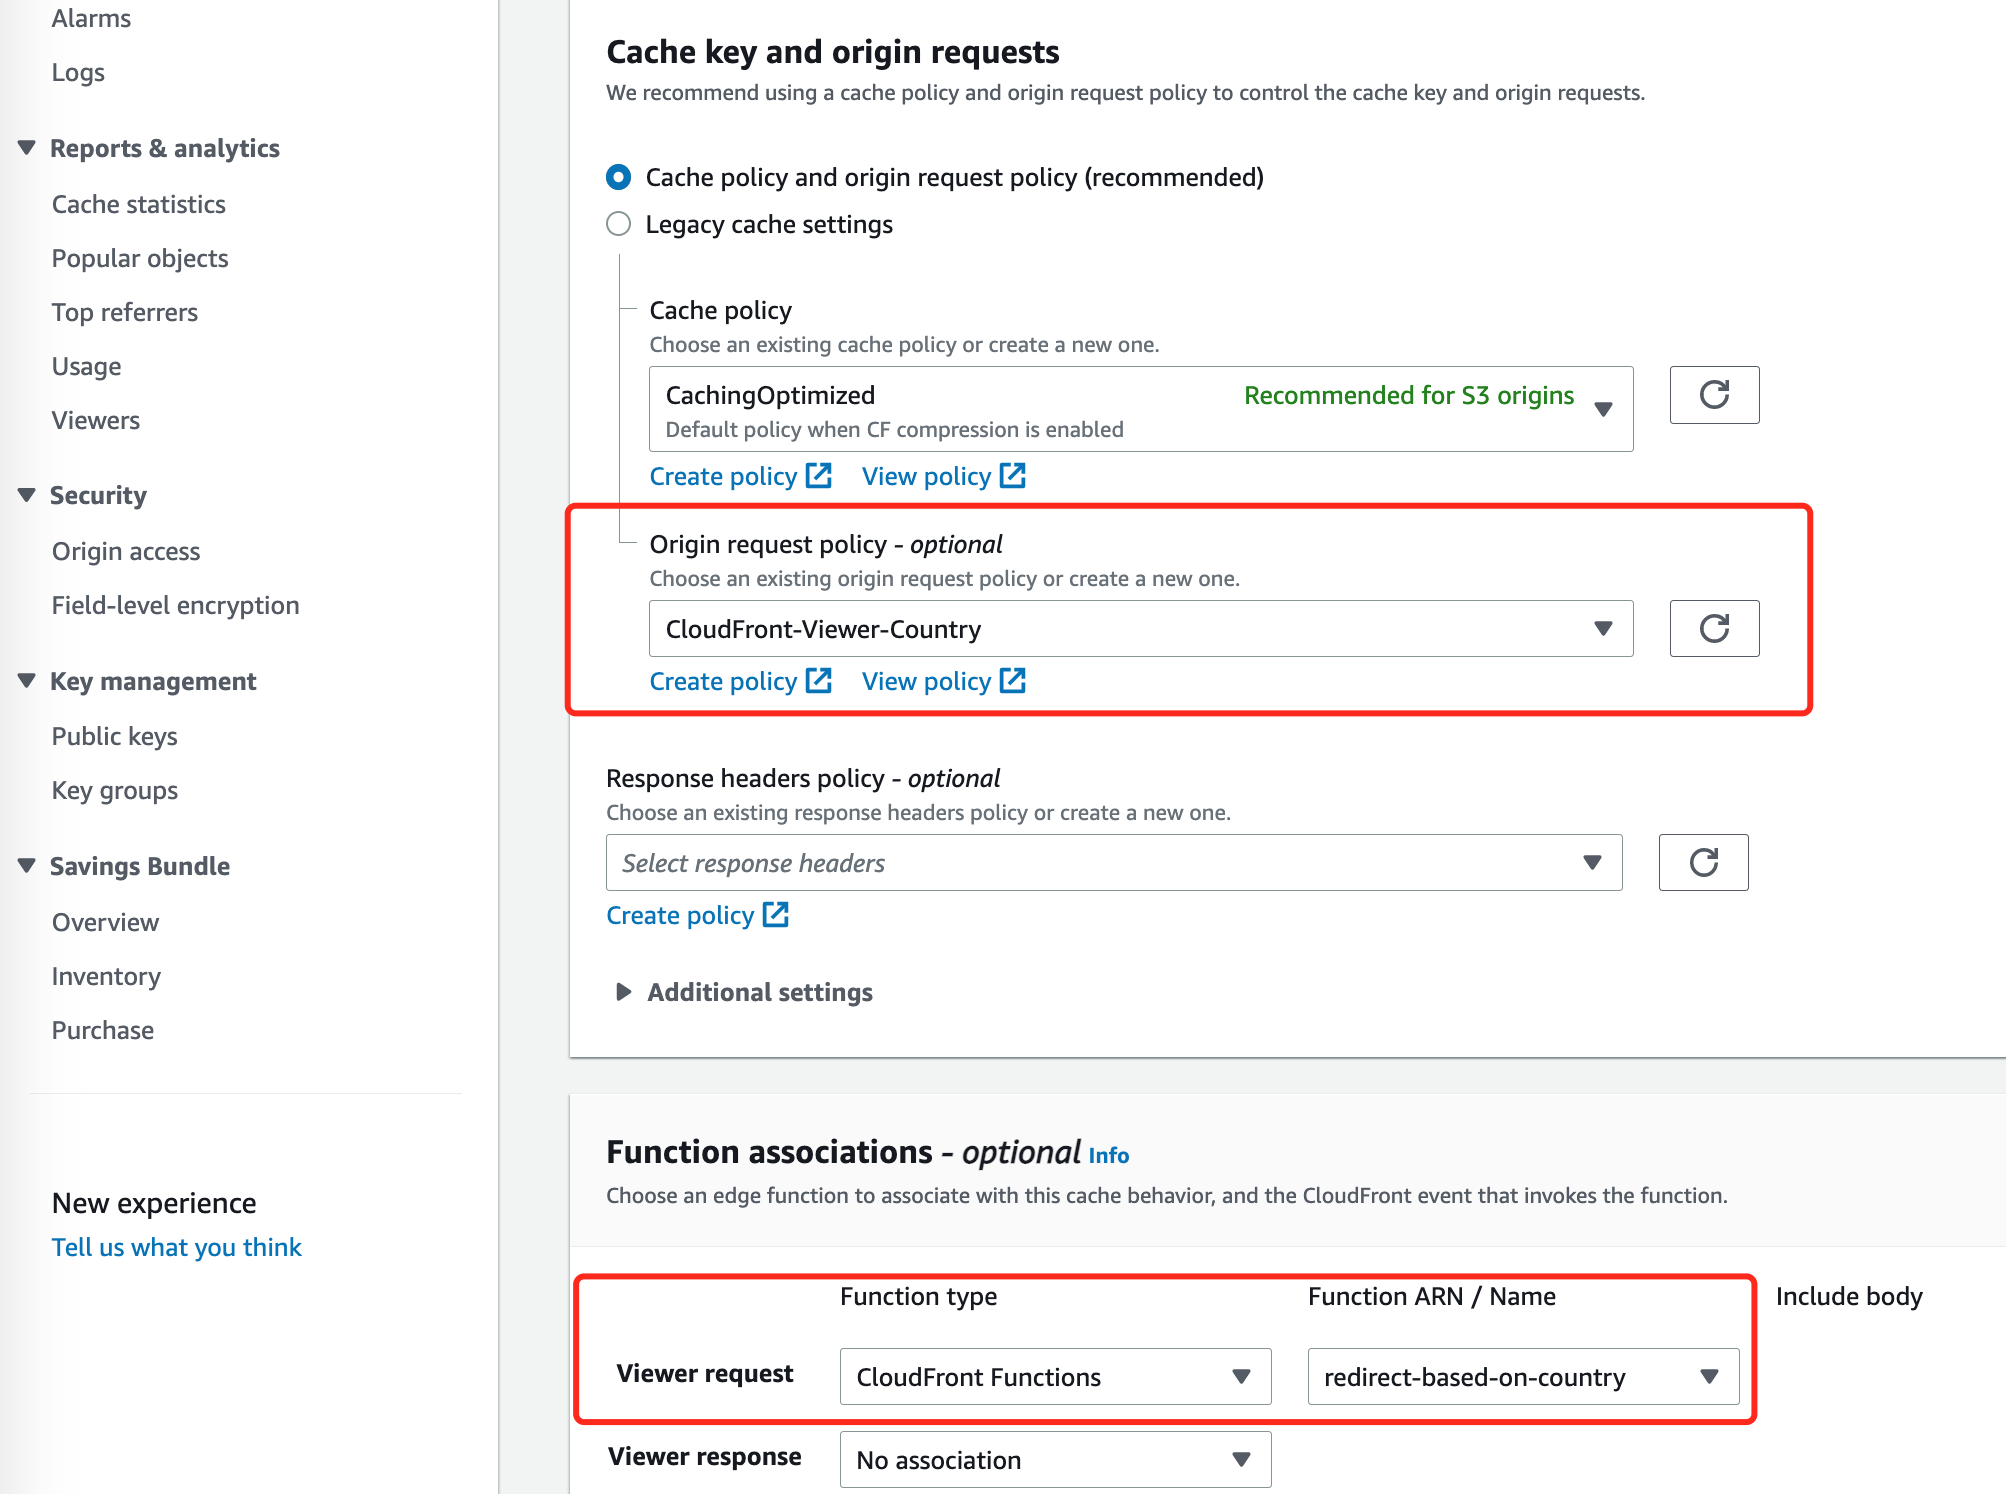
2)使用CloudFront Function,实现在边缘端根据用户位置重定向到当地站点 — CF配置标头和函数关联
三、方案展示:
经过CloudFront缓存后的DEMO站点,域名目录为: https://cf.qdsurf.com/ or https://cf.qdsurf.com/index.html
展示效果:
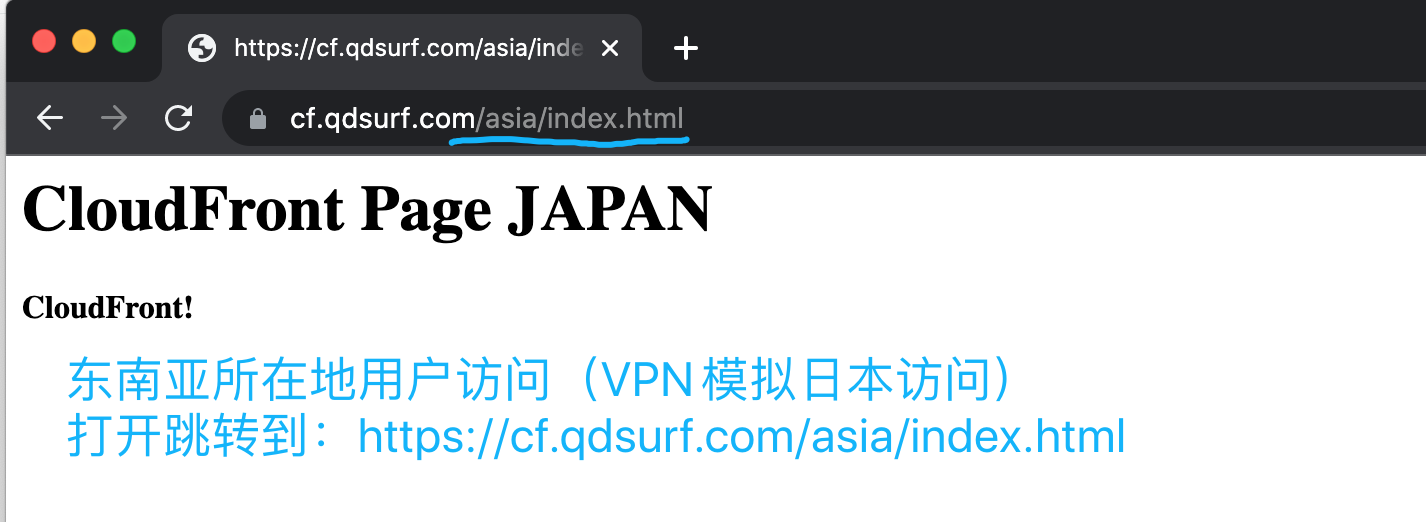
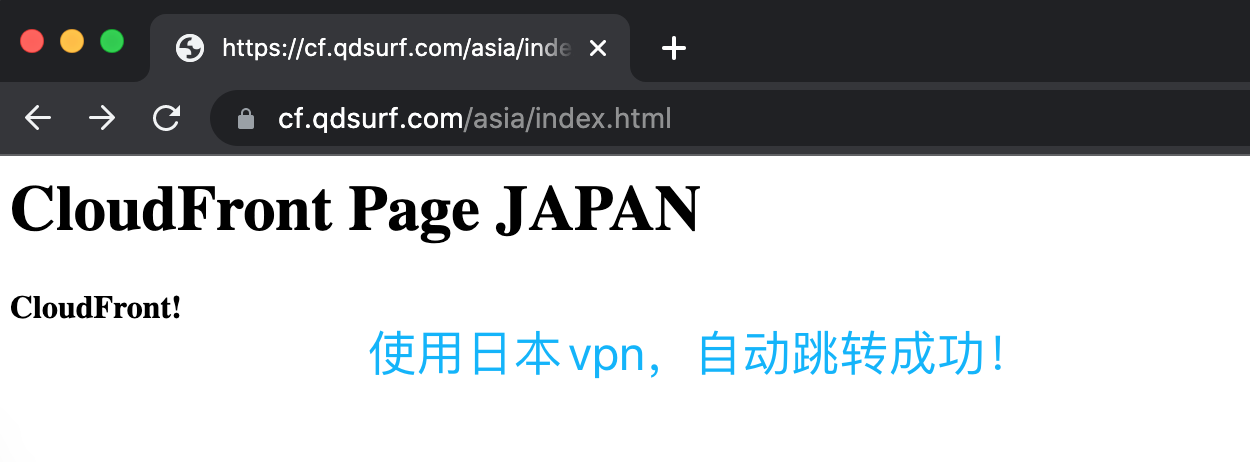
1)东南亚所在地用户访问(VPN模拟日本访问)打开跳转到:https://cf.qdsurf.com/asia/index.html
2)欧洲所在地用户访问(VPN模拟德国访问)打开跳转到:https://cf.qdsurf.com/eu/index.html
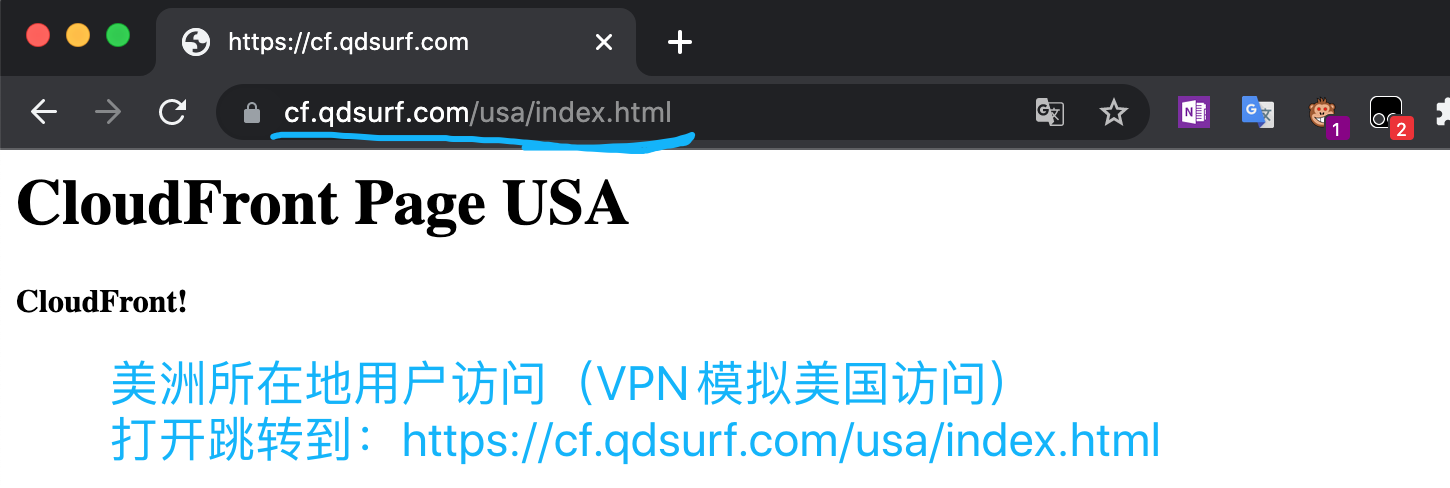
3)美洲所在地用户访问(VPN模拟美国访问)打开跳转到:https://cf.qdsurf.com/usa/index.html
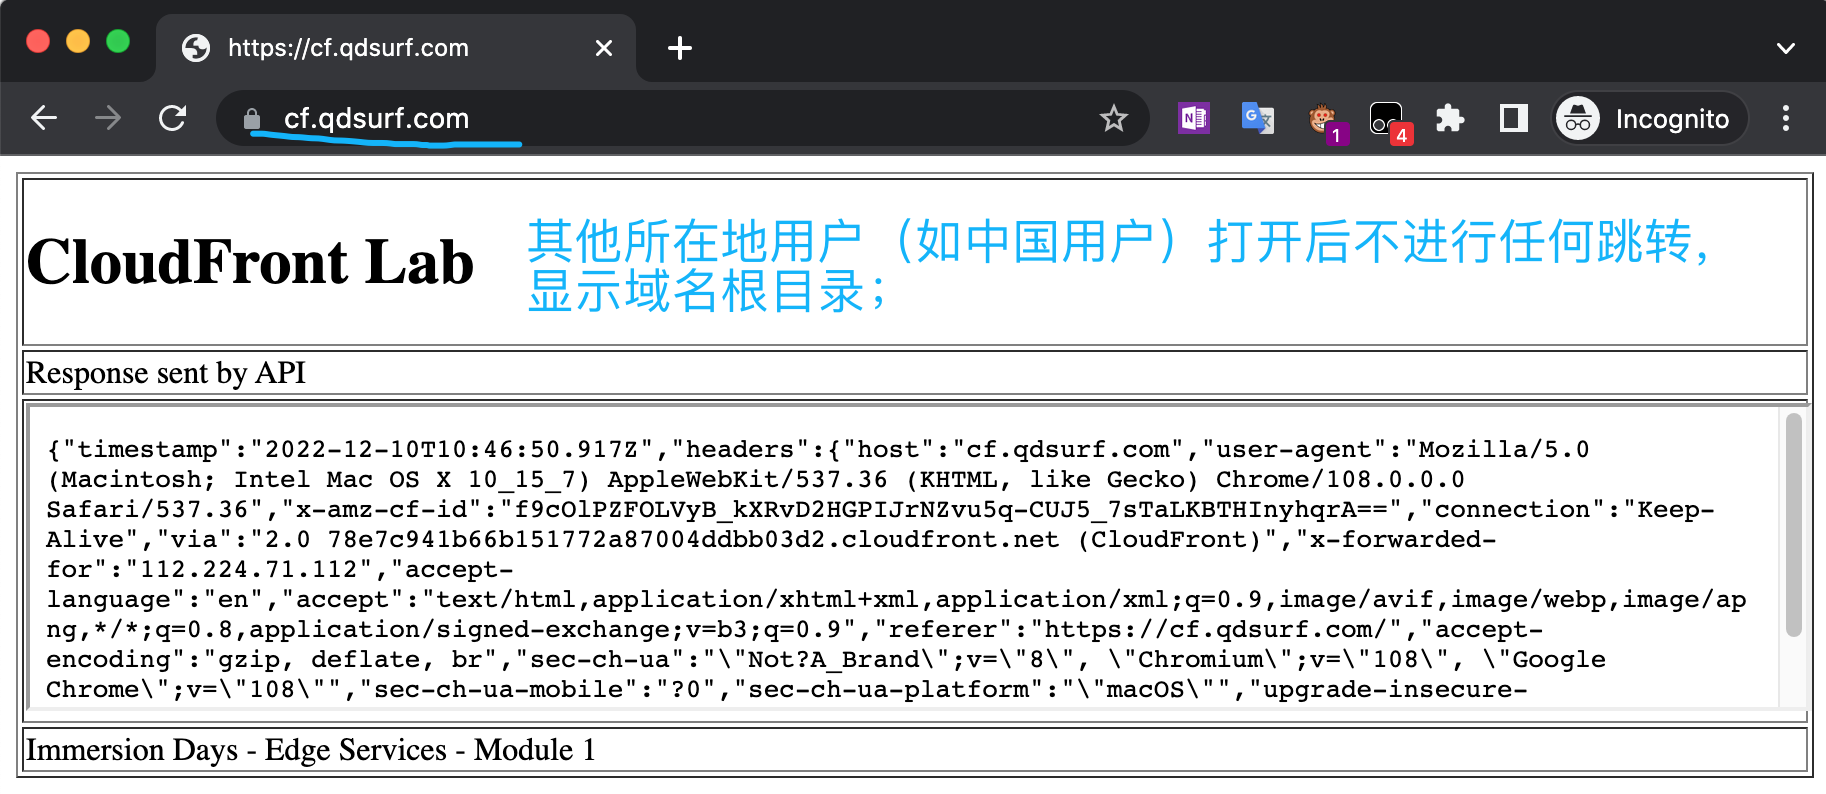
4)其他所在地用户(如**用户)打开后不进行任何跳转,显示域名根目录;
5)任何所在地的用户都可以直接访问其他任何子目录,不进行跳转,访问固定页面不受影响;
四、搭建实施全步骤教程
本教程的重点是CloudFront Function,缺省认为你应该懂怎么用S3快速新建静态的website,并开启CloudFront Distributions来启动CDN加速,另外如何用R53把域名挂到CloudFront Distributions也操作娴熟。。。这些如果都很清楚请跳过第一步;
1. 新建一个WebSite,使用Cloudfront加速,并挂载上一个域名
新建一个WebSite,使用Cloudfront加速,并挂载上一个域名,其实这个配置过程讲一遍很费时,
建议采用此方法来搭建:
1)使用AWS Workshop - Accelerate your content using Amazon CloudFront https://catalog.us-east-1.prod.workshops.aws/workshops/9331108e-464e-4699-8a9c-486090105878/en-US/10-create-ec2-and-s3-origins 来完成新建一个WebSite,使用Cloudfront加速的步骤;
2)使用AWS 官方文档 - 使用域名将流量路由到 Amazon CloudFront 分配 https://docs.aws.amazon.com/zh_cn/Route53/latest/DeveloperGuide/routing-to-cloudfront-distribution.html,完成域名挂载。 请注意选择 Alias to CloudFront distributions(CloudFront 分配的别名);
3)验证可用工作正常后,准备环境工作完成;
2. 准备HTML静态页面,用于CloudFront Function的跳转
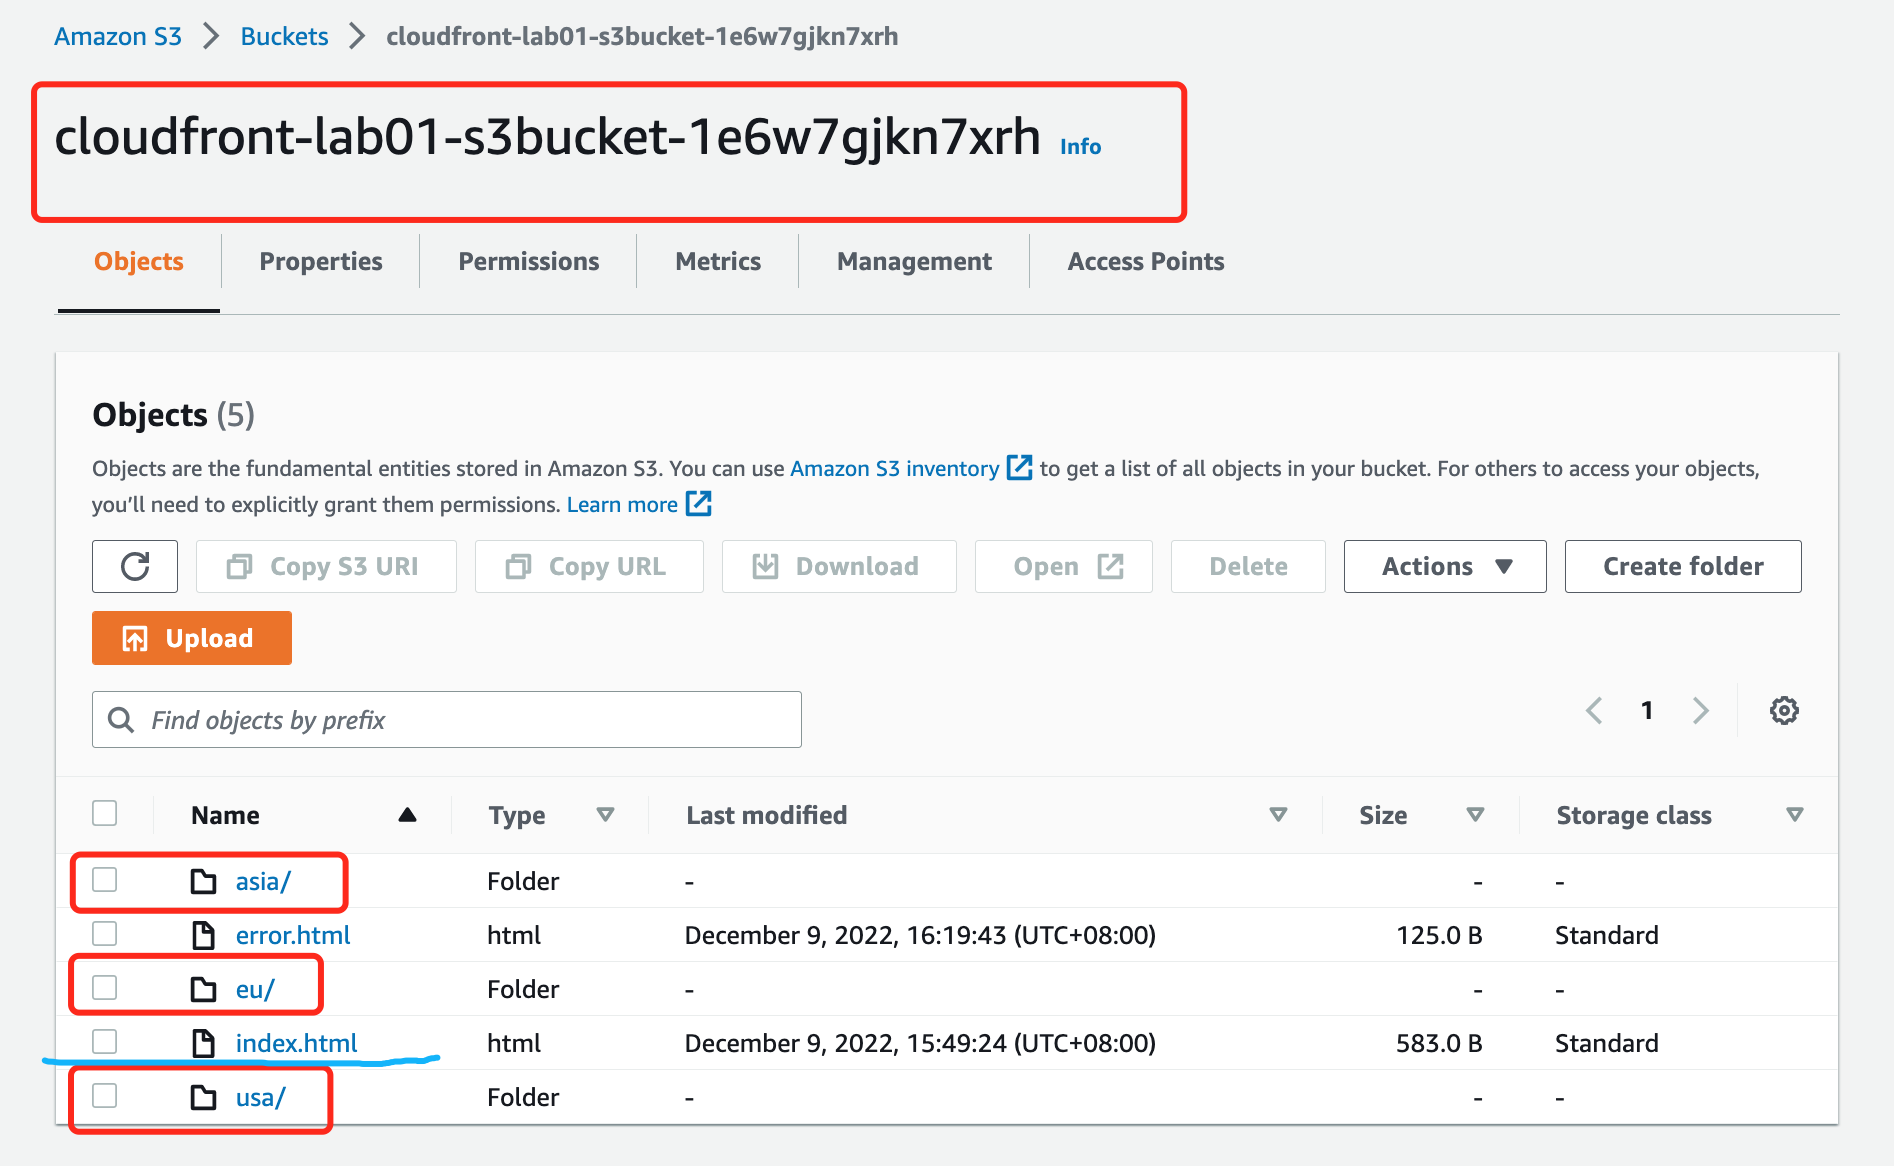
html静态页面在github子目录《cloudfront-lab01-s3bucket-xxxxxx》下面,请下载后,并放入第一步AWS Workshop创建的S3 Bucket(后者你自己创新一个新的S3 Bucket并自行完成第一步的配置),完成后效果如下:
3. 创建并测试CloudFront Function
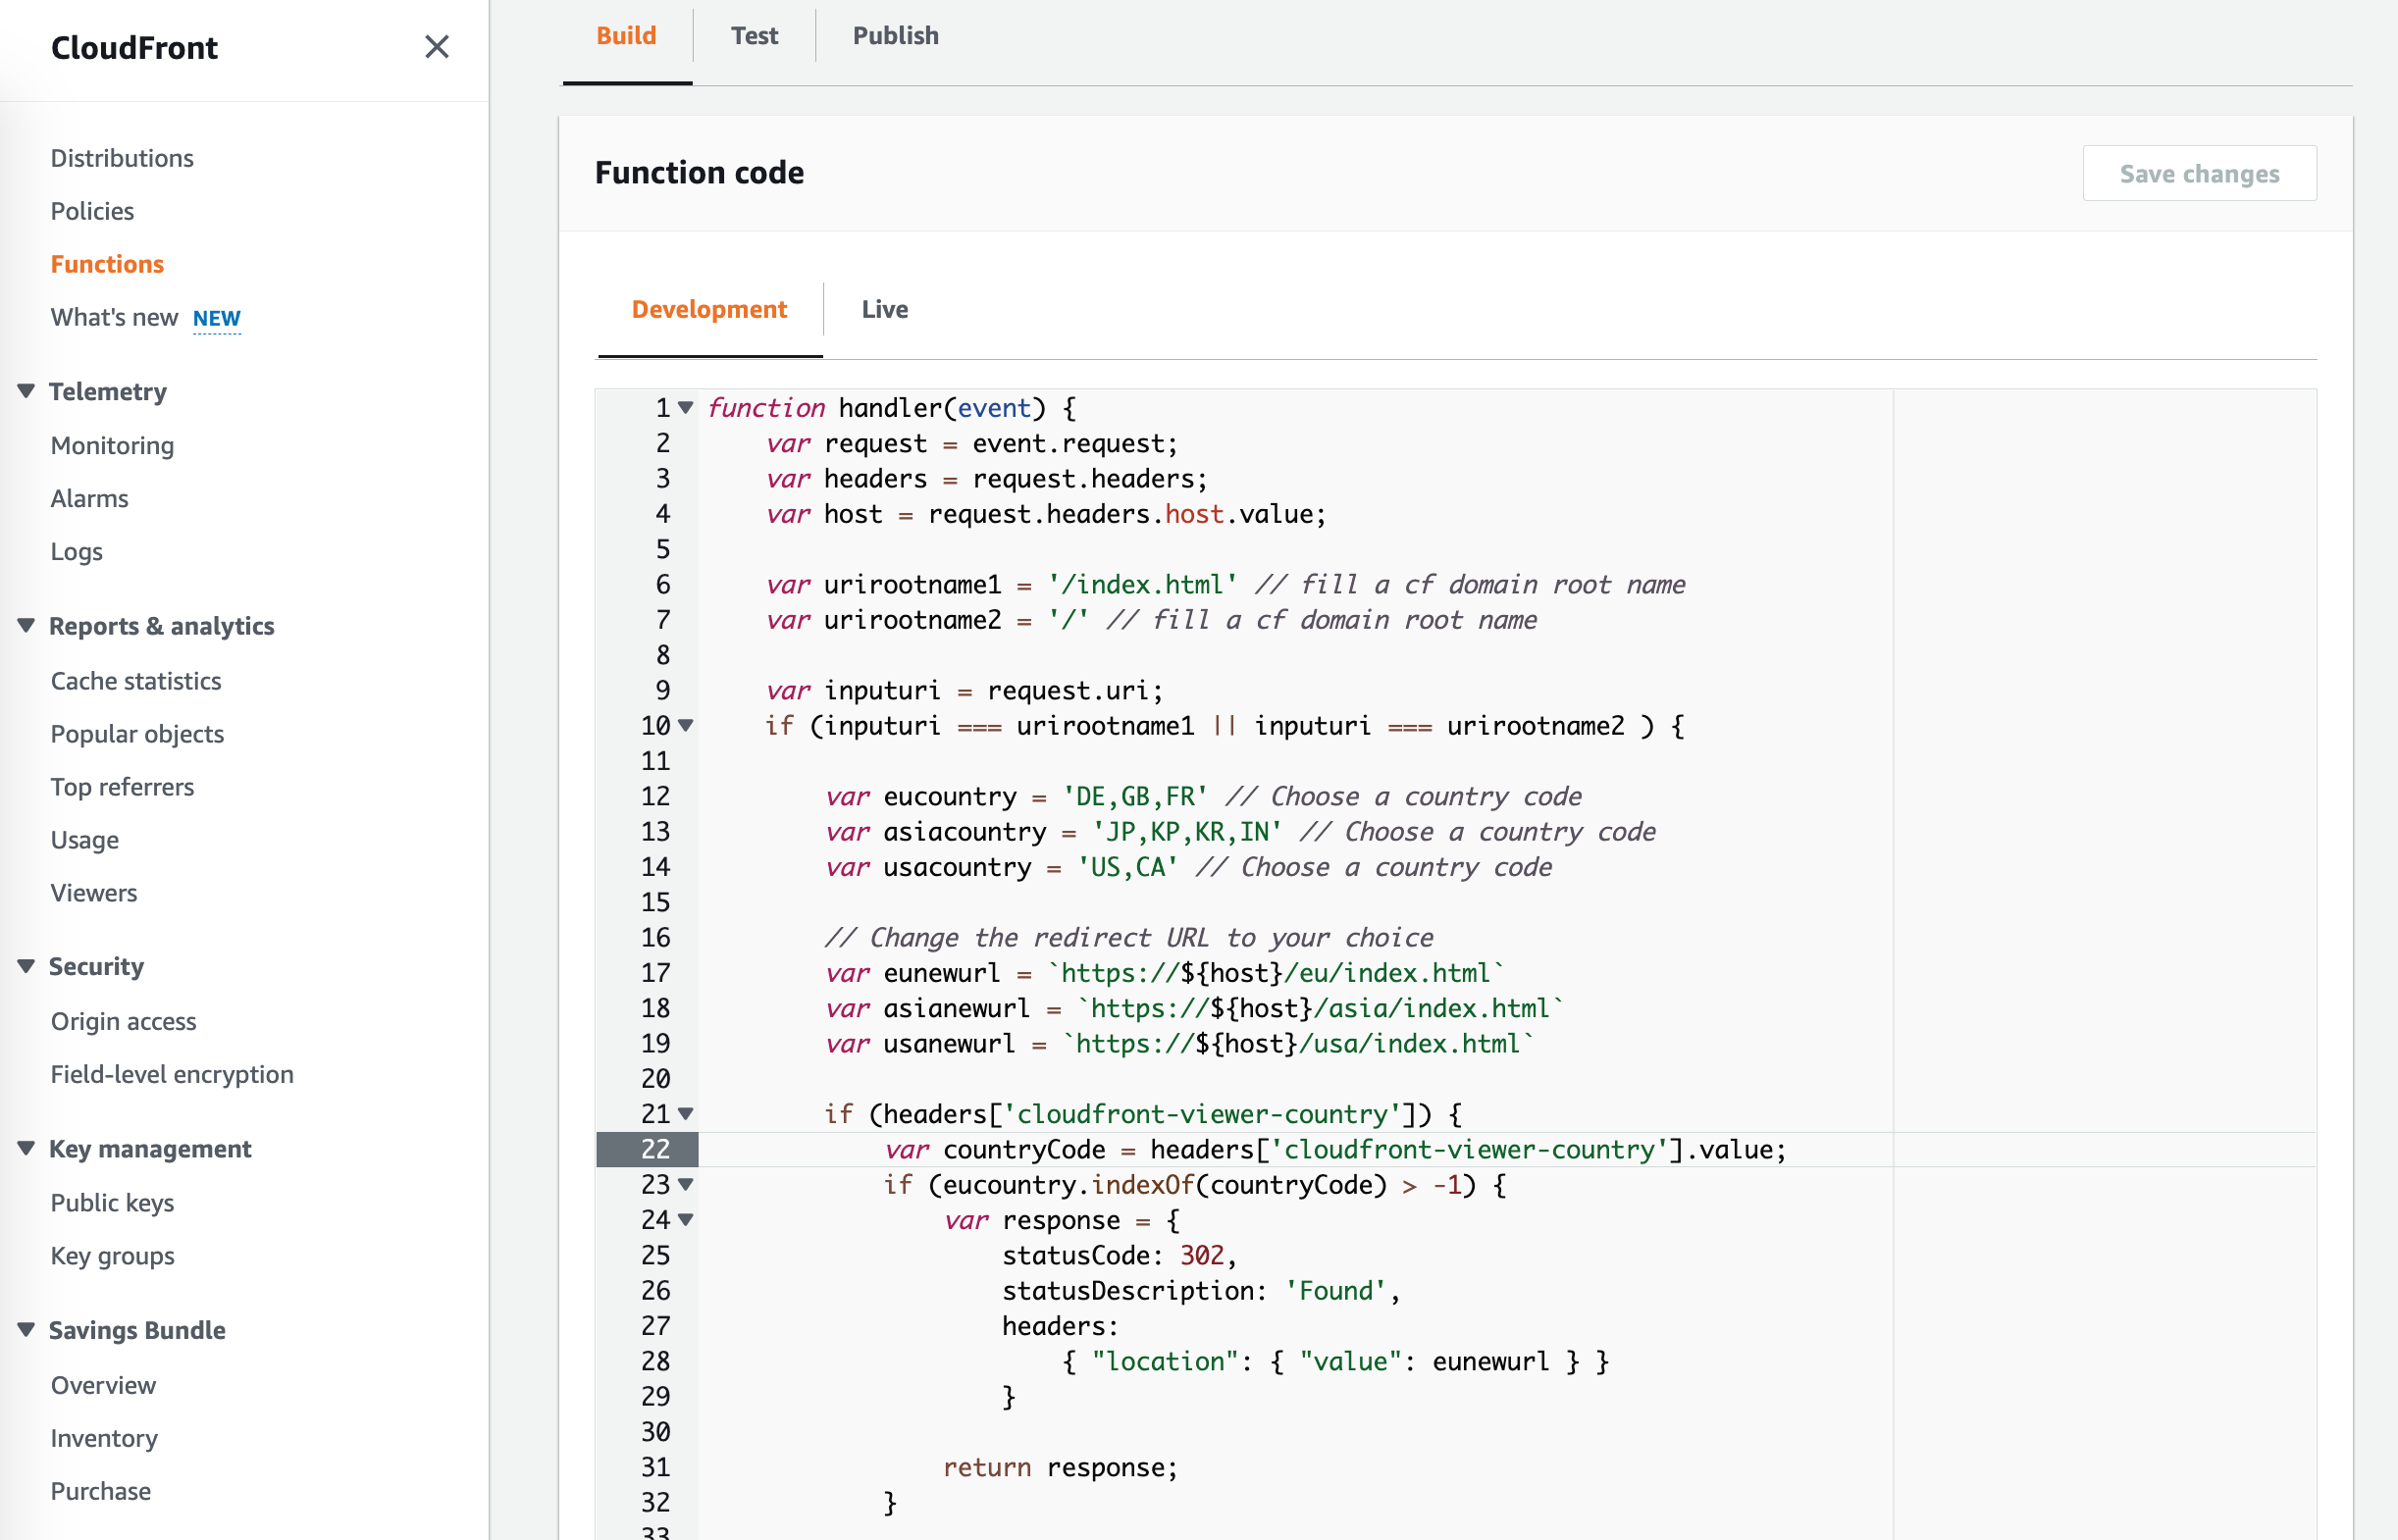
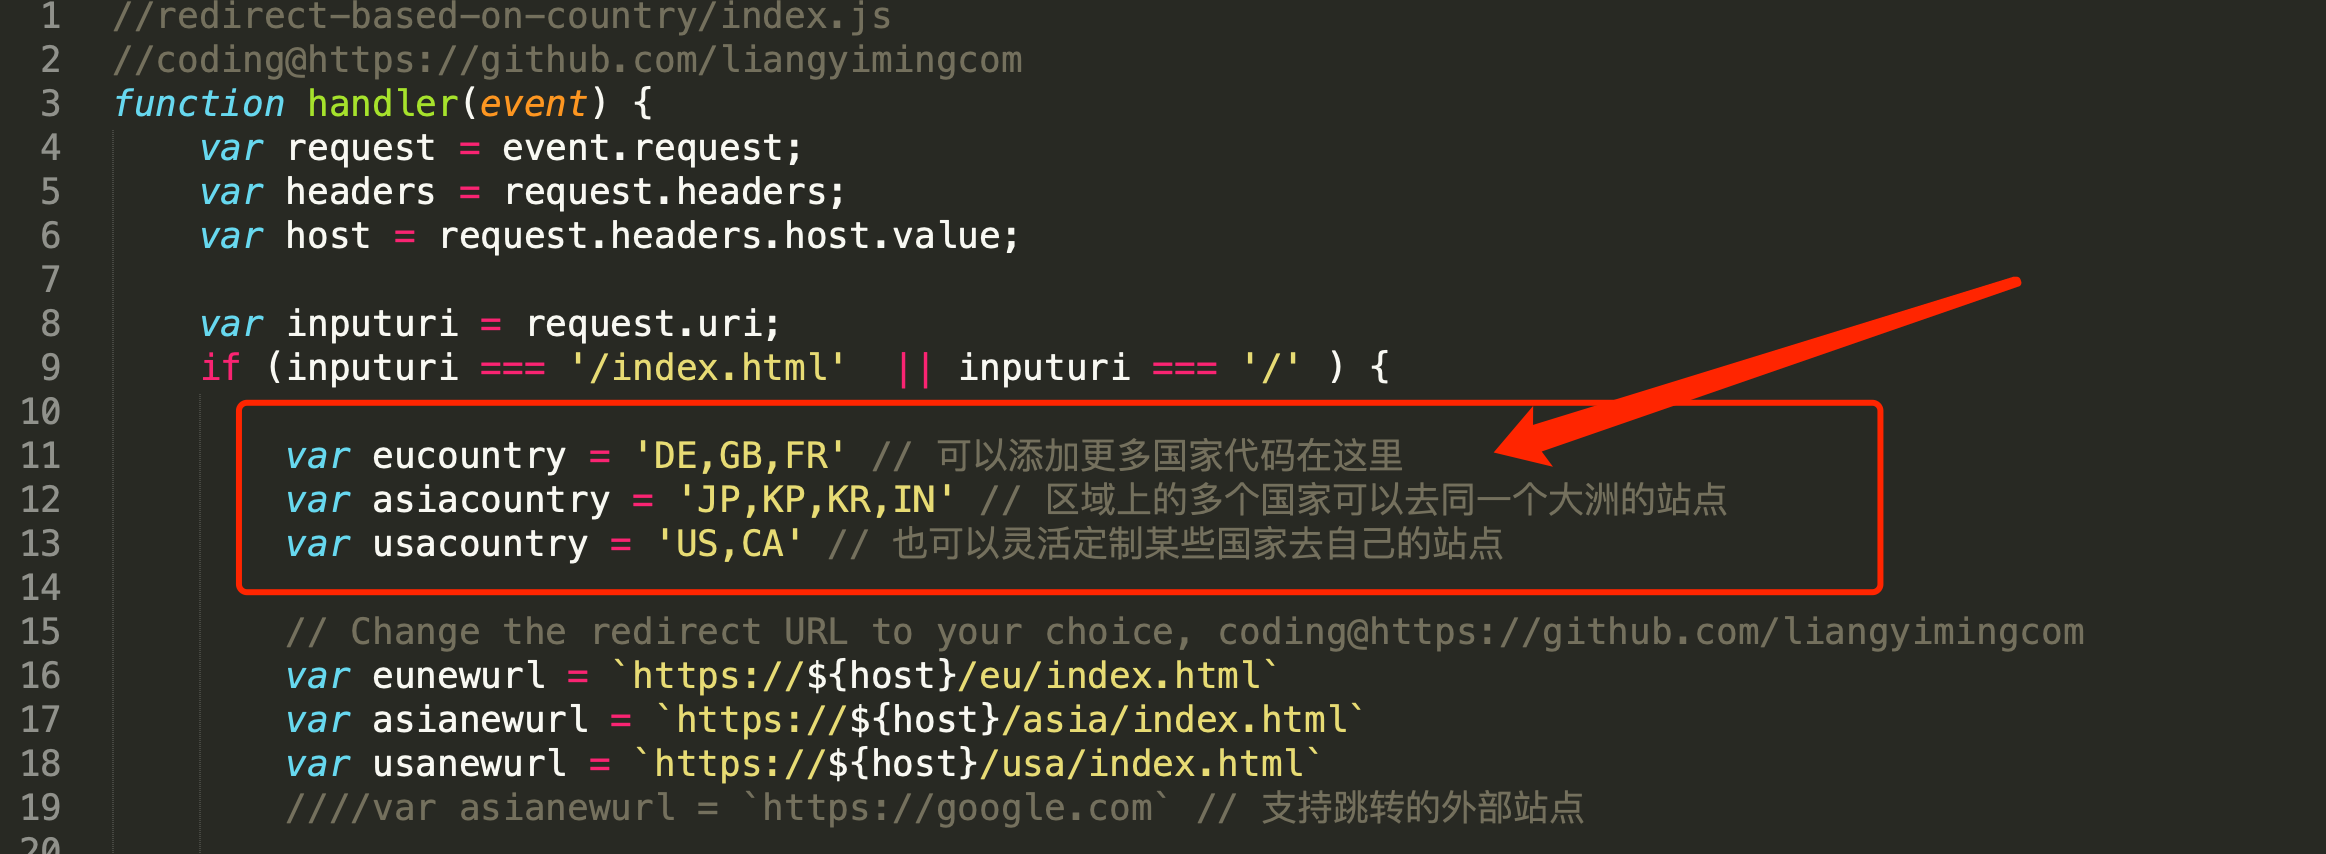
使用CloudFront Function,实现在边缘端根据用户位置重定向到当地站点 — CF重定向函数的核心代码:
//redirect-based-on-country/index.js
function handler(event) {
    var request = event.request;
    var headers = request.headers;
    var host = request.headers.host.value;

    var inputuri = request.uri;
    if (inputuri === '/index.html'  || inputuri === '/' ) {

        var eucountry = 'DE,GB,FR' // 可以添加更多国家代码在这里
        var asiacountry = 'JP,KP,KR,IN' // 区域上的多个国家可以去同一个大洲的站点
        var usacountry = 'US,CA' // 也可以灵活定制某些国家去自己的站点

        // Change the redirect URL to your choice, coding@https://github.com/liangyimingcom
        var eunewurl = `https://${host}/eu/index.html`
        var asianewurl = `https://${host}/asia/index.html`
        var usanewurl = `https://${host}/usa/index.html`
        ////var asianewurl = `https://google.com` // 支持跳转的外部站点

        if (headers['cloudfront-viewer-country']) {
            var countryCode = headers['cloudfront-viewer-country'].value;
            if (eucountry.indexOf(countryCode) > -1) {
                var response = {
                    statusCode: 302,
                    statusDescription: 'Found',
                    headers:
                        { "location": { "value": eunewurl } }
                    }
                return response;
            }

            if (asiacountry.indexOf(countryCode) > -1) {
                var response = {
                    statusCode: 302,
                    statusDescription: 'Found',
                    headers:
                        { "location": { "value": asianewurl } }
                    }
                return response;
            }

            if (usacountry.indexOf(countryCode) > -1) {
                var response = {
                    statusCode: 302,
                    statusDescription: 'Found',
                    headers:
                        { "location": { "value": usanewurl } }
                    }
                return response;
            }
        }
    }
    return request;
}
1)js代码在github子目录《redirect-based-on-country》下面,请下载后,进入命令行模式,在上一级目录里面运行后续的命令行;
2)命令行创建CloudFront Function,名字为《redirect-based-on-country》,成功后能够看到获得一个ETag名称,请记录给下一步使用。提示:aws命令行需要提前安装并配置AWS CLI;
aws cloudfront create-function \
--name redirect-based-on-country \
--function-config Comment="Function to redirect-based-on-country codingby@https://github.com/liangyimingcom",Runtime=cloudfront-js-1.0 \
--function-code fileb://redirect-based-on-country/index.js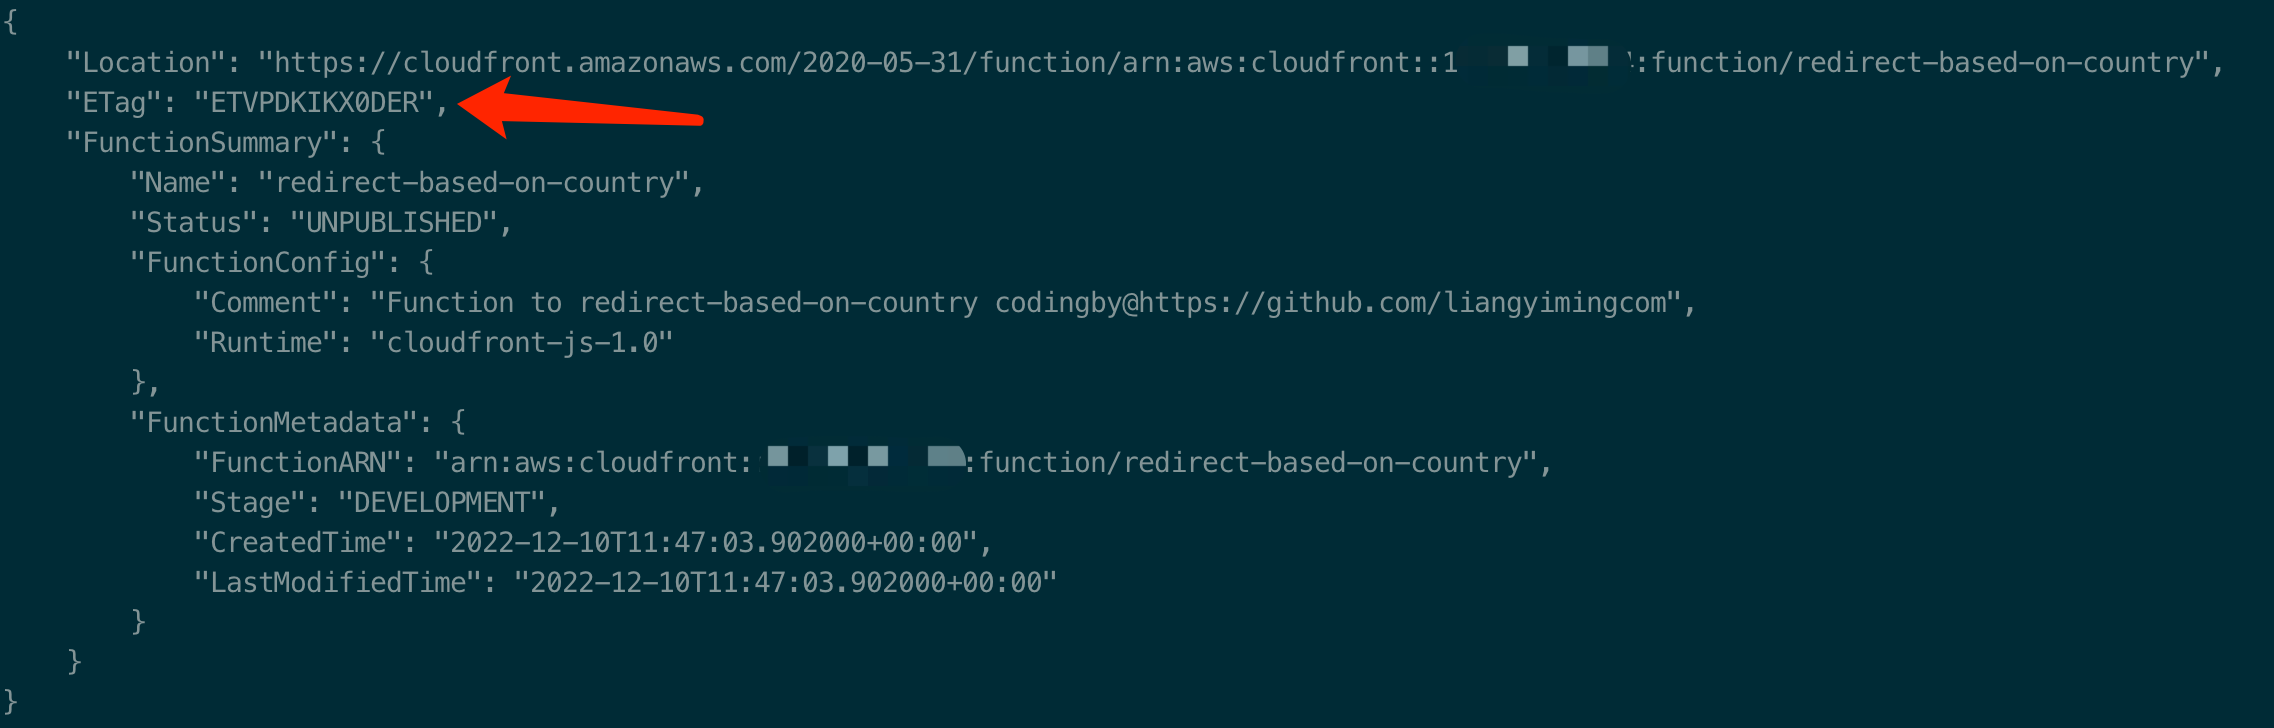
3)命令行测试CloudFront Function。此命令行直接测试cf跳转函数是否能够正常工作,debug代码非常便利。如果运行成功,你可以看到返回结果已经跳转成功到usa子目录。
aws cloudfront test-function \
--name redirect-based-on-country \
--if-match ETVPDKIKX0DER \
--event-object fileb://redirect-based-on-country/test-objects/country-usa.json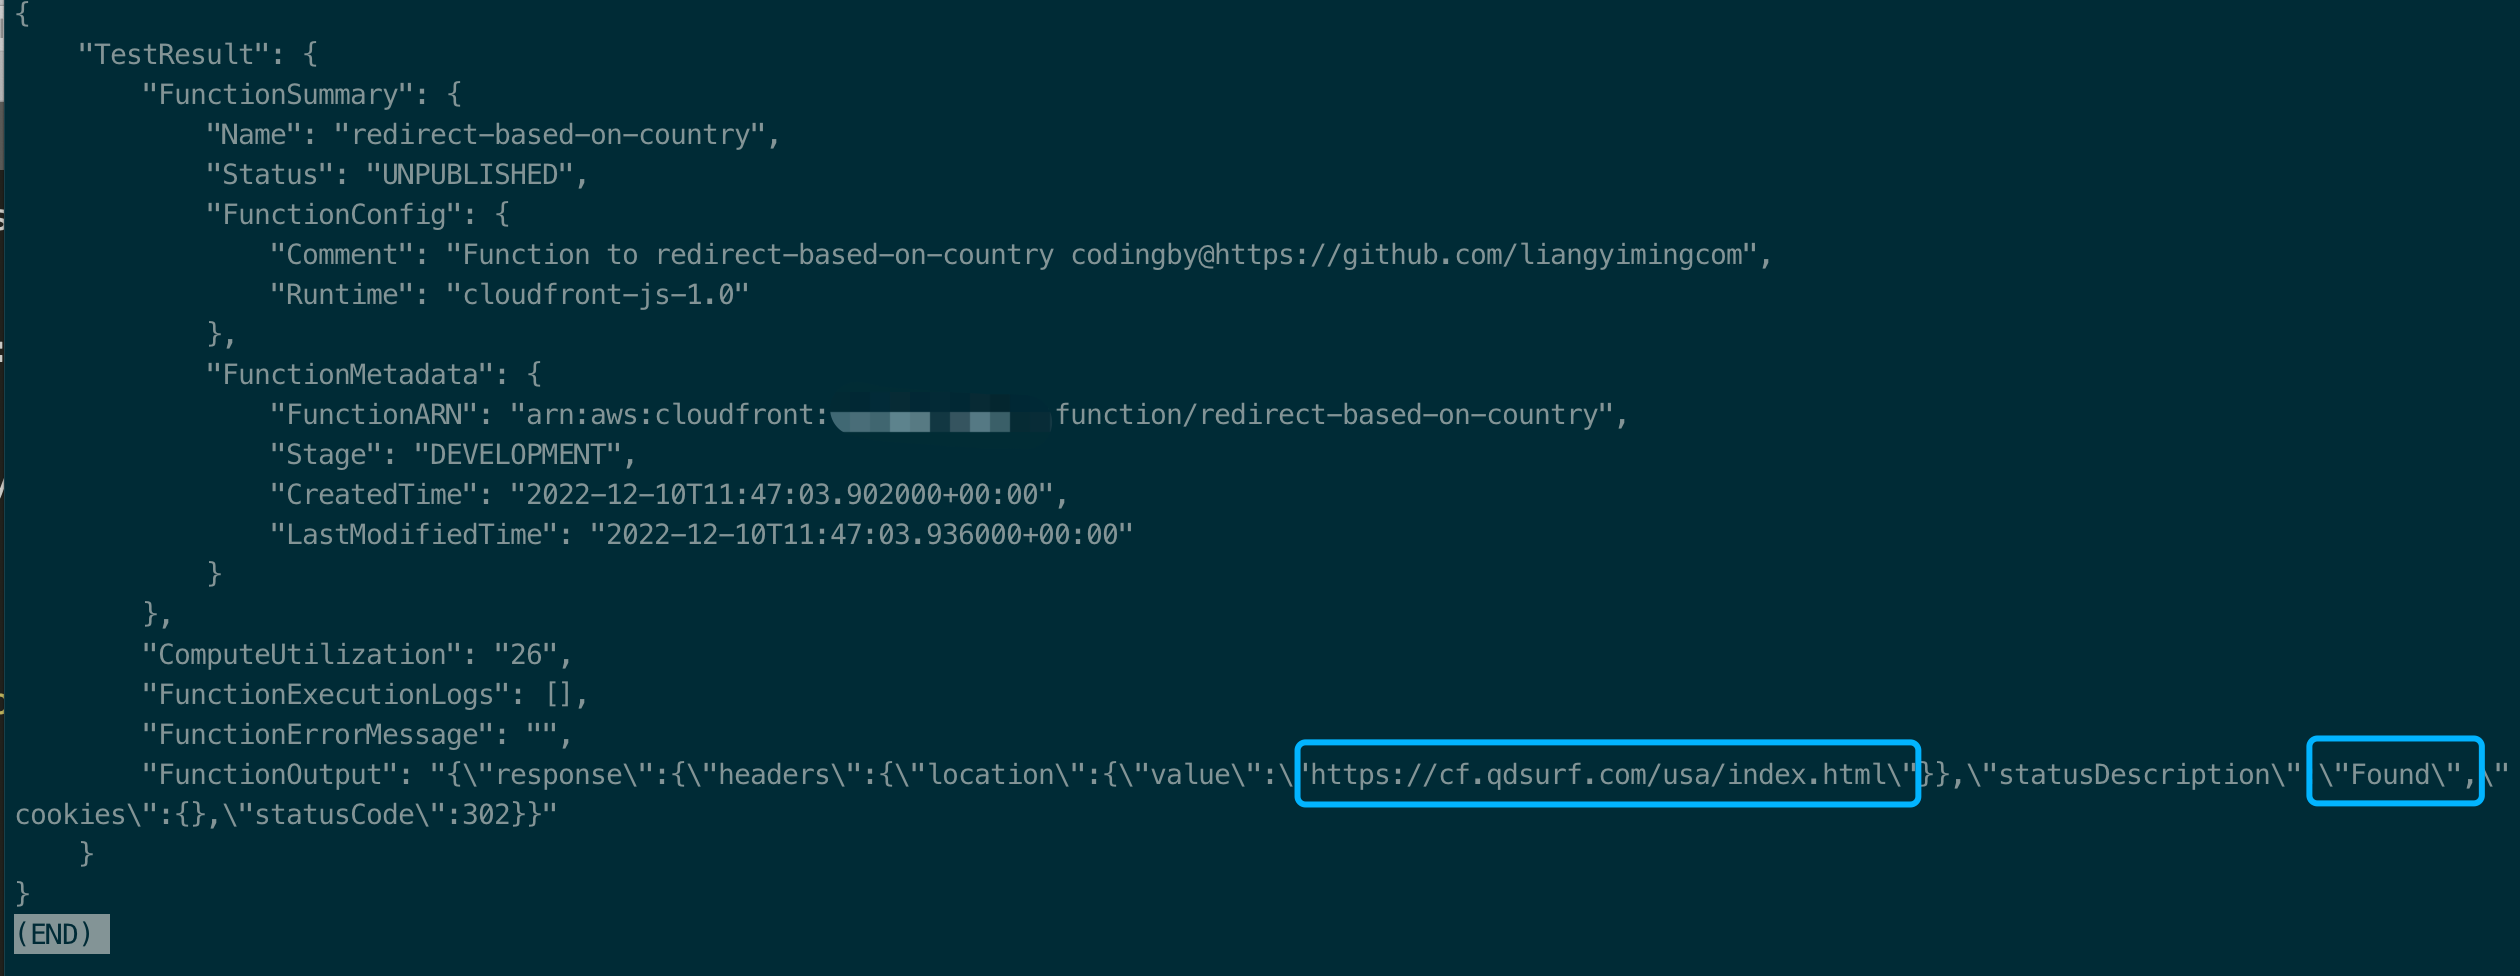
分析一下country-usa.json,重点属性为: "cloudfront-viewer-country": { "value": "US" }
{
    "version": "1.0",
    "context": {
        "eventType": "viewer-request"
    },
    "viewer": {
        "ip": "0.0.0.0"
    },
    "request": {
        "method": "GET",
        "uri": "/index.html",
        "querystring": {
            "test": { "value": "true" },
            "arg": { "value": "val1", "multivalue": [ { "value": "val1" }, { "value": "val2" } ] }
        },
        "headers": {
            "host": { "value": "cf.qdsurf.com" },
            "accept": { "value": "text/html", "multivalue": [ { "value": "text/html" }, { "value": "application/xhtml+xml" } ] },
            "cloudfront-viewer-country": { "value": "US" }
        },
        "cookies": {
            "id": { "value": "CookeIdValue" },
            "loggedIn": { "value": "false" }
        }
    }
}
4)继续命令行测试CloudFront Function。如果运行成功,你可以看到返回结果没有做任何跳转工作,访问的是用户输入地址。
aws cloudfront test-function \
--name redirect-based-on-country \
--if-match ETVPDKIKX0DER \
--event-object fileb://redirect-based-on-country/test-objects/country-not-usa.json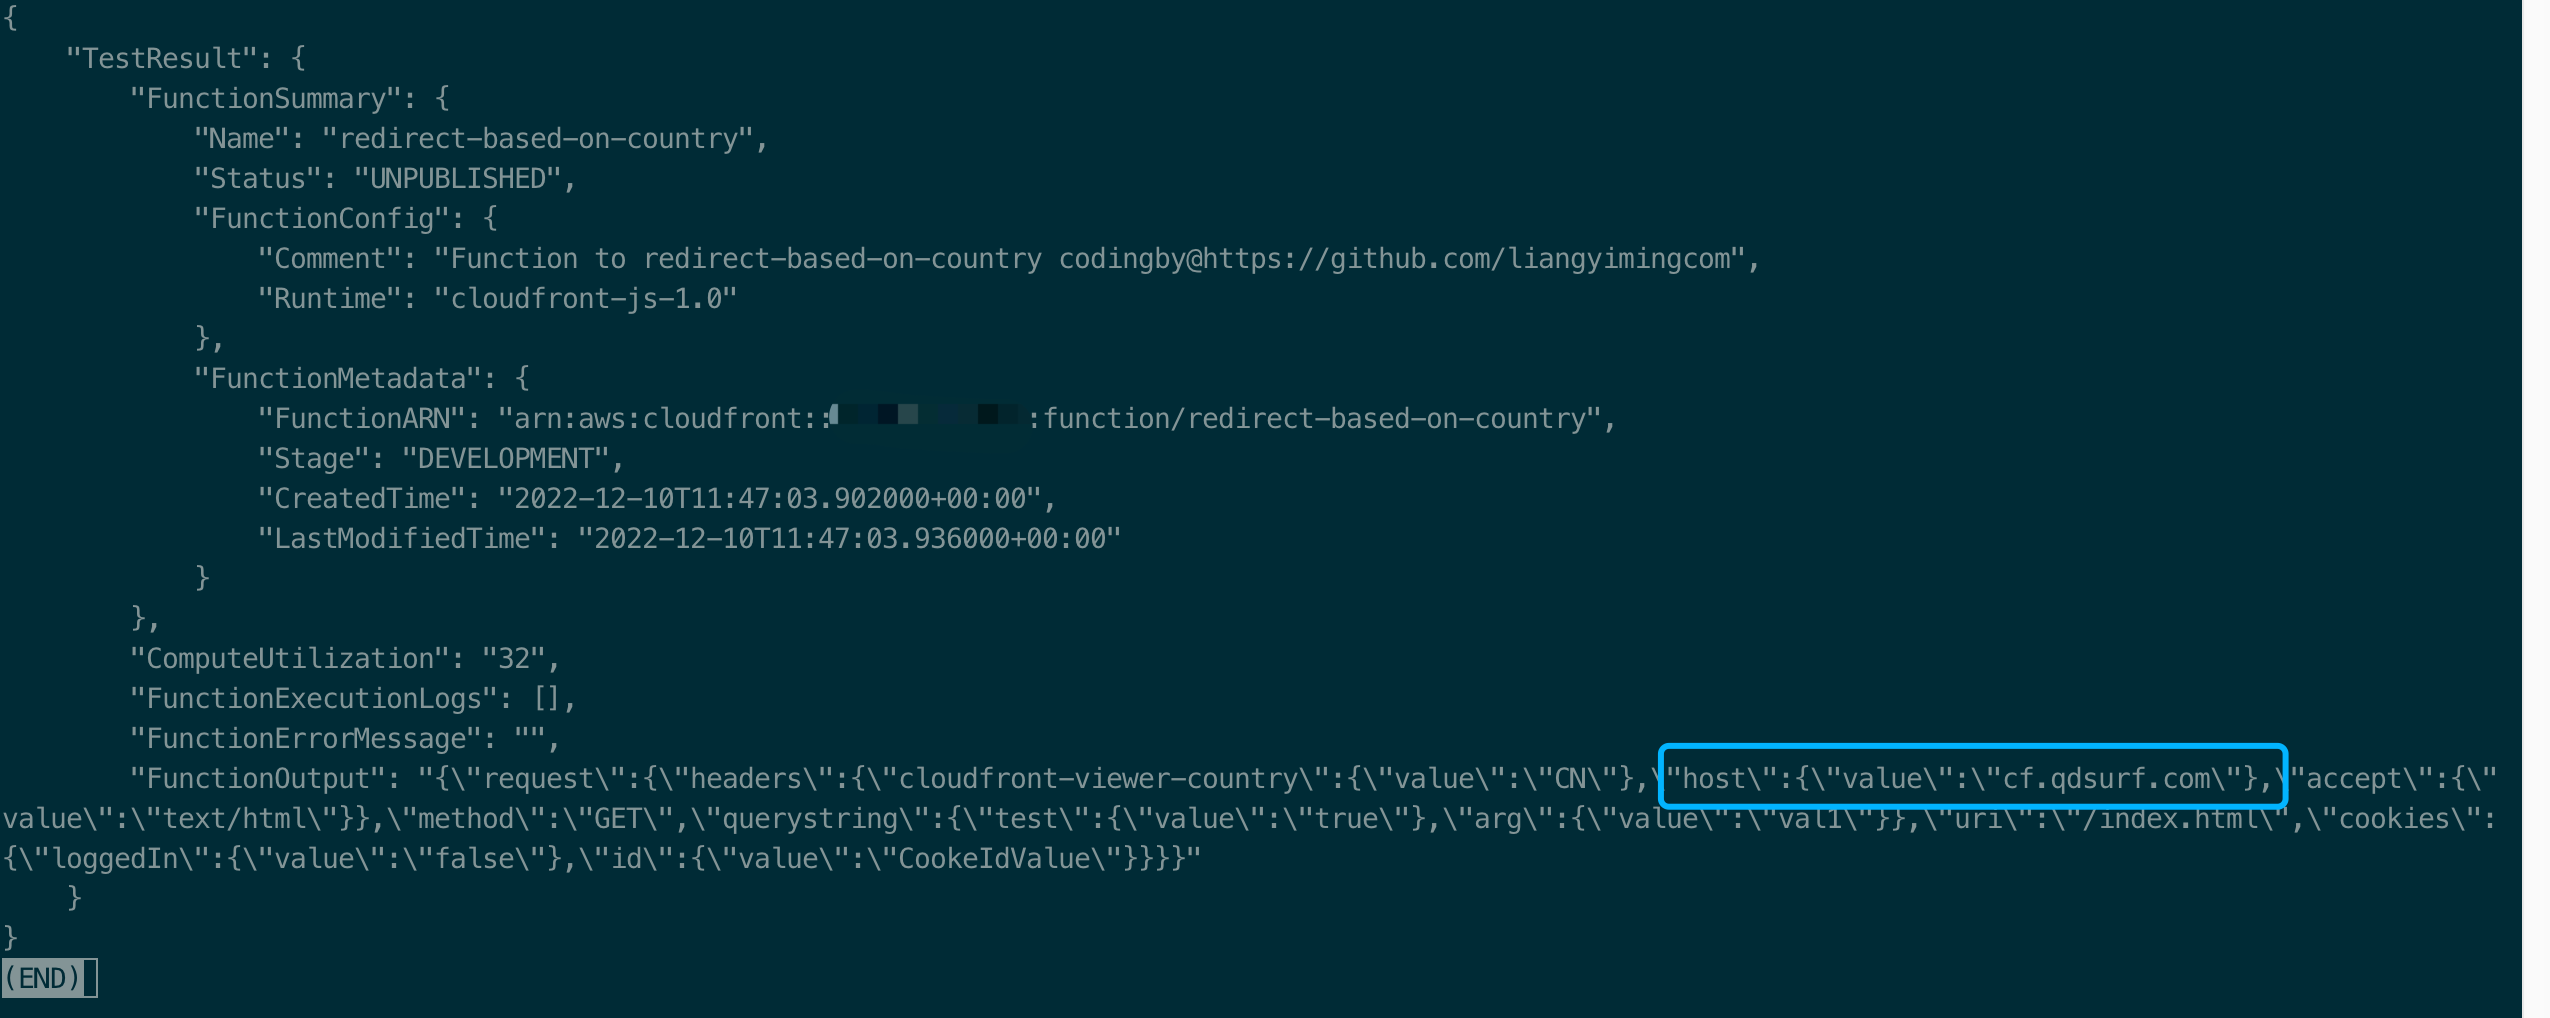
分析一下country-not-usa.json,重点属性为: "cloudfront-viewer-country": { "value": "CN" }
{
    "version": "1.0",
    "context": {
        "eventType": "viewer-request"
    },
    "viewer": {
        "ip": "0.0.0.0"
    },
    "request": {
        "method": "GET",
        "uri": "/index.html",
        "querystring": {
            "test": { "value": "true" },
            "arg": { "value": "val1", "multivalue": [ { "value": "val1" }, { "value": "val2" } ] }
        },
        "headers": {
            "host": { "value": "cf.qdsurf.com" },
            "accept": { "value": "text/html", "multivalue": [ { "value": "text/html" }, { "value": "application/xhtml+xml" } ] },
            "cloudfront-viewer-country": { "value": "CN" }
        },
        "cookies": {
            "id": { "value": "CookeIdValue" },
            "loggedIn": { "value": "false" }
        }
    }
}
4. Debug无误后发布CloudFront Function
某些情况下,CloudFront Function 代码修改后会有一些运行异常,可以通过命令行删除后再次重建来解决问题,删除命令如下:
aws cloudfront delete-function \
--name redirect-based-on-country \
--if-match ETVPDKIKX0DER
确认代码工作正常后,开始发布CloudFront Function,只有发布后才能被使用 发布成功后的页面是
aws cloudfront publish-function \
--name redirect-based-on-country \
--if-match ETVPDKIKX0DER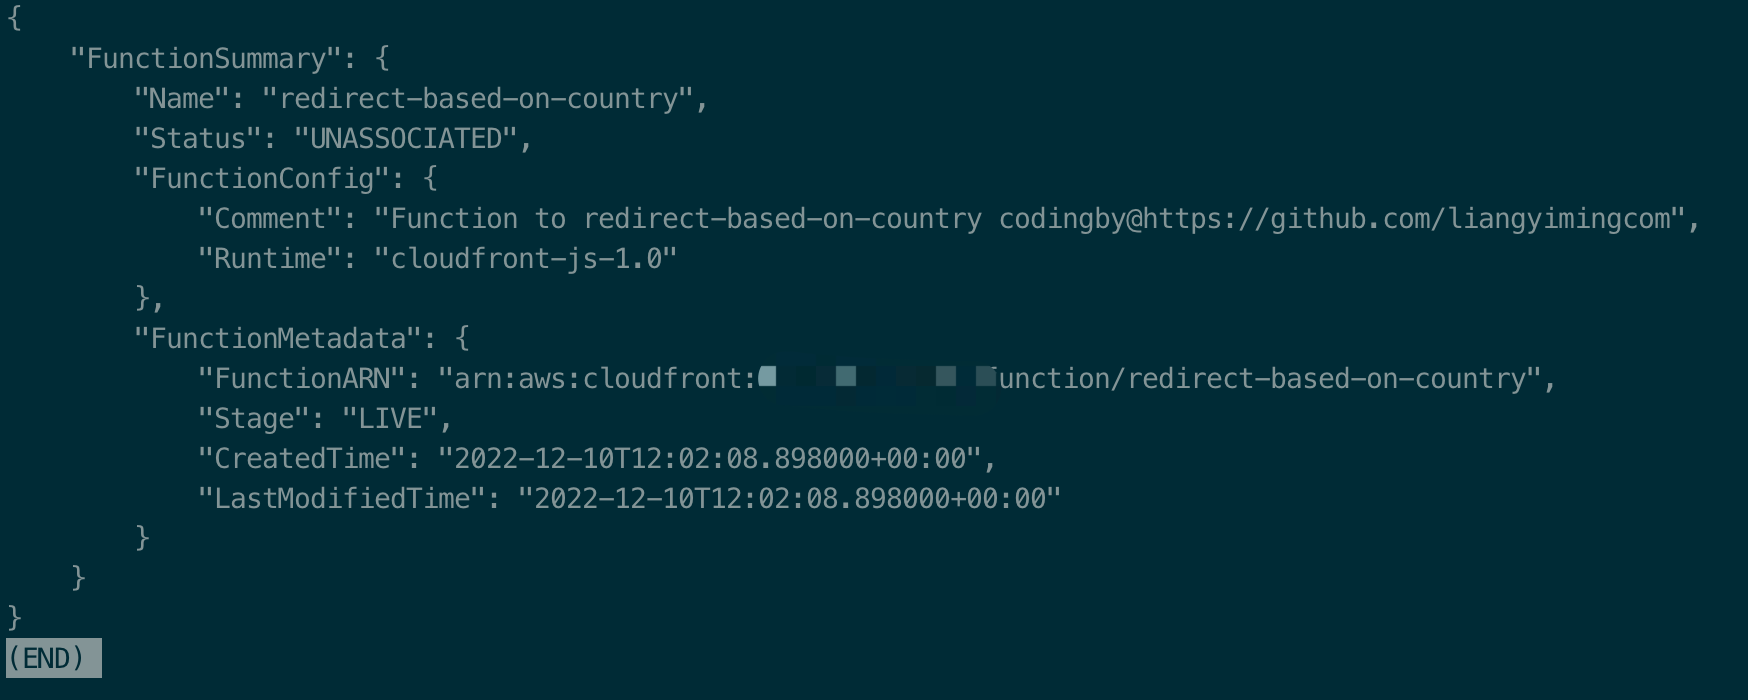
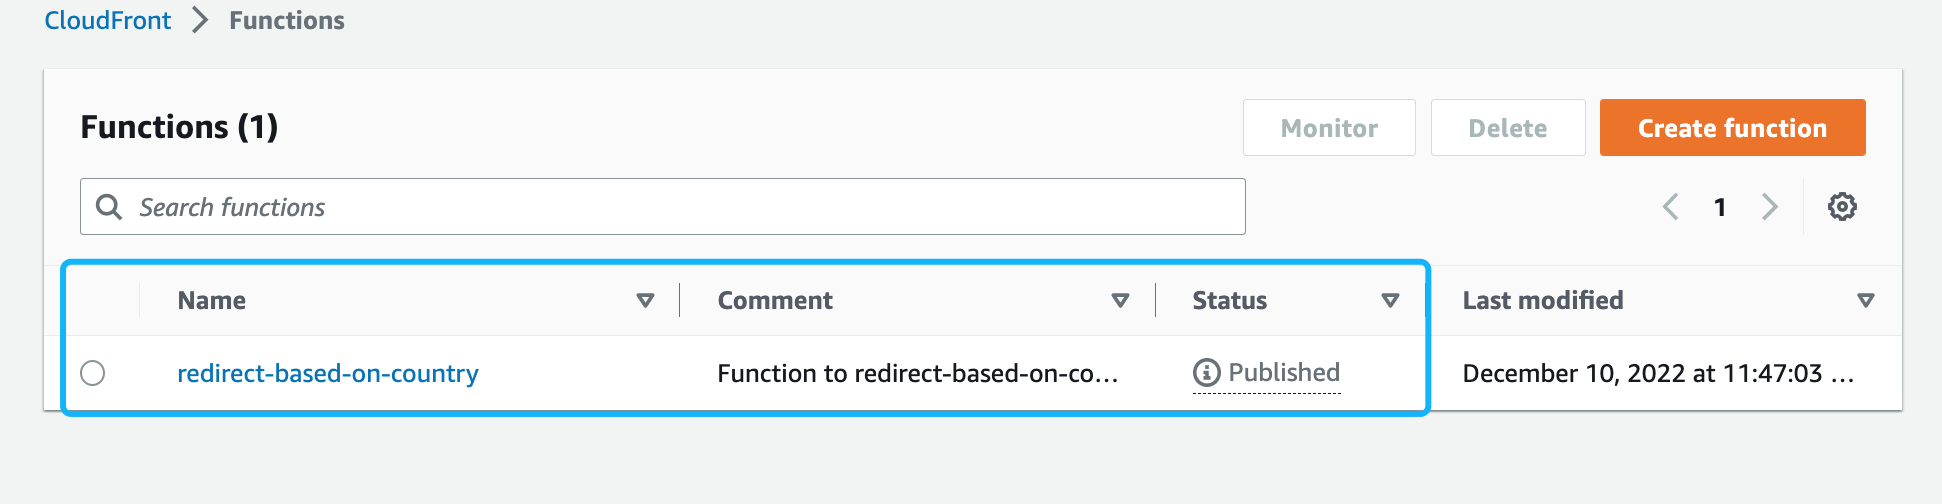
打开AWS Console控制台,可以看到CloudFront Function - redirect-based-on-country 被创建成功了,如下图:
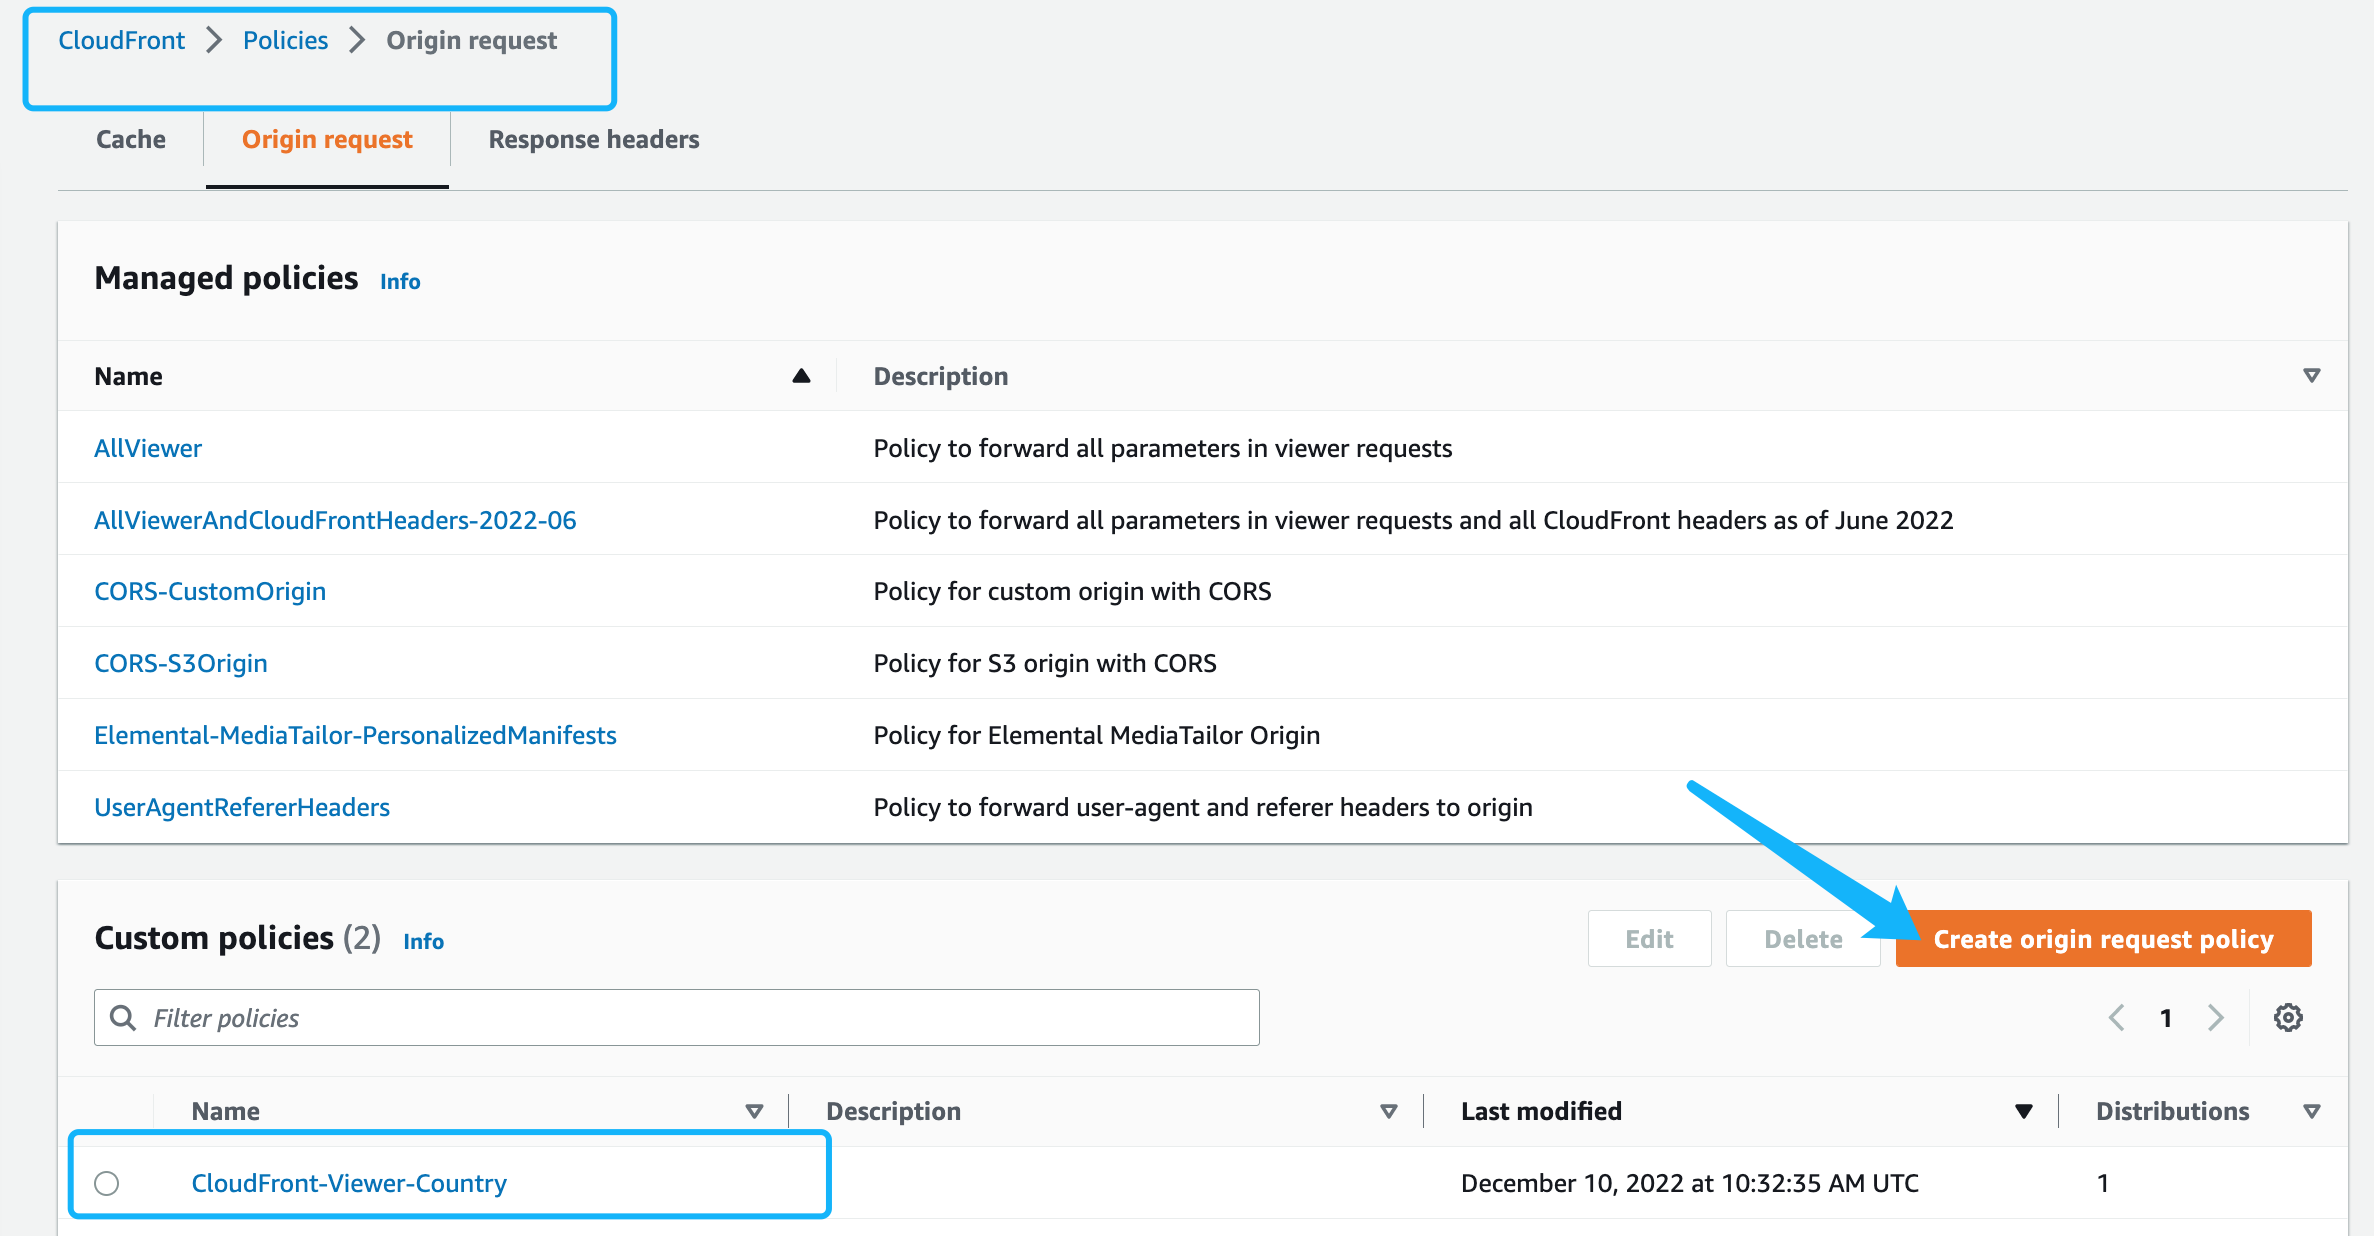
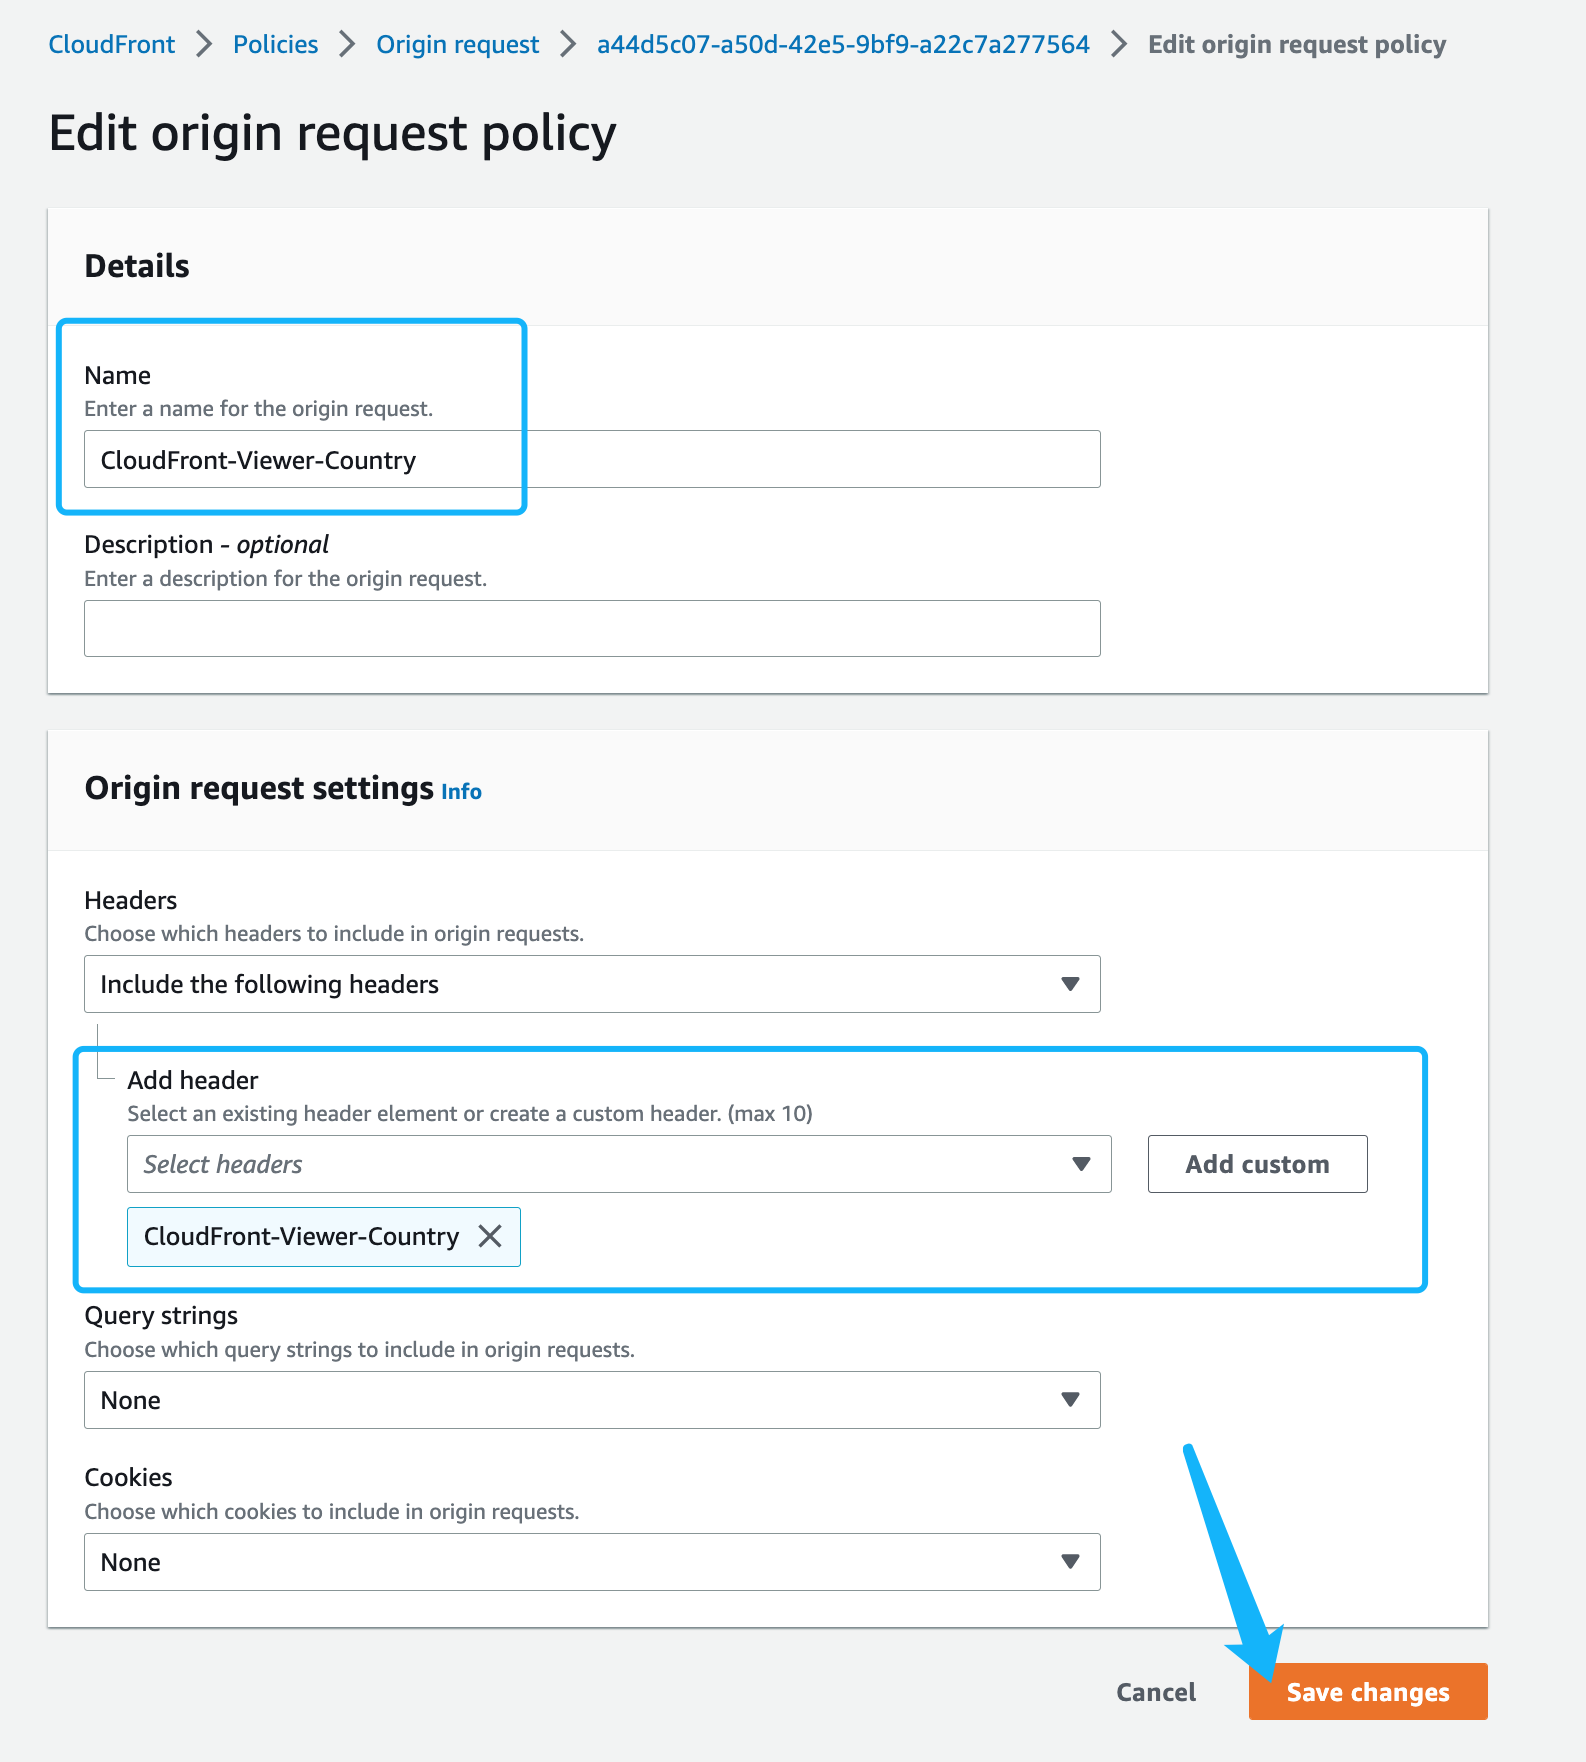
5. 创建新的CloudFront Policies - 《CloudFront-Viewer-Country》
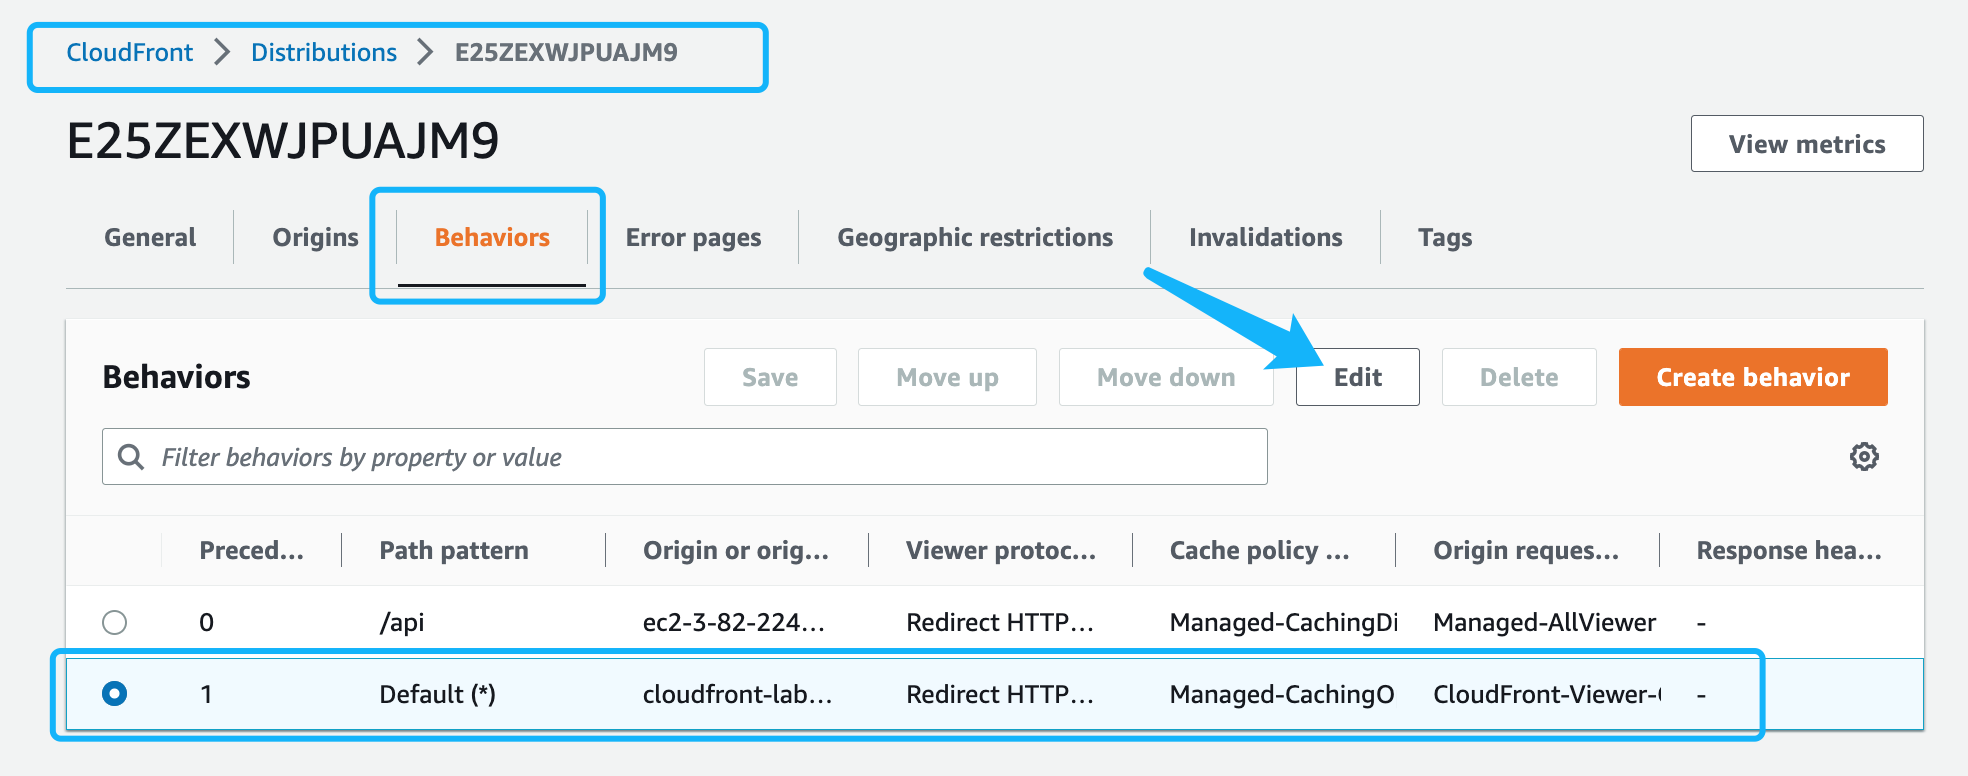
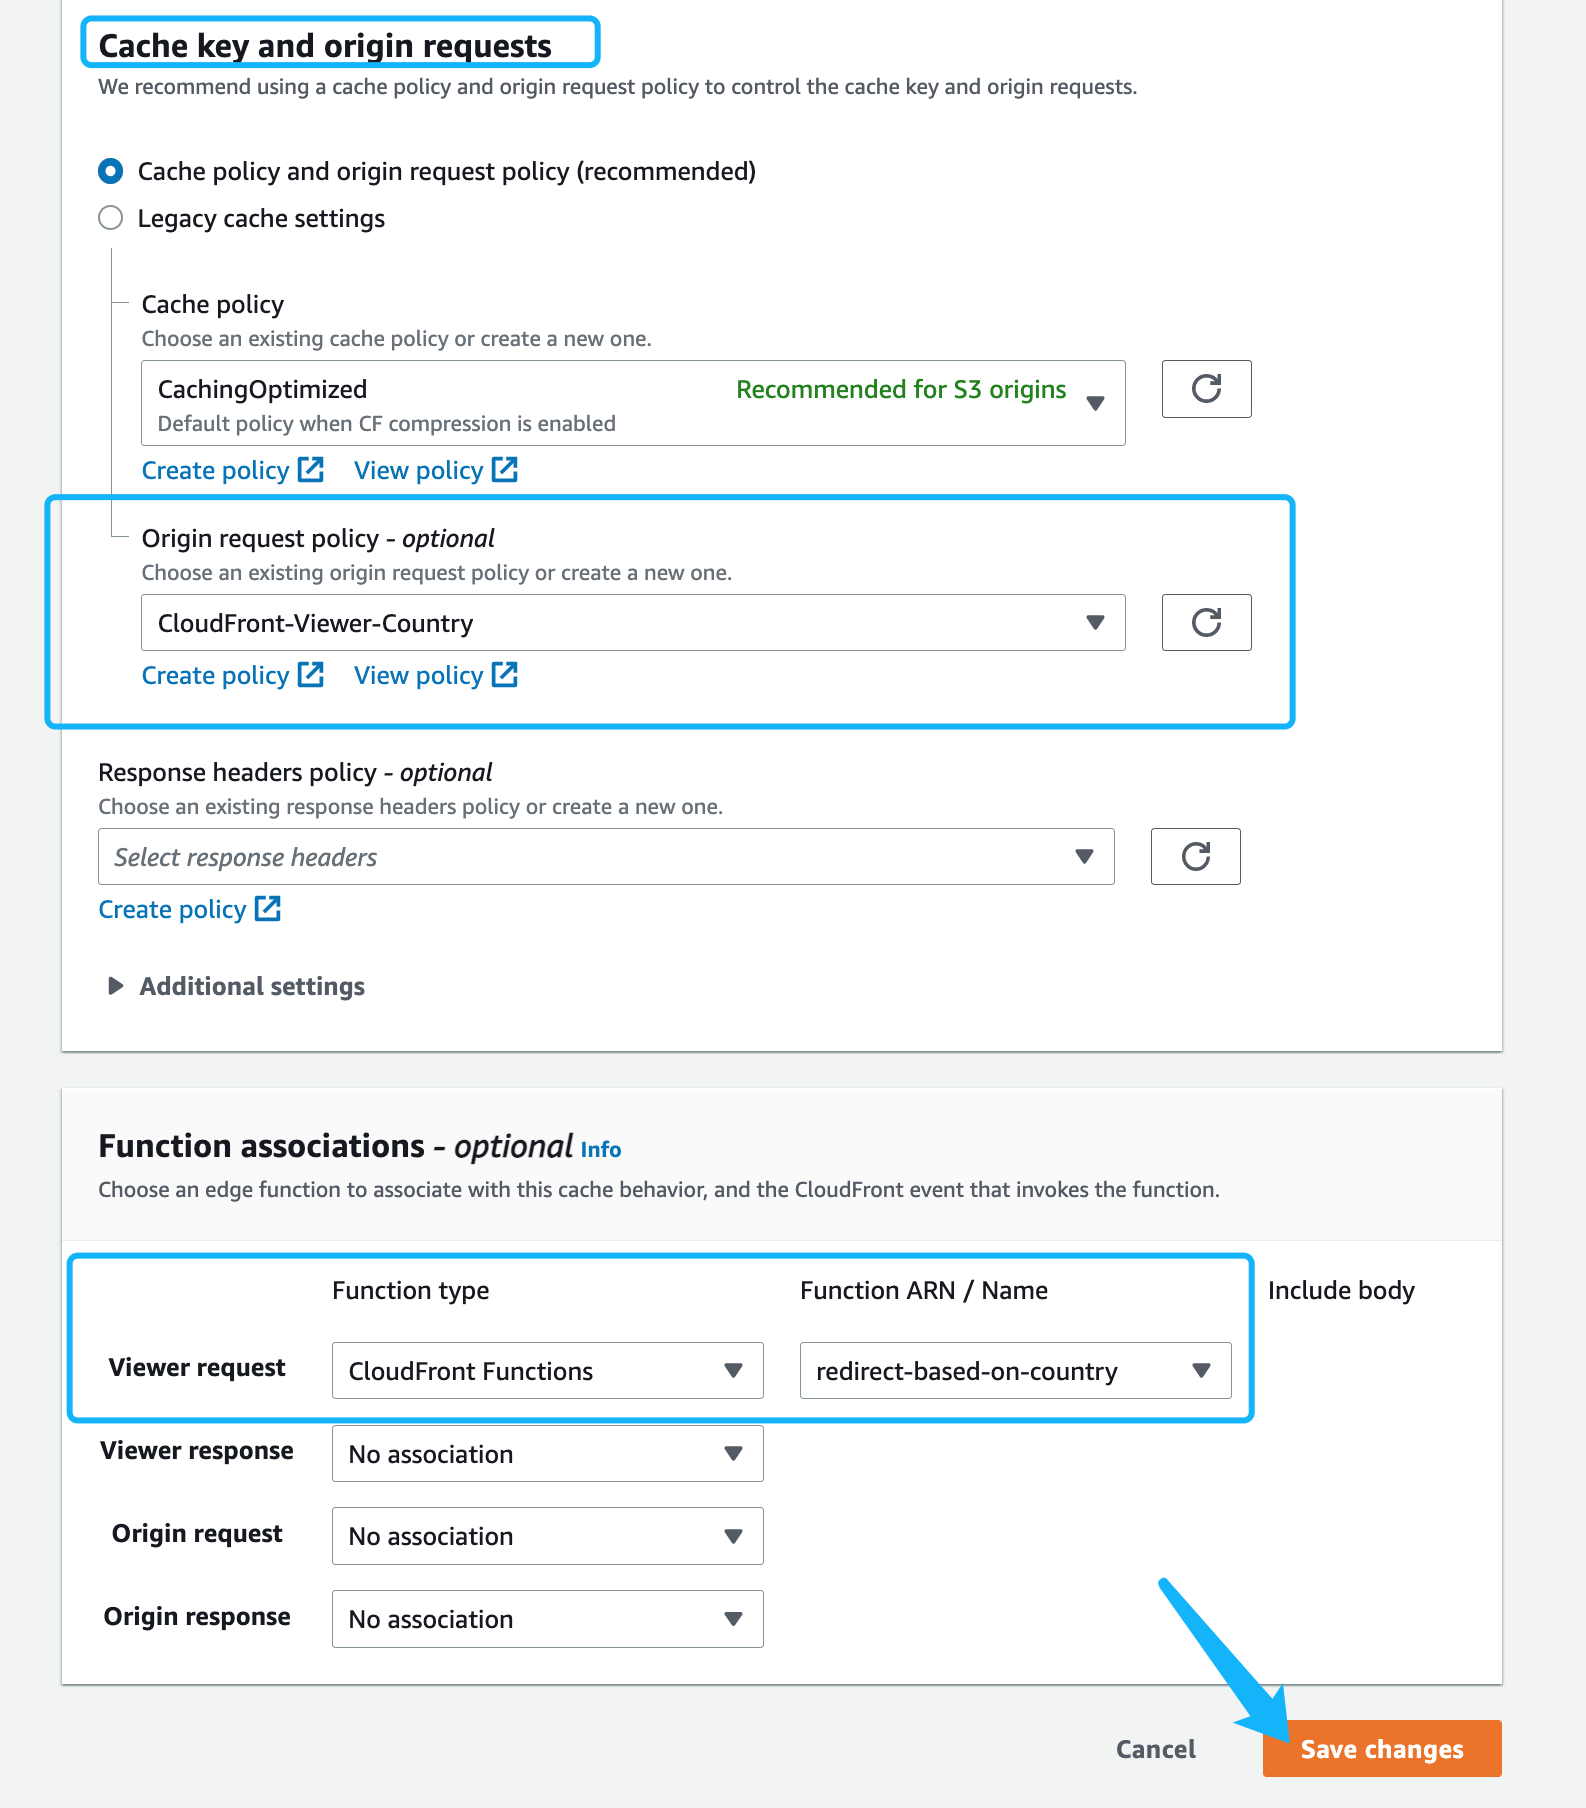
6. 在Cloudfront Distributions配置Header标头和Function函数关联
7. 等待Cloudfront Distributions生效,并测试能否正常工作
添加完毕后,Distributions 处于 Deploying 状态,需要等待几分钟后生效;

建议使用浏览器的隐私模式,进行测试:
https://cf.qdsurf.com/ https://cf.qdsurf.com/index.html https://cf.qdsurf.com/asia/index.html https://cf.qdsurf.com/eu/index.html https://cf.qdsurf.com/usa/index.html
8. 自定制站点跳转需求,兼容更多的地理位置
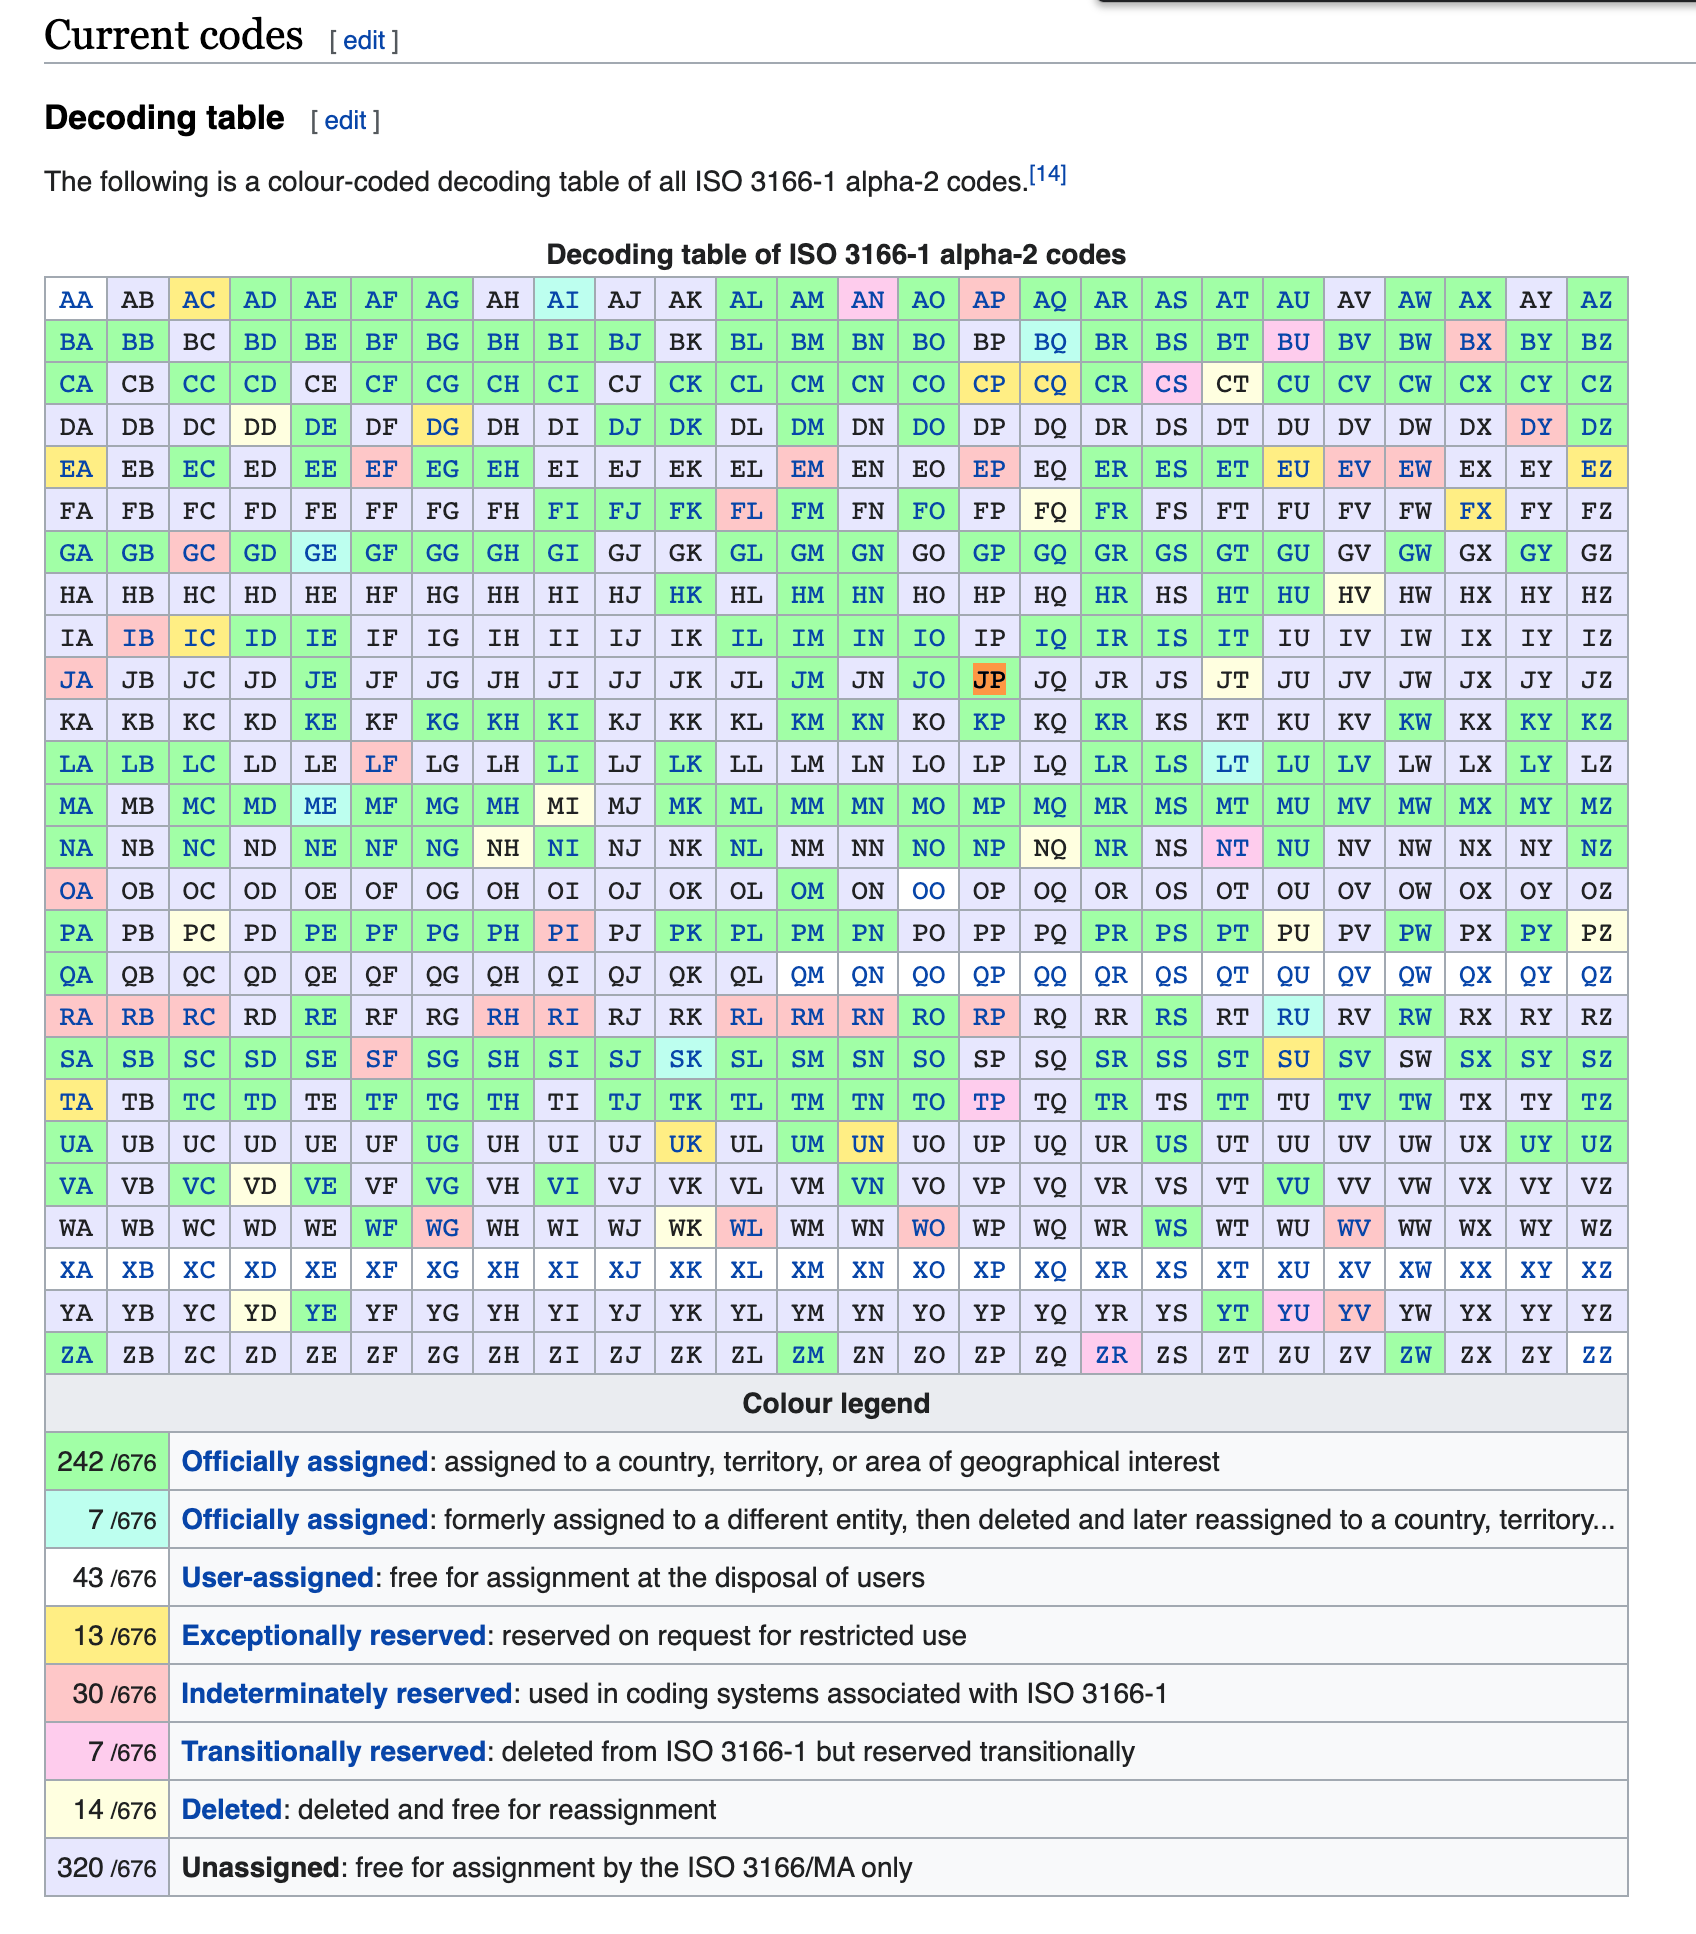
代码定义在这里,请根据需要进行添加:https://en.wikipedia.org/wiki/ISO_3166-1_alpha-2
9. 完成
五、总结:
七、引用:
- CloudFront Functions 事件结构 https://docs.aws.amazon.com/zh_cn/AmazonCloudFront/latest/DeveloperGuide/functions-event-structure.html
- 用于确定查看器的位置的标头 https://docs.aws.amazon.com/zh_cn/AmazonCloudFront/latest/DeveloperGuide/using-cloudfront-headers.html
- 将查看器重定向到新的 URL https://docs.aws.amazon.com/zh_cn/AmazonCloudFront/latest/DeveloperGuide/example-function-redirect-url.html
- Amazon CloudFront Functions https://github.com/aws-samples/amazon-cloudfront-functions URL redirect to the county-specific version of a site https://github.com/aws-samples/amazon-cloudfront-functions/tree/main/redirect-based-on-country
- ISO表头位置的区域代码:ISO 3166-1 alpha-2。
- 新手入门WORKSHOP - Accelerate your content using Amazon CloudFront https://catalog.us-east-1.prod.workshops.aws/workshops/9331108e-464e-4699-8a9c-486090105878/en-US/70-response-headers
Requester位置的标头说明:
您可以添加以下标头来确定查看器的位置。CloudFront 根据查看器的 IP 地址确定这些标头的值。对于这些标头值中的非 ASCII 字符,CloudFront 将根据 RFC 3986 的第 1.2 部分对字符进行百分比编码。
CloudFront-Viewer-Country– 包含查看器所在国家/地区的双字母国家/地区代码。有关国家/地区代码的列表,请参阅 ISO 3166-1 alpha-2。
当您添加以下标头时,CloudFront 会将其应用于除 那些源自 AWS 网络的请求之外的所有请求:
CloudFront-Viewer-City– 包含查看器所在城市的名称。CloudFront-Viewer-Country-Name– 包含查看器所在国家/地区的名称。CloudFront-Viewer-Country-Region– 包含代表查看器所在区域的代码(最多三个字符)。区域是 ISO 3166-2 代码的第一级细分(最广泛或最不具体)。CloudFront-Viewer-Country-Region-Name– 包含查看器所在区域的名称。区域是 ISO 3166-2 代码的第一级细分(最广泛或最不具体)。CloudFront-Viewer-Latitude– 包含查看器的近似纬度。CloudFront-Viewer-Longitude– 包含查看器的近似经度。CloudFront-Viewer-Metro-Code– 包含查看器的都市代码。仅当查看器所在地区是美国时提供此项。CloudFront-Viewer-Postal-Code– 包含查看器的邮政编码。CloudFront-Viewer-Time-Zone包含查看器的时区,采用 IANA 时区数据库格式(例如,America/Los_Angeles)。