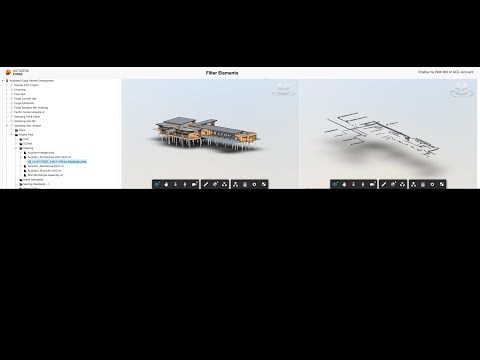
This sample demonstrates the use case of filtering model elements with specific queries conditions and load the filtered elements in Forge Viewer. It uses Model Properties API to index & query the elements.

- Forge Account: Learn how to create a Forge Account, activate subscription and create an app at this tutorial. For this new app, use http://localhost:3000/api/forge/callback/oauth as Callback URL. Finally take note of the Client ID, Client Secret and Callback URL.
- BIM 360 or ACC Account: must be Account Admin to add the app integration. Learn about provisioning.
- Node.js: basic knowledge with Node.js.
- Basic knowledge with html5,JavaScript, css,jQuery and bootstrap
- Basic knowledge with Data Management API with BIM 360/Docs, Forge Viewer and Model Properties API etc.
This sample uses JqueryBuilder for the user to input filtering conditions. However it does not mean the condition options of JqueryBuilder are exactly to those of Model Properties API. e.g.
- the option is called 'equal' in JqueryBuilder, while will be '$eq' in Model Properties API. This sample transforms some options at operators_map, but not all are transformed.
- Model Properties API can support $like, while JqueryBuilder does not have such option by default (unless you extend its options list)
For more information about query schemas of Model Properties API, please check Model Property Service Query Language Reference.
In addition, the indexing of model can have a lot of properties. Only a few properties options are initialized in queryBuilder.js for testing Revit model specifically. We suggest you try with the demo Revit models which can be downloaded in Model Properties API Postman Collection. Please add other properties options yourself if needed.
If you want to test other type of models, please ensure the initialized properties options in the sample are meaningful to your model data. We suggest you to download the demo data by other test tools to inspect the possible properties and get their keys, such as Model Properties API Postman Collection, or Model Properties API walkthrough by PowerShell Core.
In this sample query button, it will iterate each input rules from JqueryBuilder input, and transform the queries with the schemas of Model Properties API. However it only implements one level nested conditions. The more complex nested conditions have not been implemented.You could try to follow the similar logic in the query button to extend its ability.
Install NodeJS, version 8 or newer.
Clone this project or download it (this nodejs branch only). We recommended to install GitHub desktop. To clone it via command line, use the following (Terminal on MacOSX/Linux, Git Shell on Windows):
git clone https://github.com/Autodesk-Forge/forge-model.properties-elements.filtering
Install the required packages using npm install. Set the environment variables with your client ID, client secret, callback url and finally start it. Via command line, navigate to the folder where this repository was cloned and use the following:
Mac OSX/Linux (Terminal)
npm install
export FORGE_CLIENT_ID=<<YOUR CLIENT ID FROM DEVELOPER PORTAL>>
export FORGE_CLIENT_SECRET=<<YOUR CLIENT SECRET>>
export FORGE_CALLBACK_URL=<<YOUR CALLBACK URL>>
npm start
Windows (use Node.js command line from Start menu)
npm install
set FORGE_CLIENT_ID=<<YOUR CLIENT ID FROM DEVELOPER PORTAL>>
set FORGE_CLIENT_SECRET=<<YOUR CLIENT SECRET>>
set FORGE_CALLBACK_URL=<<YOUR CALLBACK URL>>
npm start
OR, set environment variables at launch.json for debugging.
-
Open the browser: http://localhost:3000. Please watch the Video for the detail and usage.
-
After the user logging succeeds, the code will start to extract all hubs, all projects, folders and model versions.
-
Click one model version, the corresponding model data will be loaded in left Forge Viewer. Click Index button to start indexing
-
After Indexing in step #3 is done, setup the query conditions in the query panel, click the Query button. The code will start to query the specific elements by the queries.

- After querying is completed, click Load button. Only the elements that match the conditions will be loaded in the viewer.
To deploy this application to Heroku, the Callback URL for Forge must use your .herokuapp.com address. After clicking on the button below, at the Heroku Create New App page, set your Client ID, Secret and Callback URL for Forge.

For local development/testing, consider use nodemon package, which auto restart your node application after any modification on your code. To install it, use:
sudo npm install -g nodemon
Then, instead of npm run dev, use the following:
npm run nodemon
Which executes nodemon server.js --ignore www/, where the --ignore parameter indicates that the app should not restart if files under www folder are modified.
After installing Github desktop for Windows, on the Git Shell, if you see an error setting certificate verify locations error, use the following:
git config --global http.sslverify "false"
- Data Management API
- Viewer
- Model Properties API Reference
- Model Properties API Walkthrough in PowerShell Core
- Postman Collection for Model Properties
- Querying Model Properties
- Tracking Changes in Model Versions
- Query Language Reference
- Forge Blog
- Field of View, a BIM focused blog
This sample is licensed under the terms of the MIT License. Please see the LICENSE file for full details.
Xiaodong Liang @coldwood, Forge Advocate and Support