This is a work in progress! While we're very excited about it, it's still in its alpha phase; it is not ready for general availability. If you want to try it out, contact product@customer.io and we'll help set you up!
Before you get started, keep in mind:
- The SDK has been tested on iOS devices. It might work on other Apple devices—macOS, tvOS, and watchOS—but we have not officially tested, nor do we officially support, non-iOS devices.
- The SDK is in its
alphaphase. Feel free to try it out, but please understand that we will likely introduce breaking changes to the API and may experience bugs.
To get started, you need to install and initialize the relevant SDK packages in your project.
To minimize our SDK's impact on your app's size, we offer multiple, separate SDKs. You should only install the packages that you need for your project.
Tip: Check out our sample iOS app, Remote Habits, for a real-world example of how to use our SDK.
Use the Swift Package Manger to install our SDKs into your project.
-
In Xcode, go to File > Swift Packages > Add Package Dependency
-
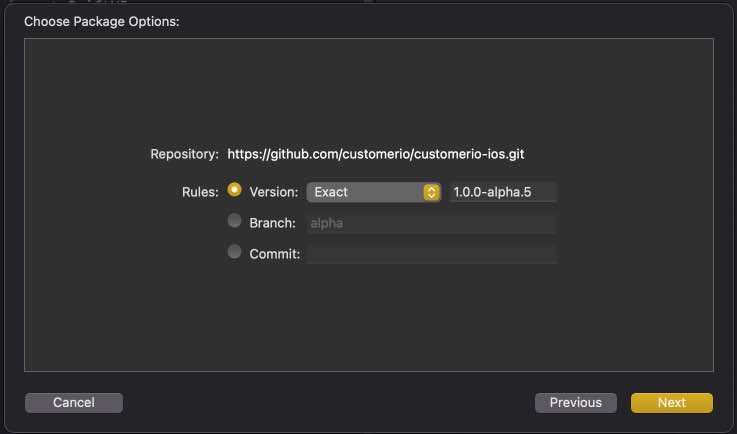
In the window that appears, enter the iOS SDK's GitHub repository:
https://github.com/customerio/customerio-ios.git -
Select the version that you want to install. While the SDK is its alpha stage, we recommend that you install an exact version of the SDK instead of indicating a range. This prevents you from automatically upgrading to a newer alpha version and possibly installing breaking changes on your code base.
-
Lastly, choose the SDK products that you want to install. You can start by selecting
Trackingfor now and adding others later if you need them.


Before you can use the Customer.io SDK, you need to initialize it. Any calls that you make to the SDK before you initialize it are ignored.
There are two ways to initialize the SDK. The method you use depends on how you want to use the SDK:
- Singleton, shared instance (the quick and easy way):
When you use the shared instance, you don't need to manage your own instances of Customer.io SDK classes. To get started, initialize the SDK in the AppDelegate application(_ application: didFinishLaunchingWithOptions) function:
import CioTracking

class AppDelegate: NSObject, UIApplicationDelegate {
    func application(
        _ application: UIApplication,
        didFinishLaunchingWithOptions launchOptions: [UIApplication.LaunchOptionsKey: Any]? = nil
    ) -> Bool {
        CustomerIO.initialize(siteId: "YOUR SITE ID", apiKey: "YOUR API KEY")

        // You can optionally provide a Region to set the Region for your Workspace:
        CustomerIO.initialize(siteId: "YOUR SITE ID", apiKey: "YOUR API KEY", region: Region.EU)

        return true
    }
}
Then, when you want to use any of the SDK features, you use the shared instance of the class:
MessagingPush.shared.application(...)- Create your own instances (better for projects using automated tests):
We recommend that you create your own instances of SDK classes if your project has automated tests. We designed our SDK with first-class support for dependency injection and mocking, which makes it easier to write automated tests. See testing for more information.
Note: Code samples in this readme use the singleton, shared instance method to call the SDK. However, all samples will also work with your own instances of SDK classes.
import CioTracking

let customerIO = CustomerIO(siteId: "XXX", apiKey: "YYY")

// You can optionally provide a Region to set the Region for your Workspace:
let customerIO = CustomerIO(siteId: "XXX", apiKey: "YYY", region: Region.EU)
Then, when you want to use any of the SDK features, you use the shared instance of the class:
let messagingPush = MessagingPush(customerIO: customerIO)

messagingPush.application(...)When you identify a customer, you:
- Add or update the customer's profile in your workspace.
- Save the customer's information on the device. Future calls to the SDK are linked to the last-identified customer. For example, after you identify a person, any events that you track are automatically associated with that person.
You can only identify one customer at a time. The SDK "remembers" the most recently-identified customer. If you identify customer "A", and then call the identify function for customer "B", the SDK "forgets" customer "A" and assumes that customer "B" is the current app user.
Learn more about the Tracking class.
import CioTracking

// - identifier: The unique value representing a person. The value you use may be an id, email address
//               or the cio_id (when updating people), depending on your workspace settings.
// - body: (Optional) The request body to send to the Customer.io API used to add attributes to a profile
//         or updating an existing profile. https://customer.io/docs/api/#operation/identify
// - onComplete: Asynchronous callback with the result of the SDK attempting to identify the profile.
// - jsonEncoder: (Optional) Custom `JSONEncoder` that you want to use to encode the `body` parameter.
// default: https://github.com/customerio/customerio-ios/blob/1.0.0-alpha.5/Sources/Tracking/Util/JsonAdapter.swift#L38-L43
CustomerIO.shared.identify(identifier: "989388339", body: ["first_name": firstName]) { [weak self] result in
    // It's recommended to use `[weak self]` in the callback but your app's use cases may be unique.
    guard let self = self else { return }

    switch result {
    case .success:
      // Customer successfully identified in your Workspace!
      break
    case .failure(let customerIOError):
      // Error occurred. It's recommended you parse the `customerIOError` to learn more about the error.
      break
    }
}

// The parameter `body` accepts many different forms.
// 1. A dictionary:
let body = ["first_name": "Dana", "last_name": "Green"]
CustomerIO.shared.identify(identifier: "989388339", body: body)
// 2. A `Encodable` object:
struct IdentifyRequestBody: Encodable {
  let firstName: String
  let lastName: String
}
CustomerIO.shared.identify(identifier: "989388339", body: IdentifyRequestBody(firstName: "Dana", lastName: "Green"))
// More complex example: https://github.com/customerio/customerio-ios/blob/1.0.0-alpha.5/Tests/Shared/IdentifyRequestBody.swift
Tip: See Error handling to learn more about how to parse the
CustomerIOError.
In your app you may need to stop identifying a profile in the Customer.io SDK. There are 2 ways to do that:
- Call the
identify()function which will stop identifying the previously identified profile (if there was one) and remember this new profile. - Use
clearIdentify()to stop identifying the previously identified profile (if there was one).
// All future calls you make to the Customer.io SDK will be ignored until you identify a new profile.
CustomerIO.shared.clearIdentify()Want to send push notification messages to your customer's devices? Great!
Note: At this time, the Customer.io SDK only supports APN push, but we're actively working on FCM support.
-
Install the SDK
MessagingPushAPNusing Swift Package Manager. Follow the Install the SDK instructions to learn more. -
Setup the APN service and receive a device token from APN.
// TODO add instructions on how to do this.
-
In your
AppDelegateclass, call the Customer.io SDK:import CioMessagingPushAPN class AppDelegate: NSObject, UIApplicationDelegate { func application(_ application: UIApplication, didRegisterForRemoteNotificationsWithDeviceToken deviceToken: Data) { MessagingPush.shared.application(application, didRegisterForRemoteNotificationsWithDeviceToken: deviceToken) { [weak self] result in // It's recommended to use `[weak self]` in the callback but your app's use cases may be unique. guard let self = self else { return } switch result { case .success: // Device token successfully added to profile! break case .failure(let customerIOError): // Error occurred. It's recommended you parse the `customerIOError` to learn more about the error. break } } } func application(_ application: UIApplication, didFailToRegisterForRemoteNotificationsWithError error: Error) { MessagingPush.shared.application(application, didFailToRegisterForRemoteNotificationsWithError: error) { [weak self] result in // It's recommended to use `[weak self]` in the callback but your app's use cases may be unique. guard let self = self else { return } switch result { case .success: // Device token successfully removed from profile! break case .failure(let customerIOError): // Error occurred. It's recommended you parse the `customerIOError` to learn more about the error. break } } } }
-
Identify a customer if you have not already. When you add a device token, it is not useful until you associate that device token with a person. You can identify a person before or after you register a device token with the Customer.io SDK. The SDK automatically adds and removes the device token from the customer profile when you identify and stop identifying a person with the SDK.
-
You should now be able to see a device token in your Customer.io Workspace for the identified person. You can send a simple push notification using the Customer.io push notification editor. If you want to use images, action buttons, or deep links you'll need to implement custom code in your app.
Whenever there's an error, the SDK returns a CustomerIOError instance. The Customer.io SDK at this time does not do error handling on behalf of your app - it's up to you.
The CustomerIOError class helps you understand what went wrong and suggests how to handle the error.
let error: CustomerIOError = ...

switch error {
case .http(let httpError):
    // An error happened while performing a HTTP request.
    // `httpError` is an instance of `HttpRequestError` and can also be parsed:
    switch httpError {
    ...
    }
    break
case .notInitialized:
    // SDK has not been initialized yet. Check the docs for `CustomerIO` class.
    break
...
}
To learn more about error handling, see all of the different types of cases of the CustomerIOError class. Also, see our example code giving suggestions on how to handle the various errors.
We designed the SDK with first-class support for automated testing, making it easy to inject dependencies and perform mocking in your code.
Every SDK class inherits from a Swift protocol. Inherited protocols use a consistent naming convention: <NameOfClass>Instance. For example, the CustomerIO class inherits the protocol CustomerIOInstance.
If you want to inject a class in your project, it could look something like this:
import CioTracking

class ProfileRepository {

    private let cio: CustomerIOInstance

    init(cio: CustomerIOInstance) {
        self.cio = cio
    }

    // Now, you can call call any of the `CustomerIO` class functions with `self.cio`!
    func loginUser(email: String, password: String, onComplete: @escaping (Result<Success, Error>) -> Void) {
        // login the user to your system. If successful,
        self.cio.identify(identifier: email) { result in
            // handle `result` of identify() call.
        }
    }
}

// Provide an instance of the `Tracking` class to your class:
let cio = CustomerIO(...)
let repository = ProfileRepository(cio: cio)The Customer.io SDK comes bundled with mock classes ready for you to use. That's right, we generated mocks for you!
Mock classes follow the naming convention: <NameOfClass>Mock. For example, mock the CustomerIO class with CustomerIOMock.
Here's an example test class showing how you would test your ProfileRepository class.
import Foundation
import CioTracking
import XCTest

class ProfileRepositoryTest: XCTestCase {
    private var cioMock: CustomerIOMock!
    private var repository: ProfileRepository!

    override func setUp() {
        super.setUp()

        cioMock = CustomerIOMock() // Create a new instance of the mock in setUp() to reset the mock.

        repository = ProfileRepository(cio: cioMock)
    }

    func test_loginUser() {
        // Because the `identify()` function returns a result, you must return a result from the mock
        // using the onComplete callback.
        cioMock.identifyBodyClosure = { identifier, body, onComplete, _ in
            // You can return a successful result:
            onComplete(Result.success(Void()))
            // Or, return an error. Like here when a request couldn't be made possibly because of a network error.
            onComplete(Result.failure(CustomerIOError.http(.noResponse)))
        }

        // Now, call your function under test:
        repository.loginUser(...)

        // You can access many properties of the mock class to assert the behavior of the mock.
        XCTAssertTrue(cioMock.mockCalled)
        XCTAssertEqual(cioMock.identifyBodyCallsCount, 1)
        XCTAssertEqual(cioMock.identifyBodyReceivedInvocations[0].identifier, expectedIdentifier)
    }
}
Mock classes:
Thanks for taking an interest in our project! We welcome your contributions. Check out our development instructions to get your environment set up and start contributing.
Note: We value an open, welcoming, diverse, inclusive, and healthy community for this project. We expect all contributors to follow our code of conduct.