Virtual keypad for Honeywell Security Accenta G4 panel.
Accenta G4 is a simple, reliable, affordable intruder alarm panel made by Honeywell Security.
It works very well for residential use but, clearly, it’s not designed for extension. You cannot expand zones, you can’t operate it remotely with your smartphone, it doesn’t expose a standard serial interface to play with.
Recently, I started dreaming of a more sophisticated panel, and after thinking of a possible upgrade, I decided to hack mine.
After a bit of googling, I found a blog with a couple of interesting posts (this and this) providing useful background on the protocol and signalling used on the keypad bus, along with a description of the messages exchanged between the keypad and the panel.
The keypads (in LED and LCD variants) communicate with the panel over a single wire (half-duplex, shared bus) using TTL levels (+5v low, 0v high). A quick analysis with the logic analyzer revealed a slightly unusual protocol: RS-232 with 8 bit of data, mark/space parity and 1 stop bit or, if you prefer, 9 bit of data and 1 stop bit, which is the same. In fact, considering bits are sent LSB first (little-endian), the parity bit is just the 9th bit of data.
Any message is sent over the bus with mark parity on the first byte and space parity on the remaining bytes.
Luckily, all communication between panel and keypads is not encrypted nor obfuscated. In fact, the protocol is fairly straightforward. Any message consists of a single byte command, one or more bytes of data and a one-byte checksum of all the preceding bytes. Messages are not terminated.
<command> <data> [<data>...] <checksum>
Apparently, the keypad sends just one type of command over the bus:
K <keycode> <checksum>
The “K” character, being the first byte of the message, has mark parity.
<keycode> is the code representing a physical or virtual (key combination) button on the keypad:
| code | ASCII | type | button |
|---|---|---|---|
| 0x30 | 0 | physical | 0 |
| 0x31 | 1 | physical | 1 |
| 0x32 | 2 | physical | 2 |
| 0x33 | 3 | physical | 3 |
| 0x34 | 4 | physical | 4 |
| 0x35 | 5 | physical | 5 |
| 0x36 | 6 | physical | 6 |
| 0x37 | 7 | physical | 7 |
| 0x38 | 8 | physical | 8 |
| 0x39 | 9 | physical | 9 |
| 0x3a | : | physical | chime |
| 0x3b | ; | physical | omit |
| 0x3c | < | physical | cancel |
| 0x3d | = | physical | program |
| 0x3e | > | physical | confirm |
| 0x3f | ? | physical | select |
| 0xaa | n/a | virtual | panic |
The panel sends out one or more messages whenever it needs to update the status displayed on the keypads. Messages of a given type are sent only if they differ from the previous message of the same type.
Please note some responses are sent exclusively as audible tones, delivered as analogue signals via a separate keypad bus wire labeled SOUNDS.
Whenever the status of at least one of the LEDs needs to be updated, a new message is sent. Each message is a full representation of all the LEDs on the keypad.
P <zone info> <general info> <checksum>
The “P” character, being the first byte of the message, has mark parity.
<zone info> is a byte where each bit represents one zone LED:
| bit | LED |
|---|---|
| 0 | zone 1 |
| 1 | zone 2 |
| 2 | zone 3 |
| 3 | zone 4 |
| 4 | zone 5 |
| 5 | zone 6 |
| 6 | zone 7 |
| 7 | zone 8 |
<general info> is a byte encoded like follows:
| bit | LED |
|---|---|
| 0 | system unset |
| 1 | tamper |
| 2 | SOS |
| 3 | power |
| 4 | not used? |
| 5 | not used? |
| 6 | not used? |
| 7 | not used? |
Whenever the text displayed on the LCD needs to be updated a new message is sent:
L <lenght> <LCD data> <checksum>
The “L” character, being the first byte of the message, has mark parity.
Lenght information is necessary, as messages are not terminated and size is not fixed, thus the receiver needs to know the message size upfront.
LCD data is a sequence of bytes, either printable (ASCII) or control codes, mostly for managing the cursor:
| code | function |
|---|---|
| 0x04 | cursor position |
| 0x05 | hide cursor |
| 0x06 | show cursor |
| 0x07 | move cursor right |
| 0x0a | newline |
| 0x0c | clear |
| 0x10 | unknown |
| 0x16 | unknown |
Cursor position is determined by the subsequent byte:
| position | coordinates |
|---|---|
| 0x80 to 0x8f | top row, column 1 to 16 |
| 0xc0 to 0xcf | bottom row, column 1 to 16 |
I believe the LCD keypad consumes "P" messages as well, as information regarding the status of the power and day LEDs doesn't seem to be show up anywhere in "L" messages.
As said, in little-endian, 8-bit with parity and 9-bit without parity are equivalent.
In particular, 8-bit with mark parity is equivalent to 9-bit without parity when the 8-bit character is ORed with 0x100.
So, it’s perfectly equivalent to forget about parity and simply think of alternate codes for the head of the message, with the 9th (or parity) bit set to 1:
| command | keycode | 9-bit code |
|---|---|---|
| K | 0x4b | 0x14b |
| L | 0x4c | 0x14c |
| P | 0x50 | 0x150 |
No matter how you look at it, having the 9th bit set exclusively for the head of the message is quite convenient, as it makes the code at the receiving end simpler and more robust. In fact it's possible to detect the head of the message without any ambiguity.
Keypad bus aside, the panel board exposes also a few output signals representing the general status, for use with a digital communicator or a speech dialer. They are labelled as follows:
- FIRE (fire)
- PA (panic)
- INT (intruder)
- SET (alarm set)
- ABORT (alarm aborted)
Signals are held at +13v and fall to 0v when active. They are absolutely crucial for this project as some critical alert conditions (like intruder or PA) are not reflected in LED or LCD status.
The objective of this project is to build a keypad emulator running in a standard browser.
Linux MPU: Raspberry Pi 3+
The MPU is responsible for the following tasks:
- expose a HTTPS server for serving the web application
- expose a secure websockets server (used by the web application)
- accept and manage websockets connections
- listen to MCU for incoming messages and broadcast to websockets clients
- listen to websockets clients for incoming messages and forward to MCU
- send email notifications
Server-side code is written in Javascript and runs under latest NodeJS and depends on express serialport, ws and rxjs
Client-side code is a HTML5/CSS3/Javascript application running in the browser.
Arduino MCU: Watterott RPI-UNO-HAT
RPI-UNO-HAT is a very nice Raspberry Pi HAT fully compatible with Arduino UNO. It features standard headers and serial communication between Raspberry Pi and Arduino, so it's possible to program and reset the Atmel MCU from the Raspberry.
In practice, Raspberry Pi + RPI-UNO-HAT = Arduino Yún on steroids!
The MCU is responsible for the following tasks:
- monitor Accenta G4 panel hardware signals (PA, INT, SET, ABORT), update local state and send updates to MPU
- provide bidirectional serial connectivity with Accenta G4 keypad bus
- listen to the keypad bus for incoming messages, update local state and send updates to MPU
- listen to MPU for virtual keystrokes and send emulated keypad messages over the keypad bus
- listen to MPU for status queries and send local status
- reply to heartbeat messages to be broadcasted to the clients, to prove end-to-end connection is alive
Arduino code is written in C/C++ and it's built around the SoftwareSerial9 library, capable of sending and receiving 9-bit messages, and QueueArray, a FIFO library used for enqueuing and throttling outgoing commands.
WARNING: the original version of SoftwareSerial9 by addible had a bug in the recv() method, fixed by edreanernst in his fork, then fixed by addible too. Both work fine, just make sure to use the latest version.
Interfacing the panel with Arduino is pretty simple.
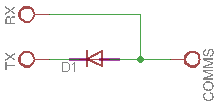
In theory, two digital I/O pins and a diode is all you need for connecting the single-wire keypad bus to distinct RX and TX ports.
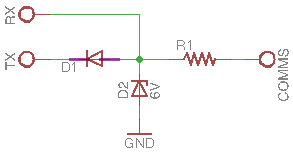
In practice, adding an additional resistor and a zener diode is a safe choice for limiting voltage and current across Arduino's I/O pins.
Panel signals (SET, ABORT, INT, PA) are active-low (12v on, 0v on). If Arduino's input is configured as INPUT_PULLUP, a diode is enough to pull the input down to LOW logical level when the corresponding panel output is active (LOW).
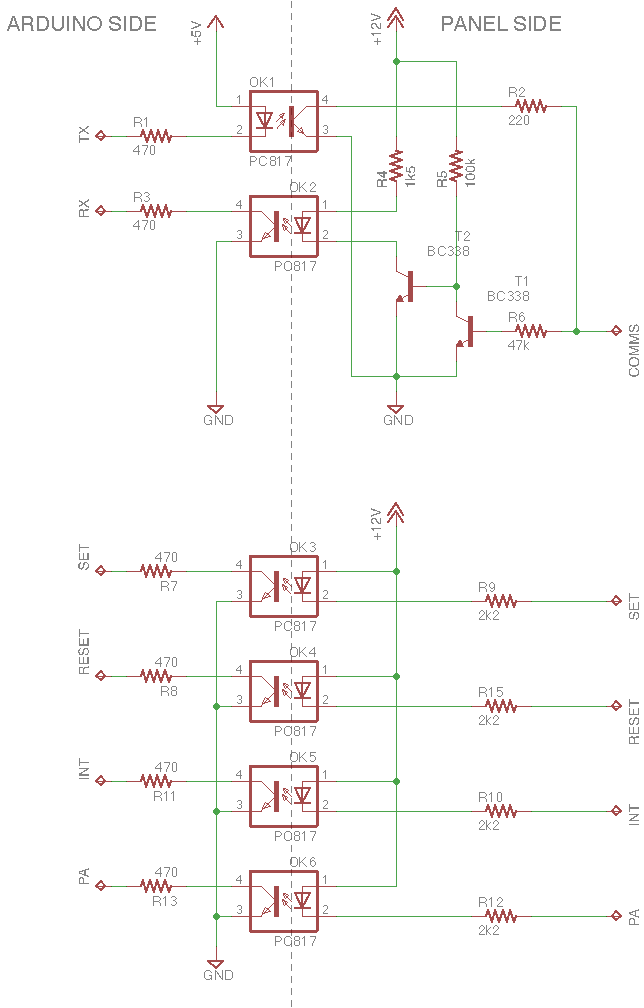
However, the keypad bus might be tampered with or be subject to interferences potentially harmful to Arduino. For these reasons, I have designed an opto-isolated circuit which provides full electrical isolation between Arduino and the panel itself.
The circuit is designed to keep the opto-isolator LEDs off during standby, to maximize their life expectancy. Here is a short description of the resistors:
| Resistor | Description |
|---|---|
| R1 | limit the current into the transmitting opto-isolator LED |
| R2 | limit the current into the transmitting opto-isolator transistor |
| R3 | limit the current into the receiving opto-isolator transistor |
| R4 | limit the current into the receiving opto-isolator LED |
| R5 | set the saturation current for T2 |
| R6 | set the saturation current for T1 |
TO BE CONTINUED...


