“Embrace curiosity, explore relentlessly, and let your instincts guide you like the agile Manul through the rugged landscapes of knowledge.”
The manul is a species of wild cat known as the Pallas’s cat (Otocolobus manul). The Pallas’s cat is native to the grasslands and montane steppes of Central Asia, including regions of Mongolia, China, Russia, and parts of Central Asia. It’s known for its distinctive appearance, with a stocky build, long fur, flat face, and expressive eyes.
The Pallas’s cat is well-adapted to its harsh, cold environment, with its dense fur providing insulation against the cold and its low metabolism enabling it to conserve energy. It’s primarily a solitary and nocturnal hunter, preying on small mammals, birds, and insects.
The Pallas’s cat is also known by other names, including the manul, the steppe cat, and the rock wildcat. It’s considered a near-threatened species due to habitat loss, degradation, and hunting pressures. Conservation efforts are underway to protect its habitat and populations.
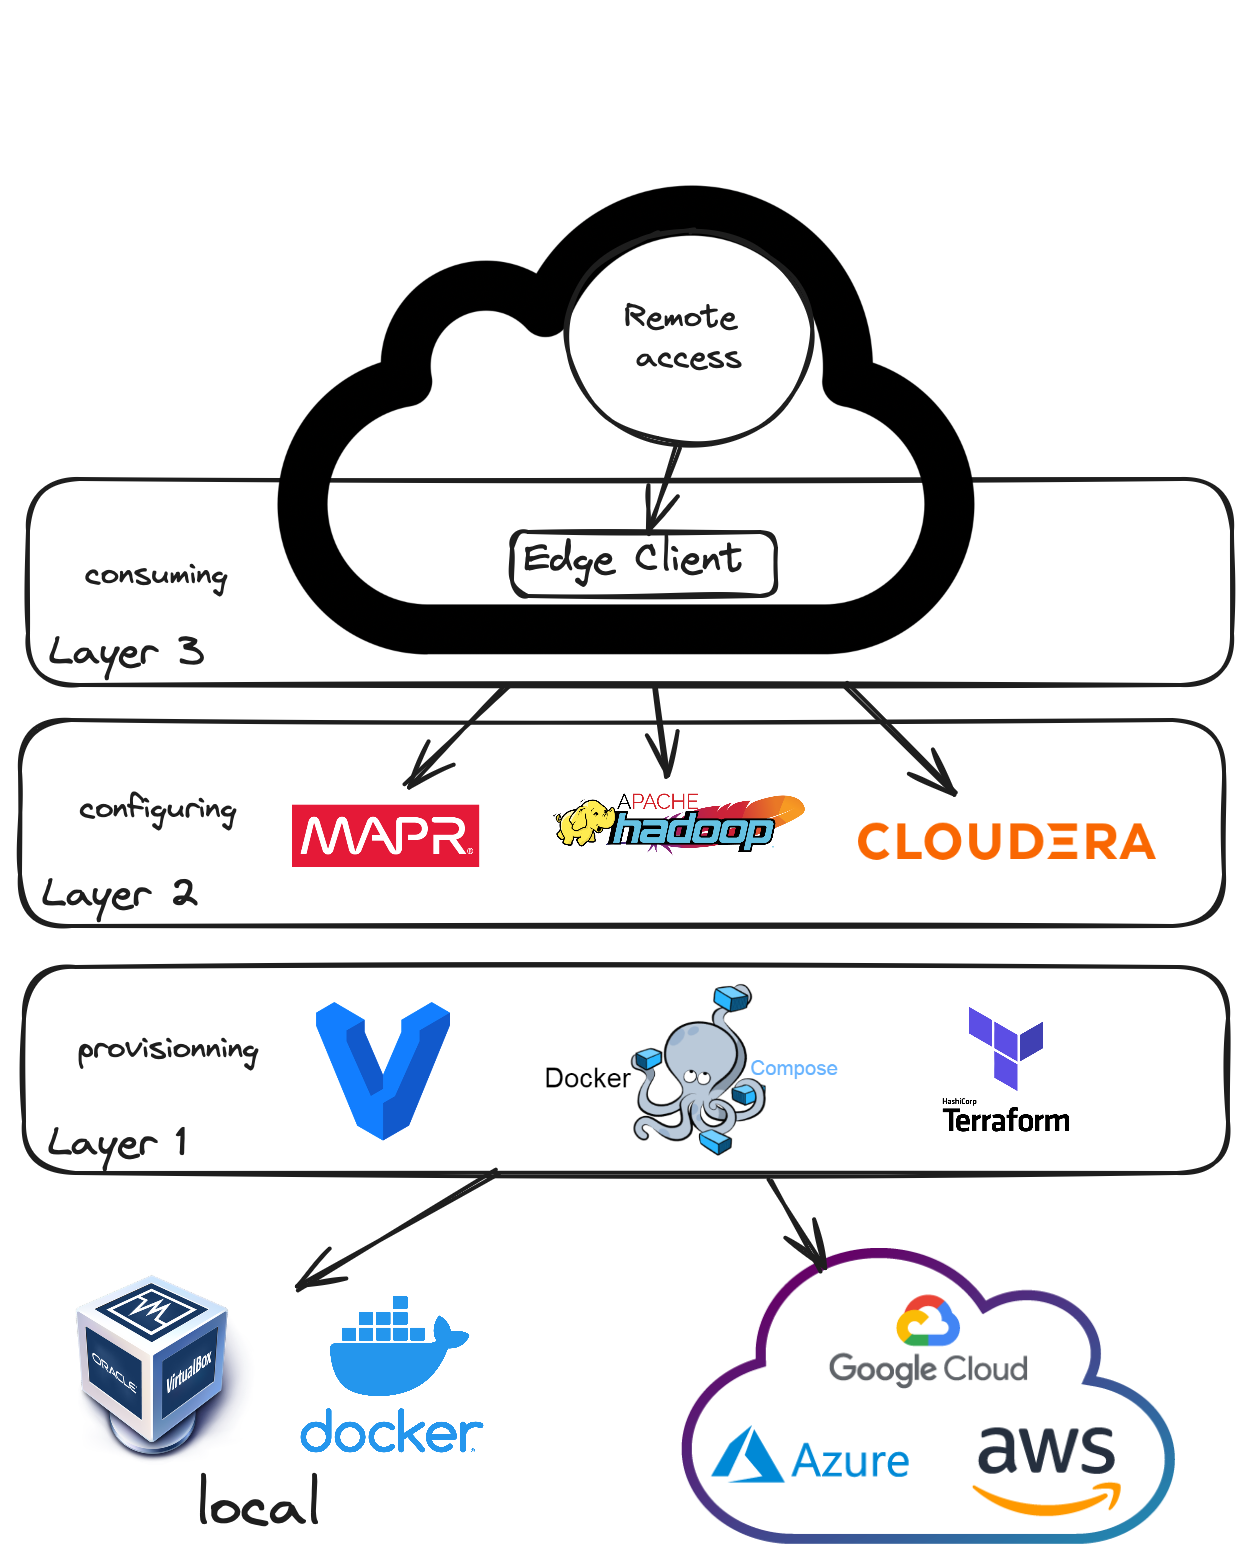
The aim of our project is to facilitate the creation of lab environments for a learning company that specializes in teaching Big Data courses. These courses are designed to provide students with hands-on experience in working with Hadoop distributions, including OSS, Cloudera, and MapR. Our toolbox offers easy deployment of these Hadoop distributions using various methods, allowing students to explore different deployment and configuration management techniques.
Jean Piaget’s Mountains Task in action!
- Hadoop Distributions: Our toolbox supports the deployment of three main Hadoop distributions: OSS, Cloudera, and MapR. This variety allows students to gain exposure to different Hadoop platforms and understand their unique features and capabilities.
- Deployment Methods: We provide multiple deployment methods to cater to
different learning preferences and scenarios:
- Docker: Students can deploy Hadoop environments using Docker containers, offering a lightweight and portable solution.
- Vagrant: Virtual environments can be created using Vagrant, allowing students to set up Hadoop clusters on their local machines with ease.
- Terraform: Infrastructure as Code (IaC) enthusiasts can utilize Terraform to provision Hadoop clusters on cloud platforms or virtualization providers.
- Ansible: Especially focused on Ansible, our toolbox emphasizes configuration management techniques, enabling students to automate the setup and management of Hadoop environments.
- Integrated Curriculum: The courses offered by the learning company include comprehensive coverage of Hadoop concepts and hands-on labs using our toolbox. Students not only learn about Hadoop but also gain practical experience in deploying and managing Hadoop clusters using industry-standard tools like Docker, Vagrant, Terraform, and Ansible.
- Hands-on Learning: By providing easy access to deployable Hadoop environments, our project enhances the hands-on learning experience for students, allowing them to apply theoretical concepts in real-world scenarios.
- Exposure to Multiple Platforms: Students get exposure to a variety of Hadoop distributions, enabling them to understand the strengths and weaknesses of each platform and make informed decisions in their future career paths.
- Comprehensive Curriculum: Our integrated curriculum ensures that students receive a holistic learning experience, covering both theoretical concepts and practical implementation using state-of-the-art tools.
- Git Collaboration: We encourage students to contribute with git to this project so that they can learn Git workflows, including working in teams with branches and pull requests. Understanding Git collaboration is essential for effective teamwork and version control in software development projects. Learning these skills will prepare students for collaborative work environments and enhance their employability in the industry.
- Enhanced Automation: Continuously improving our automation capabilities, we aim to streamline the deployment and management processes further, reducing setup time and effort for students and instructors alike.
When you name a new file, think about the query you would type in the future to find it back.
- Choose names that clearly indicate the content or purpose of the file. Avoid generic or ambiguous names.
- Include relevant keywords in the filename that you would likely use when searching for it in the future.
- Follow a consistent naming convention across your files and projects to make it easier to navigate and understand.
- While being descriptive, strive to keep the filename concise and avoid unnecessary verbosity.
- Choose a naming convention that suits your preference and maintain consistency within your project.
- If the file represents a specific version or is related to a particular date, consider including this information in the filename.
- Stick to alphanumeric characters and underscores to ensure compatibility across different platforms.
NO SPACES WINDOWS HEADS !!!
- Choose the appropriate file extension based on the file type (e.g., .py for Python scripts, .txt for text files, etc.).
- Operating System: Windows 10
- System Type: 64-bit operating system, x64-based processor
- Processor: Intel(R) Xeon(R) CPU E5-2680 v4 @ 2.40GHz (2 processors)
- Installed RAM: 60.0 GB
- Hard disk: 512 Gb
- VirtualBox Version: 7.0
- RAM Allocation: 60 GB
- Processor Allocation: 48 processors
- Vagrant: Version 2.4.1 for Windows
- Git: 2.44 for Windows
- Operating System: Ubuntu 22.04 (VirtualBox Appliance)
- RAM: At least 24 GB
- CPUs: At least 12
- Software: Docker installed (Version 20.10.21)
- CDP Private Cloud Base free trial: https://www.cloudera.com/downloads/cdp-private-cloud-trial/cdp-private-cloud-base-trial.html
- HPE Ezmeral Data Fabric free trial: https://docs.ezmeral.hpe.com/datafabric/76/licensing/obtaining_a_license.html
- Windows Subsystem for Linux 2 (WSL2) should not be used because of compatibility issues with virtualbox and Windows 10.
- For this reason, it is recommended to disable Hyper-V:
bcdedit /set hypervisorlaunchtype off- Restart your machine.
- Open a Powershell terminal on the windows 10 machine provided by the learning company.
- Clone this repository in your home directory (e.g. C:\Users\user):
git clone https://github.com/lsiksous/manul.git
cd manulYou can choose to deploy your cluster on the windows host provided by the learning company.
When you execute vagrant up, Vagrant first loads the Vagrantfile to understand the configuration of the virtual environment. This file defines parameters such as the base box (the template for the virtual machine), the provider (like VirtualBox, Hyper-V, VMware, etc.), and any additional configuration scripts.
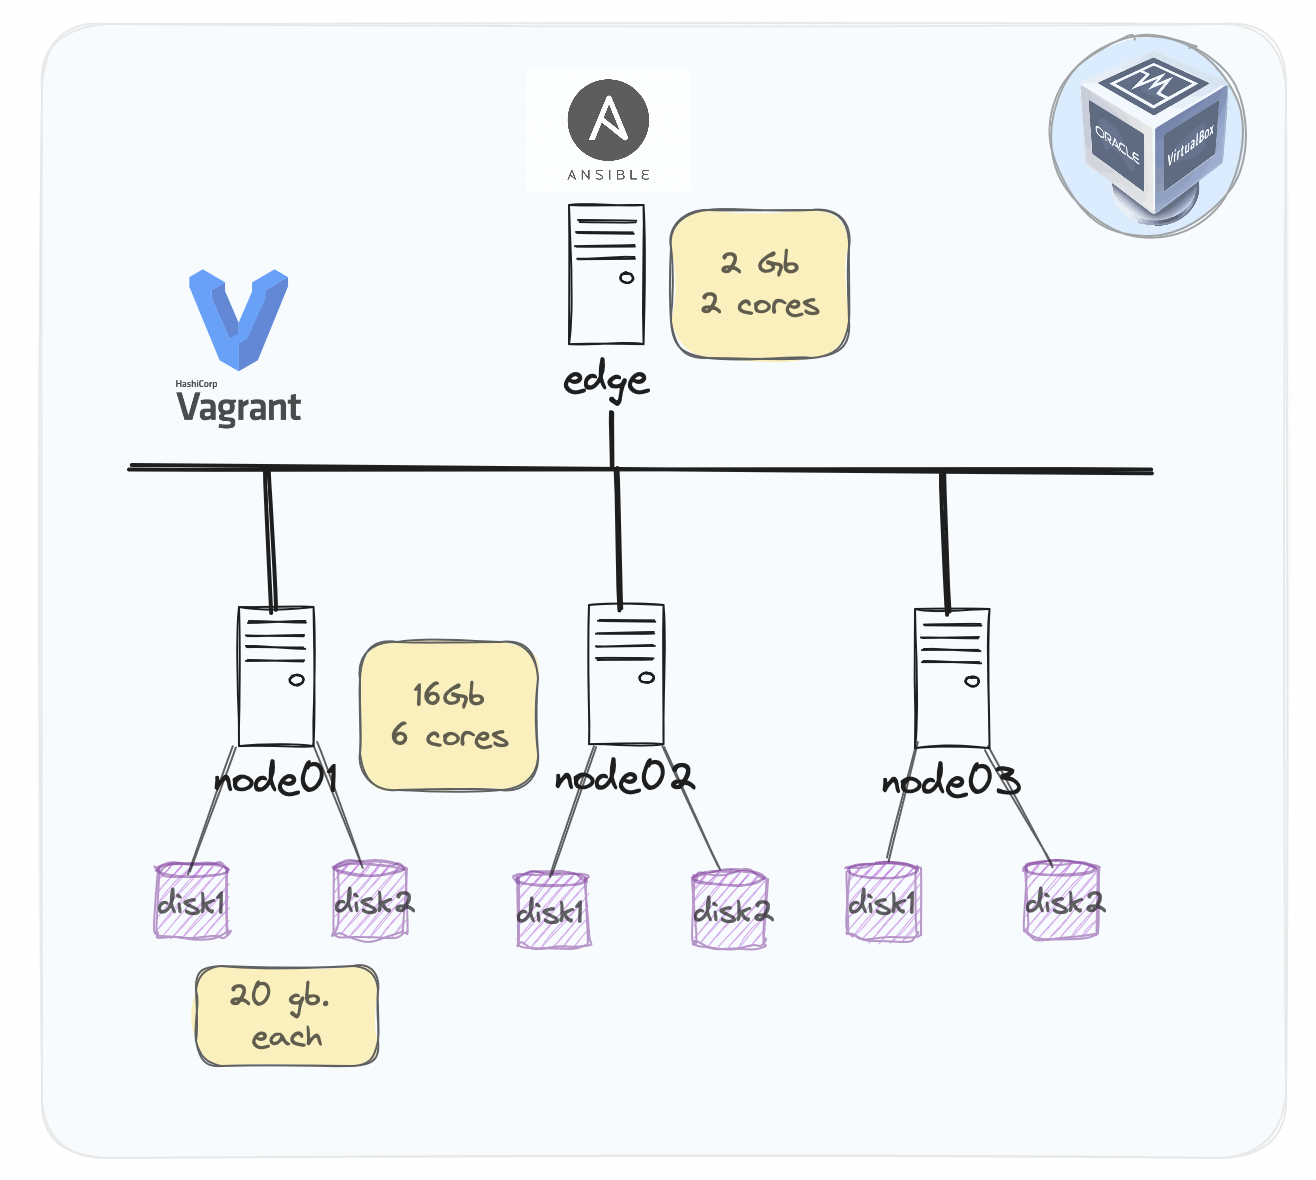
- Check your topology in tools/configure_environment.rb. You are free to adapt it to your needs by customizing the variables at the top of this file. The defaut values reflect what you see in the upper schema:
NUM_NODES = 3
NUM_CONTROLLER_NODE = 1
IP_NTW = "10.0.1."
CONTROLLER_IP_START = 2
NODE_IP_START = 3
- Open a window terminal and run vagrant up:
vagrant up - Configure ssh:
- The vagrant ssh-config command in Vagrant is a utility that outputs OpenSSH valid configuration to connect to the machine via SSH.
- We will setup VS Code to connect to our nodes (filesystem and terminal).
vagrant ssh-config > ~/.ssh/configYou can choose to deploy your cluster locally on a unix-like system (including a pre-provisionned ubuntu virtual box running on the windows host provided by the learning company).
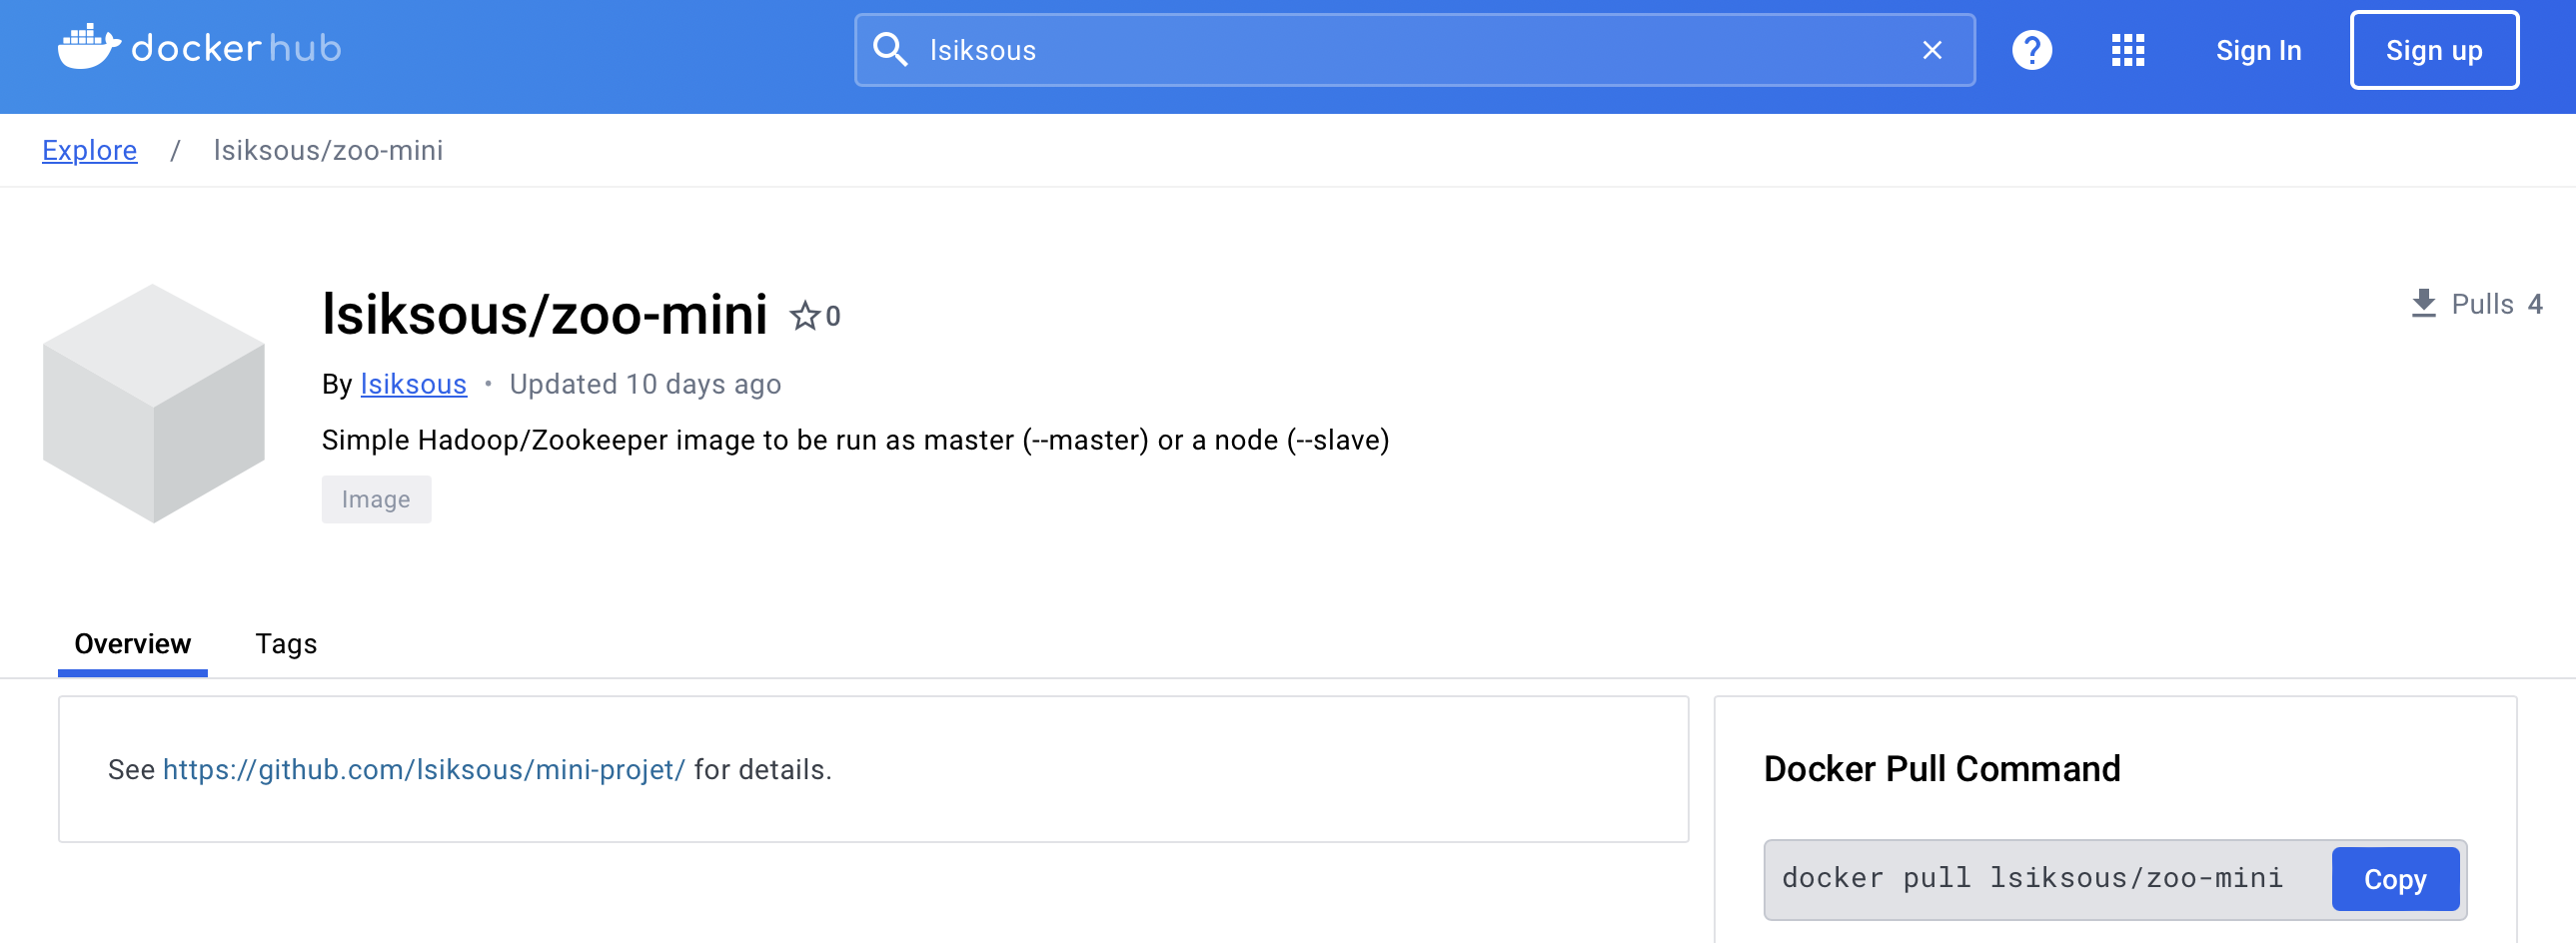
We prepared a specific docker image for this project. You can find it on Docker Hub.
docker-compose upYou can choose to deploy your cluster to the cloud (e.g. Azure).
cd terraform && terraform init && terraform plan -out main.tfplanterraform apply main.tfplan# Get the Azure resource group name
resource_group_name=$(terraform output -raw resource_group_name)
# Get the virtual network name
virtual_network_name=$(terraform output -raw virtual_network_name)
# Use az network vnet show to display the details of the newly created virtual network
az network vnet show \
--resource-group $resource_group_name \
--name $virtual_network_name# Run terraform plan and specify the destroy flag
terraform plan -destroy -out main.destroy.tfplan
# Run terraform apply to apply the execution plan
terraform apply main.destroy.tfplanMapR provides an installer that simplifies the process of setting up a cluster by automating many of the steps. This method is recommended for users who want a straightforward installation process and are willing to use a somewhat standardized cluster configuration.
Steps Involved:
- Setup an installation node that can communicate with all other nodes in the cluster.
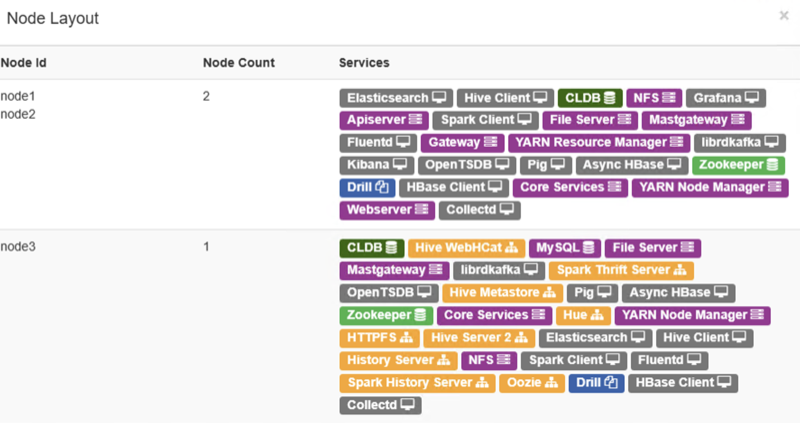
- Run the MapR Installer from a web-based interface provided by MapR, which guides you through the process.
- Select the services and features you wish to install (like MapR-FS, MapR-DB, Hadoop components, etc.).
- The installer automatically configures and deploys the selected services across the cluster.
To illustrate the installation of this distribution, we will use a vagrant cluster that we have provisioned earlier.
- Connect via ssh to your edge machine:
vagrant ssh edge - cd into manul directory and pull last version:
cd manul
git pull- Customize environment variables:
cp templates/manul_env-template.sh manul_env.shEdit the file to reflect your desired values for important variables. It may contains secrets so it will not be synced on remote origin. Think about saving it somewhere privately in case of a problem.
vagrant@edge:~/manul$ cat manul_env.sh
#!/bin/bash

export CLUSTER_NAME=manul.arpa

export MAPR_RELEASE=6.1.1
export MAPR_MEP_RELEASE=6.4.0

# MapR distribution env variables
export HPE_USER='<HPE_USER>'
export HPE_TOKEN='<HPE_TOKEN>'

export MAPR_USER=mapr
export MAPR_PASSWD=mapr
export MAPR_GROUP=mapr
export MAPR_GID=5000
export MAPR_UID=5000

# Oozie URL
export OOZIE_URL='https://node03.manul.arpa:11443/oozie'

# Hive user
export HIVE_USER=hive
export HIVE_PASSWD=hive

# OSS distribution env variables
export HADOOP_USER=hadoop
export HADOOP_PASSWD=hadoop
You should have obtained a passport from HPE. It is mandatory that you include it here. After that, source the file:
source manul_env.sh - Verify that vagrant configure environment suits to your need:
vagrant@edge:~/manul$ head -10 tools/configure_environment.rb
# configure_environment.rb
NUM_NODES = 3
NUM_CONTROLLER_NODE = 1
IP_NTW = "10.0.1."
CONTROLLER_IP_START = 2
NODE_IP_START = 3
Normally, it should be the 3 nodes cluster that this document is based on. If you had made changes in the vagrant provisioning step, it will be different.
- Generate hosts file:
vagrant@edge:~/manul$ tools/generate_hosts_file.sh
Hosts file generated successfully.
You should obtain something like this:
vagrant@edge:~/manul$ cat hosts 127.0.0.1 localhost 10.0.1.4 node01.manul.arpa node01 10.0.1.5 node02.manul.arpa node02 10.0.1.6 node03.manul.arpa node03 10.0.1.3 edge.manul.arpa edge - Now copy this hosts file to /etc/hosts.
sudo cp hosts /etc/hosts
- Check your inventory
You must verify that your inventory is coherent with your hosts file. If you had made changes in the vagrant provisioning step, you will have to reflect them in this file. Normally, it should look like this:
[edges] edge ansible_host=10.0.1.3 ansible_user=vagrant ansible_password=vagrant [nodes] node01 ansible_host=10.0.1.4 ansible_user=vagrant ansible_password=vagrant node02 ansible_host=10.0.1.5 ansible_user=vagrant ansible_password=vagrant node03 ansible_host=10.0.1.6 ansible_user=vagrant ansible_password=vagrant # Add more nodes as needed - Run ansible playbook:
# source manul_env.sh must have been done before running this command ansible-playbook -i inventory.ini 00-mapr_configure.yml - Now you should be able to launch the mapr installer (see Configuration chapter
to continue installation):
sudo /tmp/mapr-setup.sh -r https://$HPE_USER:$HPE_TOKEN@package.ezmeral.hpe.com/releases/
In a MapR cluster environment, the maprlogin command is used to authenticate users to the cluster. This command generates a ticket file that grants access to MapR services and resources for a specified period of time. Here’s how it works:
Authentication: When a user runs maprlogin, they provide their MapR cluster username and password. The maprlogin command then authenticates the user against the MapR cluster.
Ticket File Generation: Upon successful authentication, maprlogin generates a ticket file. This ticket file contains authentication credentials and permissions granted to the user. By default, the ticket file is created in the /tmp directory.
Using the Ticket: The ticket file is used to authenticate subsequent MapR commands and operations.
Executing MapR Commands: Once authenticated, the user can execute MapR commands as usual. The commands will use the ticket file to authenticate to the MapR cluster and perform the requested operations.
su mapr
maprlogin passwordHue serves as a comprehensive web-based interface for interacting with our cluster, providing a user-friendly environment for data exploration, querying, and job orchestration. With its intuitive interface, Hue simplifies access to various components of the Hadoop ecosystem, allowing users to run SQL queries, visualize data, manage Hadoop jobs, and more.
Utilizing Grafana for monitoring our cluster enhances our ability to observe, analyze, and optimize its performance. Grafana, an open-source monitoring platform, enables us to visualize key metrics and trends, facilitating proactive management and troubleshooting. By configuring Grafana to connect with our cluster’s metrics, we gain valuable insights into resource utilization, health status, and system behavior.
- Cluster Configuration: We’ll configure the MapR cluster according to our requirements. This includes specifying the nodes that will participate in the cluster, configuring storage and network settings, and setting up any additional services or features.
- Security Setup: MapR provides robust security features to protect data and resources within the cluster. We should configure security settings such as authentication mechanisms, access controls, encryption, and auditing to ensure the confidentiality, integrity, and availability of data. But we’ll leave this step out for the moment as it is a complex subject and we only need a sandbox for teaching essential concepts to newbies. Nonetheless, there definitely should be a dedicated course and labs on this one.
- Post-Installation Tasks: After the installation is complete, we may need to perform additional tasks such as verifying the installation, testing cluster functionality and integrating with other systems or applications.
This is a pretty long process, so we made a dedicated documentation for this step (See doc/mapr_configuration.org
- Run the playbook:
ansible-playbook -i inventory.ini 50-mapr_post_install-edge.yml
- Run the playbook:
ansible-playbook -i inventory.ini 99-mapr_post_install-cluster.yml
- Splendeurs Obami (@Ginius) : Beta-testing and labs development.
- Khoudia Fall (@fall5443) : A fellow student who wrote the map/reduce algo in python.
This project is licensed under the GNU General Public License v3.0.
I would like to extend my gratitude to the following individuals:
- Dr. Heni Bouhamed: A great mind and inspiration in my Hadoop learning journey. I hope to include his own hadoop distribution in this project very soon : https://zettaspark.io
- Salem Ben Afia: For his great sense of humour, talent and vision.


