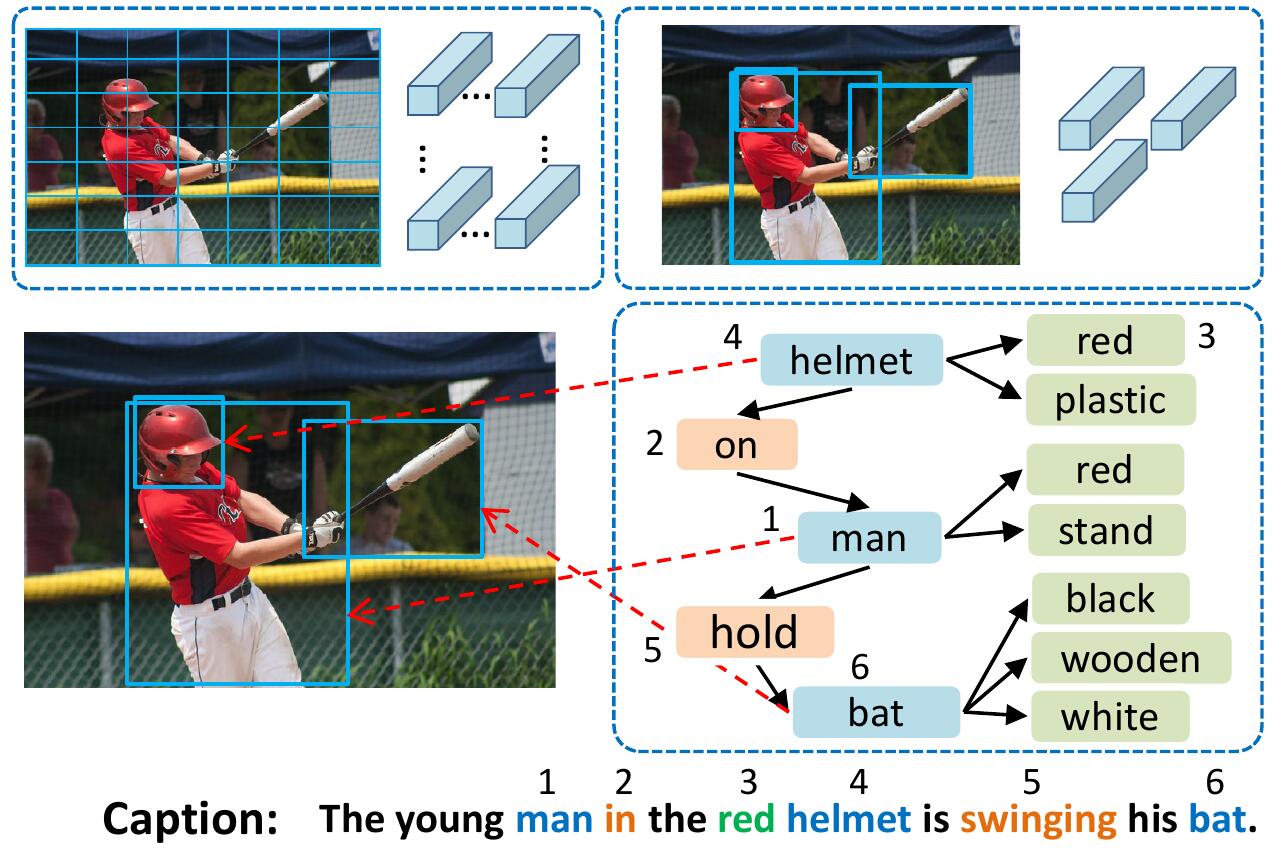
VSUA model represents images as structured graphs where nodes are the so-called Visual Semantic Units (VSUs): object, attribute, and relationship units. Our VSUA model makes use of the alignment nature between caption words and VSUs.
If you find this code useful in your research then please cite
@inproceedings{guo2019vsua,
 title={Aligning Linguistic Words and Visual Semantic Units for Image Captioning},
 author={Longteng Guo, Jing Liu, Jinhui Tang, Jiangwei Li, Wei Luo, and Hanqing Lu},
 booktitle={ACM MM},
 year={2019}}
- Cuda-enabled GPU
- Python 2.7, and PyTorch >= 0.4
- Cider (already been added as a submodule)
- Optionally:
- coco-caption (already been added as a submodule): If you'd like to evaluate BLEU/METEOR/CIDEr scores
- tensorboardX: If you want to visualize the loss histories (needs to install TensorFlow).
To install all submodules: git clone --recursive https://github.com/ltguo19/VSUA-Captioning.git
For more details and other dataset, see ruotianluo/self-critical.pytorch
Download preprocessed coco captions from link from Karpathy's homepage. Extract dataset_coco.json from the zip file and copy it into data/. This file provides preprocessed captions and also standard train-val-test splits.
Then do:
$ python scripts/prepro_labels.py --input_json data/dataset_coco.json --output_json data/cocotalk.json --output_h5 data/cocotalkprepro_labels.py will map all words that occur <= 5 times to a special UNK token, and create a vocabulary for all the remaining words. The image information and vocabulary are dumped into data/cocotalk.json and discretized caption data are dumped into data/cocotalk_label.h5.
We use the pre-extracted bottom-up image features. Download pre-extracted feature from link (we use the adaptive one in our experiments). For example:
mkdir data/bu_data; cd data/bu_data
wget https://storage.googleapis.com/bottom-up-attention/trainval.zip
unzip trainval.zip
Then:
python script/make_bu_data.py --output_dir data/cocobuThis will create data/cocobu_fc, data/cocobu_att and data/cocobu_box.
We use the scene graph data from yangxuntu/SGAE. Download the files coco_img_sg.zip and coco_pred_sg_rela.npy from this link and put them into the folder data and then unzip them.
coco_img_sg.zip contains scene graph data for each image, including object labels and attributes labels for each box in the adaptive bottom-up data, and the semantic relationship labels between boxes. coco_pred_sg_rela.npy contains the vocabularies for the object, attribute and relation labels.
Download the files vsua_box_info.pkl from this link, which contains the size of each box and the width/height of each image.
Then do:
python scripts/cal_geometry_feats.py
python scripts/build_geometry_graph.py
to extract the geometry relation features and build the geometry graph. This will createdata/geometry_feats-undirected.pkl and data/geometry-iou0.2-dist0.5-undirected.
Overall, the data folder should contain these files/folders:
cocotalk.json         	# additional information about images and vocab
cocotalk_label.h5       # captions
coco-train-idxs.p       # cached token file for cider
cocobu_att              # bottom-up feature
cocobu_fc               # bottom-up average feature
coco_img_sg             # scene graph data
coco_pred_sg_rela.npy   # scene graph vocabularies
vsua_box_info.pkl       # boxes and width and height of images
geometry-iou0.2-dist0.5-undirected # geometry graph datapython train.py --gpus 0 --id experiment-xe --geometry_relation TrueThe train script will dump checkpoints into the folder specified by --checkpoint_root and --id.
python train.py --gpus 0 --id experiment-rl --geometry_relation True --learning_rate 5e-5 --resume_from experiment-xe --resume_from_best True --self_critical_after 0 --max_epochs 50--gpuspecifies the GPU used to run the model.--idis the name of this experiment and all information and checkpoints will be dumped tocheckpoint_root/idfolder.--geometry_relationspecifies the type of relationship to use. True: use geometry relationship, False: use semantic relationship.- To resume training, you can specify
--resume_fromoption to be the experiment id you want to resume from, and use--resume_from_bestto choose whether to resume from the best-performing checkpoint or the latest checkpoint. - If you have TensorFlow, the loss histories are automatically dumped into
checkpoint_root/id, and can be visualized using tensorboard bysh script/tensorboard.sh. - If you'd like to evaluate BLEU/METEOR/CIDEr scores during training in addition to validation cross-entropy loss, use
--language_eval 1option, but don't forget to download the coco-caption code intococo-captiondirectory. - For more options, see
opts.py. And see self-critical.pytorch for more training guidance.
This code is modified from Ruotian Luo's brilliant image captioning repo ruotianluo/self-critical.pytorch. We use the visual features provided by Bottom-Up peteanderson80/bottom-up-attention, and the scene graph data provided by yangxuntu/SGAE. Thanks for their works! If you find this code helpful, please consider citing their corresponding papers and our paper.
