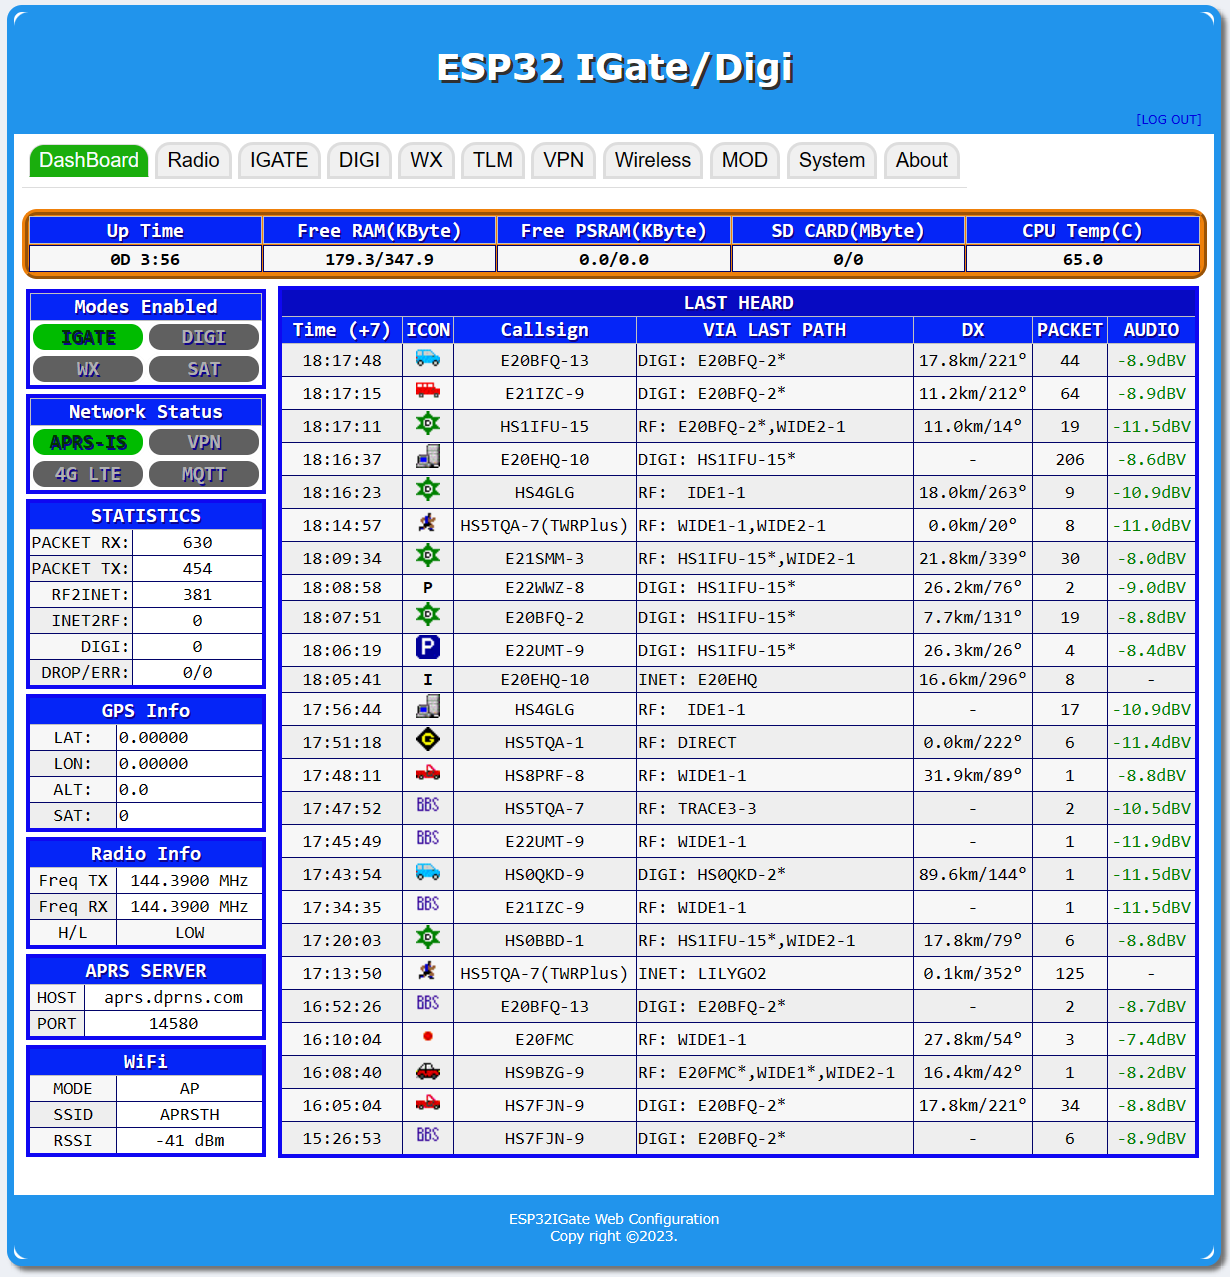
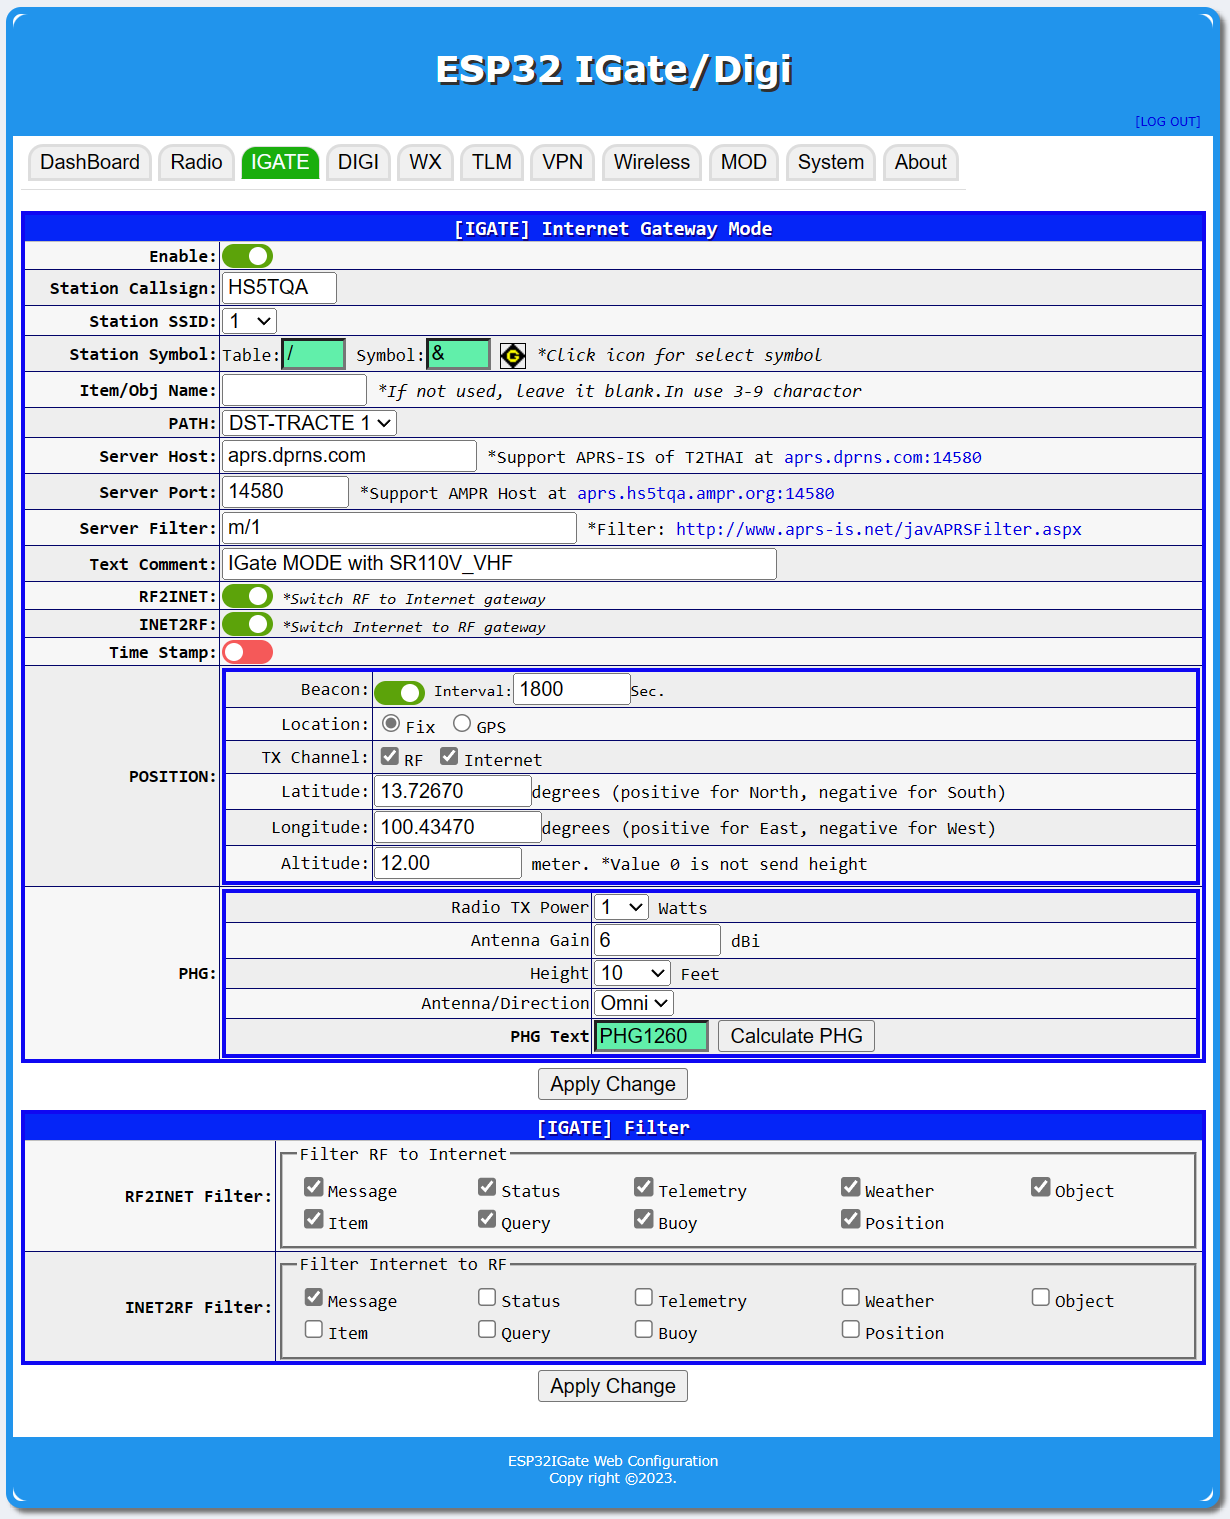
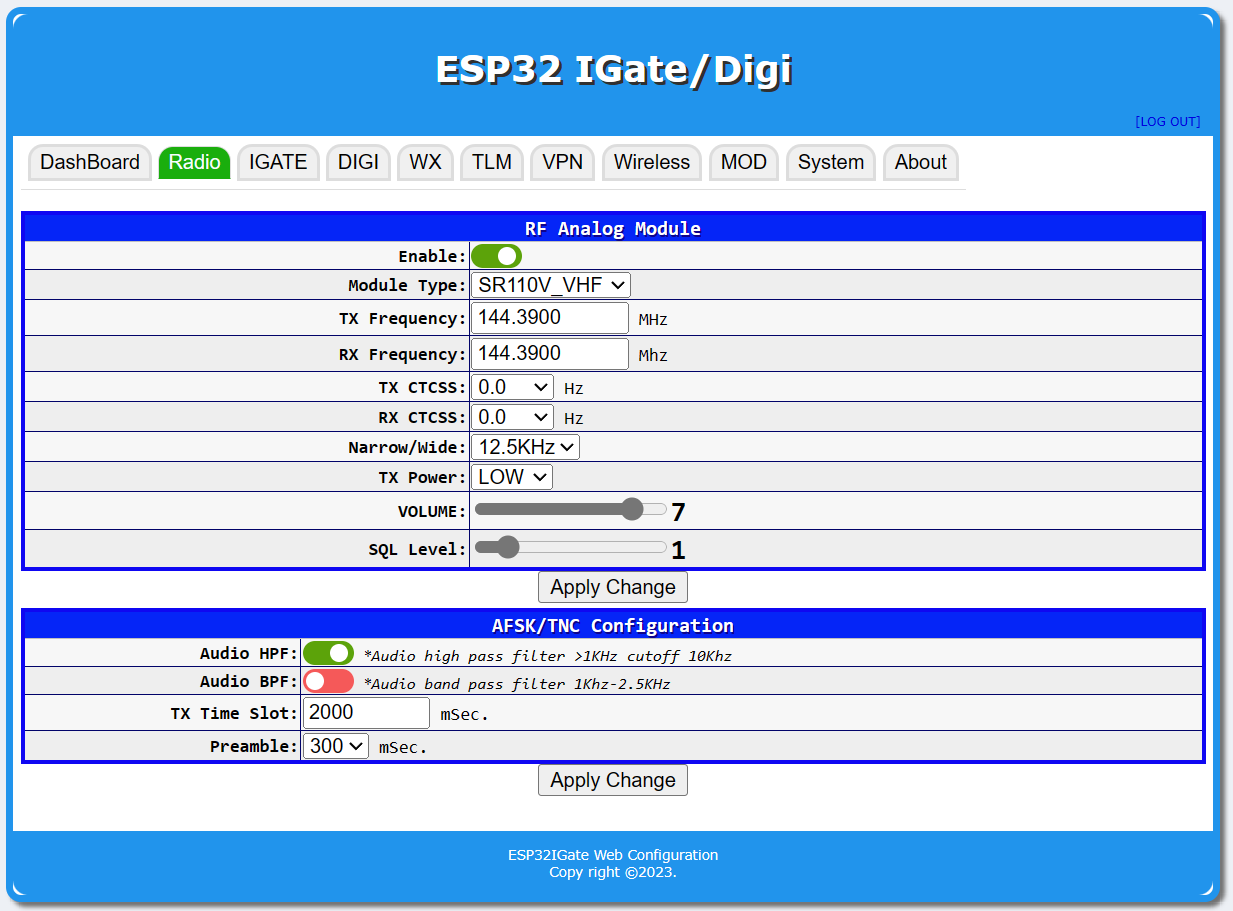
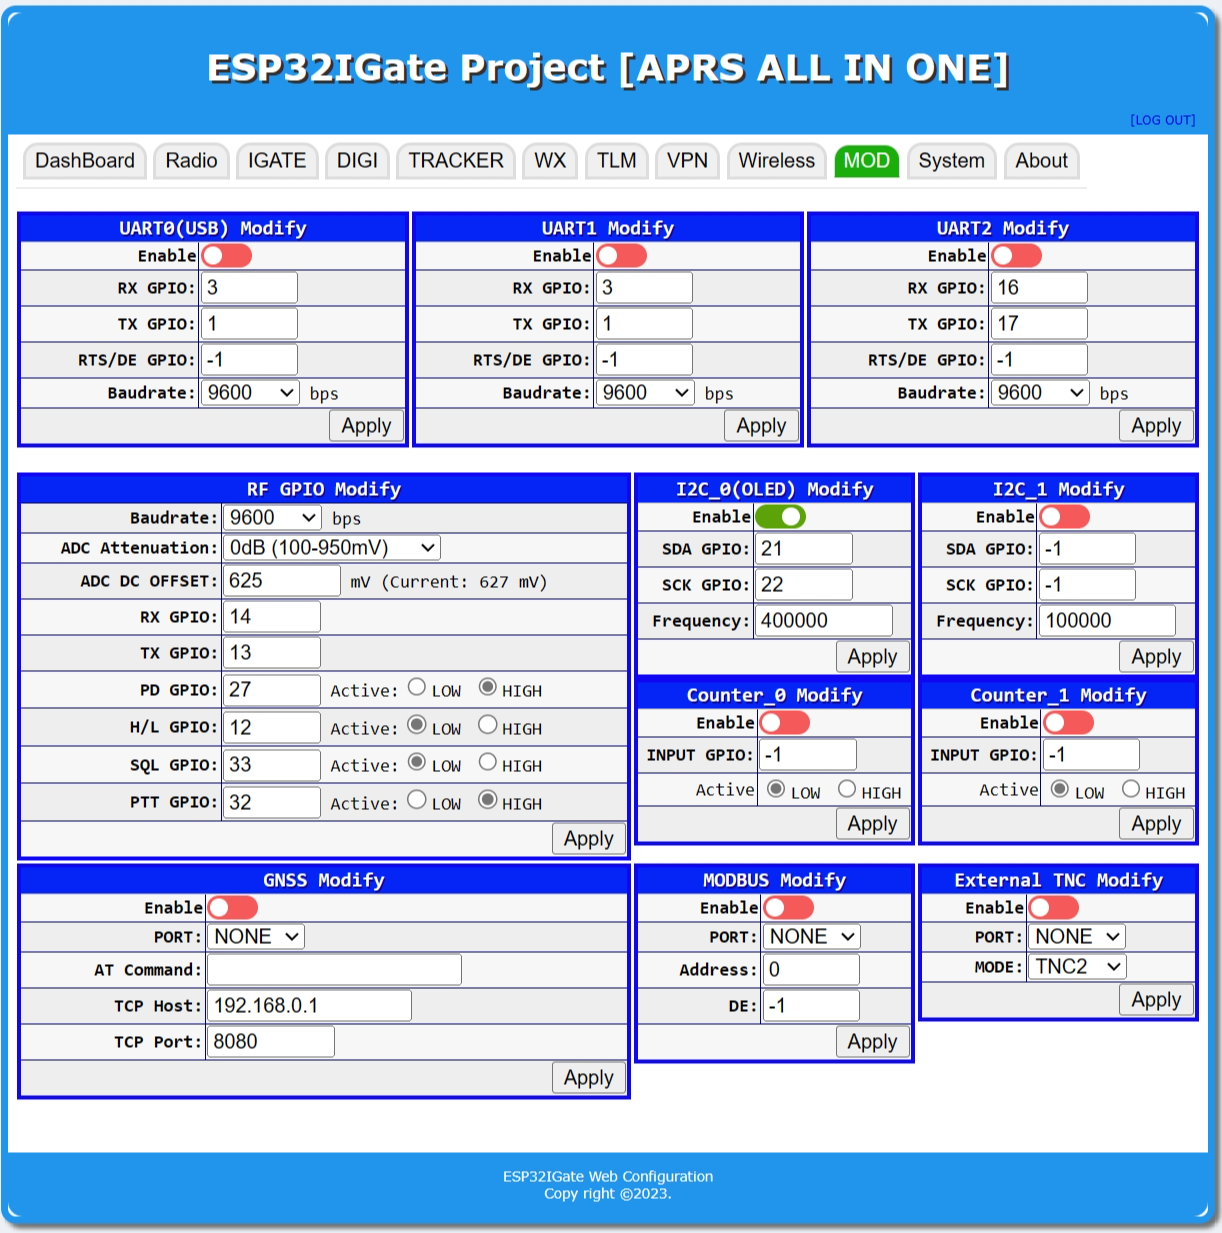
ESP32IGate is a Internet Gateway(IGate)/Dital Repeater(DiGi)/Tracker/Weather(WX)/Telemetry(TLM) with TNC Built in that is implemented for Espressif ESP32 processor.
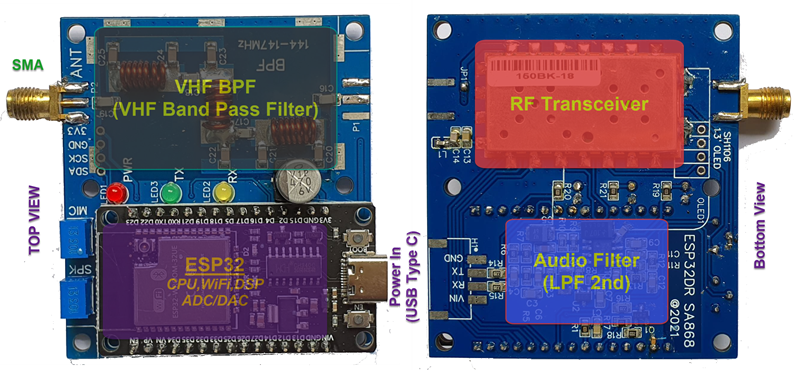
- Supported hardware: ESP32DR Simple,ESP32DR,D.I.Y Other
- Supported RF Module: SA8x8/FRS VHF/UHF/350 model
- Support APRS internet gateway (IGATE)
- Support APRS digital repeater (DIGI)
- Support APRS tracker (TRACKER)
- Support GNSS External mod select UART0-2 and TCP Client
- Support TNC External mod select UART0-2 and Yaesu packet
- Support APRS IGATE/DIGI/WX with fix position for move position from GNSS
- Using ESP-Arduino development on Visual studio code + Platform IO
- Support AFSK 1600/1800Hz 300bps AFSK (For HF radio)
- Support AFSK Bell202 1200bps (For VHF/UHF radio)
- Implementing software modem, decoding and encoding
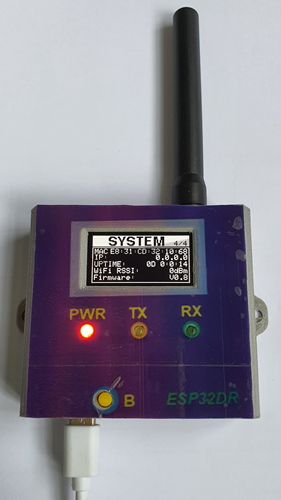
- Support monitor display information and statistices
- Support Wi-Fi multi station or WiFi Access point
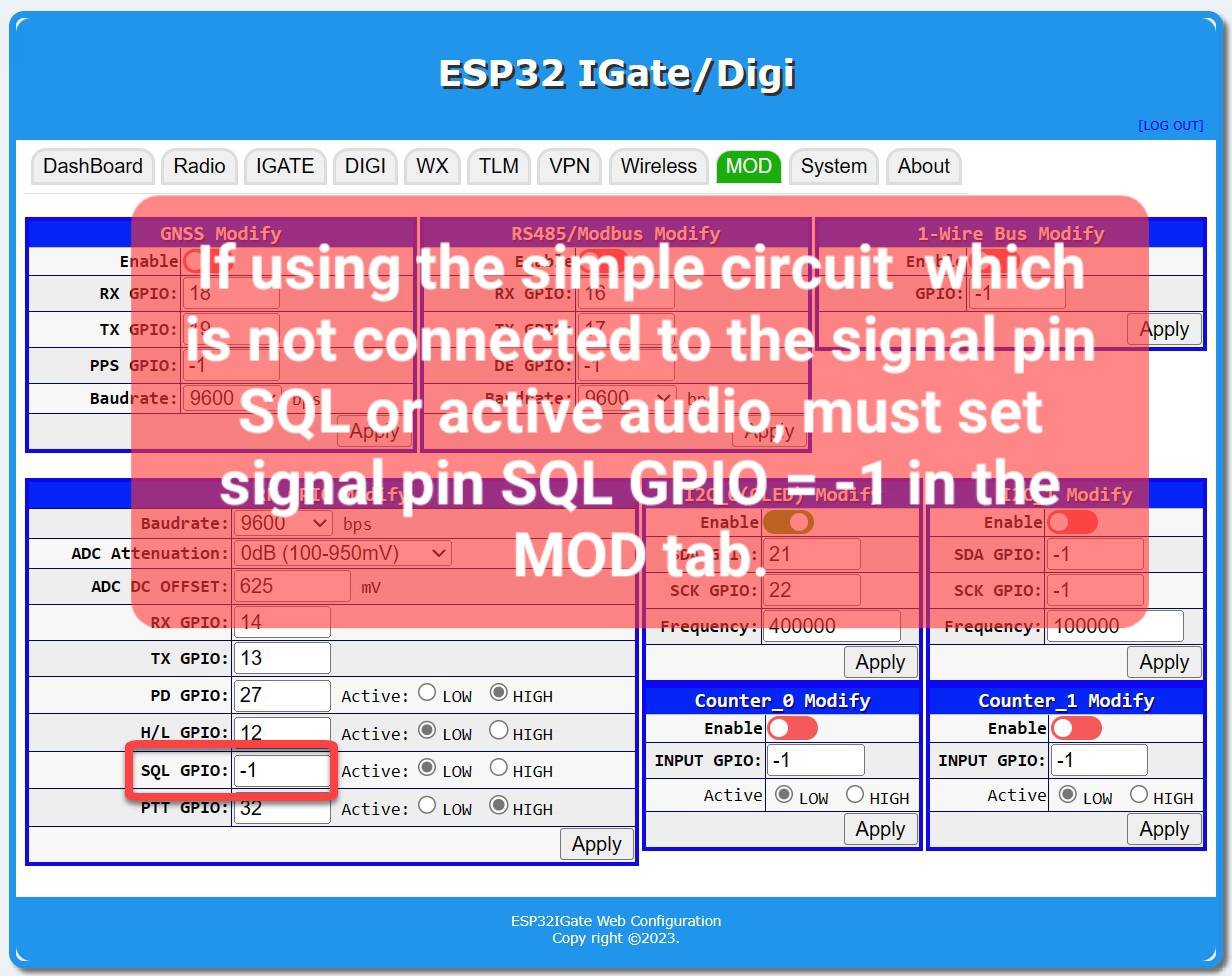
- support Web Service config and control system
- support filter packet rx/tx on igate,digi,display
- support audio filter BPF,HPF
- support VPN wireguard
- support global time zone
- support web service auth login
- display received and transmit packet on the LED and display OLED
Share project here
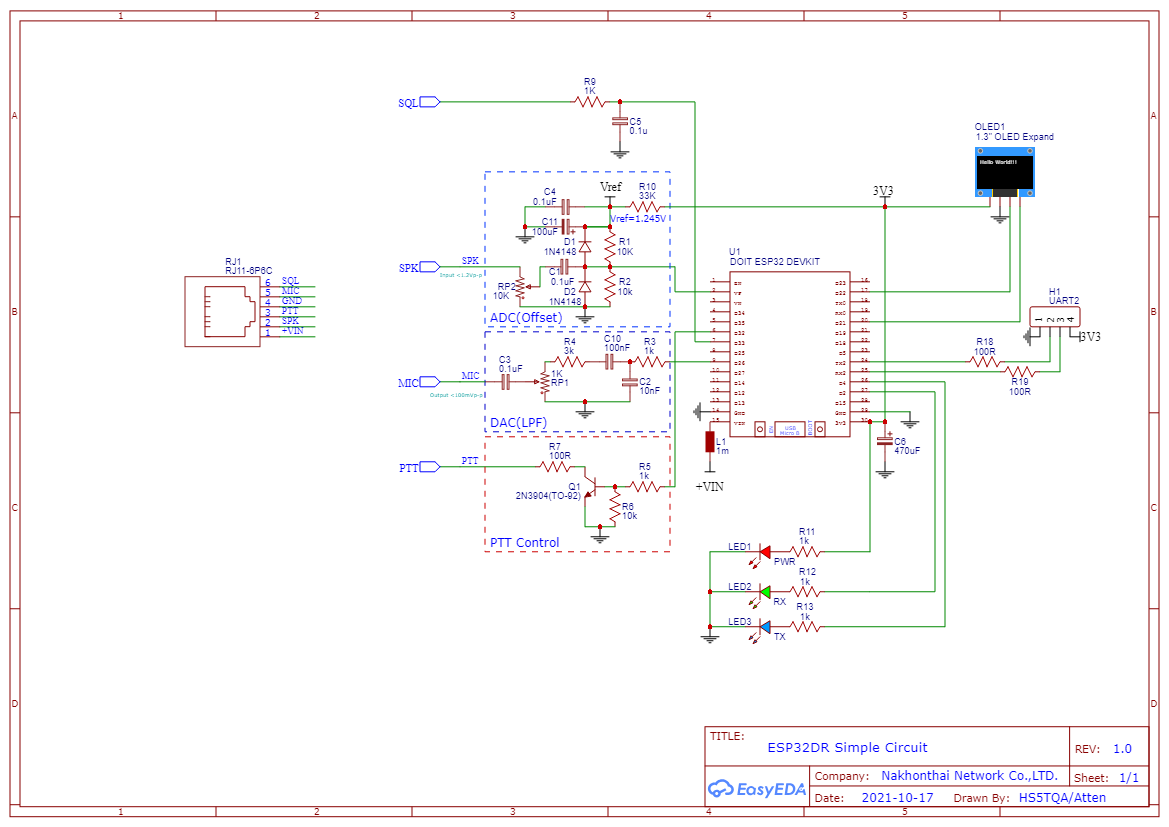
Schematic here
PCB Gerber hare
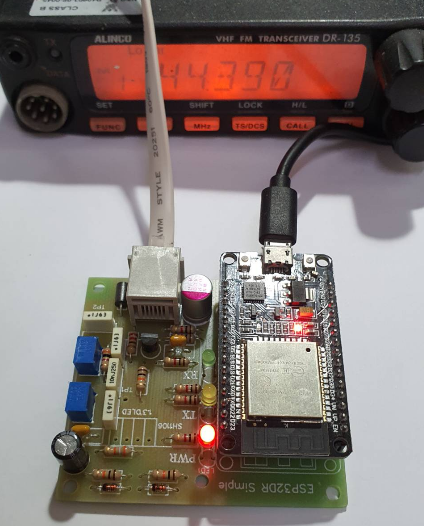
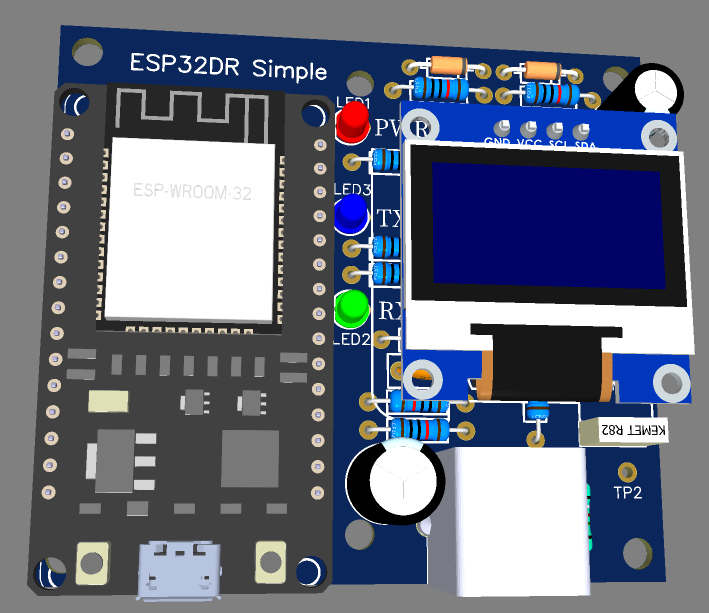
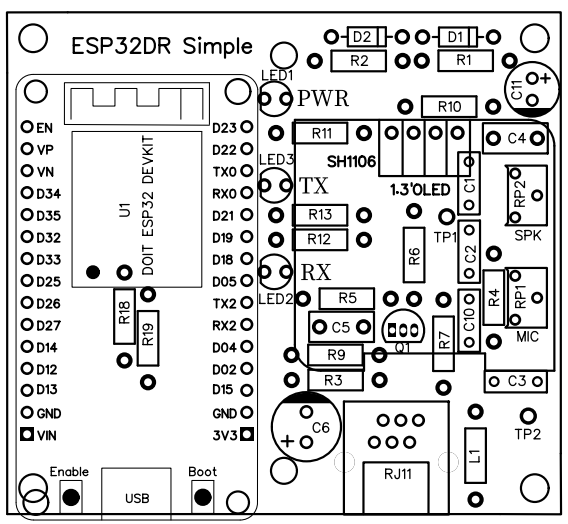
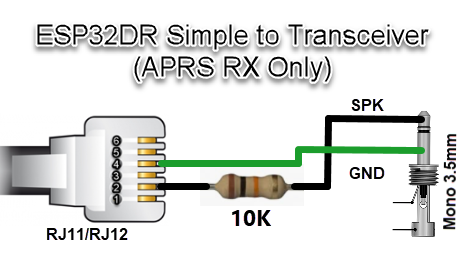
ESP32DR Simple Circut is small interface board for connecting to a transceiver.
- PCB size is 64x58mm
- PCB Single size
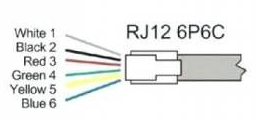
- RJ11 6 Pin out to Radio
The gerber data is here
The PCB film positive is here
The PCB film negative is here
The PCB Layout is here
The Schematic PDF is here
| Reference | Value | Description |
|---|---|---|
| U1 | ESP32 DEVKIT | DOIT ESP32 DEVKIT (โมดูล ESP32) |
| RP2 | 1K | VR 3362W (R ปรับค่าเสียงออก) |
| RP1 | 10K | VR 3362W (R ปรับค่าเสียงเข้า) |
| RJ11 | RJ11-6P6C | แจ๊คโมดูล RJ11 แบบ 6ขา |
| R13,R12,R11,R5,R3,R9 | 1K | R 1K 1/4W (ค่าสี: น้ำตาล ดำ แดง) |
| R7,R18,R19 | 100R | R 100R 1/4W (ค่าสี: น้ำตาล ดำ ดำ) |
| R6,R2,R1 | 10K | R 10k 1/4W (ค่าสี: น้ำตาล ดำ ส้ม) |
| R4 | 3K | R 3k 1/4W (ค่าสี: ส้ม ดำ แดง) |
| R10 | 33K | R 33K 1/4W (ค่าสี: ส้ม ส้ม ส้ม) |
| Q1 | 2N3904 | ทรานซิสเตอร์ NPN (TO-92) |
| LED3 | LED 3.5mm | สีเหลือง แสดงส่งสัญญาณ TX |
| LED2 | LED 3.5mm | สีเขียว แสดงรับสัญญาณ RX |
| LED1 | LED 3.5mm | สีแดง แสดงไฟเข้าทำงาน |
| L1 | L or JMP | L Isolate or Jumper |
| C11 | 100uF/6.3V | ตัวเก็บประจุแบบอิเล็กโทรไลติก |
| C4,C5 | 100nF | ตัวเก็บประจุแบบเซรามิกมัลติเลเยอร์ |
| C6 | 470uF/10V | ตัวเก็บประจุแบบอิเล็กโทรไลติก |
| C1,C3,C10 | 100nF หรือ 0.1uF | ตัวเก็บประจุแบบโพลีโพรไพลีน |
| C2 | 10nF หรือ 0.01uF | ตัวเก็บประจุแบบโพลีโพรไพลีน |
| D2,D1 | 1N4148 | ไดโอด หรือใช้ C 0.01uF แทนได้ |
*R18 and R19 ไม่ใส่ก็ได้.
*D2,D1 เปลี่ยนเป็นตัวเก็บประจุแบบเซรามิกมัลติเลเยอร์ค่า 10nF แทนได้
*หากใช้ต่อกับวิทยุรับส่งเข้าขาไมค์นอก ให้เปลี่ยน R4 เป็น 100K
จัดซื้อชุดคิทผ่าน Shopee ได้ที่ คลิ๊ก
The Howto DIY is here
Solder jumper is needed depending on a transceiver.
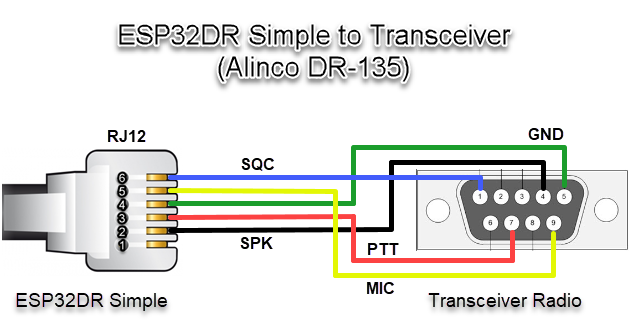
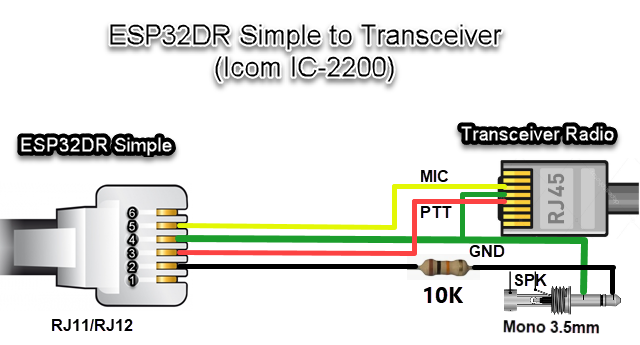
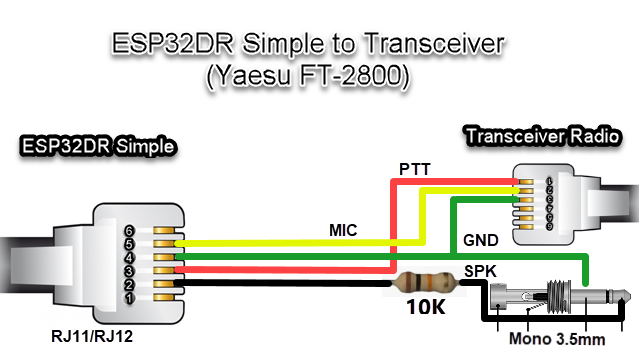
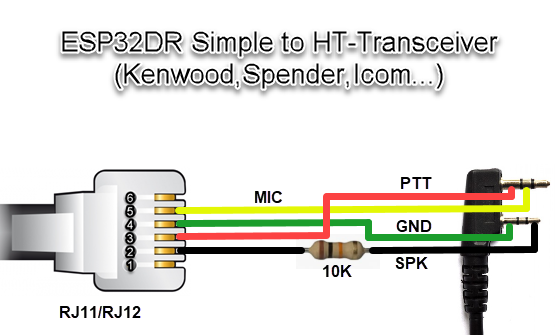
| Manufacture | RJ11-1 (+VIN) | RJ11-2 (SPK) | RJ11-3 (PTT) | RJ11-4 (GND) | RJ11-5 (MIC) | RJ11-6 (SQL) |
|---|---|---|---|---|---|---|
| Alinco DR-135(DB9) | - | 2 | 7 | 5 | 9 | 1 |
| IC2200(RJ45) | - | SP | 4 | 5 | 6 | - |
| FT-2800(RJ11) | - | SP | 1 | 3 | 2 | - |
| HT Mic Cable | - | SPK | PTT | GND | MIC | - |
for Alinco DR-135(DB9)
for ICOM IC2200(RJ45)
for Yaesu FT-2800(RJ11)
for Handheld
- 1.Connect the USB cable to the ESP32 Module.
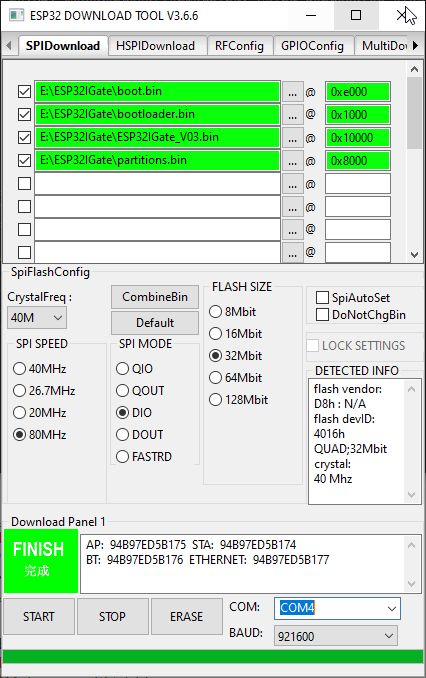
- 2.Download firmware and open the program ESP32 DOWNLOAD TOOL, set it in the firmware upload program, set the firmware to ESP32IGate_Vxx.bin, location 0x10000 and partitions.bin at 0x8000 and bootloader.bin at 0x1000 and boot.bin at 0xe000, if not loaded, connect GPIO0 cable to GND, press START button finished, press power button or reset (red) again.
- 3.Then go to WiFi AP SSID: ESP32IGate and open a browser to the website. http://192.168.4.1 password: aprsthnetwork Can be fixed Or turn on your Wi-Fi router.
- 4.Push BOOT button long >100ms to TX Position and >10Sec to Factory Default
https://www.espressif.com/en/support/download/other-tools
- Install Visual Studio Code and Python
- Search for the
PlatformIOplugin in theVisualStudioCodeextension and install it. - After the installation is complete, you need to restart
VisualStudioCode - After restarting
VisualStudioCode, selectFilein the upper left corner ofVisualStudioCode->Open Folder-> select theESP32APRS_T-TWRdirectory - Click on the
platformio.inifile, and in theplatformiocolumn, cancel the sample line that needs to be used, please make sure that only one line is valid - Click the (✔) symbol in the lower left corner to compile
- Connect the board to the computer USB
- Click (→) to upload firmware and reboot again
- After reboot display monitor and reconfig
- APRS SERVER of T2THAI at aprs.dprns.com:14580
- APRS SERVER of T2THAI ampr host at aprs.hs5tqa.ampr.org:14580
- APRS MAP SERVICE http://aprs.nakhonthai.net
To support the development of ESP32APRS you can make us a donation using github sponsors.
If you want to donate some hardware to facilitate APRS porting and development, contact us.
https://www.espressif.com/en/support/download/other-tools
This project implement by APRS text (TNC2 Raw) only,It not support null string(0x00) in the package.
