Java SE 8
Java 8 supported platforms, Android (API > 24)
Currently there are two ways to get the Azure IoT Central device library:
- Include the library as a dependency in your project if your project is a managed through Maven.
- Download the source code and build on your machine
This is the recommended method of including the Azure IoTCentral library in your project, however this method will only work if your project works with Maven.
- Navigate to http://search.maven.org, search for com.github.lucadruda.iotc and take note of the latest version number (or the version number of whichever version of the library you desire to use).
- In your main pom.xml file, add the Azure IoT Device client as a dependency using your desired version as follows:
	<dependency>
        <groupId>com.github.lucadruda</groupId>
        <artifactId>iotc-device-client</artifactId>
        <version>2.1.0</version>
		<!--This is the current version number as of the writing of this document. Yours may be different.-->
</dependency>- Get a copy of the Azure IoTCentral SDK for Java from GitHub (current repo). You should fetch a copy of the source from the master branch of the GitHub repository: https://github.com/lucadruda/iotc-java-device-client
git clone https://github.com/lucadruda/iotc-java-device-client.git- Open a command prompt and use the following commands:
mvn installThis will compile and install both client and samples project. If you wish to only build one or the other just specify project name:
mvn install -pl [project-name] # ('iotc-device-client' or 'iotc-device-samples')The compiled JAR file with all dependencies bundled in can then be found at:
{IoTCentral SDK for Java root}/target/iotc-device-client-{version}-with-dependencies.jar
When you're ready to use the Java device SDK in your own project, include this JAR file in your project.
Javadocs are automatically generated and available at Azure IoTCentral Device SDK doc page.
A couple of samples can be found in the samples folder.
import com.github.lucadruda.iotc.device.IoTCClient;
import com.github.lucadruda.iotc.device.enums.IOTC_CONNECT;

IoTCClient client = new IoTCClient(deviceId, scopeId, credType, credentials, storageManager);
deviceId : Device ID scopeId : IoT Central Scope ID
credType : IOTC_CONNECT => IOTC_CONNECT.SYMM_KEY or IOTC_CONNECT.DEVICE_KEY or IOTC_CONNECT_X509_CERT
credentials : SAS key or x509 Certificate
storageManager : A storage manager to cache credentials (see Cache Credentials for details);
The client also accepts custom loggers to use a different solution than console logging (default). The provided class must implement the ILogger interface.
IoTCClient client = new IoTCClient(deviceId, scopeId, credType, credentials, storageManager, logger);NOTE: Instructions on connecting devices using x.509 on IoT Central here.
Most of the APIs throw IoTCentralException when a failure occurs
void client.Connect([timeout]);timeout: optional timeout for connection in seconds.
The client provides automatic re-connection in case of network issues. If you need to definitely disconnect it, just call the Disconnect method.
void client.Disconnect();Sends a telemetry to IoT Central.
void client.SendTelemetry(payload,[properties]);-
payload: The telemetry object. It can be a JSON string (e.g. "{"temperature":23}" ) or a plain Java object (POJO).
-
properties: Optional object containing extra properties for the message. It can be a JSON string or a plain Java object (POJO).
Sends a property to IoT Central.
void client.SendProperty(payload,[properties]);payload: The property object. It can be a JSON string (e.g. "{"fanSpeed":120}" ) or a plain Java object (POJO).
Change the logging level.
void client.SetLogging(IOTC_LOGGING logLevel);- logLevel : (default value is
IOTC_LOGGING.API_ONLY)
class IOTLogLevel:
  IOTC_LOGGING.DISABLED, // no logs
  IOTC_LOGGING.API_ONLY, // common operations
IOTC_LOGGING.ALL // verbose log and debugChange the provisioning service endpoint URL
void client.SetGlobalEndpoint(String url)
url : URL for service endpoint. (default value is global.azure-devices-provisioning.net)
NOTE: this must be called before Connect().
Set the transport protocol for both Provisioning Service and IoT Central client.
public void SetProtocol(IOTC_PROTOCOL transport);- transport: One transport protocol between HTTPS, MQTT, AMQPS and their WebSocket mods (MQTT_WS, AMQPS_WS).
Default: MQTT
NOTE: this must be called before Connect().
void client.on(IOTC_EVENTS.Properties, callback);- callback: Callback receiving an IoTCProperty object and triggered when a property changes in IoTCentral. Class PropertiesCallback can be used for this purpose.
e.g.
PropertiesCallback onProps = (IoTCProperty property) -> {
            System.out.println(String.format("Received property '%s' with value: %s", property.getName(),
                    property.getValue().toString()));
            property.ack("Property applied");
        };
Calling ack() after property value has been received/applied is mandatory to sync values between device and IoT Central application.
client.on(IOTC_EVENTS.Commands, onCommand);- callback: Callback receiving an IoTCCommand object and triggered when a command is sent from IoTCentral. For offline command, callback will trigger both when device is connected and when a command is enqueued and device re-connect after disconnession. Class CommandCallback can be used for this purpose.
e.g.
        CommandCallback onCommand = (IoTCCommand command) -> {
            System.out.println(String.format("Received command '%s' with value: %s", command.getName(),
                    command.getRequestPayload().toString()));
            return command.reply(IOTC_COMMAND_RESPONSE.SUCCESS, "Command executed");
        };
Calling reply() after command execution is used when a response is required (default). For offline commands the method is a no-op.
public boolean UploadFile(String fileName, File file);Uploads a file to a storage account configured in the IoT Central application.
-
fileName: The final name for the file on the storage. This is not the source file path, but target name of the final blob.
-
file: The File object to upload
Instructions on enabling file upload feature for an IoT Central application are available here.
The IoT Central device client accepts a storage manager to cache connection credentials. This allows to skip unnecessary device re-provisioning and requests to provisioning service. When valid credentials are present, device connects directly to IoT Central, otherwise it asks provisioning service for new credentials and eventually cache them.
Provided class must implement ICentralStorage interface.
public interface ICentralStorage {
    void persist(Storage storage);
    Storage retrieve();
}A device can send custom data during provision process: if a device is aware of its IoT Central template Id, then it can be automatically provisioned.
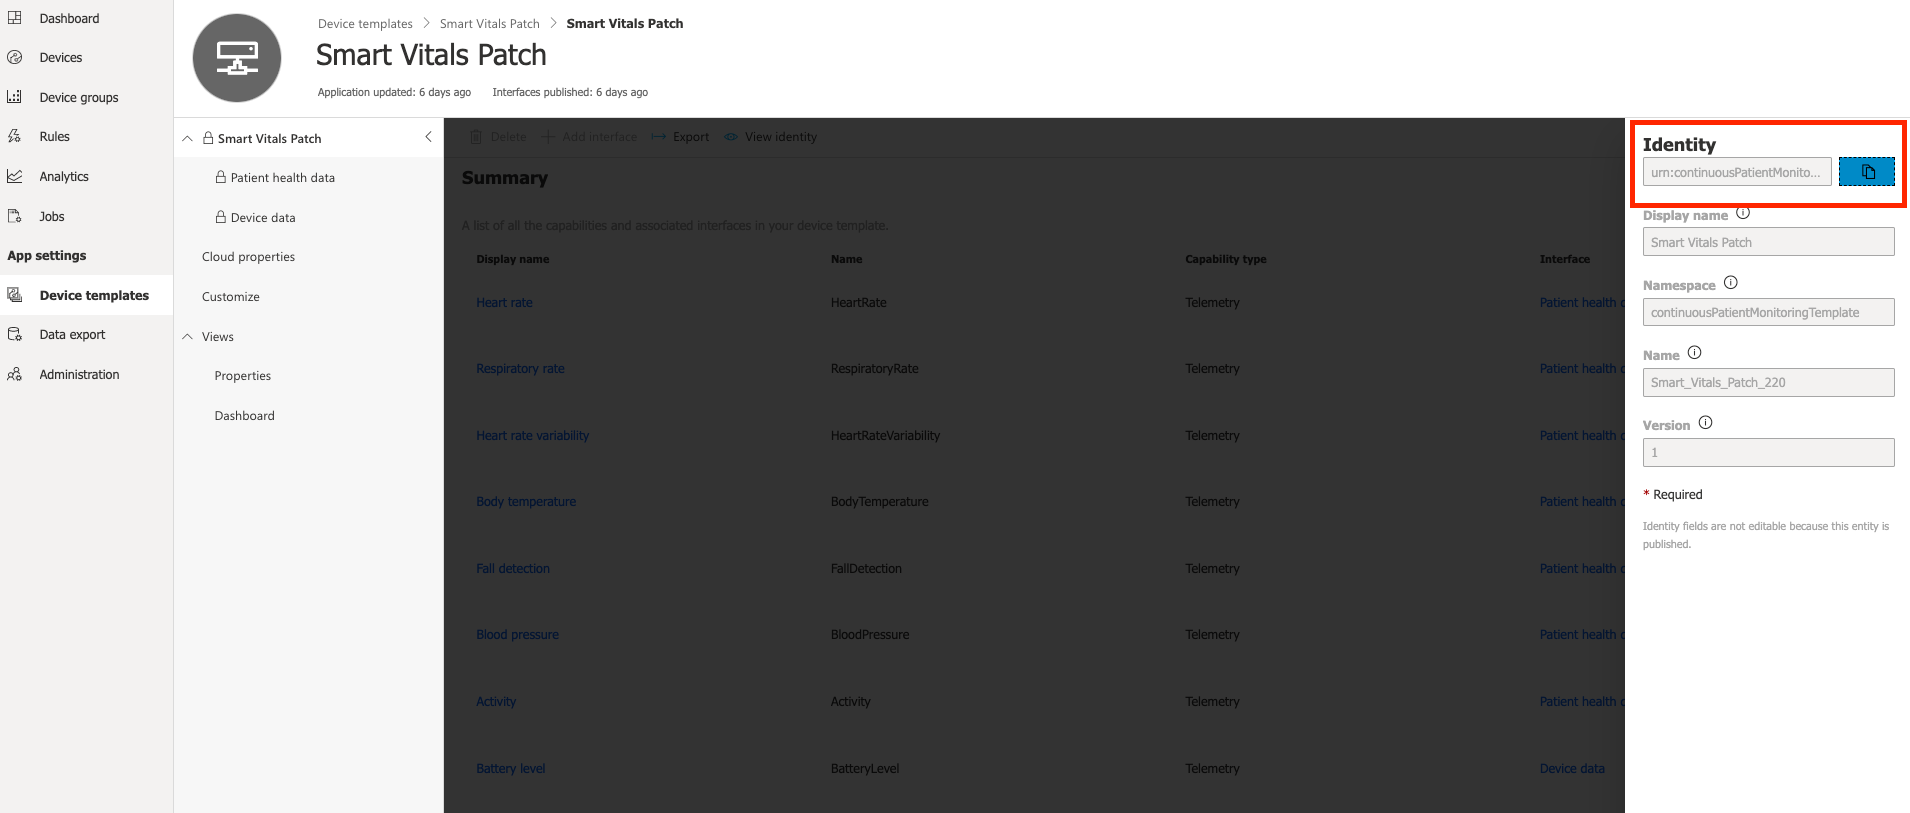
Device template id (a.k.a Model Id) is used when obtaining authorization codes for new devices and automatically assign them to the right template. By providing template id during credentials generation, user doesn't need to manually migrate or assign device from IoT Central site.
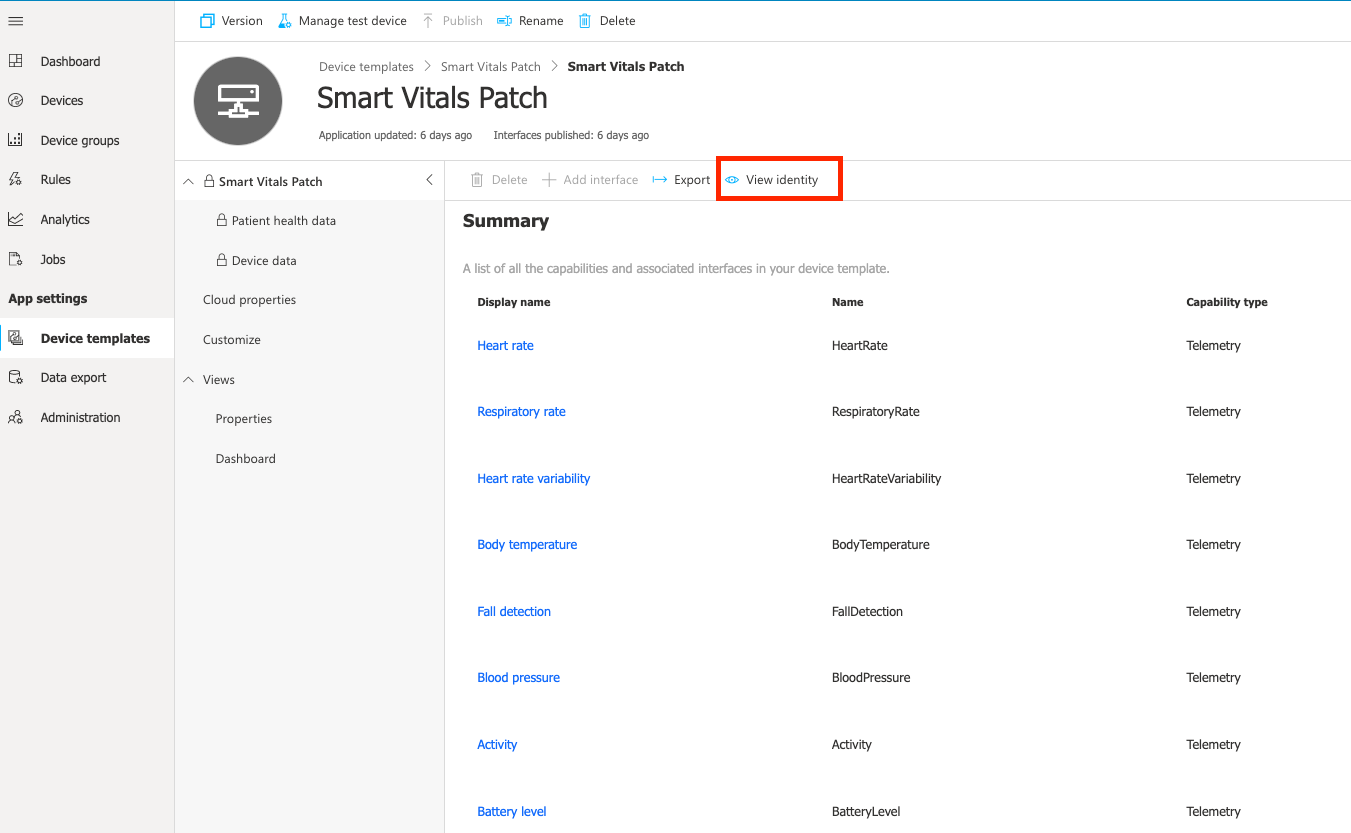
In order to get the unique identifier, open configuration page for required model under "Device templates" section.

Click on "View Identity" and in next screen copy model urn.

Then call this method before connect():
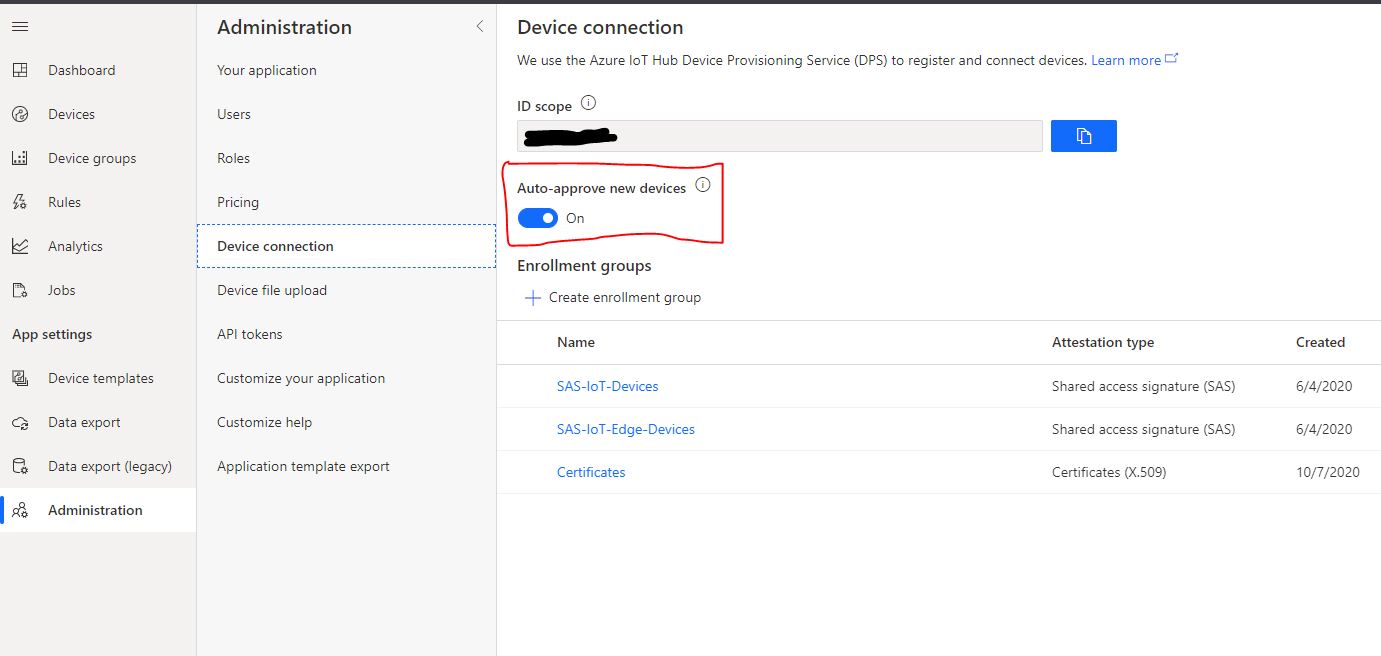
public void SetModelId(String modelId);By default device auto-approval in IoT Central is enabled, which means that administrators don't need to approve device registration to complete the provisioning process when device is not already created.
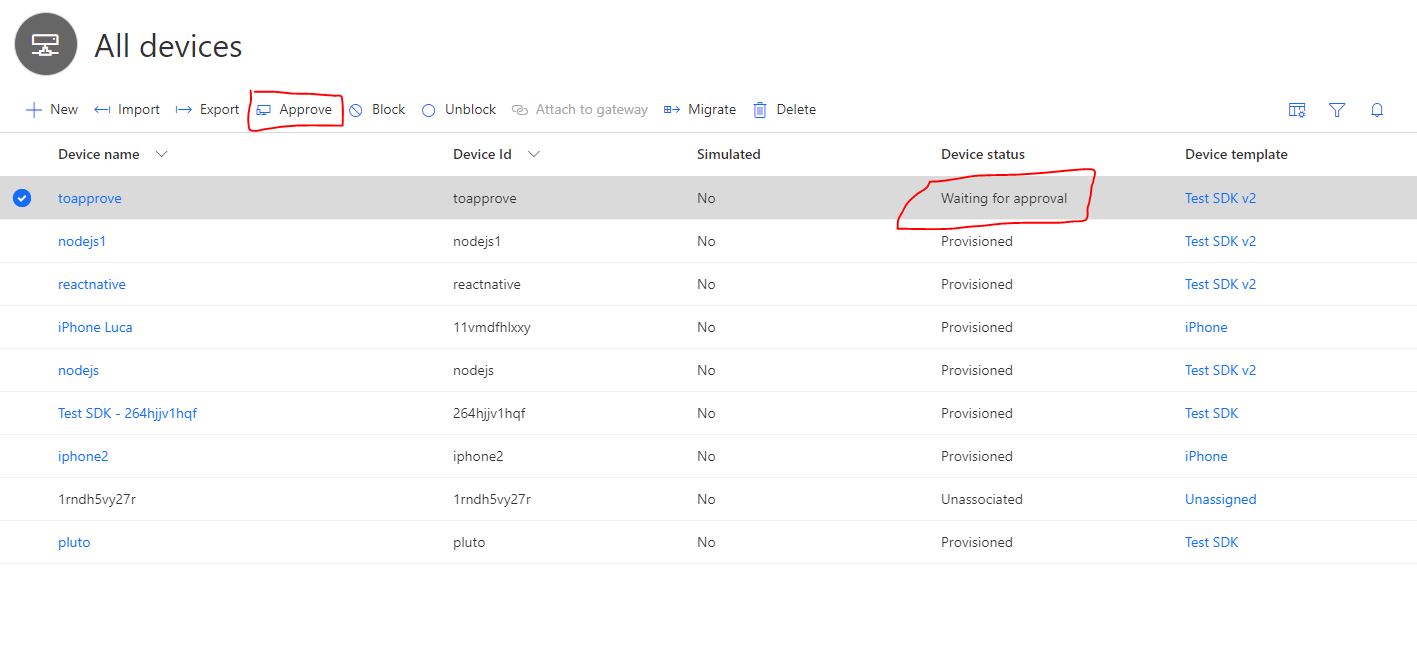
If auto-approval is disabled, administrators need to manually approve new devices.
This can be done from explorer page after selecting the device

This samples is licensed with the MIT license. For more information, see LICENSE

