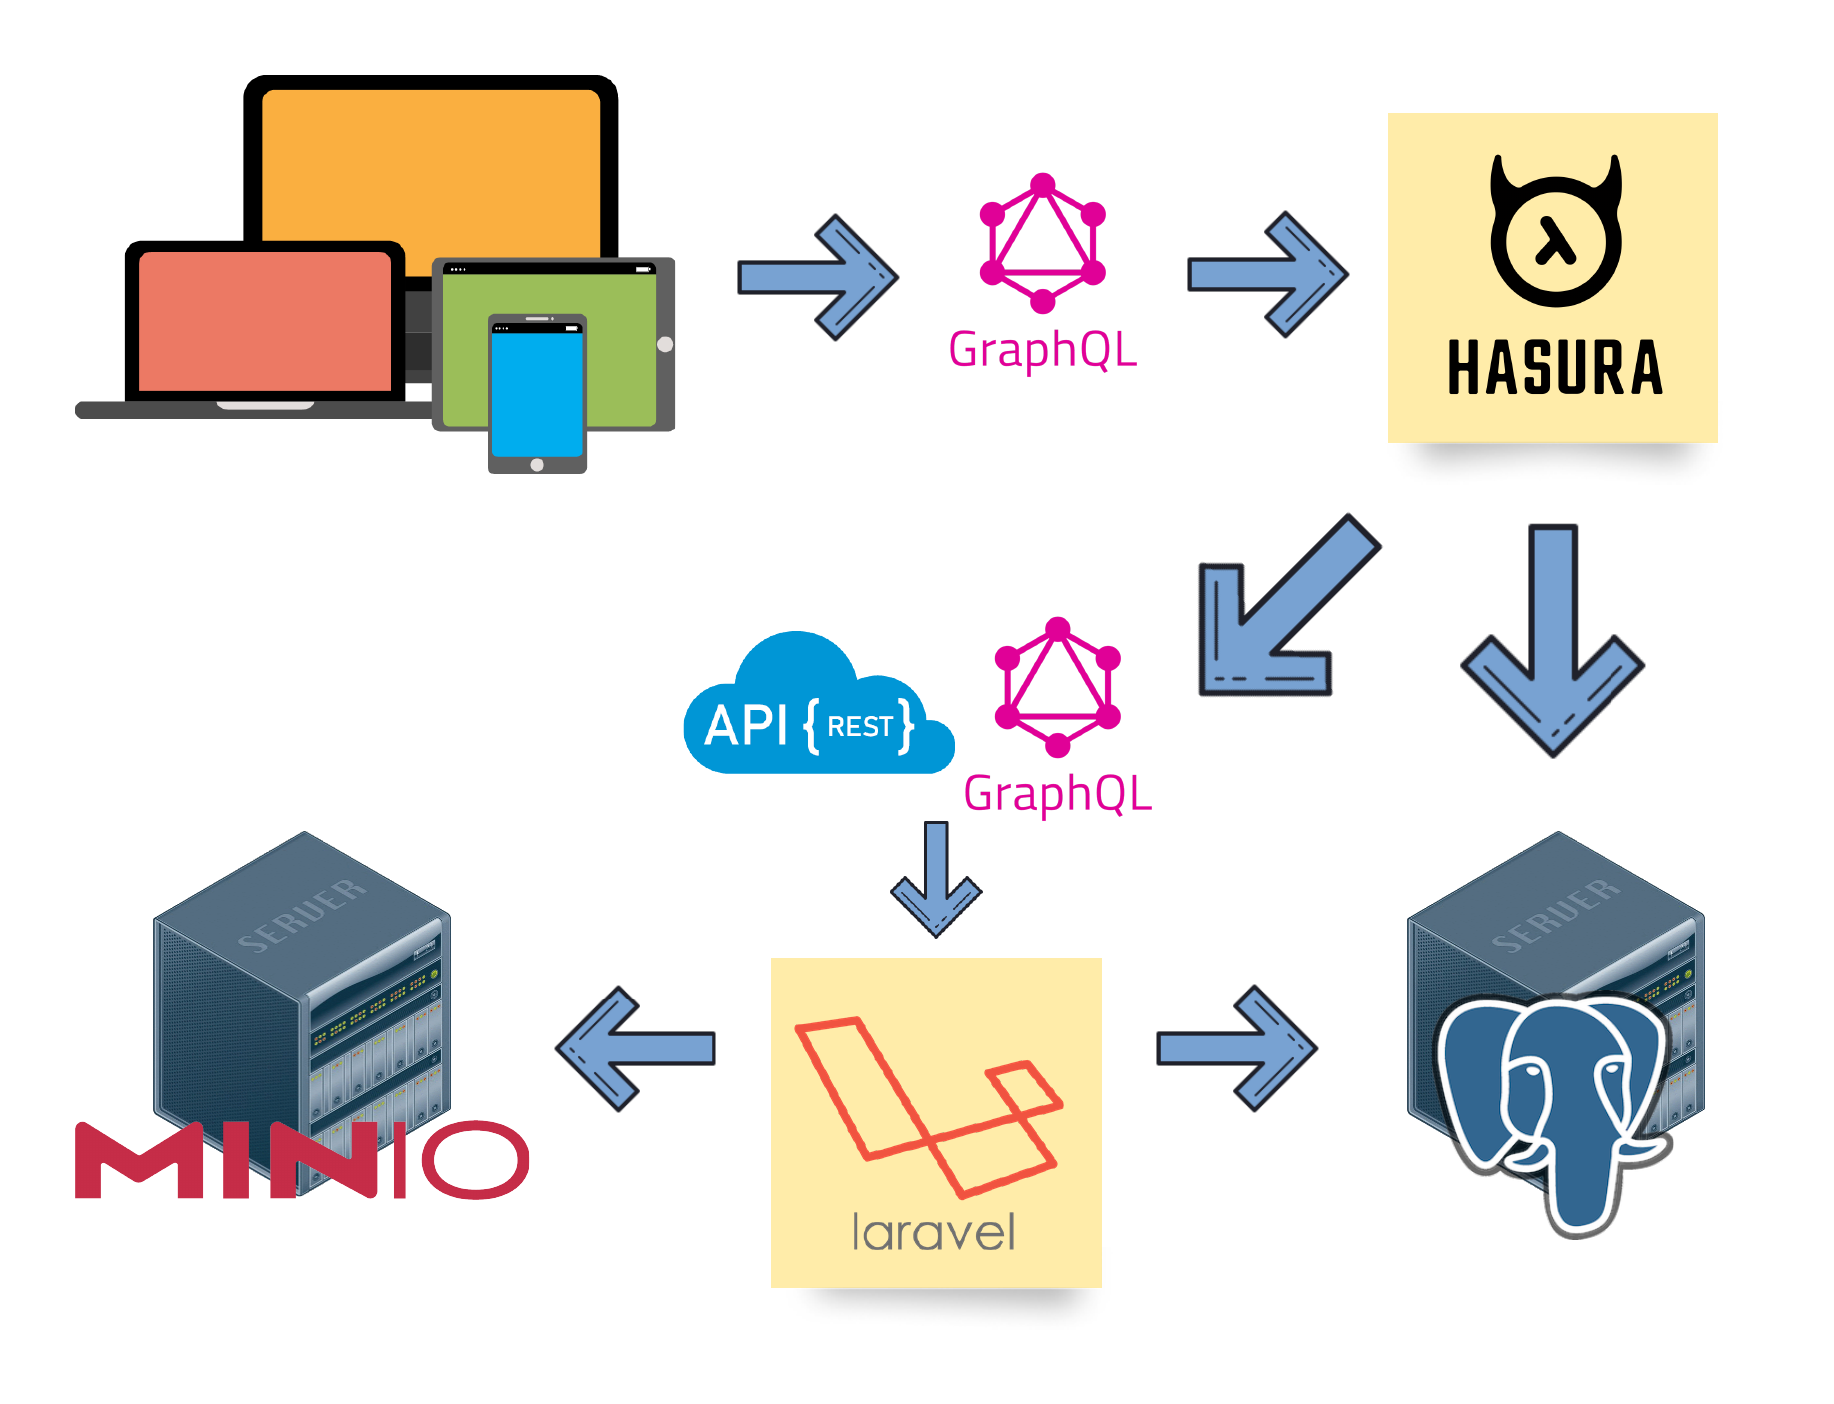
This backend-only boilerplate is created for people who are really really curious about GraphQL with Laravel 7.x and want to experience the wonders of Hasura GraphQL Builder. 😎 This is also for the frontend developers (yep, you, guys 😉) who just want to have a ready-to-use backend with all the basic features like JWT authentication 🔐, multi-role system 👔, and file upload feature 💾.
Btw, if you have cool suggestions, you can fork this repo or discuss it with me directly (Facebook). 😁 If you have a job offering, I am up for an interview! (Yes, I need MONEY! 💰💰💰)
P.S. There's a PPT presentation for more info here. Its password is laravelhasura.
- GraphQL-ready ⚡
- GraphQL JWT Authentication System 🔐 (Login, Register, Social Login, etc.)
- JWT Claims for Hasura GraphQL Server 💡
- Multi-Roles for Users with Approval and Access Level Logic 👔
- Anonymous Role for Newly Registered Users with Role Under Approval 👀
- MinIO Object Storage Integration 💾
- RESTful API route for Photo Upload 📷
- RESTful API route for Multiple Photo Upload 📷
- RESTful API route for Document Upload 📚
- RESTful API route for Multiple Document Upload 📚
- Payment Gateway Integration (Paymongo/Stripe) 💰
- SMS Gateway Integration (Nexmo) 📮
- Frontend (Gatsby React with Authentication Scaffolding) (LET'S GO FULLSTACK SOON! 🎉)
- GraphQL
- Hasura
- Postgres
- Laravel
- JWT
- MinIO
- Docker
/laravel- Laravel application/nginx- Configuration files for nginx to serve PHPlaravel.dockerfile- Dockerfile to boostrap Laravel appnginx.dockerfile- Dockerfile to serve nginx websitehasura.dockerfile- Dockerfile for Hasura GraphQL enginedocker-compose.yaml- Composition of nginx + laravel + postgres to work together
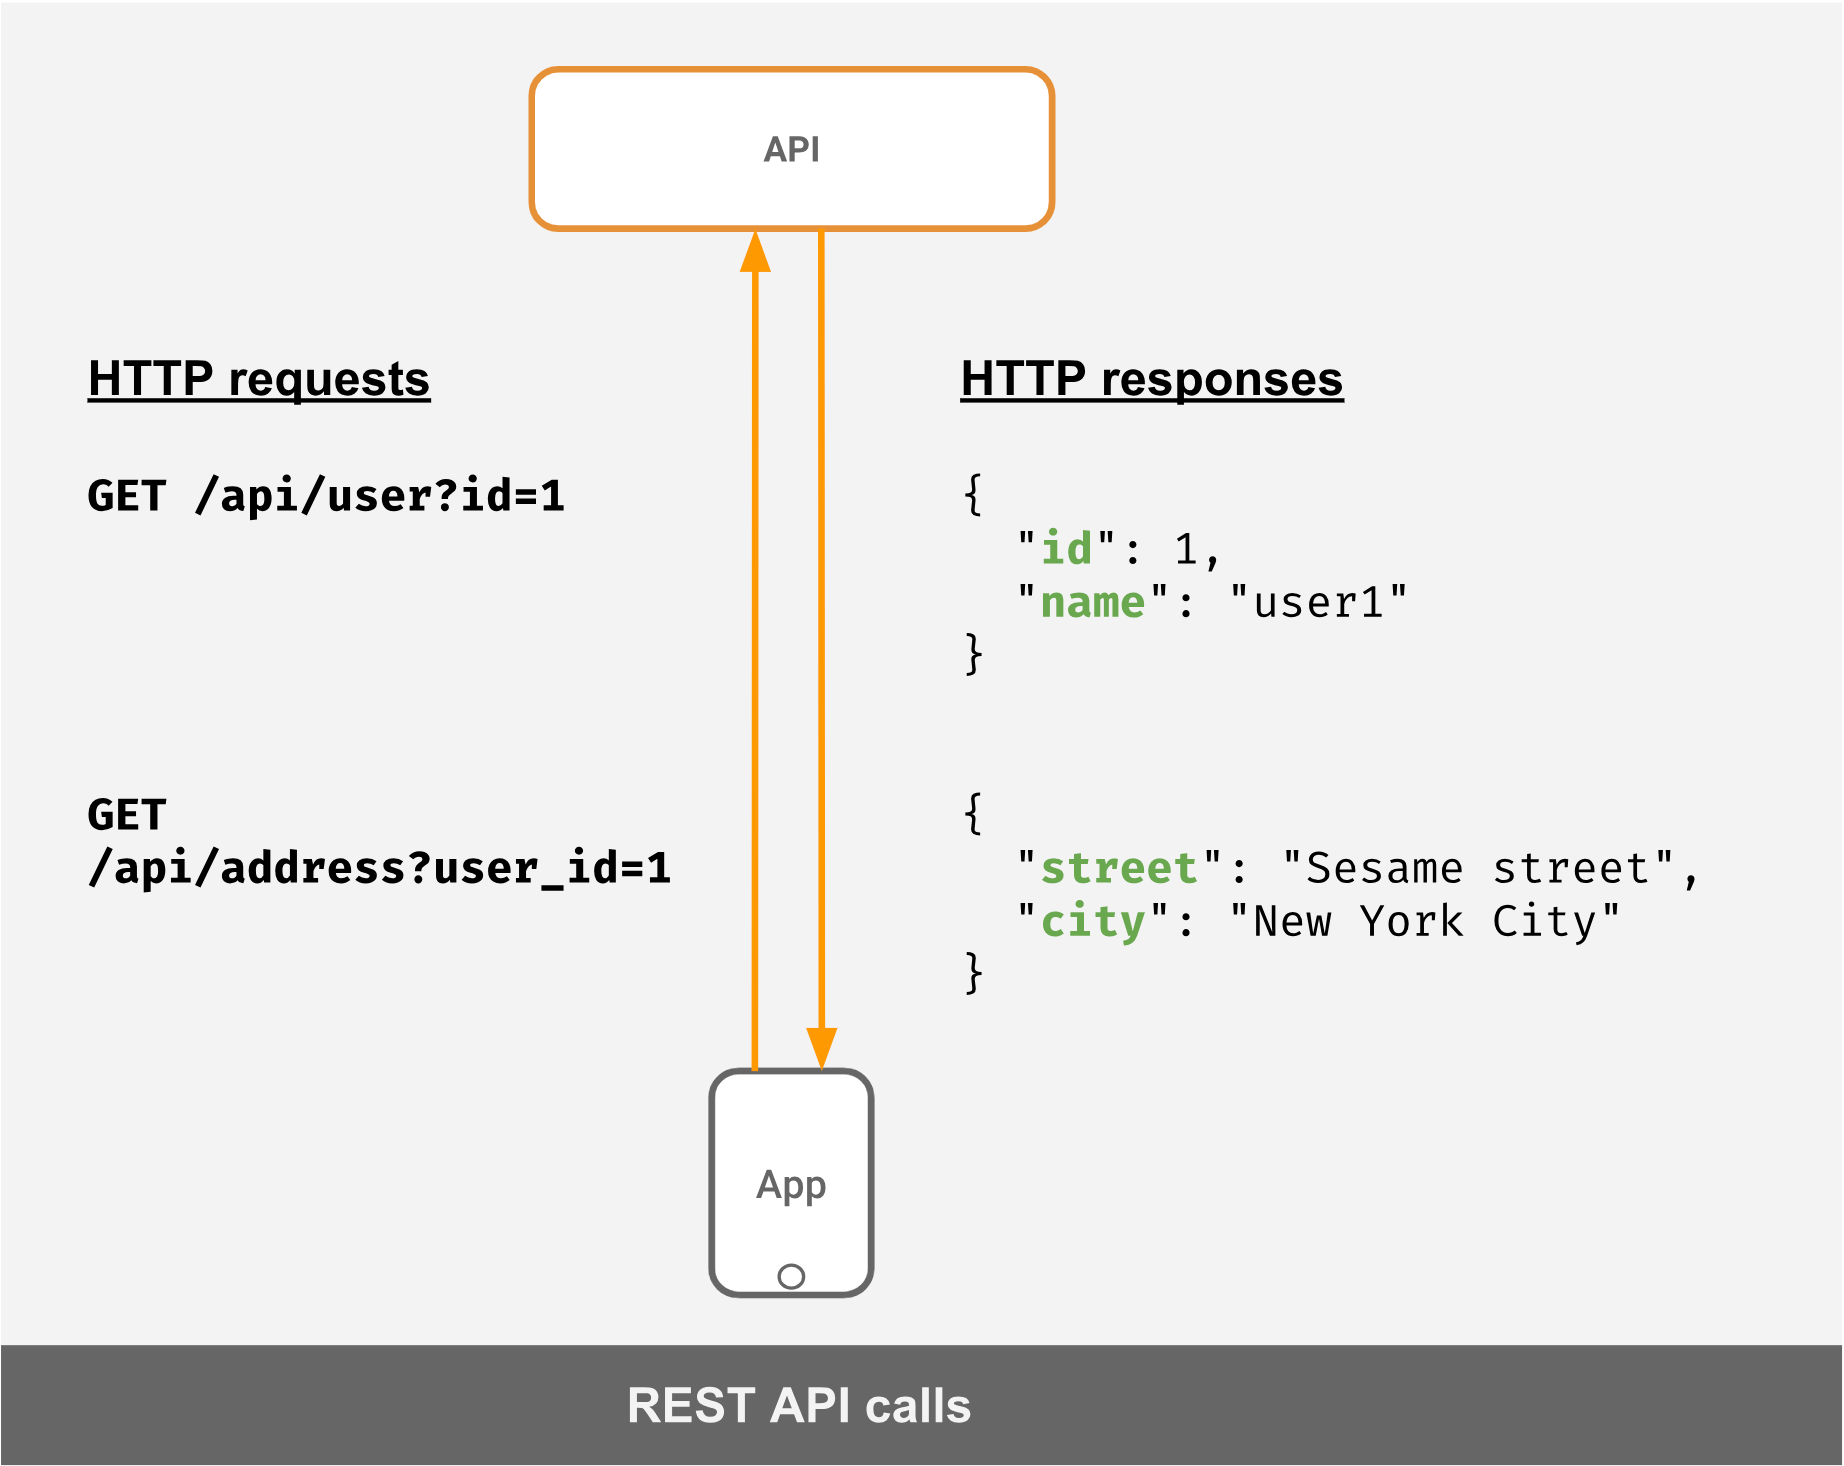
I came upon an article about GraphQL while browsing the web for some cool tech stuff. I got excited all of a sudden after reading that it addresses over-fetching (getting more data than you need). For most, it's not big of a deal, but for backend developers, it is sort of a challenge. Yes, I know that we can solve it by adding more logic to our existing RESTful API's, but then again, that means more work for the backend people. 😭 So yeah, I like making my life easier so I chose GraphQL. 🤣 You can read more about other issues addressed by GraphQL here.
And so I tried researching how to create a GraphQL server with Laravel since I am comfortable with it. There I found the Laravel Lighthouse. Consequently, by pure luck, I found Jose Luis Fonseca's package (joselfonseca/lighthouse-graphql-passport-auth) which gave me instant authentication-related GraphQL mutations such as login, register, and logout! Thanks, Mr. Fonseca! 👏
I then studied how to create my own queries, mutations, and subscriptions but the amount of stuff to learn is A LOT! And so my lazy self looked for an easier route and there I found Hasura GraphQL API Builder, the best friend of all GraphQL enthusiasts! 🤩
With Hasura, all you need to do is create a database table via Hasura Console and all queries, mutations, and subscriptions are automagically created for you!
Hasura is almost perfect really. But it lacks two very important features that most developers are looking for. And those are authentication 🔐 and non-database related computations 📈📉📊.
Hasura does not have a built-in authentication system. It is by design, according to them. It needs a 3rd party authentication provider like Auth0, AWS Cognito, AuthGuardian, etc. Adding custom logic on top of Hasura such as complicated computations is also not possible with Hasura. It is also by design. Either build a serverless function or create a RESTful API somewhere.
I almost gave up with Hasura but then a question popped out of my head...
Is it possible for Laravel and Hasura to fulfill each other's weaknesses?
I mean just think about it...
- Hasura needs a 3rd party authentication service. Laravel can provide that easily (via Laravel Passport)!
- Hasura needs 3rd party serverless functions for custom computations. Laravel can provide that as well (via RESTful APIs)!
- GraphQL development with Laravel is really slow for beginners. Hasura can make it faster!
So yep, theoretically, they are match made in heaven. 😍 So the goal became how to make them work with each other.
So it took me a while (months really since I have too much on my plate) to finally figure out how to make 'em work with each other.
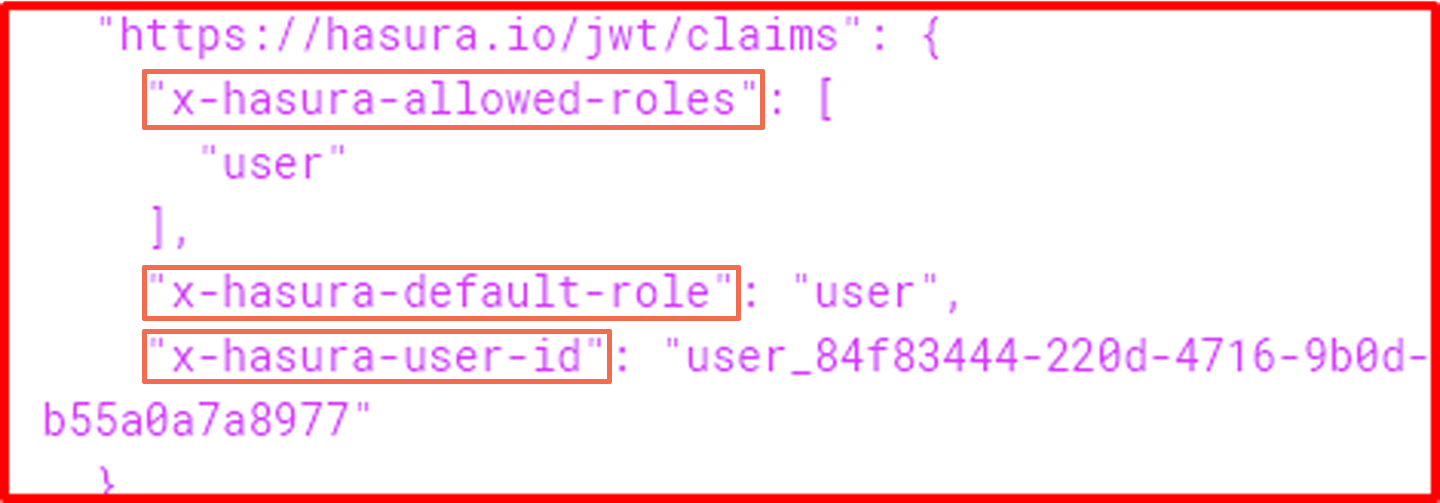
Before, Laravel can create JWT access tokens but that isn't enough for Hasura since it requires custom claims. So I looked for a way to add some custom claims to Laravel's default JWT, and there I found the final piece of the puzzle, Cor Bosman's package (corbosman/laravel-passport-claims). Thanks, Mr. Bosman! 👏
Below is the custom claims added using the package:
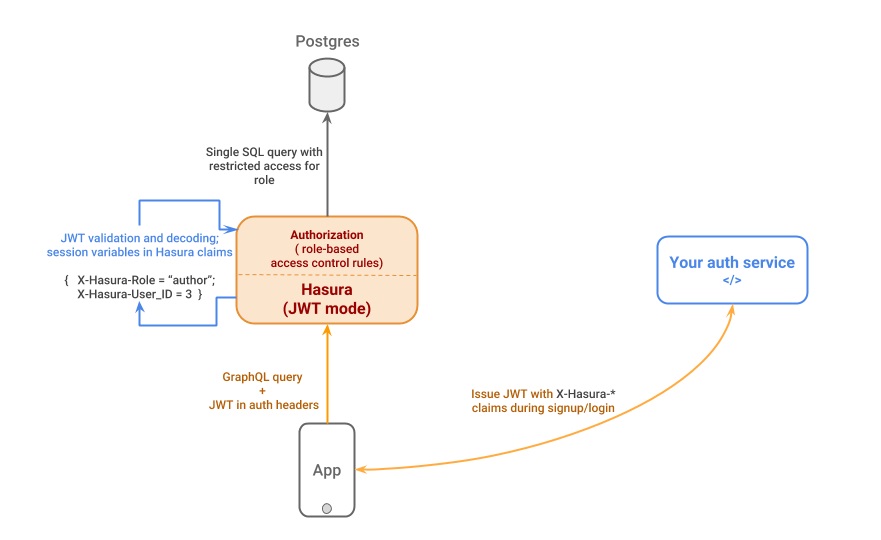
Below is the JWT mode of authentication for the whole boilerplate:
Requires Docker v2.x or higher
To download Docker images and create PostgreSQL, MinIO and Hasura containers on Docker Hub, you have to run this command:
docker-compose up -dTo remove all containers and volumes (persistent data), you have to run this command:
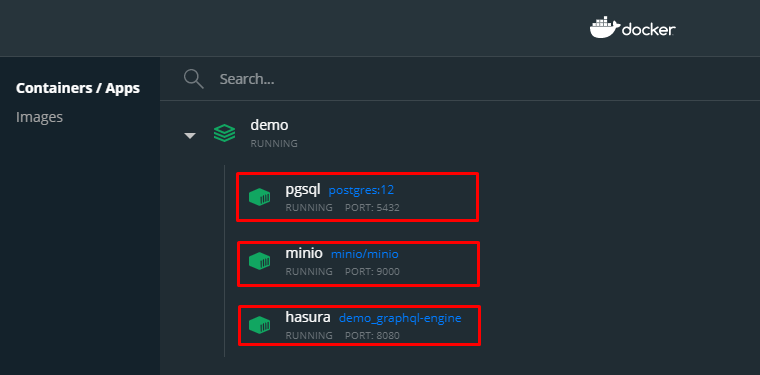
docker-compose down -vMake sure to be on the root folder of the cloned boilerplate as this command will look for the docker-compose.yaml. If successful, you should see the 3 services.
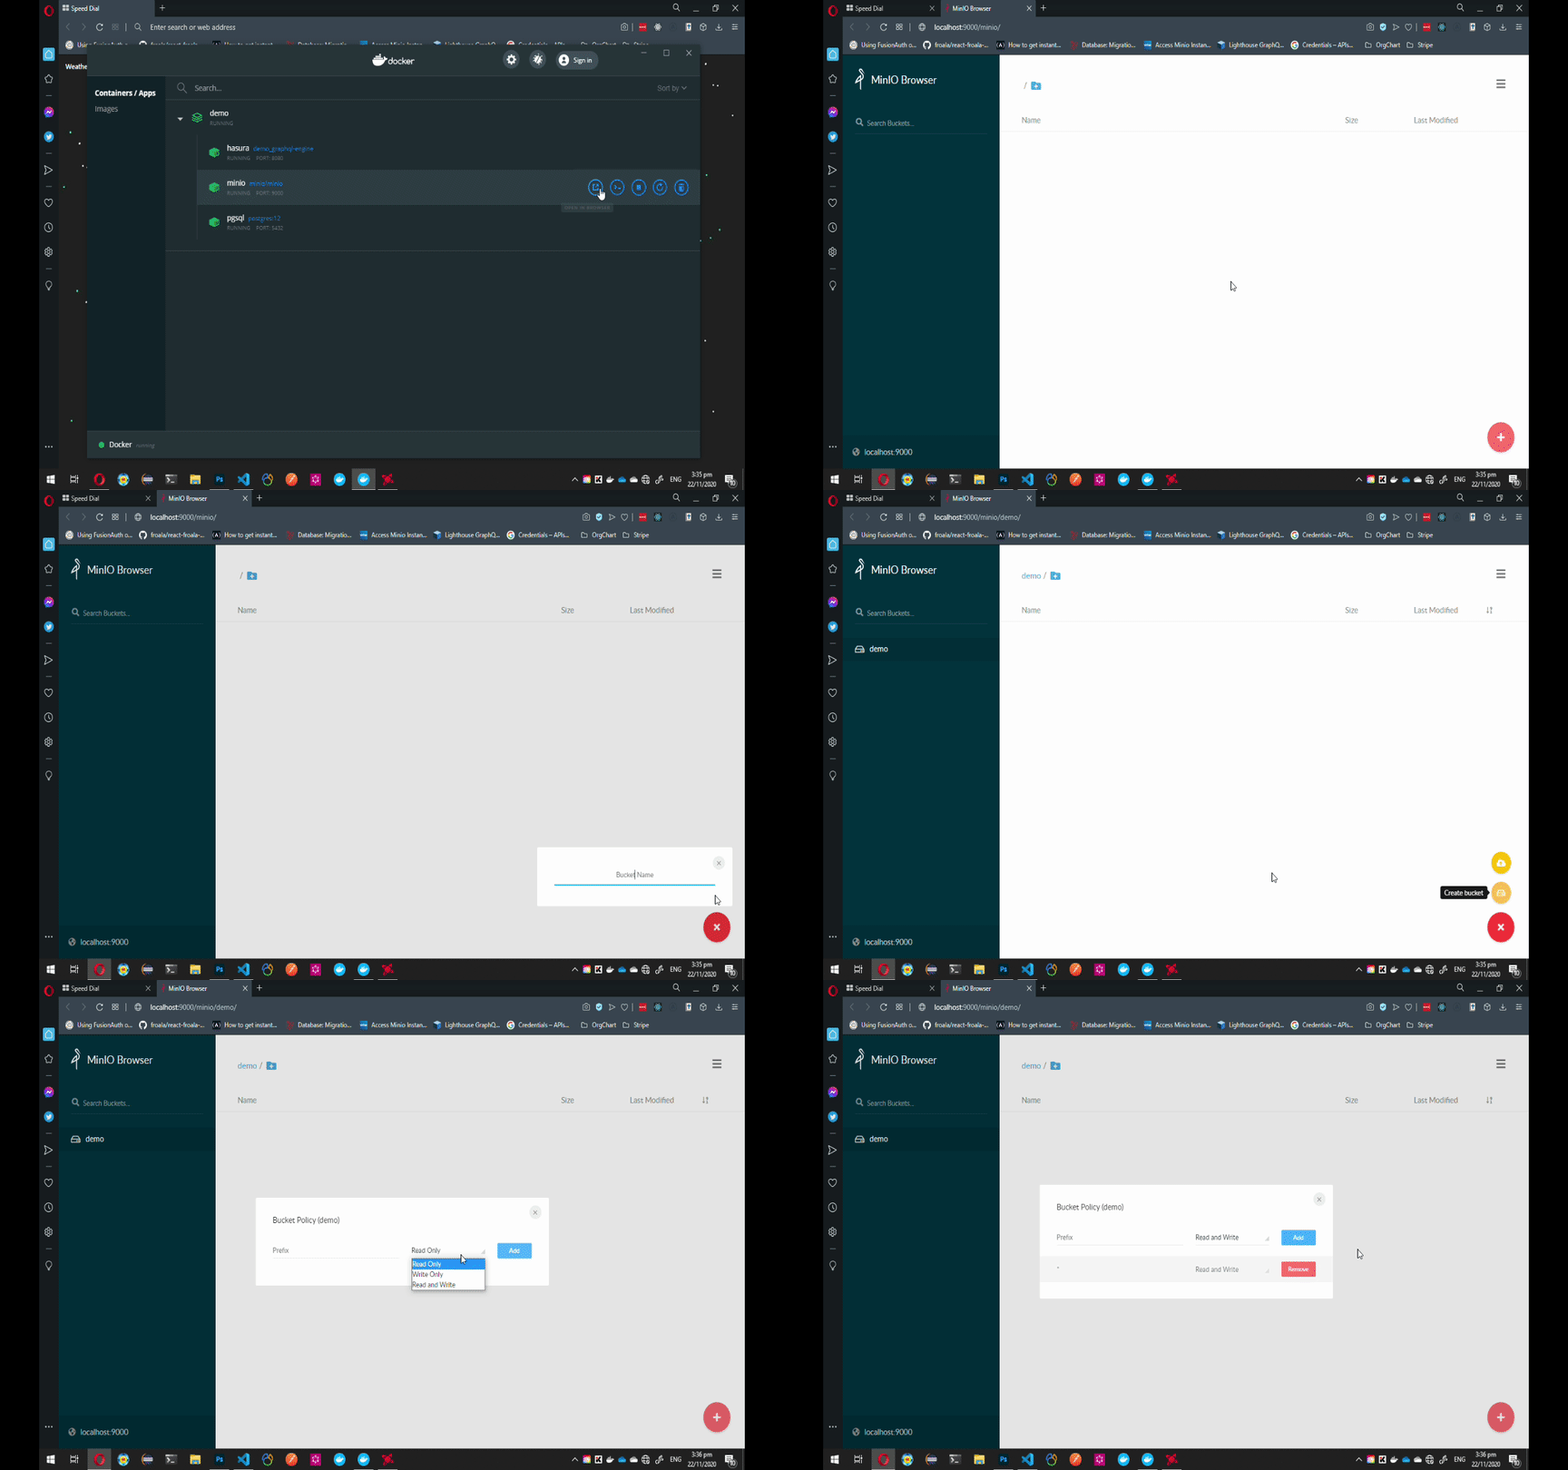
To configure MinIO to work with Laravel, follow the GIF instruction below.
Note: You can always choose another name for the bucket but make sure to add Read and Write Policy to that bucket and update the MINIO_BUCKET variable on Laravel's .env file.
Laravel's files are located on the laravel folder. Do not rename the folder since Nginx will look for this specific folder during online deployment.
Step 1: Since Laravel requires .env file, rename the .env.example to .env. Make sure to install all Laravel dependencies by running this command:
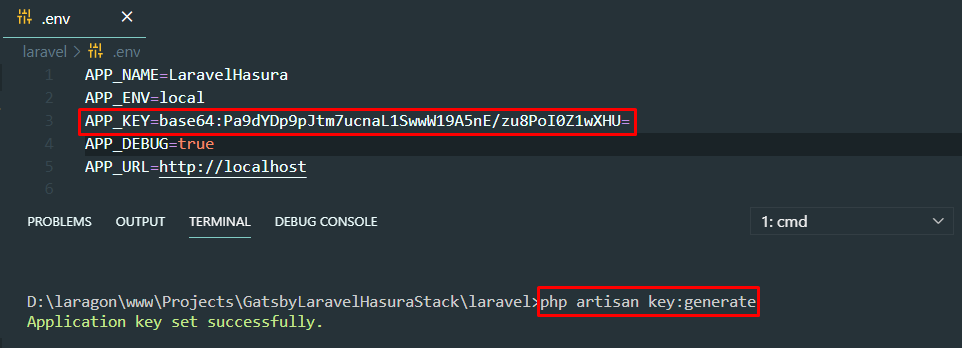
composer installStep 2: Make sure to generate your own app key before anything else. App Key will be used for all sorts of encryption within Laravel.
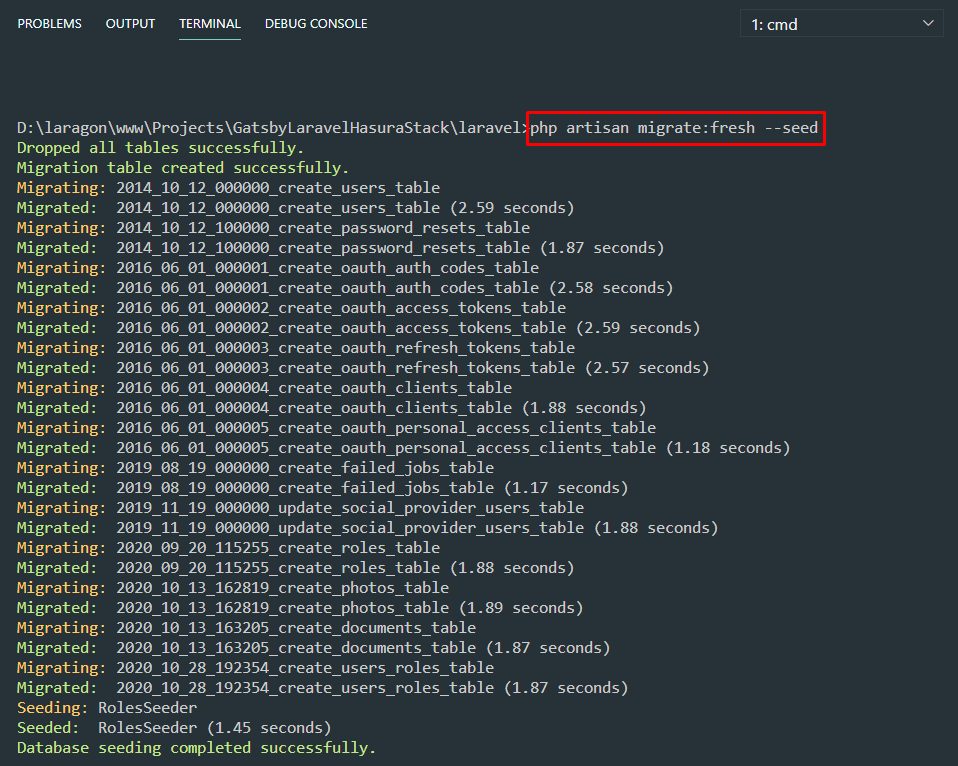
php artisan key:generateStep 3: Run fresh migrations to create all necessary tables and seed the roles table as well. To add or customize the roles, look for the RolesSeeder.php file.
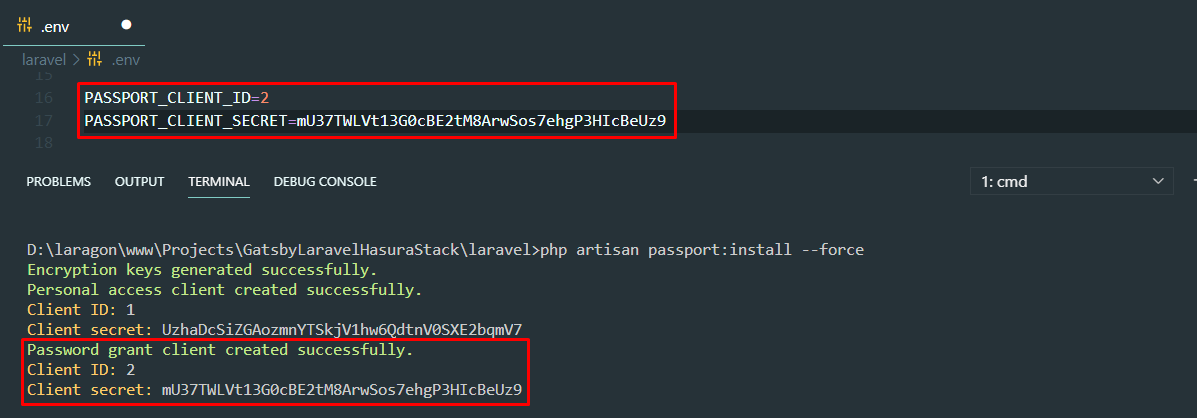
php artisan migrate:fresh --seedStep 4: You have to generate your own OAuth Keys as well. To remove mine, just use --force. Make sure to paste the new grant client id and secret to Laravel's env file.
php artisan passport:install --forceStep 5: Make sure to refresh config cache to utilize the new keys.
php artisan config:cache Step 6: Run the app to test our GraphQL API. By default, the GraphQL endpoint will be at
 http://localhost:8000/graphql. You can download GraphiQL or GraphQL Playground to test this endpoint.
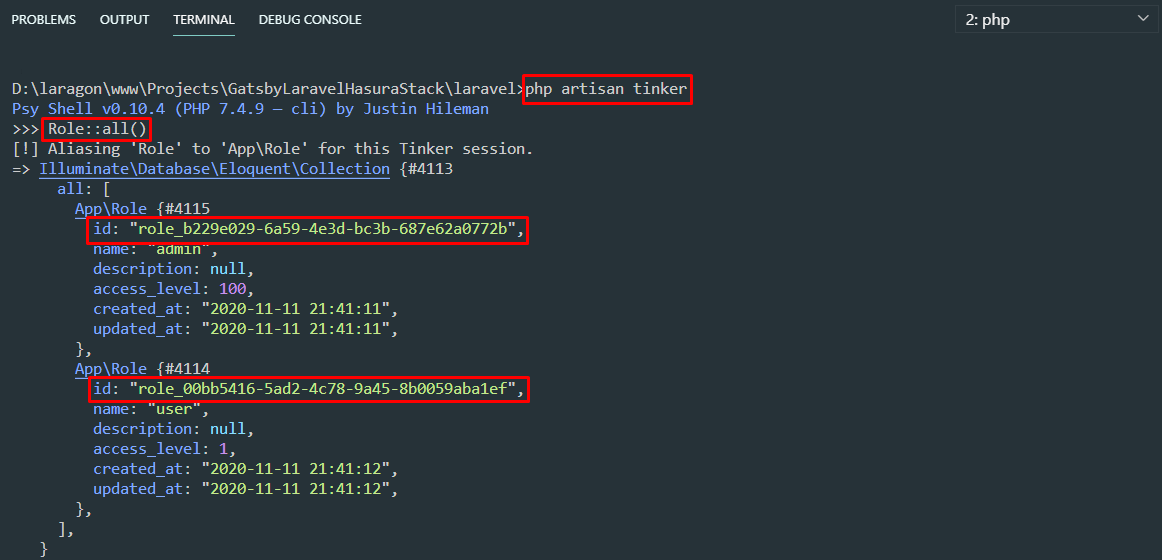
php artisan serveStep 7: If we will try to register, the role id is required. We can look for the role id's via Laravel Tinker.
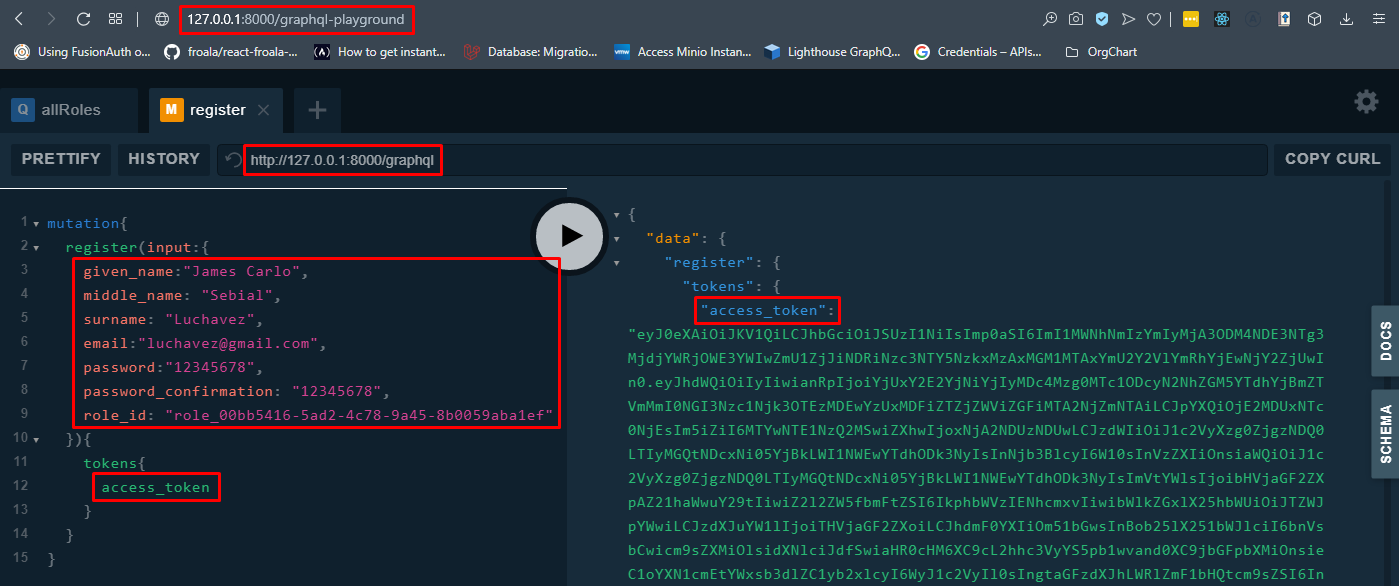
Step 8: Since we now have the role id for the user, we can proceed to register an account. To register, we have to use the register mutation and supply all information needed. For this demo, we just need the access_token so we only need to specify that as the output.
mutation registerUser {
  register(object:{
    given_name: "James"
    middle_name: "Sebial"
    surname: "Luchavez"
    email: "james@gmail.com"
    password: "12345678"
    password_confirmation: "12345678"
    role_id: "insert_id_here"
  }){
    tokens{
      access_token
      refresh_token
    }
  }
}
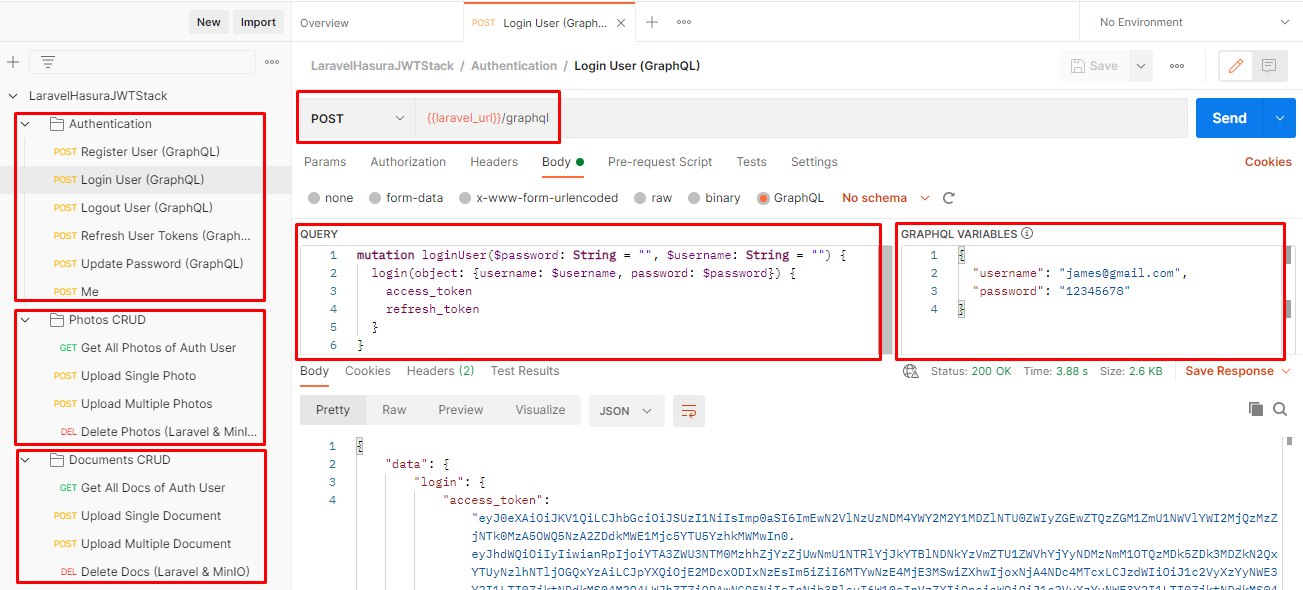
Step 9: Since we already registered the user above, we can now use it to login as well. To login, we have to use the login mutation and specify access_token to be the output.
mutation loginUser {
  login(object:{
    username: "mrstudyfirst@gmail.com"
    password: "12345678"
  }){
    access_token
    refresh_token
  }
}
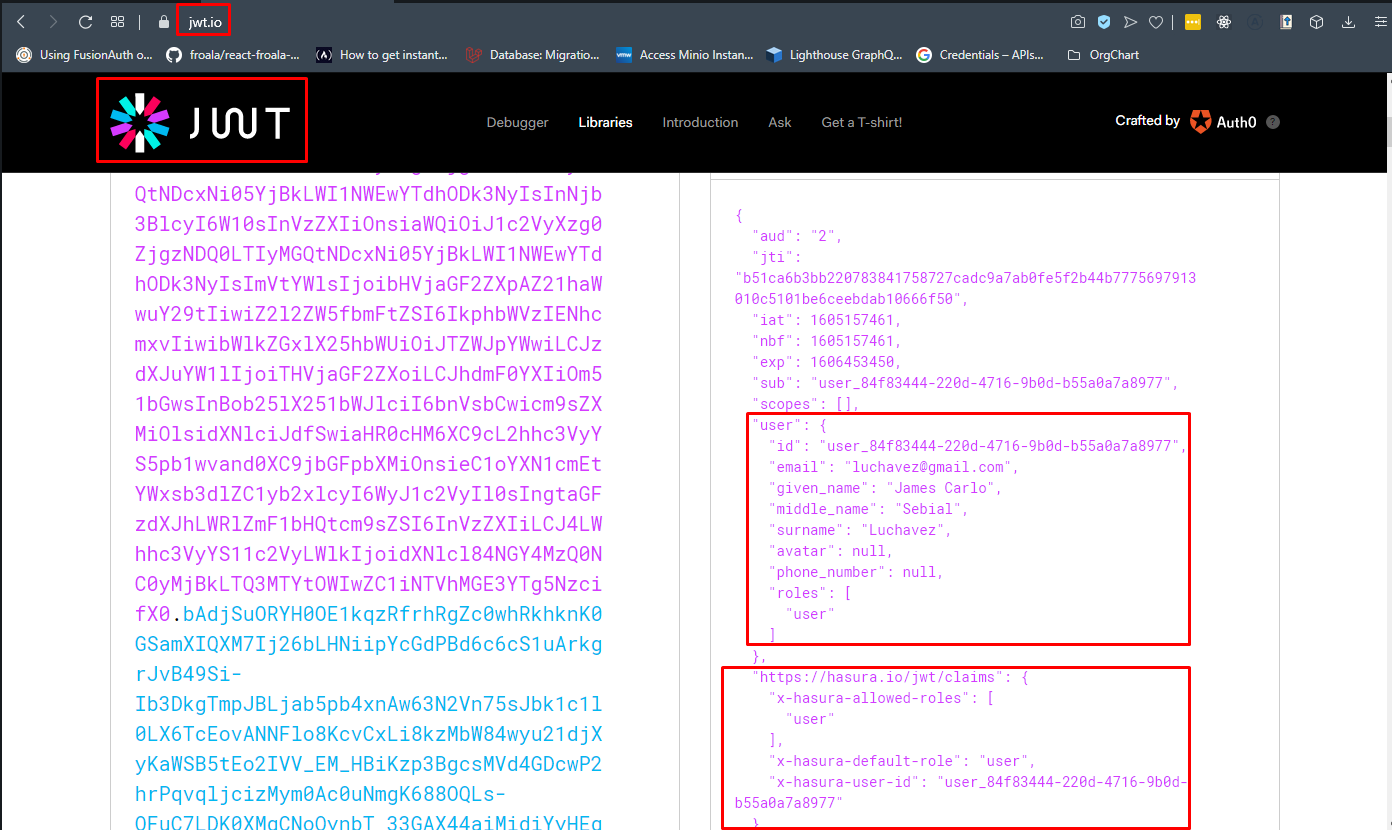
Step 10: The JWT access_token can be decoded to get important information like expiration date, user information, and custom claims (required by Hasura). You can try at jwt.io and paste the access_token.
To view all authentication mutations, photos CRUD, and documents CRUD, import my Postman Collection: https://www.getpostman.com/collections/c58cae3c7bc6bf72462d
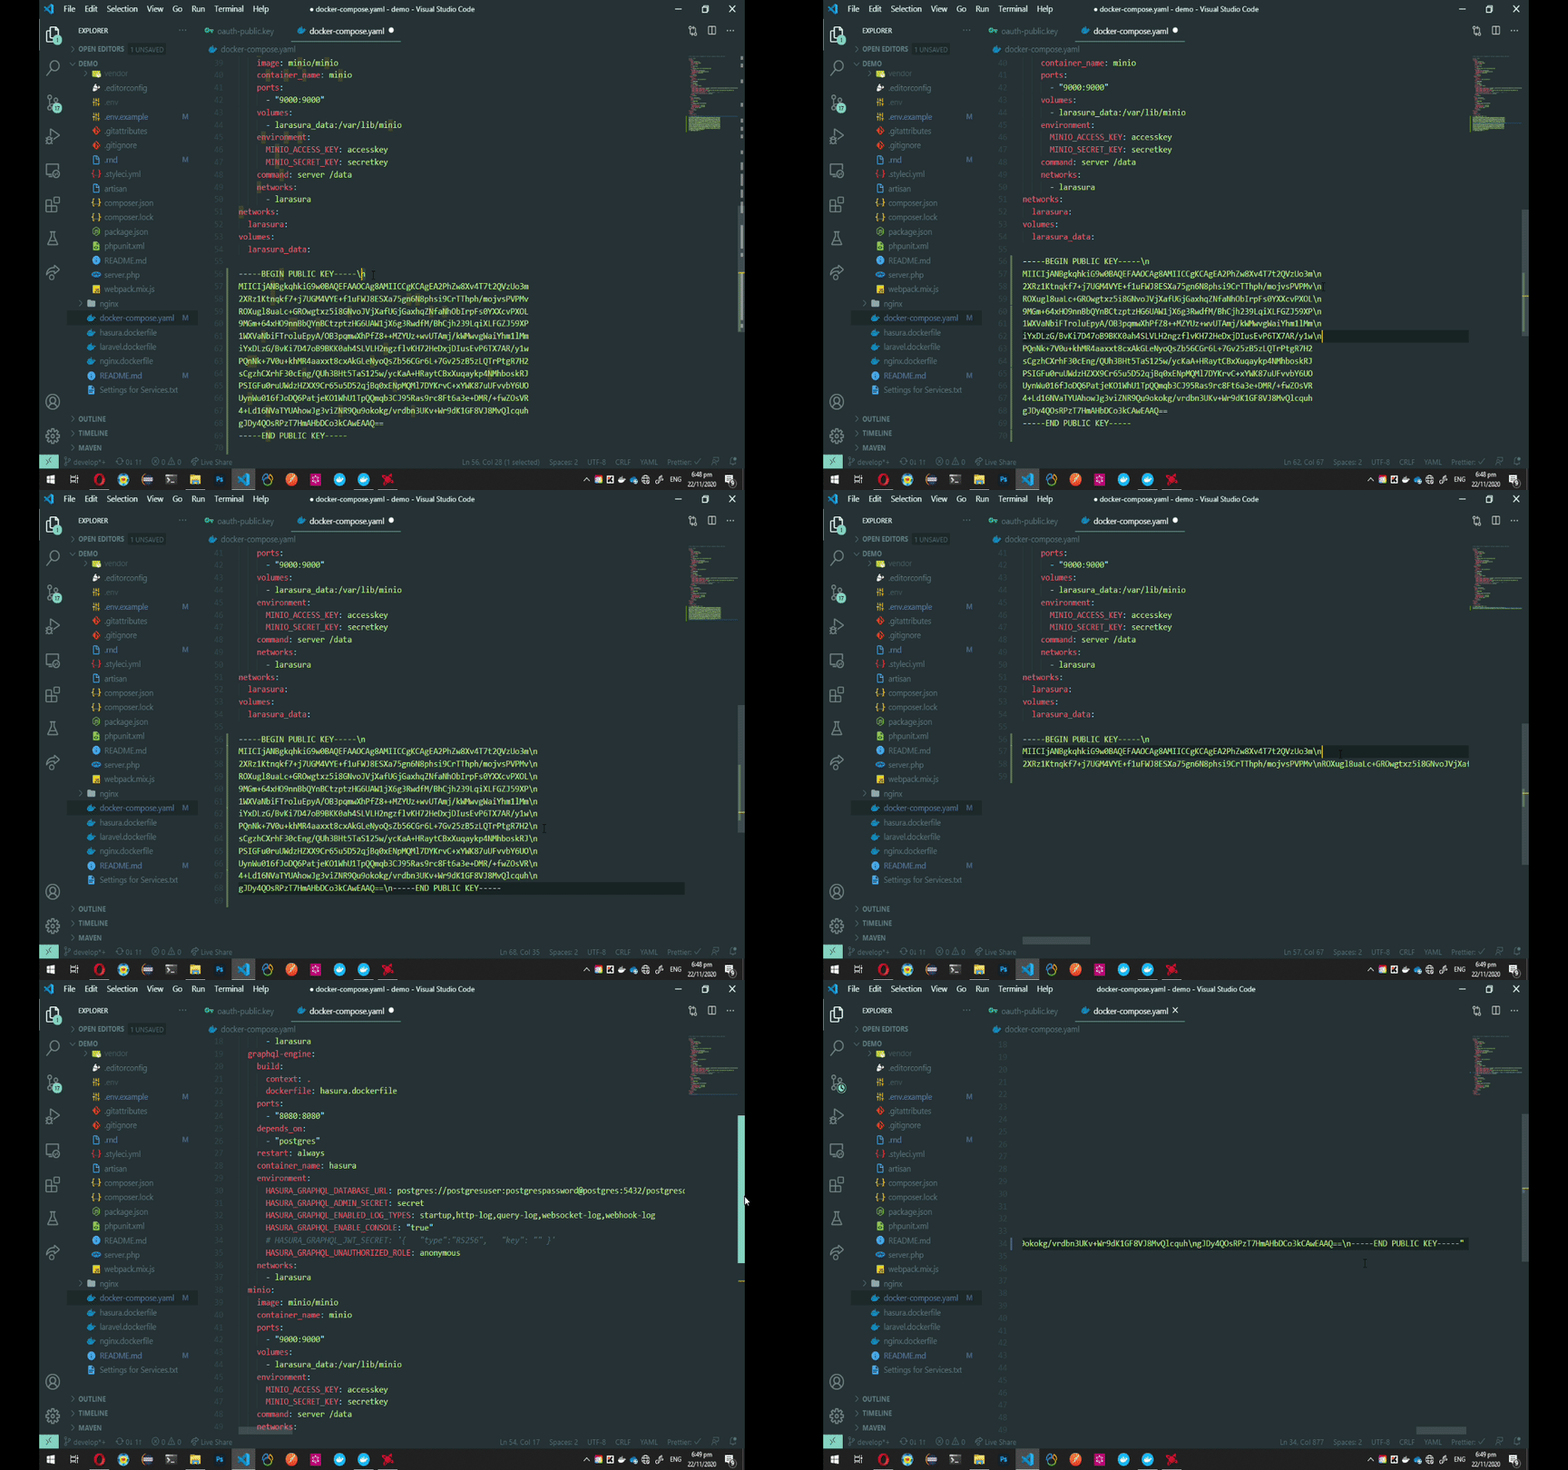
For Hasura to utilize the tokens generated by Laravel, it needs to have the OAuth public key. Look for HASURA_GRAPHQL_JWT_SECRET on the docker-compose.yaml file and add the single-line public key. Follow the GIF instruction below for the single-line public key.
Once finished, run the following command again to recreate the Hasura container:
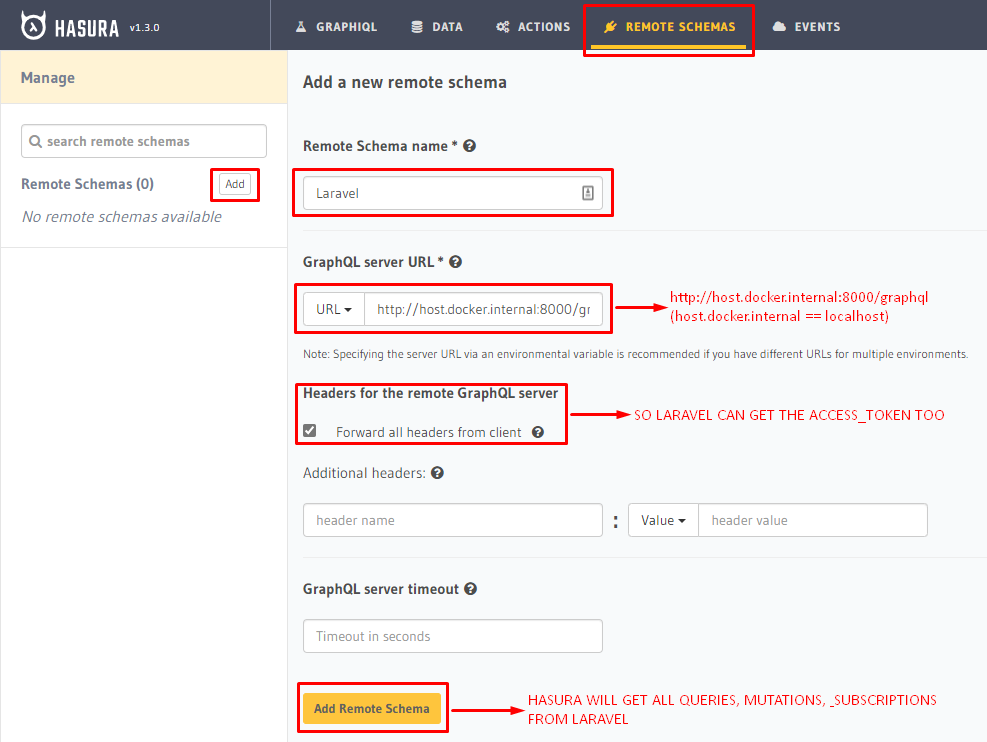
docker-compose up -dFor Hasura to get all of Laravel's Schema operations like queries, mutations, and subscriptions, we need to setup Hasura Remote Schema.
Open the Hasura Console, go to Remote Schema tab. Click Add. Give it a name like "Laravel". Since this is local deployment, Hasura requires host.docker.internal instead of localhost. So on GraphQL server URL, since Laravel's GraphQL API endpoint is at http://localhost:8000/graphql, it will now become http://host.docker.internal:8000/graphql. But for deployed versions, it will require the actual GraphQL endpoint.
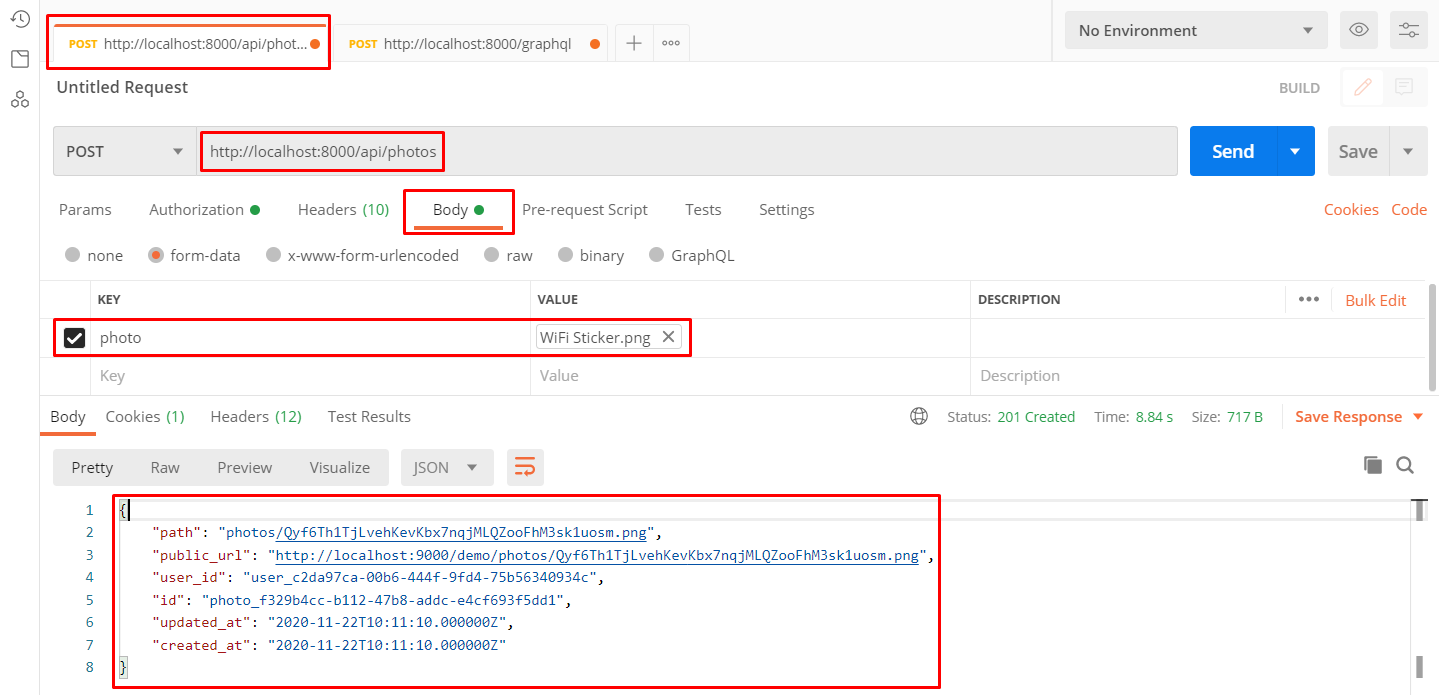
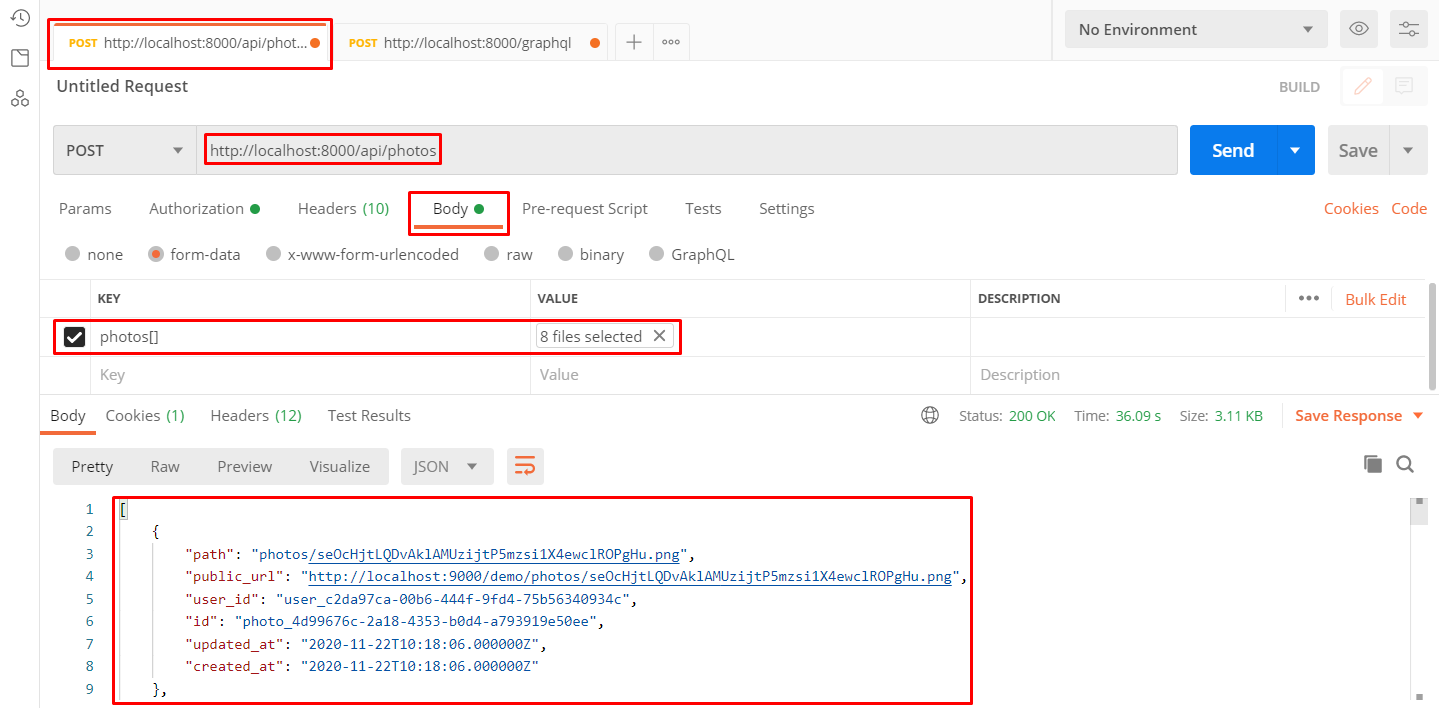
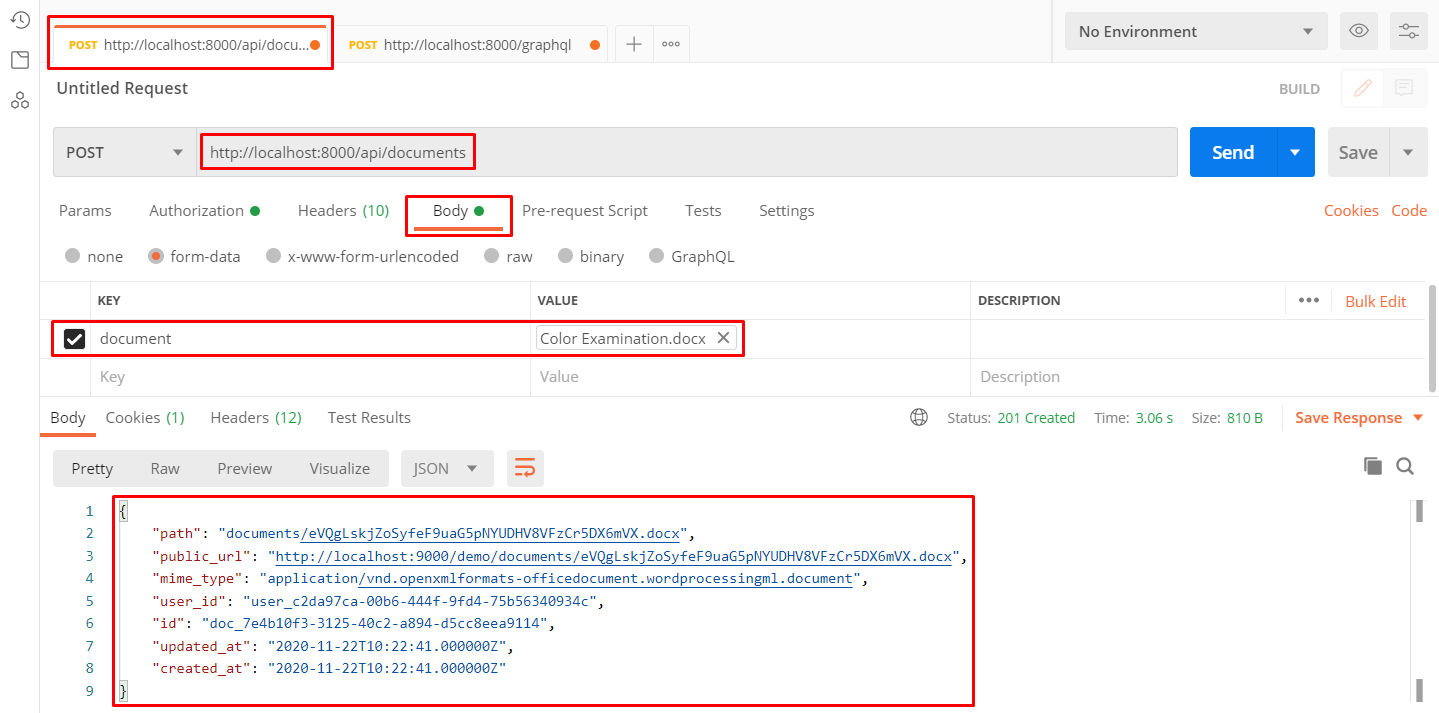
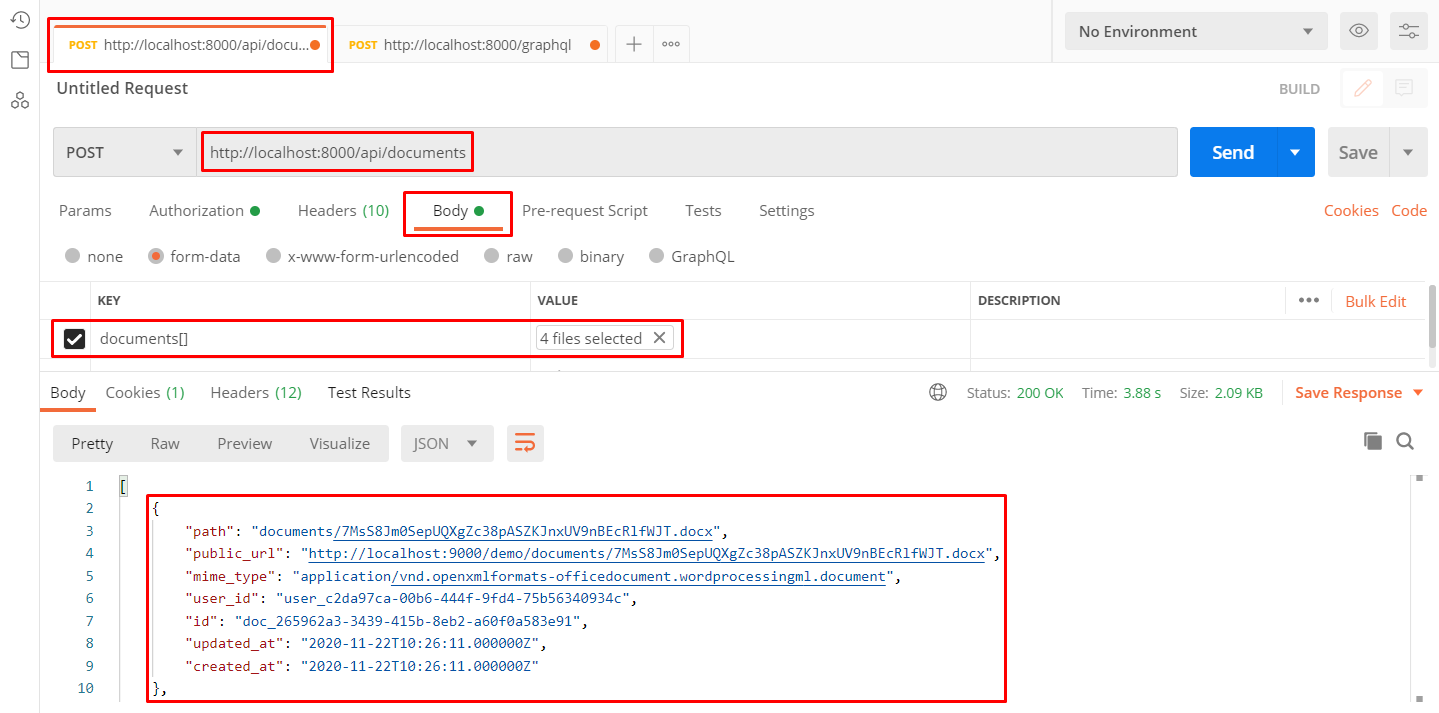
As mentioned, one vital part of this boilerplate is the storage service (MinIO). Before you can upload anything, you have to have a valid access_token and you can only get one if you have registered already. To demonstrate, Postman is used.
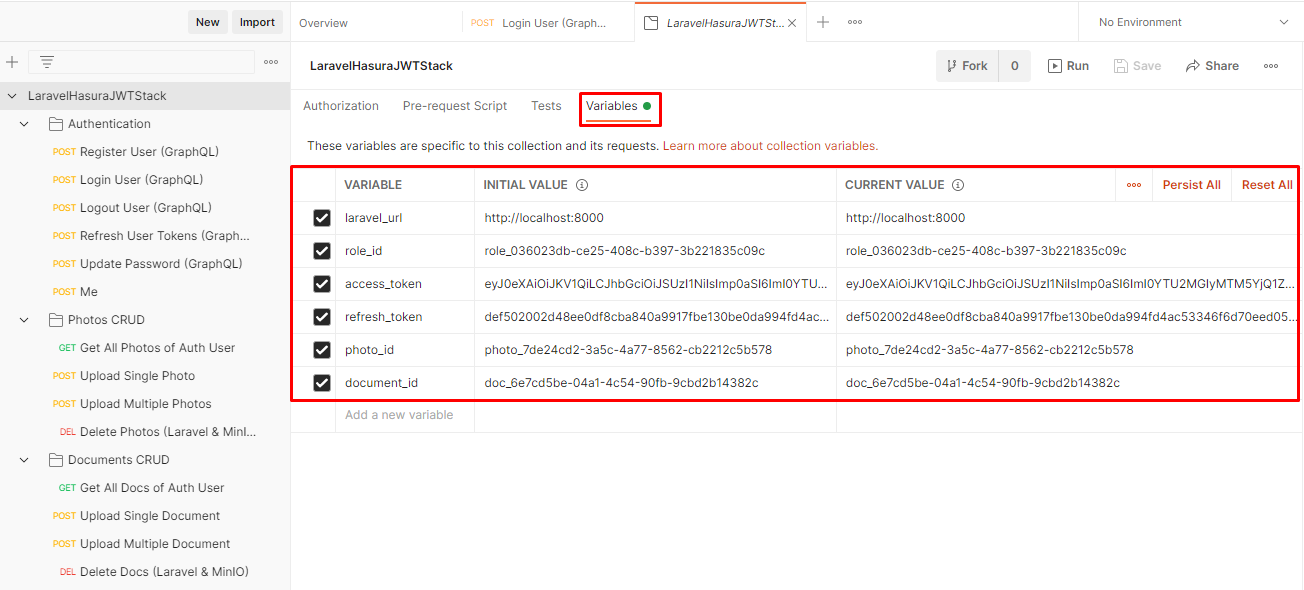
To view all authentication mutations, photos CRUD, and documents CRUD, import my Postman Collection: https://www.getpostman.com/collections/c58cae3c7bc6bf72462d
Also make sure to provide values to variables like this:
- Endpoint:
http://localhost:8000/api/photos - Operation:
POST - Key:
photo - Validations:
images|max:5120(max of 5MB)
- Endpoint:
http://localhost:8000/api/photos - Operation:
POST - Key:
photos[] - Validations:
images|max:5120(max of 5MB each)
- Endpoint:
http://localhost:8000/api/documents - Operation:
POST - Key:
document - Validations:
mimes:doc,docx,pdf,txt|max:5120(max of 5MB)
- Endpoint:
http://localhost:8000/api/documents - Operation:
POST - Key:
documents[] - Validations:
mimes:doc,docx,pdf,txt|max:5120(max of 5MB each)
🌎 Online Deployment at KintoHub (optional) 🌎
Since KintoHub's databases can only be accessed within their environment (which makes it really secure), I usually just deploy this setup as it is. I then connect to my Postgres database via Kinto CLI, and then redeploy my Laravel application and Hasura server with updated settings.
Note: You can always deploy this setup on other platforms like Heroku, DigitalOcean, etc. I just use KintoHub since this is where I first deployed it and since it uses Docker by default.
If you do not have an account yet, signup first.
- Click Create Service at the top right of your environment
- Click From Catalog and then select PostgreSQL
- Fill or generate your
username,passwordandroot passwordfor your database - Click Deploy At the top right.
Once complete, go to the Access tab and copy the Root User Connection String. This will take several minutes to complete.
Note: You can deploy your PostgreSQL database elsewhere but make sure to install pgcrypto extension.
- Click Create Service at the top right of your environment
- Choose Backend API from the list
- Change the Dockerfile Name to
laravel.dockerfile - Change the Port to
9000 - Open the Environment Variables tab and paste these values:
APP_DEBUG=true
APP_KEY=insert_new_app_key
APP_NAME=Laravel
DB_CONNECTION=pgsql
DB_PORT=5432
DB_DATABASE=insert_db_name
DB_HOST=insert_db_host
DB_USERNAME=insert_db_username
DB_PASSWORD=insert_db_password
LOG_CHANNEL=errorlog
MINIO_BUCKET=demo
MINIO_ENDPOINT=http://storage.jarcalculator.me:9000
MINIO_KEY=minioadmin
MINIO_REGION=us-east-1
MINIO_SECRET=minioadmin
PASSPORT_CLIENT_ID=insert_grant_client_id
PASSPORT_CLIENT_SECRET=insert_grant_client_secretWe need to deploy web host proxy to serve the php app on KintoHub.
- Click Create Service at the top right of your environment
- Choose Web App from the list
- Change the Dockerfile Name to
nginx.dockerfile - Change the Port to
80 - Open the Environment Variables tab to copy and paste the following into the key textbox:
- Click Deploy at the top right
When complete, open the Access tab and open the external URL to see your Laravel app!
- Click Create Service at the top right of your environment
- Choose Backend API from the list
- Change the Dockerfile Name to
hasura.dockerfile - Change the Port to
8080 - Open the Environment Variables tab and paste these values:
HASURA_GRAPHQL_ADMIN_SECRET=12345678
HASURA_GRAPHQL_DATABASE_URL=postgresql://username:password@host:5432/database
HASURA_GRAPHQL_ENABLED_LOG_TYPES=startup,http-log,query-log,websocket-log,webhook-log
HASURA_GRAPHQL_ENABLE_CONSOLE=true
HASURA_GRAPHQL_JWT_SECRET={   "type":"RS256",   "key": "" }
HASURA_GRAPHQL_UNAUTHORIZED_ROLE=anonymous
When complete, open the Access tab and open the external URL to see your Hasura app!

