This app allows to control the computer mouse pointer to move according to the gaze of a person (either based on a video or camera stream). Therefore, this project is build with the inference engine of the Intel OpenVINO™ toolkit asd for vision based deep learning models. This project demonstrates the ability of creating a data pipeline that can handle multiple data sources and inference with multiple models in sequence.
| Details | |
|---|---|
| Language: | Python 3.6.X |
| OpenVINO ToolKit: | 2020.1.023 |
| Hardware Used: | Intel(R) Core(TM) i5-6300U |
| Device (OpenVINO) Used: | CPU |
This project builds on the inference engine of the Intel OpenVINO™ toolkit.
As input for the app, the user can specify a data source (camera stream, video file or image).
OpenCV is used for handling this user data in a data pipline, as presented in the following flow chart:

The gaze estimation model (in this project: gaze-estimation-adas-0002) requires three inputs (head pose, left eye image, right eye image) and is therefore supported by three other OpenVINO models in this project.
- Face detection model: to detect the face of a person in the data
and allows to crop the frame to a face frame.
Used model in this project: face-detection-adas-binary-0001 - Pose estimation model: to estimate the head pose (defined by yaw, pitch and roll).
Used model in this project: head-pose-estimation-adas-0001 - Landmarks detection model: to detect facial landmarks (eyes, mouth, nose)
to allow the crop of the face frame to an eye frame per side.
Used model in this project: landmarks-regression-retail-0009
Generated with tree && du -sh the directory structure is the following:
.
├── README.md
├── bin
│   ├── demo_four-people_image.png
│   ├── demo_four-people_image_out.png
│   ├── demo_image.png
│   ├── demo_image_out.png
│   ├── demo_no-face_image.png
│   ├── demo_no-face_image_out.png
│   ├── demo_video.mp4
│   ├── demo_video_output.mp4
│   └── readme_data_pipeline.png
├── download_models.sh
├── main.py
├── models
│   └── [...] autogenerated with "download_models.sh"
|
├── requirements.txt
└── src
    ├── input_feeder.py
    ├── model_classes
    │   ├── facedetection_model.py
    │   ├── gazeestimation_model.py
    │   ├── landmarksdetection_model.py
    │   ├── model.py
    │   └── poseestimation_model.py
    └── mouse_controller.py
To run this project the following setup must be completed (tested on Ubuntu 18.04):
- Install OpenVINO: this depends on your distribution (Linux, Windows or Mac). A detailled installation instruction can be found at the OpenVINO documentation. A short walkthrough for Linux is given now:
- Move to the home directory. It will be used as the main directory for this installation process:
cd ~ - Download the OpenVINO installer. For this project release 2020.01 was used. Find the installer download here.
wget http://registrationcenter-download.intel.com/akdlm/irc_nas/16345/l_openvino_toolkit_p_2020.1.023_online.tgz - unpack the downloaded archive and change into the directory
tar -xvf l_openvino_toolkit_p_2020.1.023_online.tgz cd l_openvino_toolkit_p_2020.1.023_online - Either execute the GUI or shell installer. The installer prints available options/problems in GUI/shell.
sudo ./install.sh - Install external software dependencies (suggested by Intel)
sudo -E /opt/intel/openvino/install_dependencies/install_openvino_dependencies.sh - Source the environments variables (everytime before using OpenVINO) or add the source to
~/.bashrcto automatically load the variables at shell start-up.source /opt/intel/openvino/bin/setupvars.sh
- Move to the home directory. It will be used as the main directory for this installation process:
- Check system dependencies: WARNING: can vary dependend on the system!
- Install python3 pip and virtual environment functions:
sudo apt update
sudo apt-get install git python3-pip python3-venv python3-tk python3-dev
- Install python3 pip and virtual environment functions:
- Setup virtual environment: use python virtual environment to encapsulate packages
- Move back to home directory and create the virtual environment openvino-venv
cd ~ python3 -m venv openvino-venv - Add the openvino variables setup to virtual environment. Therefore, open the environment file with a text editor, e.g.
nano openvino-venv/bin/activate. Then add the following line to the end of the file and save it:source /opt/intel/openvino/bin/setupvars.sh - Activate the environment:
source openvino-venv/bin/activate
- Move back to home directory and create the virtual environment openvino-venv
- Setup project files: download the project files
- clone the repo in the user home directory and change into the project directory
cd ~ git clone https://github.com/luckyluks/pointer-controller-app.git cd pointer-controller-app - Update pip and install pip dependencies
python3 -m pip install --upgrade pip python3 -m pip install -r requirements.txt - Download the required model. Optionally other models could be used and replace them.
Use the--all_available_precisionsflag to download all available precisions!This creates a new directory./download_models.sh --all_available_precisionsmodels/and downloads the models (face-detection-adas-binary-0001, head-pose-estimation-adas-0001, landmarks-regression-retail-0009, gaze-estimation-adas-0002) in all available precisions into this new directory using the OpenVINO model downloader.
- clone the repo in the user home directory and change into the project directory
The integrated argument parser returns a description of the available command line arguments.
You can see them with python3 main.py --help
usage: main.py [-h] -i INPUT [-o OUTPUT] [-l CPU_EXTENSION] [-d DEVICE]
               [-p PRECISION] [-pt PROB_THRESHOLD] [--draw_prediction]
               [--enable_mouse] [-mp MOUSE_PRECISION] [-ms MOUSE_SPEED]
               [-mfd MODEL_FACE_DETECTION] [-mpe MODEL_POSE_ESTIMATION]
               [-mle MODEL_LANDMARKS_DETECTION] [-mge MODEL_GAZE_ESTIMATION]
               [-db] [-v] [--print_stats]

optional arguments:
  -h, --help            show this help message and exit
  -i INPUT, --input INPUT
                        Path to image file OR video file OR camera stream. For
                        stream use "CAM" as input!
  -o OUTPUT, --output OUTPUT
                        (optional) Path to save the output video to
  -l CPU_EXTENSION, --cpu_extension CPU_EXTENSION
                        (optional) MKLDNN (CPU)-targeted custom
                        layers.Absolute path to a shared library with
                        thekernels impl.
  -d DEVICE, --device DEVICE
                        (optional) Specify the target device to infer on: CPU,
                        GPU, FPGA or MYRIAD is acceptable. Sample will look
                        for a suitable plugin for device specified (CPU by
                        default)
  -p PRECISION, --precision PRECISION
                        (optional) Specify the model inference precision:
                        either one-for-all, like FP32 or FP16 (FP32 by
                        default), or per-model seprated with "/" symbol, like
                        FP32&FP16&FP16&FP16.WARNING: Only works with default
                        model paths from download_models.sh
  -pt PROB_THRESHOLD, --prob_threshold PROB_THRESHOLD
                        (optional) Set probability threshold for detections
                        filtering(0.5 by default)
  --draw_prediction     (optional) Draw the prediction outputs.
  --enable_mouse        (optional) Enable mouse movement.
  -mp MOUSE_PRECISION, --mouse_precision MOUSE_PRECISION
                        (optional) Specify the mouse precision ["high", "low",
                        "medium"](how much the mouse moves) if it is activated
                        with "--enable_mouse" ("high" by default)
  -ms MOUSE_SPEED, --mouse_speed MOUSE_SPEED
                        (optional) Specify the mouse speed ["fast", "slow",
                        "medium"](how fast the mouse moves) if it is activated
                        with "--enable_mouse" ("fast" by default)
  -mfd MODEL_FACE_DETECTION, --model_face_detection MODEL_FACE_DETECTION
                        (optional) Set path to an xml file with a trained face
                        detection model. Default is the FP32 face-detection-
                        adas-binary-0001
  -mpe MODEL_POSE_ESTIMATION, --model_pose_estimation MODEL_POSE_ESTIMATION
                        (optional) Set path to an xml file with a trained pose
                        estimation model. Default is the FP32 head-pose-
                        estimation-adas-0001
  -mle MODEL_LANDMARKS_DETECTION, --model_landmarks_detection MODEL_LANDMARKS_DETECTION
                        (optional) Set path to an xml file with a trained
                        landmarks detection model. Default is the FP32
                        landmarks-regression-retail-0009
  -mge MODEL_GAZE_ESTIMATION, --model_gaze_estimation MODEL_GAZE_ESTIMATION
                        (optional) Set path to an xml file with a trained gaze
                        estimation model. Default is the FP32 gaze-estimation-
                        adas-0002.xml
  -db, --debug          (optional) Sets loging level to DEBUG, instead of
                        WARNING (for developers).
  -v, --verbose         (optional) Sets loging level to INFO, instead of
                        WARNING (for users).
  --print_stats         (optional) Verbose OpenVINO layer performance stats.
                        WARNING: better pass output to file, to avoid spamming
                        the log!
- A basic example to run the application on a camera stream, output the prediction as video, log debug info and move the mouse:
python3 main.py \ --input cam \ --output bin/cam_output.mp4 \ --draw_prediction \ --enable_mouse \ --debug - A basic example to run the application on a video file, output the prediction in a video file and log debug info:
python3 main.py \ --input bin/demo_video.mp4 \ --output bin/demo_video_output.mp4 \ --draw_prediction \ --debug - A basic example to run the application on a image file, output the prediction in a image and log debug info:
python3 main.py \
--input bin/demo_image.png \
--output bin/demo_image_out.png \
--draw_prediction \
--debug
To test different model precisions for the used OpenVINO models, the application has been used with the sample video file bin/demo_video.mp4 . A comparison of the FP32 to available FP16 precision is given below, regarding model size, model loading time and average inference time per model/per frame.
The benchmark test was run on a Intel(R) Core(TM) i5-6300U.
| Model Name | Model Precision | Model Size | Load Time | Inference Time |
|---|---|---|---|---|
| face-detection-adas-binary-0001 | FP32-INT1 | 1.8Mb | 163.9ms | 21.6ms |
| head-pose-estimation-adas-0001 | FP32 | 7.5Mb | 50.4ms | 2.0ms |
| landmarks-regression-retail-0009 | FP32 | 0.8Mb | 38.4ms | 0.9ms |
| gaze-estimation-adas-0002 | FP32 | 7.3Mb | 64.9ms | 2.4ms |
| Details | |
|---|---|
| Total Processing Time: | 30.65s |
| Average Inference Time: | 26.9ms |
| Model Name | Model Precision | Model Size | Load Time | Inference Time |
|---|---|---|---|---|
| face-detection-adas-binary-0001 | FP32-INT1 | 1.8Mb | 158.5ms | 20.9ms |
| head-pose-estimation-adas-0001 | FP16 | 3.8Mb | 65.5ms | 1.9ms |
| landmarks-regression-retail-0009 | FP16 | 0.4Mb | 42.5ms | 0.8ms |
| gaze-estimation-adas-0002 | FP16 | 3.7Mb | 79.9ms | 2.3ms |
| Details | |
|---|---|
| Total Processing Time: | 29.58s |
| Average Inference Time: | 26.0ms |
It can be seen, that:
- reducing the precision from FP32 to FP16 reduces the model size by 50%
- the loading time is rather independed from the precision:
it increases and decreases for decreasing precision - the inference time decreases, but only slightly (~0.1ms per model)
- in total this reduces the inference time (per frame) by roughly 1ms
There are certain situations that can break the inference flow:
- lightning changes: this could affect the prediction/estimation accuracy of the different networks, e.g. input with few contrast could be insufficient to detect/estimate correctly, since vision decide based models are based on colors and contrats.
Because this is heavily depended on the input used, furthermore the camera which records the input, this topic was not improved during this project. - no face in frame: if the face detection does not detect a face in the frame, the data should not be passed to sequential models in order to avoid wrong gaze estimation or raising errors.
This can be fixed with a simple condition if the detection detected a face, and if not skip the further processing.
A test sample is included:./bin/demo_no-face_image.png
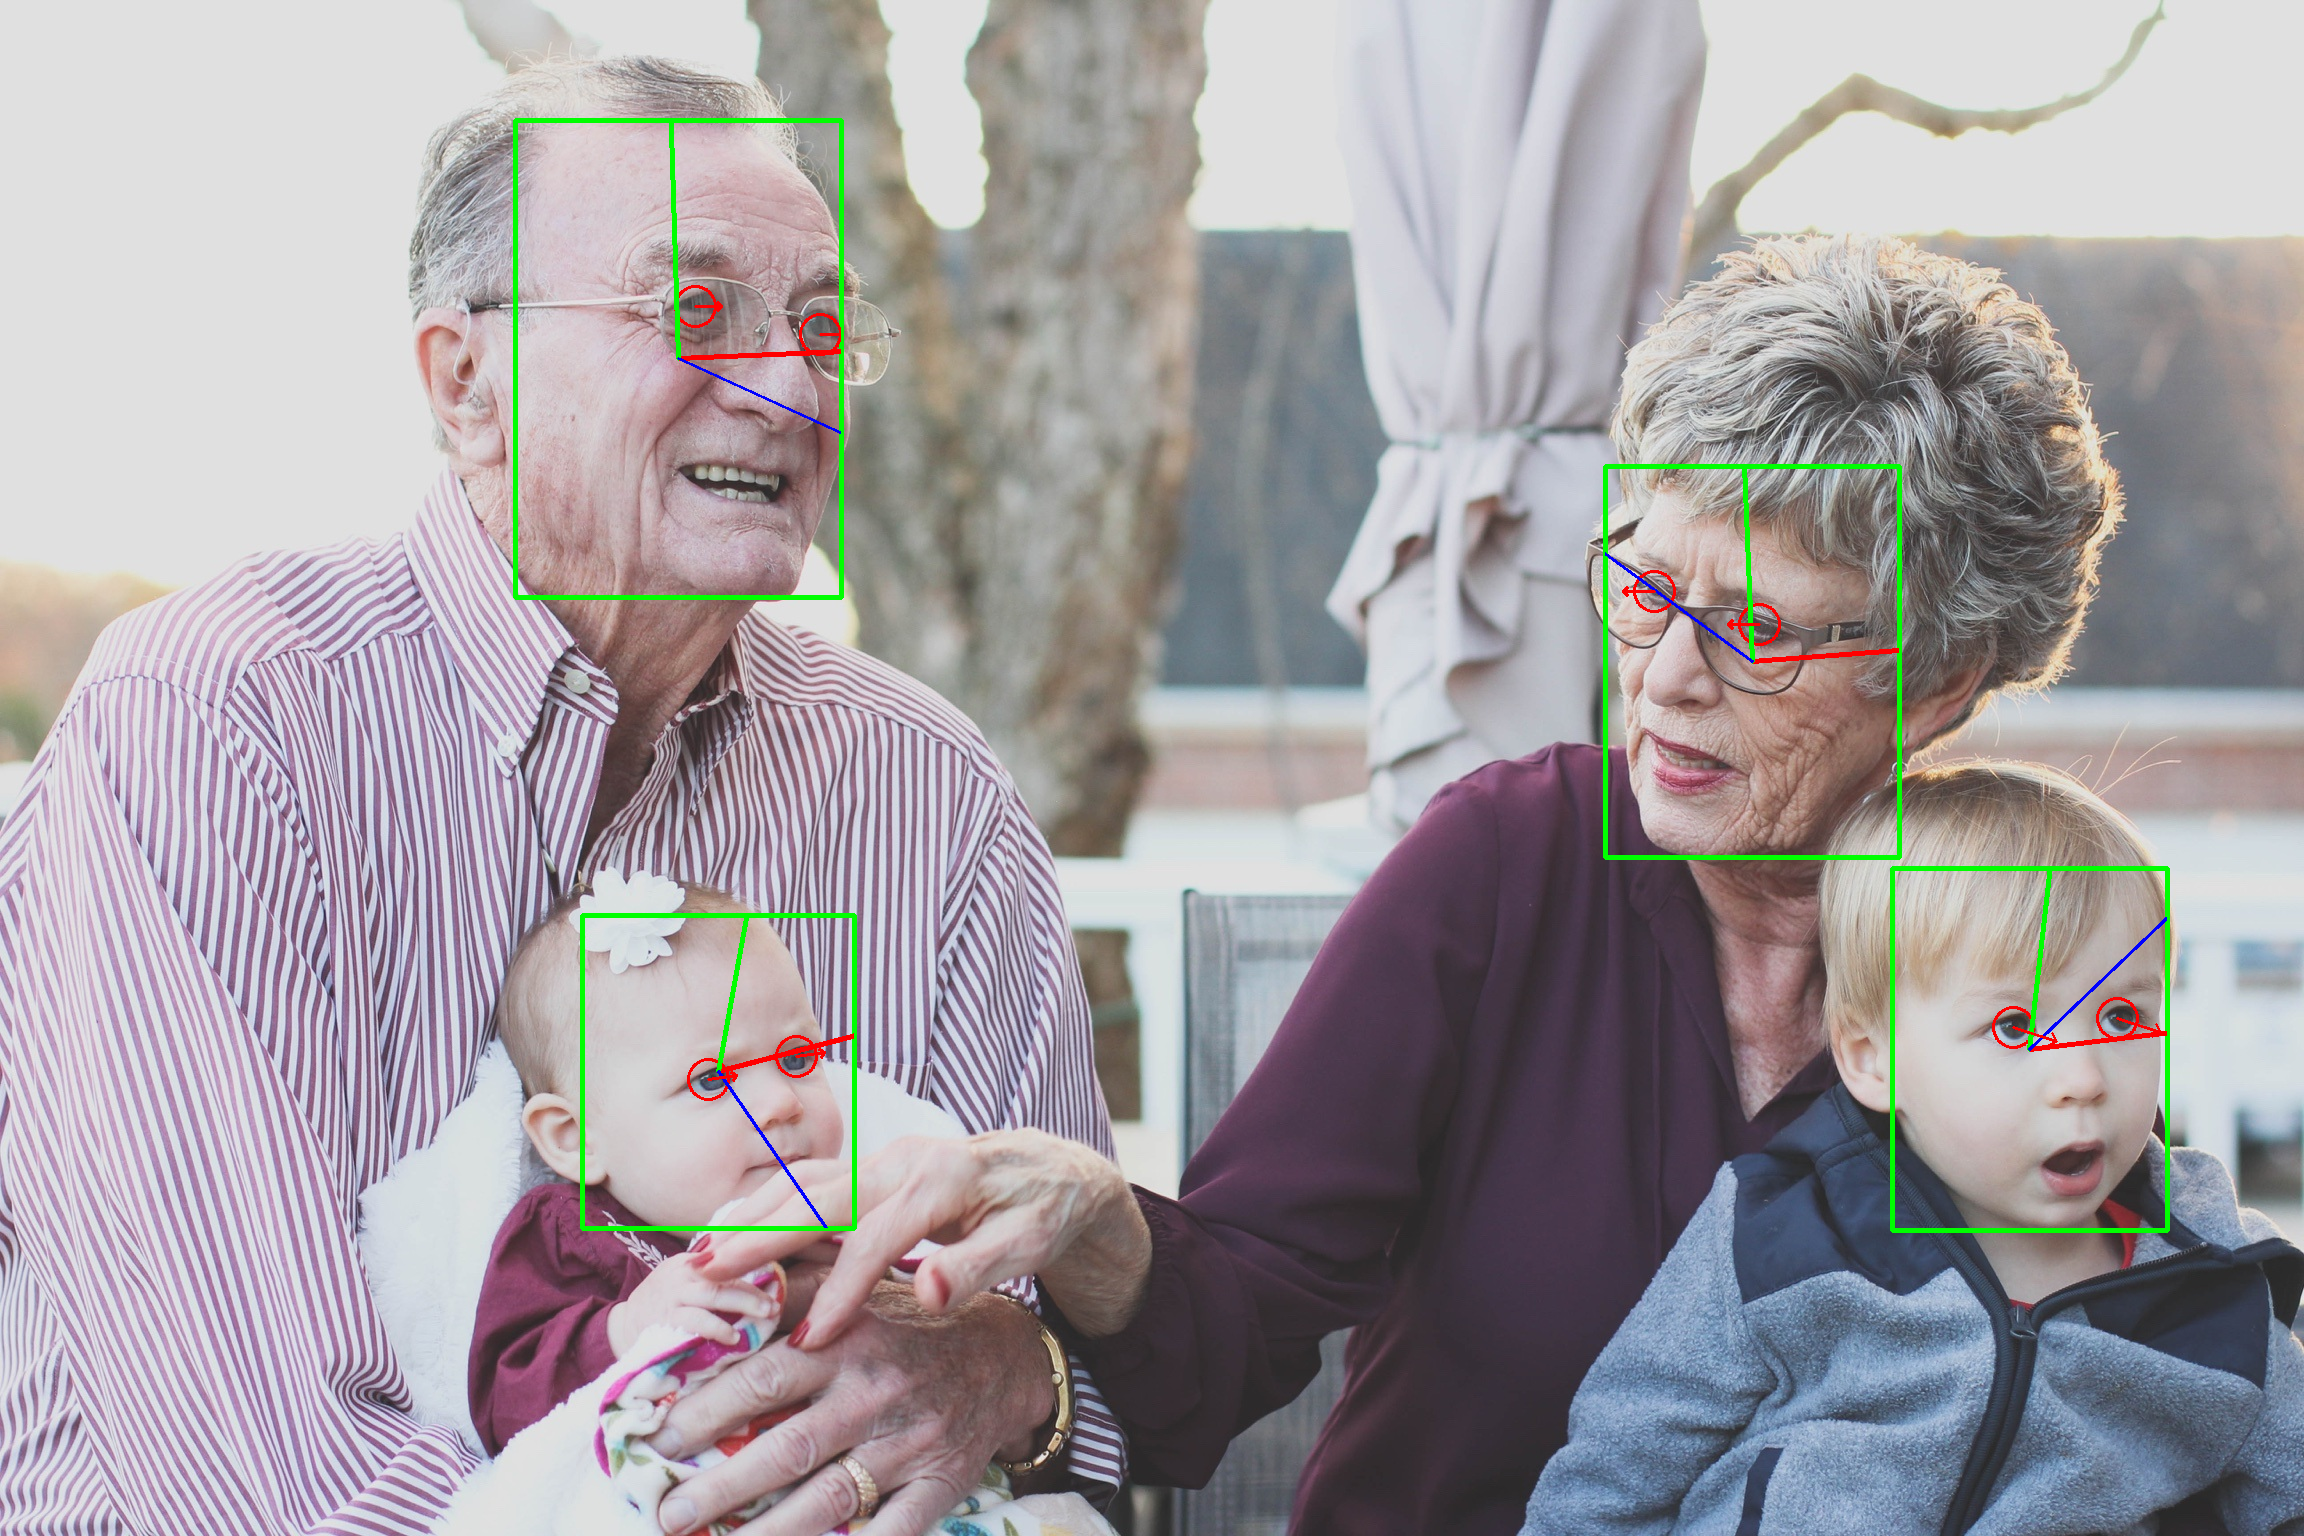
- multiple faces in frame: if the face detection detects more than one face, the inference should be runned on each face, clearly separted to no mix up facial details between the faces.
This can be easily implemented with a for loop, over all detected faces. Of course, this extends the inference time per frame if multiple faces are detected.
A test sample is included:./bin/demo_four-people_image.png