By 张天佑 SY2117325
研一下学期图像处理分析与识别课程大作业,基于Swin-Transformer实现猫狗品种分类。
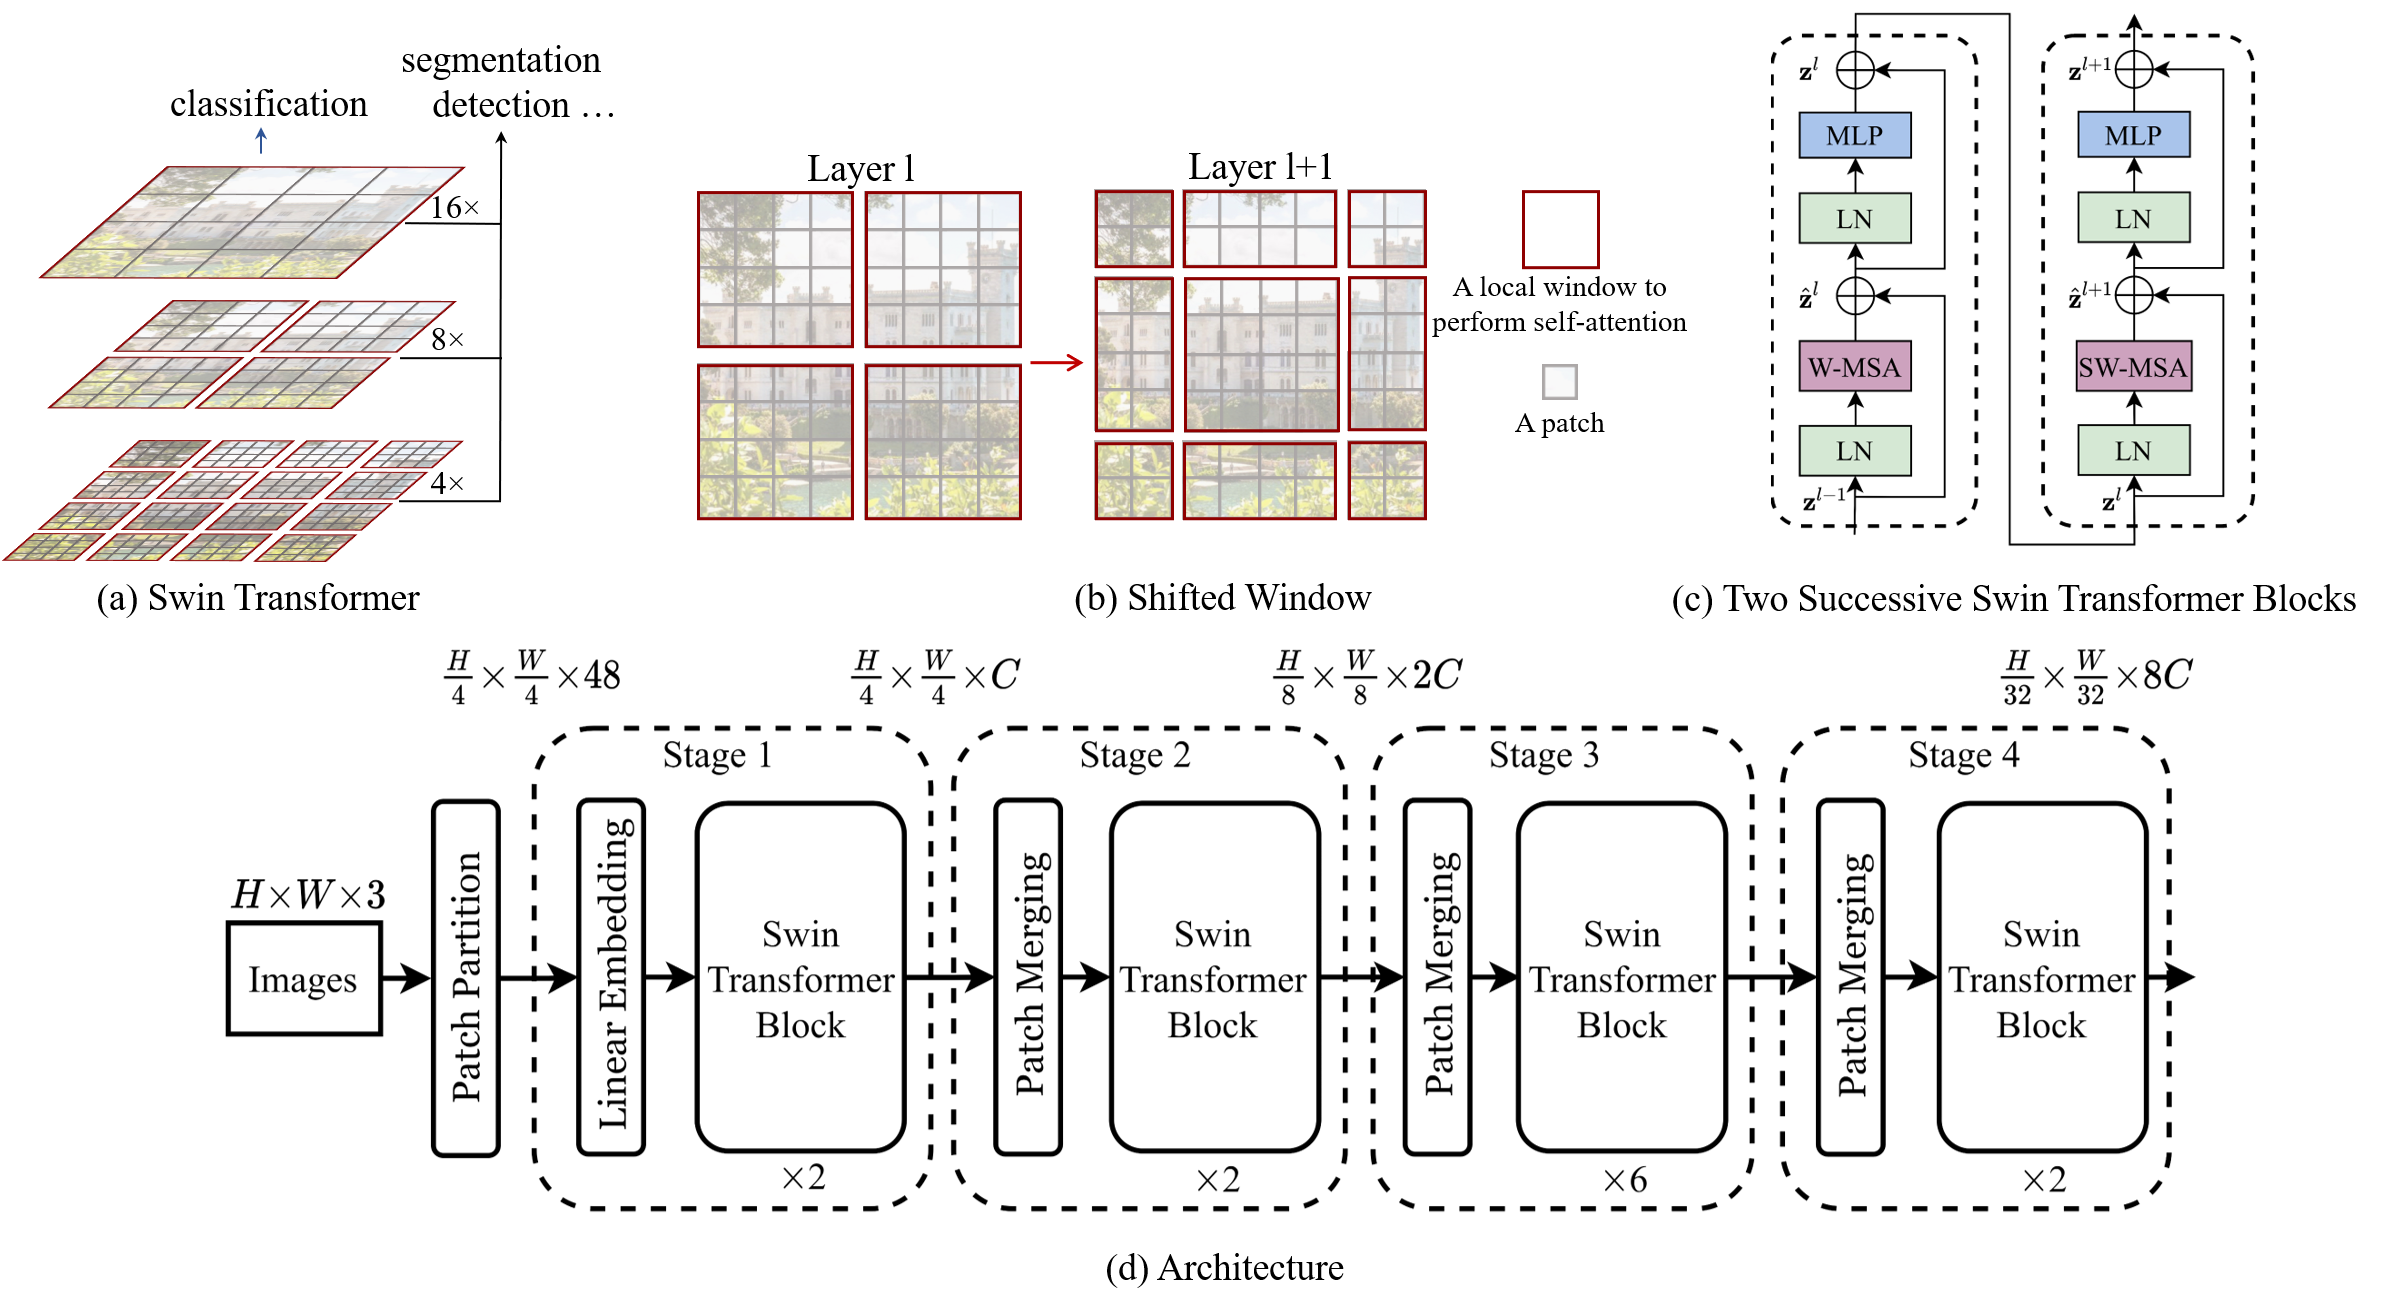
from Swin
Swin Transformer (the name Swin stands for Shifted window) is initially described in arxiv, which capably serves as a
general-purpose backbone for computer vision. It is basically a hierarchical Transformer whose representation is
computed with shifted windows. The shifted windowing scheme brings greater efficiency by limiting self-attention
computation to non-overlapping local windows while also allowing for cross-window connection.
Swin Transformer achieves strong performance on COCO object detection (58.7 box AP and 51.1 mask AP on test-dev) and
ADE20K semantic segmentation (53.5 mIoU on val), surpassing previous models by a large margin.
搜集建立了包含 39 种不同种类宠物猫狗的图像数据集image_demo,每个种类包含 200 张图片,总计 7900 张图片,以 imagenet1k 的数据格式保存。训练结果 acc@1 达到 96.7%,acc@5 达到 99.6%。
| name | pretrain | resolution | acc@1 | acc@5 | model |
|---|---|---|---|---|---|
| Swin-B | ImageNet-1K | 224*224 | 96.667 | 99.615 | github |
十分建议根据原 repo 提示安装(get_started.md),但有部分安装操作存在问题,可以参照此 repo 进行安装。
- Clone this repo:
git clone https://github.com/lukahola/Pet-classification.git
cd Pet-classification- Create a conda virtual environment and activate it:
conda create -n swin python=3.7 -y
conda activate pet- Install
CUDA==10.1withcudnn7following the official installation instructions - Install
PyTorch==1.8.1andtorchvision==0.9.1withCUDA==10.1(注意版本与原 repo 不同,实测原 repoPyTorch==1.7.1andtorchvision==0.8.2不行):
conda install pytorch==1.8.1 torchvision==0.9.1 cudatoolkit=10.1 -c pytorch- Install
timm==0.3.2:
pip install timm==0.3.2- Install
Apex:
git clone https://github.com/NVIDIA/apex
cd apex
pip install -v --disable-pip-version-check --no-cache-dir --global-option="--cpp_ext" --global-option="--cuda_ext" ./
如果出现问题,可以尝试:
python setup.py install- Install other requirements:
pip install opencv-python==4.4.0.46 termcolor==1.1.0 yacs==0.1.8本项目数据集格式基于 imagenet1k,结构如下所示:
$ tree data
imagenet
├── train_map.txt
├── train
│   ├── class1
│   │   ├── img1.jpeg
│   │   ├── img2.jpeg
│   │   └── ...
│   ├── class2
│   │   ├── img3.jpeg
│   │   └── ...
│   └── ...
├──val_map.txt
└── val
  ├── class1
  │   ├── img4.jpeg
  │   ├── img5.jpeg
  │   └── ...
  ├── class2
  │   ├── img6.jpeg
  │   └── ...
└── ...train_map.txt和val_map.txt的内容格式为
class1/img1.jpeg 1
class1/img2.jpeg 1
...
class2/img45.jpeg 2
...数据集中的图像示例如下,数据集已经上传至网盘: 有效期限:2022-08-01 23:59 访问密码:c8mA

其余尽可参照原 repo。
从头训练 Swin Transformer 可以使用以下命令:
python -m torch.distributed.launch --nproc_per_node <num-of-gpus-to-use> --master_port 12345  main.py \
--cfg <config-file> --data-path <imagenet-path> [--batch-size <batch-size-per-gpu> --output <output-directory> --tag <job-tag>]
例如:
python -m torch.distributed.launch --nproc_per_node 4 --master_port 12345 main.py --cfg configs/swin_tiny_patch4_window7_224.yaml --data-path imagenet --batch-size 64如果想添加识别种类,首先需要按照Data preparation所提示的进行准备,简单的改文件名、改注释map的工具可以参照annotation_tools.py. 之后更改NUM_CLASS为增加数据集后的数量,并在之后的验证中讲所添加种类增加到种类dict中。
在验证集上评估 Swin Transformer 可以使用以下命令:
python -m torch.distributed.launch --nproc_per_node <num-of-gpus-to-use> --master_port 12345 main.py --eval \
--cfg <config-file> --resume <checkpoint> --data-path <imagenet-path>
例如:
python -m torch.distributed.launch --nproc_per_node 4 --master_port 12345 main.py --eval --cfg configs/swin_tiny_patch4_window7_224.yaml --resume/pth/swin_tiny_patch4_window7_224.pth --data-path imagenet如果只是想测试单张图片,只需要在ckpt_loader.py更改文件目录到所测试图片路径后,使用以下命令:
python ckpt_loader.py或者直接在编译器中运行。