![]()
| 模型 | 参考链接 | 预训练权重链接 |
|---|---|---|
| SwinV1 | SwinV1 | SwinV1_Weight |
| SwinV2 | Swinv2 | SwinV2_Weight |
- SwinV1精度fp32最差能达到1e-3,fp16最差能达到1e-2,加速比fp16达到x2.02,fp32则达到1.87
- SwinV2精度fp32最差为nan值,其余batch最差为常数量级误差,fp16最差能达到1e-2,加速比fp32粗看在2.03左右,待后续解决精度问题后,重新测试fp32和fp16加速
Swin Transformer是基于transformer结构的视觉任务backbone,它结合了传统cnn网络层次化的特征图**,是vit提出以来视觉transformer主干的集大成者。文章发表时在多种下游任务中取得Sota的成绩。而Swin TransformerV2(以下简称swinv2)在swinv1的基础上改善了网络结构,以解决大规模模型训练时的收敛问题。
- The Swin Transformer is a type of Vision Transformer. It builds hierarchical feature maps by merging image patches (shown in gray) in deeper layers and has linear computation complexity to input image size due to computation of self-attention only within each local window (shown in red). It can thus serve as a general-purpose backbone for both image classification and dense recognition tasks. In contrast, previous vision Transformers produce feature maps of a single low resolution and have quadratic computation complexity to input image size due to computation of self-attention globally. (quoted from Hugginface*)
Swin Transformer的典型应用包括图像分类,目标检测,实例分割等。例如如下的道路目标检测以及实例分割:

Swin Transformer引入了两个关键概念来解决原始ViT面临的问题——层次化特征映射和窗口注意力转换。事实上,Swin Transformer的名字来自于“Shifted window Transformer”。Swin Transformer的总体架构如下所示:
Swin的层次化特征与其窗口注意力的特点可以像下面这样理解

特征映射在每一层之后逐步合并和下采样,创建具有层次结构的特征映射。并且,Swin Transformer中使用的窗口MSA只在每个窗口内计算注意力。由于窗口大小在整个网络中是固定的,因此基于窗口的MSA的复杂度相对于patch的数量(即图像的大小)是线性的,相对于标准MSA的二次复杂度有了很大的提高。(原文)
同时还引入了移动窗口机制解决了全局信息交换的问题,使得每个窗口的特征信息可以和别的窗口进行交互。
swinv2在swinv1的基础上加入了一些新的机制,这使得两者在TensorRT部署过程中出现了不同的表现。其结构对比如下:


具体表现可以归纳为:
- 计算attention的方式从点积attention变为了
**cosine attention** - 交换了LayerNorm与MLP层的位置
- 在计算qk的softmax值前引入了一种
**对数间隔连续位置偏差**
NVIDIA出的FastTransfomer中已经包含了高效的Swinv1实现,并且可以通过Plugins的形式融合到trt的引擎构建中,本项目后续会对其进行梳理,但目前的部署过程并未参考FastTransformer,仅基于预赛的经验。
- 转onnx的时候出现roll算子不支持的问题,导致无法直接转换为onnx。
- swinv2模型相对于swinv1引入了例如cosine attention等新的模块,直接使用trtexec中的onnxparser解析并推理后的精度很差
- 即使是swinv1模型fp16推理时也会出现精度下降,推测有计算密集型算子累积传递了fp16的截断误差
- 项目结构如下
├── SwinTransformerV2_TensorRT
  ├── config.py               // swin模型的基本配置信息
  ├── data
  │   ├── batch_data_gen.py   // 数据生成脚本
  ├── Images            // readme用图
  ├── models
  │   ├── build.py
  │   ├── checkpoints   // 存放pytorch模型权重文件和onnx文件
  │   ├── __init__.py
  │   ├── swin.py       // pytorch网络
  │   ├── swin_v2.py
  │   ├── swinv2.yaml   // 网络配置信息
  │   └── swin.yaml
  ├── onnx
  │   ├── export_onnx.py  // 导出onnx
  │   ├── graphsurgeon    // 优化onnx节点
  │   ├── onnx_test.py    // 测试onnx精度
  ├── README.md
  ├── Results
  │   ├── encoderScore.txt
  │   ├── nsight_result
  │   └── trt_log
  ├── TensorRT
  │   ├── build.sh        // trt脚本
  │   ├── INT8
  │   │   ├── quant.py        // int8 量化构建脚本
  │   │   └── swin_calibration_test.cache
  │   ├── Plugins
  │   │   ├── Attention       // TensorRT插件
  │   │   ├── F-Norm
  │   │   ├── LayerNorm
  │   │   └── LayerNormPlugin_with_params
  │   └── TRT_Engine         // 生成的engine文件
  ├── test_swinV2.py         // 精度测试脚本
  └── utils.py               // 一些辅助函数
说明
models中包含swinv2和swinv1的官方实现。data中包含batch数不同的imagenet2012-val数据。-onnx中包含了与onnx相关的代码,包括onnx导出,精度验证以及graph-surgeon等。-TensorRT包含TensorRT部署的相关代码。
参考了官方教程 ----->Swin环境搭建
conda环境搭建
conda create -n swin2 python=3.7 -y
conda activate swin2
pip3 install torch==1.10.0+cu113 torchvision==0.11.1+cu113 torchaudio==0.10.0+cu113 -f https://download.pytorch.org/whl/cu113/torch_stable.html
pip install numpy
pip install timm==0.4.12
pip install opencv-python==4.4.0.46 termcolor==1.1.0 yacs==0.1.8
pip install onnxruntime-gpu
pip install onnx
pip install pillow
pip install nvidia-tensorrt
pip install cuda-python
pip install graph_surgeon
Docker 环境搭建
nvidia-docker pull registry.cn-hangzhou.aliyuncs.com/trt2022/dev
Swin Transformer预训练权重,这里参考初赛的模型大小,选择small规模的SwinV1和SwinV2模型。
| 模型 | 参考链接 | 预训练权重链接 |
|---|---|---|
| SwinV1 | SwinV1 | SwinV1_Weight |
| SwinV2 | Swinv2 | SwinV2_Weight |
cd checkpoints/
wget https://github.com/SwinTransformer/storage/releases/download/v2.0.0/swinv2_small_patch4_window8_256.pth
wget https://github.com/SwinTransformer/storage/releases/download/v1.0.0/swin_small_patch4_window7_224.pth
这里将原模型权重导出onnx,将batch维设为动态维度,opset=12。onnx推理测试与pytorch前向结果一致。
python onnx/export_onnx.py --type swinv1 --resume /root/workplace/SwinTransformerV2_TensorRT/models/checkpoints/swin_small_patch4_window7_224.pth --cfg /root/workplace/SwinTransformerV2_TensorRT/models/swin.yaml   // 通过type参数指定输入的torch模型类型{swinv1,swinv2}, resume参数指定权重文件, cfg指定模型参数配置文件,权重文件放在models/checkpoints里

python onnx/onnx_test.py --onnx /root/workplace/SwinTransformerV2_TensorRT/models/checkpoints/swinv1_12.onnx  --resume /root/workplace/SwinTransformerV2_TensorRT/models/checkpoints/swin_small_patch4_window7_224.pth --cfg /root/workplace/SwinTransformerV2_TensorRT/models/swin.yaml           // 通过onnx参数指定输入的onnx模型路径, resume参数指定权重文件, cfg指定模型参数配置文件,onnx和权重文件都放在models/checkpoints里
python onnx/graphsurgeon/add_layernorm_with_params.py // 需要进入文件修改onnx文件路径和保存路径
这里使用了imagenet2012中val数据集的数据,分成不同batch并经过onnx推理后将输入输出存入npy文件中,与初赛一样,便于最后的推理验证
python data/batch_data_gen.py --model /root/workplace/SwinTransformerV2_TensorRT/models/checkpoints/swinv1_12.onnx // 通过model参数指定输入的onnx模型
主要利用trtexec进行模型解析和构建
sh TensorRT/build_swinv1_fp16.sh
sh TensorRT/build_swinv1_layernorm_fp16.sh      //fp16 with layernorm plugin
sh TensorRT/build_swinv1.sh                    //fp32 for swinv1
sh TensorRT/build_swinv2_layernorm.sh
sh TensorRT/build_swinv2.sh                  //fp32 for swinv2
python Onnx_Latency.py --model /root/workplace/SwinTransformerV2_TensorRT/models/checkpoints/swinv1_12.onnx
python Torch_Latency.py  --type swinv1  --resume /root/workplace/SwinTransformerV2_TensorRT/models/checkpoints/swin_small_patch4_window7_224.pth --cfg /root/workplace/SwinTransformerV2_TensorRT/models/swin.yaml
python TRT_test.py    // TRT_test 需要进入文件修改一下planfile的路径
- 转onnx的时候出现roll算子不支持的问题,但pytorch官方在1.9版本支持了这一算子,因此升级pytorch版本即可,目前升级到了1.10,对应cuda-11.3
pip3 install torch==1.10.0+cu113 torchvision==0.11.1+cu113 torchaudio==0.10.0+cu113 -f https://download.pytorch.org/whl/cu113/torch_stable.html
- SwinV2不加载预训练模型构建的plan进行推理精度合格,而加载预训练模型构建的plan精度不合格。同时这里尝试了SwinV1的构建,加载预训练模型后精度仍然合格。推测初始化模型的某些数值与预训练权重相比较小,在trt构建时不易出现溢出问题。同时SwinV2与SwinV1不同的部分产生了误差。因此需要对SwinV2改变的部分进行逐一核验。观察cosine attention的onnx图如下:
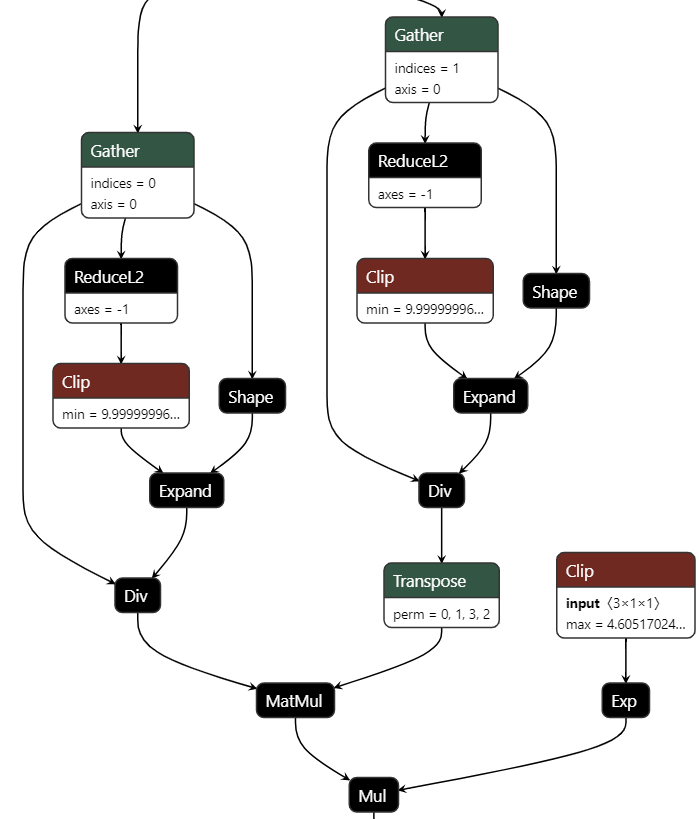

对应代码实现
# cosine attention
  attn = (F.normalize(q, dim=-1) @ F.normalize(k, dim=-1).transpose(-2, -1))
  logit_scale = torch.clamp(self.logit_scale, max=torch.log(torch.tensor(1. / 0.01))).exp()
  attn = attn * logit_scale
- 其中可能对精度产生影响的包括L2Norm算子,clamp(), exp()等
Relative_pos对应代码实现
  relative_position_bias_table = self.cpb_mlp(self.relative_coords_table).view(-1, self.num_heads)
  relative_position_bias = relative_position_bias_table[self.relative_position_index.view(-1)].view(
      self.window_size[0] * self.window_size[1], self.window_size[0] * self.window_size[1], -1)  # Wh*Ww,Wh*Ww,nH
  relative_position_bias = relative_position_bias.permute(2, 0, 1).contiguous()  # nH, Wh*Ww, Wh*Ww
  relative_position_bias = 16 * torch.sigmoid(relative_position_bias)
- 其中cpb_mlp由线性层和relu组成
- 目前看来问题最有可能出在cosine attention中,因此计划实现一个plugin去替换它,目前只实现了其中L2Norm的plugin,测试结果仍没有解决精度问题。
- 进行FP16推理的时候SwinV1出现了精度下降,这里观察onnx结构,发现存在大量(53)的LayerNorm节点,根据初赛的经验,LayerNorm存在计算量较大的Reduce以及开方,求根的操作,很容易将误差放大,所以可以采用Plugins的方式自己实现该算子并融合到trtexec的构建过程中,实际利用layernorm的确在fp16中解决了一部分精度问题。

-
注意到SwinV1在替换了layernorm节点后,batchsize大于4的情况下进行
trt时显存不够用了,这里是很奇怪的一点。 -
完成了INT8的推理脚本路径在TensorRT/INT8/quant.py, 在解决fp16的精度问题之后,继续完成int8的优化。

onnx没有做任何处理直接构建的的Engine Profiling结果如上图,可以发现trt将包含数个w-msa在内的节点融合成了一个超大节点,耗时约占整体的80%以上

加入了layernorm节点以后,可以看到原先的超大节点被分解,形成了以一个attention block为中心的融合节点,其余则为layernorm等分支节点。attention的总体耗时还是最大的,所以如果要追求时间上的最优,需要对window-multihead-self-attention整体进行一个cuda的实现
这里均选择batch为1的数据进行测试,swinv1的测试都加上了layernorm plugin
精度对比
| 模型 | pytorch | onnx | TRT-FP32 | TRT-FP16 |
|---|---|---|---|---|
| SwinV1 | - | 0 | max: 1.508e-3 medium: 8.304e-4 | max: 1.714e-2 medium: 1.541e-3 |
| SwinV2 | - | 0 | max: nan medium: nan | / |
SwinV2在batch为1的情况下,trt推理输出会出现nan值,其余batch情况中位数维持在1e-1和最大值维持在常数数量级
- 这里精度都是和onnx推理的结果对比
运行时间对比
| 模型 | pytorch | onnx | TRT-FP32 | TRT-FP16 |
|---|---|---|---|---|
| SwinV1 | 15.01ms | 5.309ms | 2.840ms | 2.626ms |
| SwinV2 | 23.06ms | 7.188ms | 3.531ms | / |
这里未用torchscript导出,并利用libtorch推理,后续可以尝试
目前SwinV2的精度问题还未解决
- 初赛组委会和选手们都提供了很多帮助,也学习到了很多。复赛认识到自己的差距。
- 目前SwinV2工作还远未完成,接下来会继续完善这个项目。