1. Overview [Paper] [PyTorch Implementation] [Project Webpage]
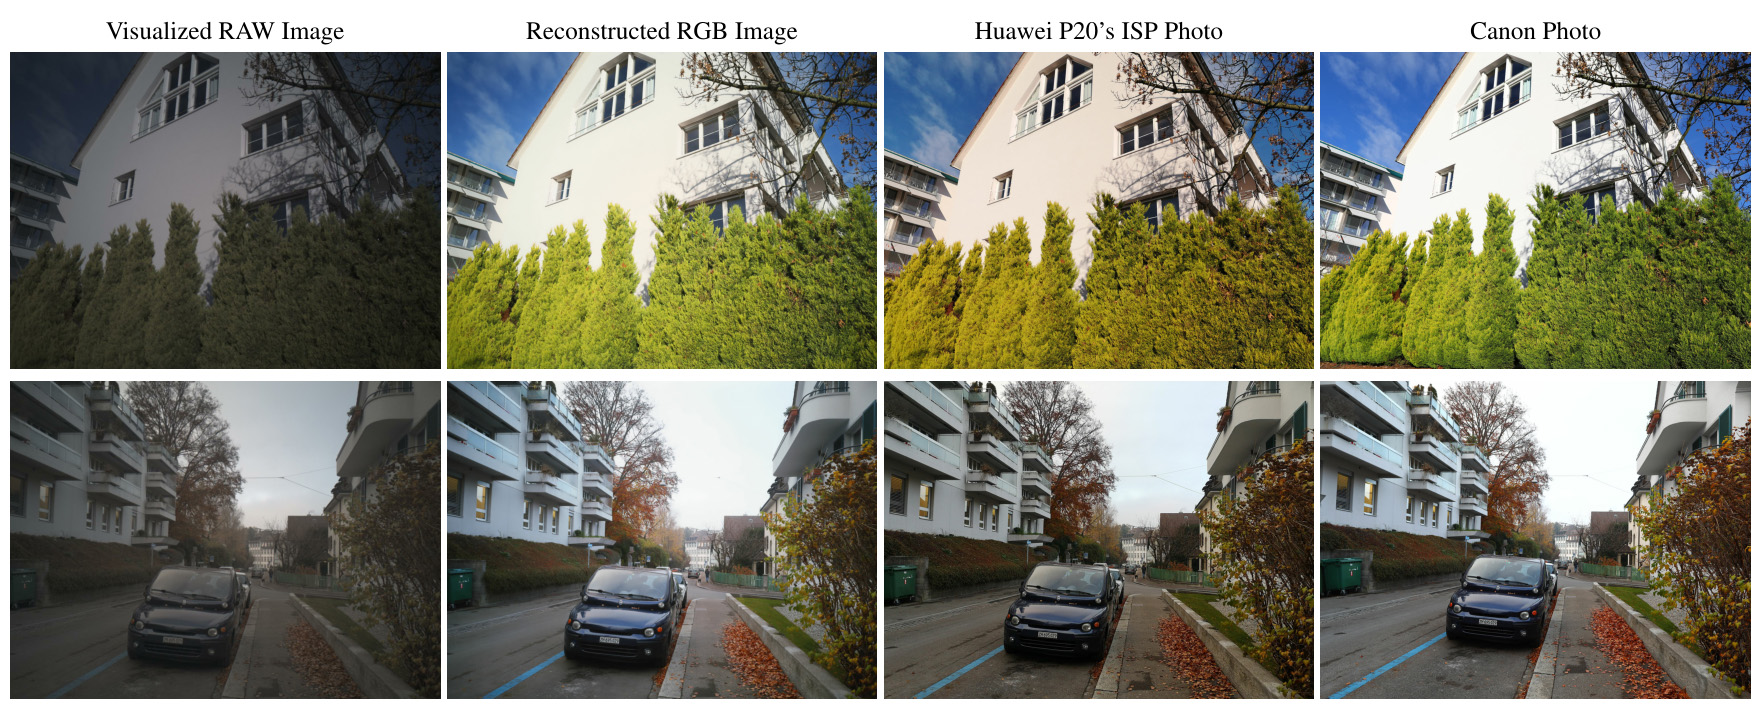
This repository provides the implementation of the RAW-to-RGB mapping approach and PyNET CNN presented in this paper. The model is trained to convert RAW Bayer data obtained directly from mobile camera sensor into photos captured with a professional Canon 5D DSLR camera, thus replacing the entire hand-crafted ISP camera pipeline. The provided pre-trained PyNET model can be used to generate full-resolution 12MP photos from RAW (DNG) image files captured using the Sony Exmor IMX380 camera sensor. More visual results of this approach for the Huawei P20 and BlackBerry KeyOne smartphones can be found here.
- Python: scipy, numpy, imageio and pillow packages
- TensorFlow 1.X + CUDA cuDNN
- Nvidia GPU
-
Download the pre-trained VGG-19 model Mirror and put it into
vgg_pretrained/folder. -
Download the pre-trained PyNET model and put it into
models/original/folder. -
Download Zurich RAW to RGB mapping dataset and extract it into
raw_images/folder.
This folder should contain three subfolders:train/,test/andfull_resolution/Please note that Google Drive has a quota limiting the number of downloads per day. To avoid it, you can login to your Google account and press "Add to My Drive" button instead of a direct download. Please check this issue for more information.
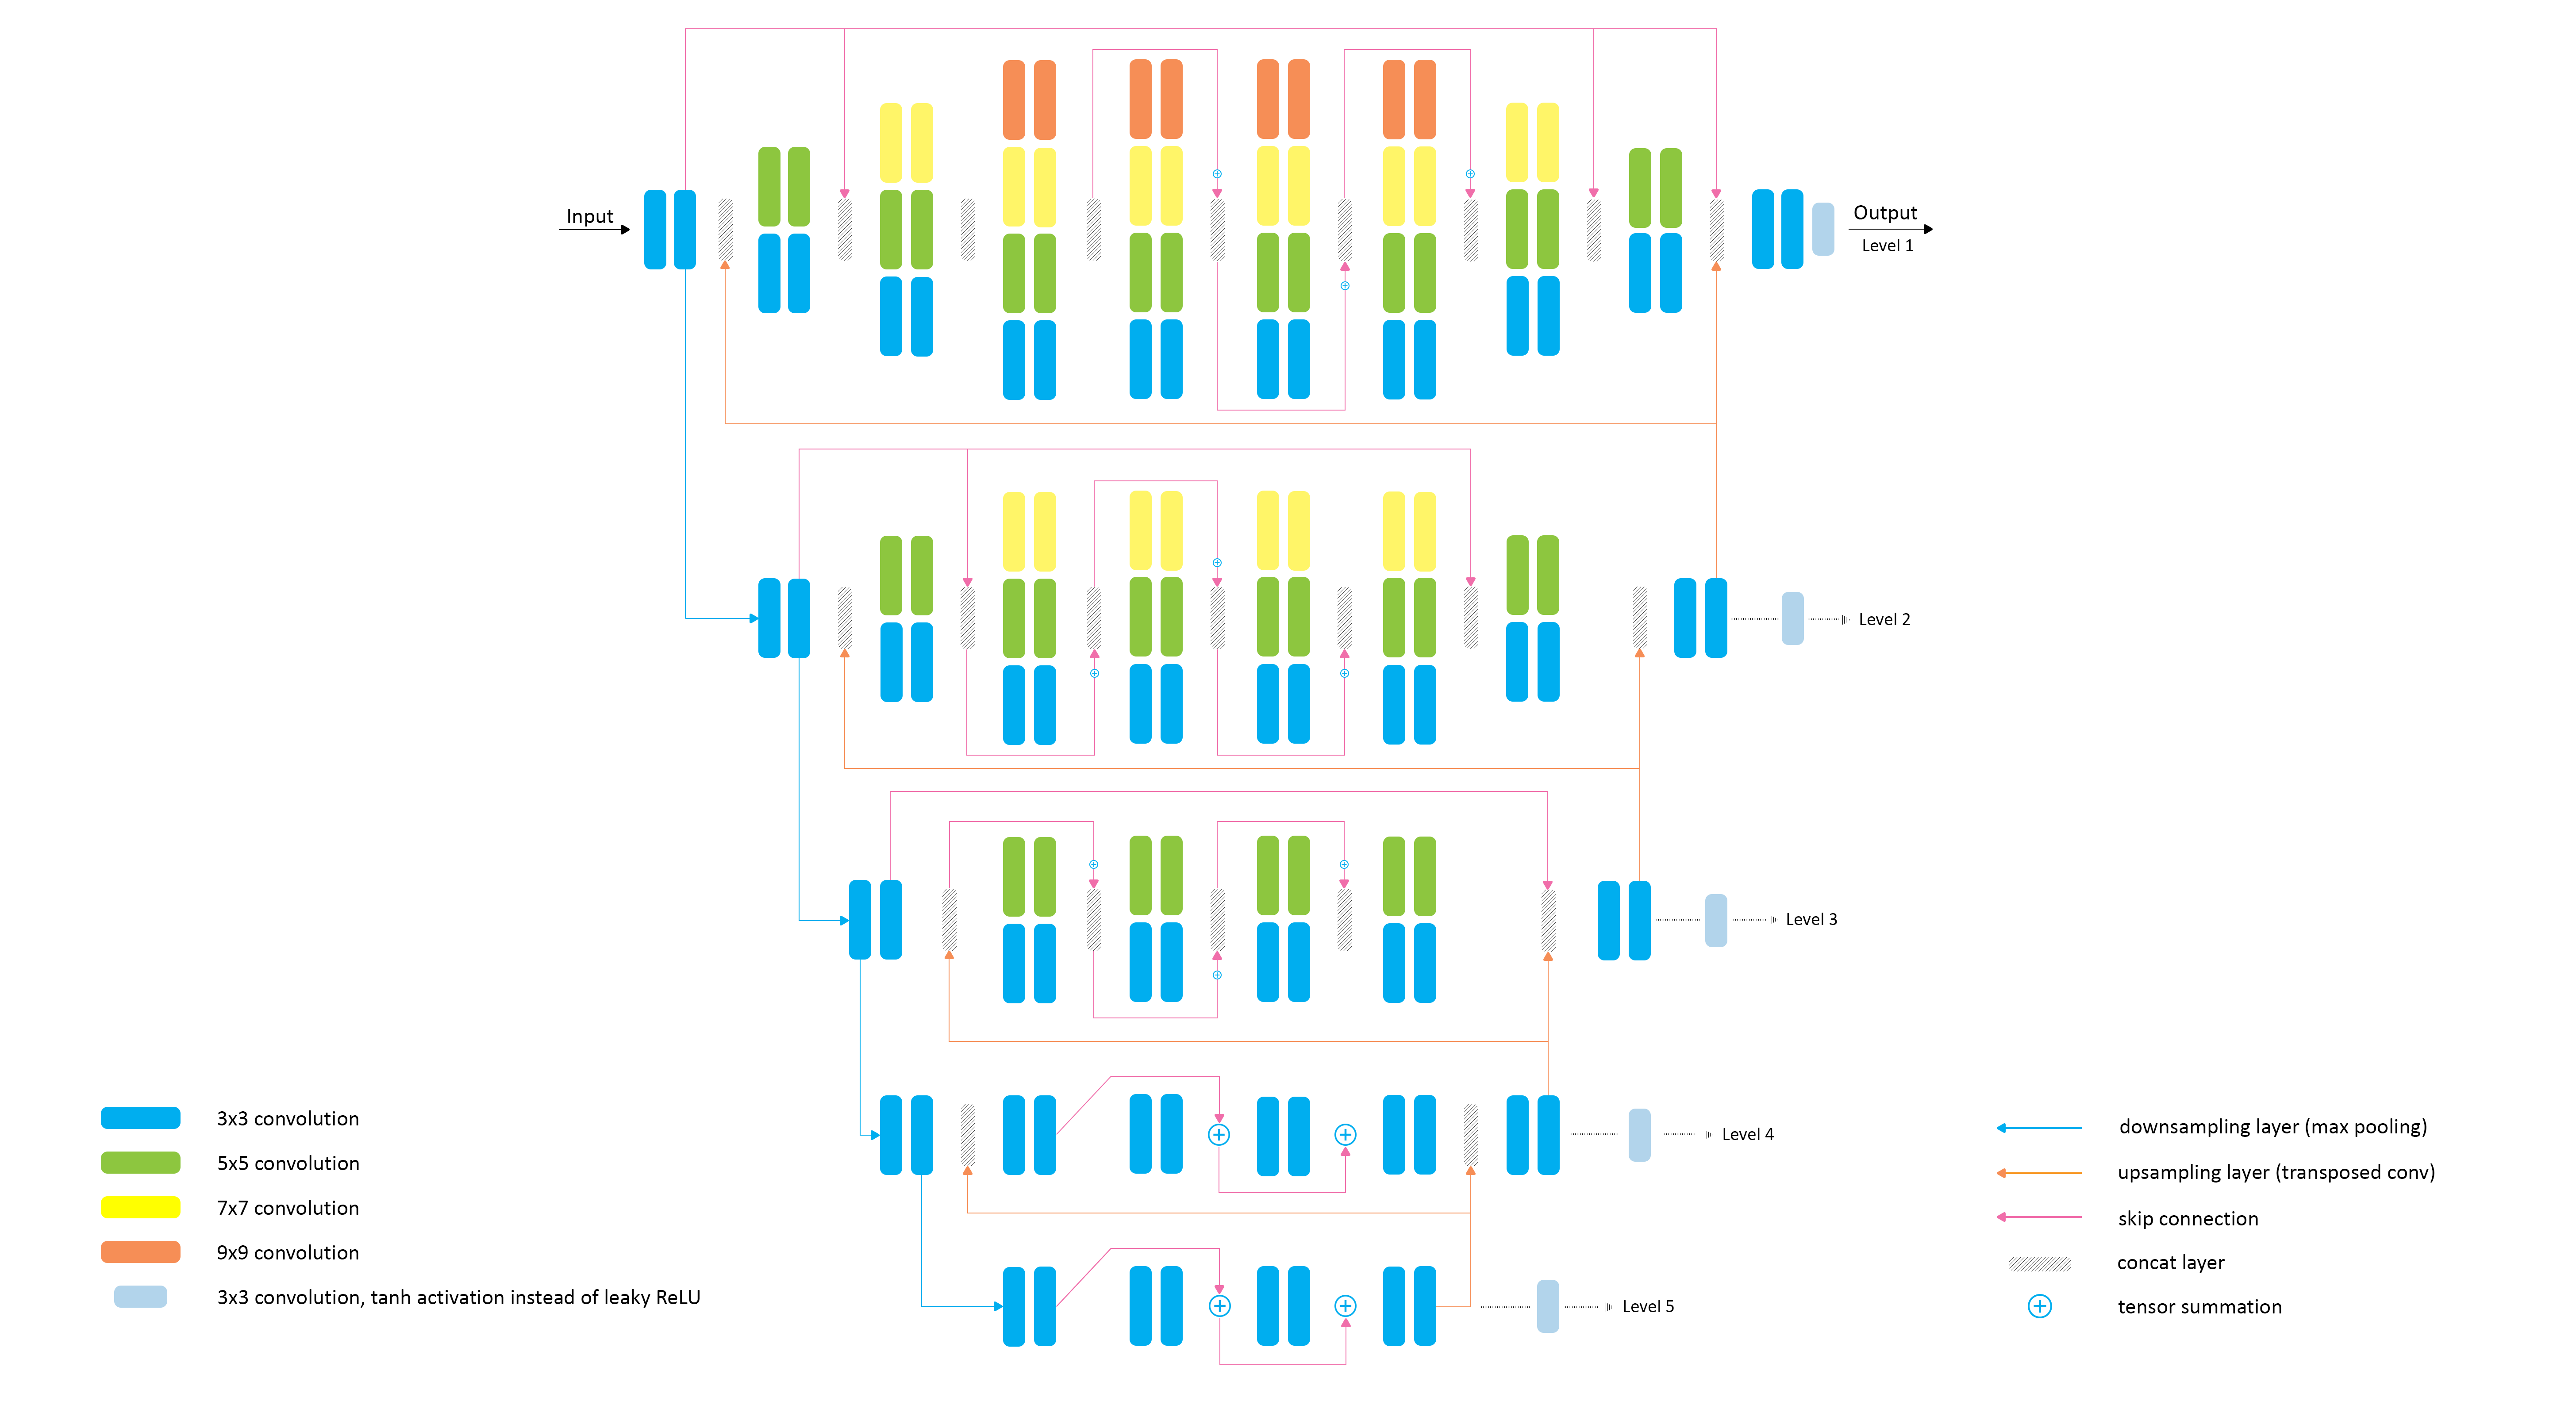
PyNET architecture has an inverted pyramidal shape and is processing the images at five different scales (levels). The model is trained sequentially, starting from the lowest 5th layer, which allows to achieve good reconstruction results at smaller image resolutions. After the bottom layer is pre-trained, the same procedure is applied to the next level till the training is done on the original resolution. Since each higher level is getting upscaled high-quality features from the lower part of the model, it mainly learns to reconstruct the missing low-level details and refines the results. In this work, we are additionally using one transposed convolutional layer (Level 0) on top of the model that upsamples the image to its target size.
The model is trained level by level, starting from the lowest (5th) one:
python train_model.py level=<level>Obligatory parameters:
level:5, 4, 3, 2, 1, 0
Optional parameters and their default values:
batch_size:50- batch size [small values can lead to unstable training]
train_size:30000- the number of training patches randomly loaded each 1000 iterations
eval_step:1000- eacheval_stepiterations the accuracy is computed and the model is saved
learning_rate:5e-5- learning rate
restore_iter:None- iteration to restore (when not specified, the last saved model for PyNET'slevel+1is loaded)
num_train_iters:5K, 5K, 20K, 20K, 35K, 100K (for levels 5 - 0)- the number of training iterations
vgg_dir:vgg_pretrained/imagenet-vgg-verydeep-19.mat- path to the pre-trained VGG-19 network
dataset_dir:raw_images/- path to the folder with Zurich RAW to RGB dataset
Below we provide the commands used for training the model on the Nvidia Tesla V100 GPU with 16GB of RAM. When using GPUs with smaller amount of memory, the batch size and the number of training iterations should be adjusted accordingly:
python train_model.py level=5 batch_size=50 num_train_iters=5000
python train_model.py level=4 batch_size=50 num_train_iters=5000
python train_model.py level=3 batch_size=48 num_train_iters=20000
python train_model.py level=2 batch_size=18 num_train_iters=20000
python train_model.py level=1 batch_size=12 num_train_iters=35000
python train_model.py level=0 batch_size=10 num_train_iters=100000python test_model.py level=0 orig=trueOptional parameters:
use_gpu:true,false- run the model on GPU or CPU
dataset_dir:raw_images/- path to the folder with Zurich RAW to RGB dataset
python test_model.py level=<level>Obligatory parameters:
level:5, 4, 3, 2, 1, 0
Optional parameters:
restore_iter:None- iteration to restore (when not specified, the last saved model for level=<level>is loaded)
use_gpu:true,false- run the model on GPU or CPU
dataset_dir:raw_images/- path to the folder with Zurich RAW to RGB dataset
models/- logs and models that are saved during the training process
models/original/- the folder with the provided pre-trained PyNET model
raw_images/- the folder with Zurich RAW to RGB dataset
results/- visual results for small image patches that are saved while training
results/full-resolution/- visual results for full-resolution RAW image data saved during the testing
vgg-pretrained/- the folder with the pre-trained VGG-19 network
load_dataset.py- python script that loads training data
model.py- PyNET implementation (TensorFlow)
train_model.py- implementation of the training procedure
test_model.py- applying the pre-trained model to full-resolution test images
utils.py- auxiliary functions
vgg.py- loading the pre-trained vgg-19 network
These files can be useful for further experiments with the model / dataset:
dng_to_png.py- convert raw DNG camera files to PyNET's input format
evaluate_accuracy.py- compute PSNR and MS-SSIM scores on Zurich RAW-to-RGB dataset for your own model
Copyright (C) 2020 Andrey Ignatov. All rights reserved.
Licensed under the CC BY-NC-SA 4.0 (Attribution-NonCommercial-ShareAlike 4.0 International).
The code is released for academic research use only.
@article{ignatov2020replacing,
  title={Replacing Mobile Camera ISP with a Single Deep Learning Model},
  author={Ignatov, Andrey and Van Gool, Luc and Timofte, Radu},
  journal={arXiv preprint arXiv:2002.05509},
  year={2020}
}
Please contact Andrey Ignatov (andrey@vision.ee.ethz.ch) for more information

