A project starter which pairs up the best features of Hasura with Django ❤️
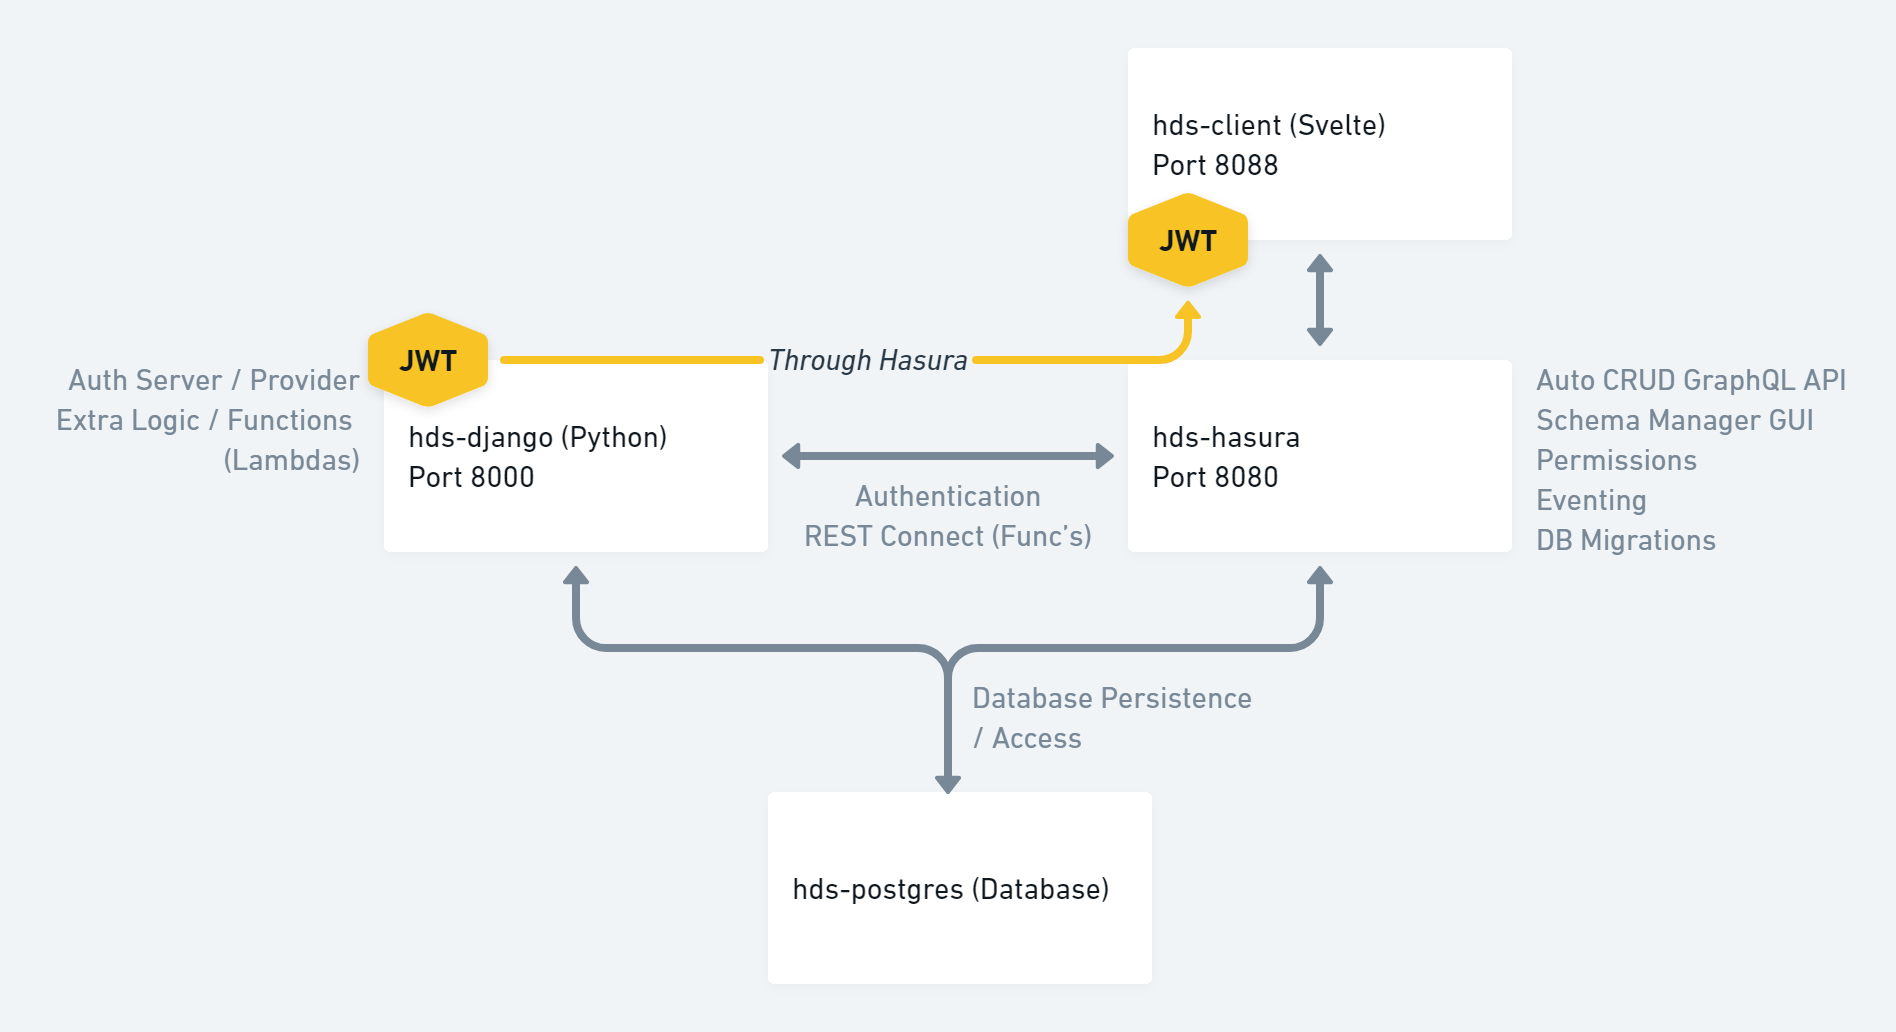
The best of Hasura's instant, realtime GraphQL API meshed with Django's built-in auth model and the ability to extend logic across the two services.
(Now with 100% more Hasura 2.0+ examples)
Updates / New Features
- Updated to use Hasura 2.0+ and Hasura Metadata v3
- Makes more effective use of Actions for mapping Django REST endpoints to GraphQL nodes (no REST usage).
- Added healthchecks to docker-compose (to help with the order-of-operations of installing migrations Postgres Up > Django Migrations > Hasura Migrations)
- Added
DJANGO_DEFAULT_USERNAME,DJANGO_DEFAULT_PASSWORD,DJANGO_DEFAULT_EMAIL,DJANGO_DEFAULT_ROLEin env vars (to create initial superuser).
Looking for 1.3.3?
- Looking for the first release with support for Hasura 1.3.3?
- Check out here: https://github.com/m-rgba/hasura-django-starter/tree/1.0
Running these 3 commands will get your project up and running (as long as you have Docker installed).
git clone https://github.com/mm-io/hasura-django-starter.git && cd ./hasura-django-starter && docker-compose up
Already cloned the repo? Just run docker-compose up from the project directory.
For Docker installation - see here: https://docs.docker.com/get-docker/
Afterwards:
- Your Hasura Console dashboard will be exposed at: http://localhost:8080/console
- You can start creating / exposing tables for your API here: http://localhost:8080/console/data/schema/public
- You can test with your GraphQL endpoint here: http://localhost:8080/v1/graphql
- Your client demo will be available at: http://localhost:8088
- Your REST API (for Django stuff) will be accessible over: http://localhost:8000
- Auto-generate GraphQL API for any Postgres database.
- Database management UI.
- Row-level permissions management system.
- Events (with samples for sending new user and forgot password emails triggered from Hasura through Django).
- Action (with a sample action for demo-ing more advanced non-CRUD logic between Hasura and Django).
- Database / metadata migrations (and container auto-apply).
- Registration, login, and password reset auth-flows (REST-based).
- See
./django.requirements.txtfor any packages used.
- See
- JWT tokens (Simple-JWT), with custom Hasura claims by way of Django's built-in auth-layer.
- Extended user model (added role, registration, UUID, registration_sent > flag for new user emails).
- Ability to extend Hasura's logic through endpoints (+ getting auth-only endpoints for *free).
- Django-specific database migrations and container auto-apply (user model).
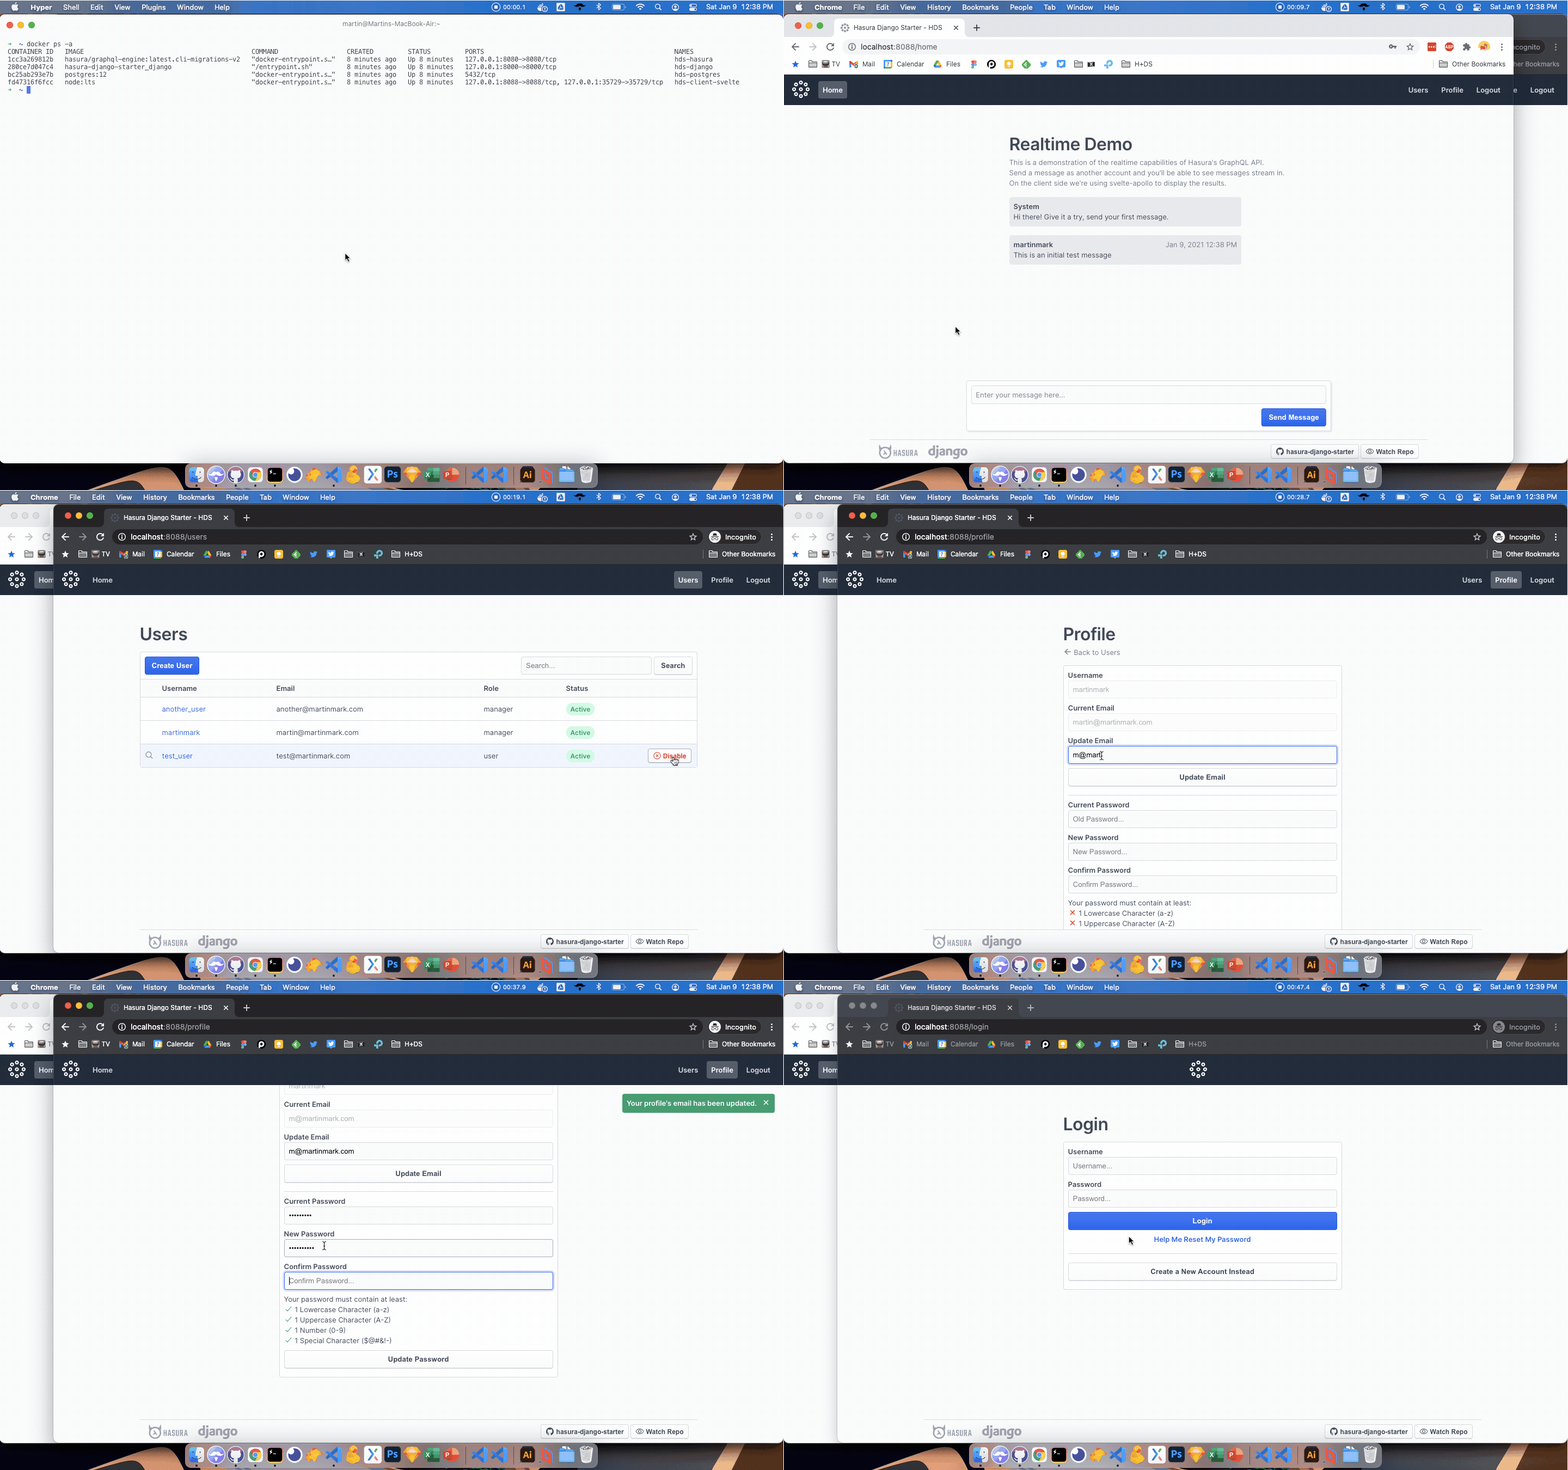
You'll be able to access your sample app through: http://localhost:8088/
A sample client application which helps illustrate everything tied together:
- User management and standard authentication (note: SMTP emails need to be setup through Django for Forgot Password - read below about where to find the boilerplate for creating emails).
- Example usage of the REST endpoints listed below.
- Query and mutation GraphQL samples (verbose, no client magic - using Fetch).
- Subscriptions to demonstrate Hasura's realtime API (more magical - using Svelte-Apollo).
./hasura/metadata/
Contains YAML files for all the metadata that runs Hasura. Includes things like tables which are exposed and configuration options for events.
./hasura/migrations/
Contains folders with SQL files. These will be used to migrate your database. There should be up.sql and down.sql files in each directory - these are meant for apply migrations and rollbacks.
The container we're using will automatically pick this up and apply them on building the container. If you don't want to use these, use the other image commented out in the docker-compose.yml file.
./django/app/
Contains our project settings > contains settings.py. The urls.py for the root of our project direct us to the api application.
./django/api/
Contains all of our application logic:
- admin.py
- What shows up in the Django admin interface (currently disabled, but configured to show any custom info for users)
- apps.py
- General configuration options
- models.py
- Extends user model
- Adds
user,role(for custom roles),registration_sent(flag for registration email),uuidas a lookup to default user model.
- auth.py
- Auth specific views and serializers.
- Customizes Hasura JWT claims.
- sample_logic.py
- Contains any extended logic (this is where you can write custom functions).
- sample_email.py
- Email-specific extended logic
- This is used below for our email eventing examples, and a custom action example where Hasura -> <- from Django.
- urls.py
- Routing for API endpoints
- You should update your secrets and passwords, everything in this demo is for demonstration purposes.
- You should be able to update everything by using the
docker-compose.ymlto configure your new secret key. - If updating the admin password for Hasura, you'll also need to update the
./hasura/config.yamlin order to use the Creating New Migrations section below.
If you're running your Django container and would like to generate a new secret, you can do so by using the following command:
docker exec hds-django bash -c 'python -c "import secrets; print(secrets.token_urlsafe())"'
Note: if you're using a $ as a character, you need to use $$ for docker-compose to interpolate it as $.
More information here: https://stackoverflow.com/questions/40619582/how-can-i-escape-a-dollar-sign-in-a-docker-compose-file
As of 2.0 these are mapped to GraphQL nodes using Hasura Actions.
http://localhost:8000/api/user/register/
POST : accepts username, email, and password. Returns new user info and a first set of returned tokens.
GQL Query:
mutation userRegister($email: String = "", $password: String = "", $username: String = "") {
  user_register(arg: {password: $password, username: $username, email: $email}) {
    id
    username
    email
    tokens
  }
}
Variable:
{
  "email": "[EMAIL]",
  "password": "[PASSWORD]",
  "username": "[USERNAME]"
}http://localhost:8000/api/login/
POST : accepts username and password. Returns access and refresh tokens.
GQL Query:
query userLogin($username: String = "", $password: String = "") {
  user_login(arg: {username: $username, password: $password}) {
    access
    refresh
  }
}
Variable:
{
  "username": "[USERNAME]",
  "password": "[PASSWORD]"
}http://localhost:8000/api/token/refresh/
POST : accepts refresh token. Provides new access token.
GQL Query:
query userRefresh($refresh: String = "") {
  user_refresh(arg: {refresh: $refresh}) {
    access
  }
}
Variable:
{
  "refresh": "[REFRESH TOKEN]"
}http://localhost:8000/api/user/change_password/
PUT / PATCH : accepts old_password, new_password. Requires authorization header with access token.
GQL Query:
mutation userChangePassword($old_password: String = "", $new_password: String = "") {
  user_change_password(arg: {old_password: $old_password, new_password: $new_password}) {
    status
    code
  }
}
Variable:
{
  "old_password": "[OLD PASSWORD]",
  "new_password": "[NEW PASSWORD]"
}http://localhost:8000/api/reset_password/
POST : accepts email. Generates a password reset token in the database
Note: there's a message below in Events in where you can add your SMTP email logic logic.
GQL Query:
mutation userPasswordReset($email: String = "") {
  user_password_reset(arg: {email: $email}) {
    status
  }
}
Variable:
{
  "email": "[EMAIL]"
}http://localhost:8000/api/reset_password/validate_token/
POST : accepts email and token. Returns 200 OK status if the token is verified.
GQL Query:
query userPasswordResetValidateToken($email: String = "", $token: String = "") {
  user_password_reset_validate(arg: {email: $email, token: $token}) {
    status
  }
}
Variable:
{
  "email": "[EMAIL]",
  "token": "[TOKEN]"
}http://localhost:8000/api/reset_password/confirm/
POST : accepts email, token, password (new password). Returns 200 status if the token + email pair is verified and the password is updated.
GQL Query:
mutation userPasswordResetChangeConfirm($email: String = "", $token: String = "", $password: String = "") {
  user_password_reset_confirm(arg: {email: $email, token: $token, password: $password}) {
    status
  }
}
Variable:
{
  "email": "[EMAIL]",
  "password": "[PASSWORD]",
  "token": "[TOKEN]"
}
Aside from the data views Hasura provides through GraphQL from our database's tables, how else can we get views of our data?
Hasura provides the ability to write raw SQL (through: http://localhost:8080/console/data/sql), and then track and expose Views and Functions to your GraphQL API.
Most Views and Functions (Stored Procedures) are compatible with Hasura, see the following documentation for more information, examples and formatting:
https://hasura.io/docs/1.0/graphql/core/schema/views.html
https://hasura.io/docs/1.0/graphql/core/schema/custom-functions.html
We've provided a sample demo_public_posts_count SQL View which counts posts by user.
We've also provided a sample demo_public_posts_search SQL Function which provides a node for searching multiple columns the demo_public_posts table.
This project makes use of 2 of Hasura's methods for extending it's generate CRUD API.
- Events use database eventing to provide at least once delivery of a database event (create, update, etc.) to a webhook endpoint.
- We have 2 custom events created at
http://localhost:8080/console/events/data/managefor sending emails to newly registered users and new password resets.- These events throw to endpoints which are defined at
./django/api/sample_emails.py(+./django/api/urls.py). - You'll notice each of these items have a flag to define completion (
registration_sent, andreset_sentin their respective tables) - that's because of the at least once caveat to make sure that in the case of a double-send (rare, but happens), we don't accidentally double-send an email.
- These events throw to endpoints which are defined at
- Actions extend the query or mutation root of the generated API to define a payload which will be sent to a webhook endpoint, and an expected response to get back.
- We have 1 action created at
http://localhost:8080/console/actions/manage/actionswhich is a very simple example.- The payload is a food which will be thrown to the logic defined in
./django/api/sample_logic.py(+./django/api/urls.py). - The logic looks at if the food entered is a hotdog and replies true of false.
- The nice part of this we can lean on Django's built in
@permission_classes([IsAuthenticated])decorator insample_logic.pyto verify I'm a logged in user making the request (we're passing our headers from the action), and pair that with Hasura's permissions around which role should be able to make the request through GraphQL.
- The payload is a food which will be thrown to the logic defined in
We have some sample email logic which can be found in ./django/api/sample_emails.py which can be uncommented and used as needed.
For the reset password flow, generally you'll be looking to handle the token as:
- Embed token in URL link in email (boilerplate shows one implementation of how you may want to do this).
- In that URL, pass token as query-string which the client can use.
- Client will call back to the
/api/reset_password/confirm/endpoint with the user's token, email, and new password to reset the password.
We've made a couple of small changes to how we handle JWT tokens vs the standard SimpleJWT implementation.
There are typically 2 gotchas when handling tokens:
- How can I revoke a token (instances of deactivating accounts)?
- Is the current token's claims valid?
The way we've looked to solve these issues are:
- Short access token life, longer refresh token (standard) - this can be set through settings in
./django/app/settings.py - Instead of blacklisting tokens (which is one way to revoke tokens), on refresh we check for:
- Whether the user exists / is marked as active in the DB.
- Whether the JWT claims for the user's role match the
user.profile.rolewhich is set in the DB.- If either of these throw an exception, refresh endpoint will reply with a 401 (and the user should be redirected to login and obtain a new access / refresh token pair if their account is valid).
You can find, change, or disable all of this logic in ./django/api/auth.py
You can customize permissions logic based on the Permission tab of any table in the schema builder / explorer http://localhost:8080/console/data/schema/public
If you create a role for public this role will be able to access without authorization - so you can do things like give it read status to public-facing parts of the application.
The role name public is defined in the docker-compose.yml file under HASURA_GRAPHQL_UNAUTHORIZED_ROLE.
There is a sample public table we've created with permissions at: http://localhost:8080/console/data/schema/public/tables/public_posts/permissions
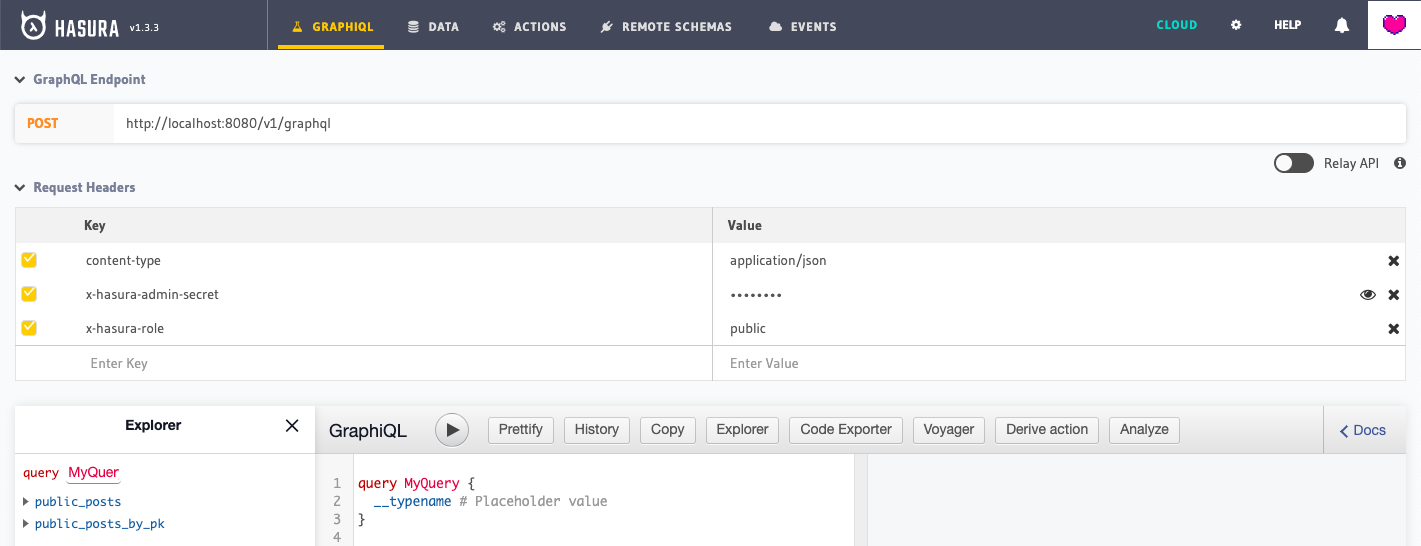
To test out your permission you can use it as a x-hasura-role header in your API explorer (as pictured below): http://localhost:8080/console/api-explorer
If you'd like to remove the sample migration which creates an initial the public posts table, a test user, and a post - you can do so by removing the directory: ./hasura/migrations/1609171942629_create_public_demo_table/
Start by installing the Hasura CLI (https://hasura.io/docs/1.0/graphql/core/hasura-cli/install-hasura-cli.html):
curl -L https://github.com/hasura/graphql-engine/raw/stable/cli/get.sh | bash
-
Change directory to Hasura in this project
cd ./hasura -
Bring up the Hasura CLI Console
hasura console -
Console should launch on http://localhost:9695
Any schema oriented changes should create new migrations within the ./hasura/migrations directory.
These migrations are saved as SQL files. For each migration created there will be an up.sql and down.sql. These are made for applying the migration (up), and then rolling back the migration (down) if needed.
When you're ready to export your metadata (all tracked tables, actions, events, etc.) you're able to do so by running hasura metadata export.
This will export your metadata information as YAML files to your ./hasura/metadata directory.
For more information on all the features of migrations - read the CLI docs over at: https://hasura.io/docs/1.0/graphql/core/hasura-cli/index.html


