A Go package that interacts with Junos devices, as well as Junos Space, and allows you to do the following:
- Run operational mode commands, such as
show,request, etc.. - Compare the active configuration to a rollback configuration (diff).
- Rollback the configuration to a given state or a "rescue" config.
- Configure devices by submitting commands, uploading a local file or from a remote FTP/HTTP server.
- Commit operations: lock, unlock, commit, commit at, commit confirmed, commit full.
- Device views - This will allow you to quickly get all the information on the device for the specified view.
- [SRX] Convert from a zone-based address book to a global one.
Junos Space <= 15.2
- Get information from Junos Space managed devices.
- Add/remove devices from Junos Space.
- List all software image packages that are in Junos Space.
- Stage and deploy software images to devices from Junos Space.
- Create, edit and delete address and service objects/groups.
- Edit address and service groups by adding or removing objects to them.
- View all policies managed by Junos Space.
- Publish policies and update devices.
- Add/modify polymorphic (variable) objects.
go get -u github.com/scottdware/go-junos
Note: This package makes all of it's calls over Netconf using the go-netconf package from Juniper Networks. Please make sure you allow Netconf communication to your devices:
set system services netconf ssh
set security zones security-zone <xxx> interfaces <xxx> host-inbound-traffic system-services netconf
There are two different ways you can authenticate against to device. Standard username/password combination, or use SSH keys. There is an AuthMethod struct which defines these methods that you will need to use in your code. Here is an example of connecting to a device using only a username and password.
auth := &junos.AuthMethod{
    Credentials: []string{"scott", "deathstar"},
}

jnpr, err := junos.NewSession("srx.company.com", auth)
if err != nil {
    fmt.Println(err)
}
If you are using SSH keys, here is an example of how to connect:
auth := &junos.AuthMethod{
    Username:   "scott",
    PrivateKey: "/home/scott/.ssh/id_rsa",
    Passphrase: "mysecret",
}

jnpr, err := junos.NewSession("srx.company.com", auth)
if err != nil {
    fmt.Println(err)
}
If you do not have a passphrase tied to your private key, then you can omit the Passphrase field entirely. In the above example,
we are connecting from a *nix/Mac device, as shown by the private key path. No matter the OS, as long as you provide the location of the
private key file, you should be fine.
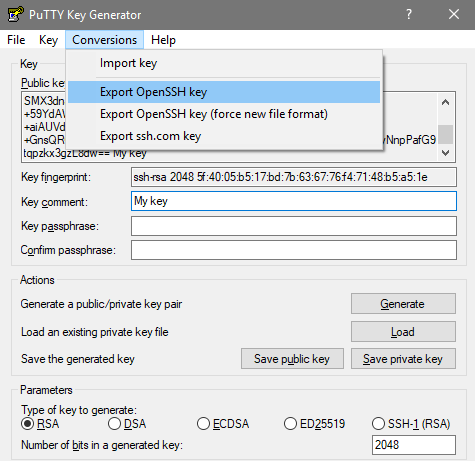
If you are running Windows, and using PuTTY for all your SSH needs, then you will need to generate a public/private key pair by using Puttygen. Once you have generated it, you will need to export your private key using the OpenSSH format, and save it somewhere as shown below:
Visit the GoDoc page for package documentation and examples.
Connect to a device, and view the current config to rollback 1.
auth := &junos.AuthMethod{
    Credentials: []string{"admin", "Juniper123!"},
}

jnpr, err := junos.NewSession("qfx-switch.company.com", auth)
if err != nil {
    fmt.Println(err)
}

defer jnpr.Close()

diff, err := jnpr.Diff(1)
if err != nil {
    fmt.Println(err)
}

fmt.Println(diff)

// Will output the following

[edit vlans]
-   zzz-Test {
-       vlan-id 999;
-   }
-   zzz-Test2 {
-       vlan-id 1000;
-   }
View the routing-instance configuration.
auth := &junos.AuthMethod{
    Username:   "admin",
    PrivateKey: "/home/scott/.ssh/id_rsa",
}

jnpr, err := junos.NewSession("srx.company.com", auth)
if err != nil {
    fmt.Println(err)
}

defer jnpr.Close()

riConfig, err := jnpr.GetConfig("text", "routing-instances")
if err != nil {
    fmt.Println(err)
}

fmt.Println(riConfig)

// Will output the following

## Last changed: 2017-03-24 12:26:58 EDT
routing-instances {
    default-ri {
        instance-type virtual-router;
        interface lo0.0;
        interface reth1.0;
        routing-options {
            static {
                route 0.0.0.0/0 next-hop 10.1.1.1;
            }
        }
    }
}Device views allow you to quickly gather information regarding a specific "view," so that you may use that information however you wish. A good example, is using the "interface" view to gather all of the interface information on the device, then iterate over that view to see statistics, interface settings, etc.
Note: Some of the views aren't available for all platforms, such as the
ethernetswitchandvirtualchassison an SRX or MX.
Current out-of-the-box, built-in views are:
| Views | CLI equivilent |
|---|---|
arp |
show arp |
route |
show route |
bgp |
show bgp summary |
interface |
show interfaces |
vlan |
show vlans |
ethernetswitch |
show ethernet-switching table |
inventory |
show chassis hardware |
virtualchassis |
show virtual-chassis status |
staticnat |
show security nat static rule all |
sourcenat |
show security nat source rule all |
storage |
show system storage |
firewallpolicy |
show security policies (SRX only) |
NOTE: Clustered SRX's will only show the NAT rules from one of the nodes, since they are duplicated on the other.
You can even create your own views by creating a struct that models the XML output from using the GetConfig() function. Granted,
this is a little more work, and requires you to know a bit more about the Go language (such as unmarshalling XML), but if there's a custom
view that you want to see, it's possible to do this for anything you want.
I will be adding more views over time, but feel free to request ones you'd like to see by emailing me, or drop me a line on Twitter.
Example: View the ARP table on a device
views, err := jnpr.Views("arp")
if err != nil {
    fmt.Println(err)
}

fmt.Printf("# ARP entries: %d\n\n", views.Arp.Count)
for _, a := range views.Arp.Entries {
    fmt.Printf("MAC: %s\n", a.MACAddress)
    fmt.Printf("IP: %s\n", a.IPAddress)
    fmt.Printf("Interface: %s\n\n", a.Interface)
}

// Will print out the following

# ARP entries: 4

MAC: 00:01:ab:cd:4d:73
IP: 10.1.1.28
Interface: reth0.1

MAC: 00:01:ab:cd:0a:93
IP: 10.1.1.30
Interface: reth0.1

MAC: 00:01:ab:cd:4f:8c
IP: 10.1.1.33
Interface: reth0.1

MAC: 00:01:ab:cd:f8:30
IP: 10.1.1.36
Interface: reth0.1