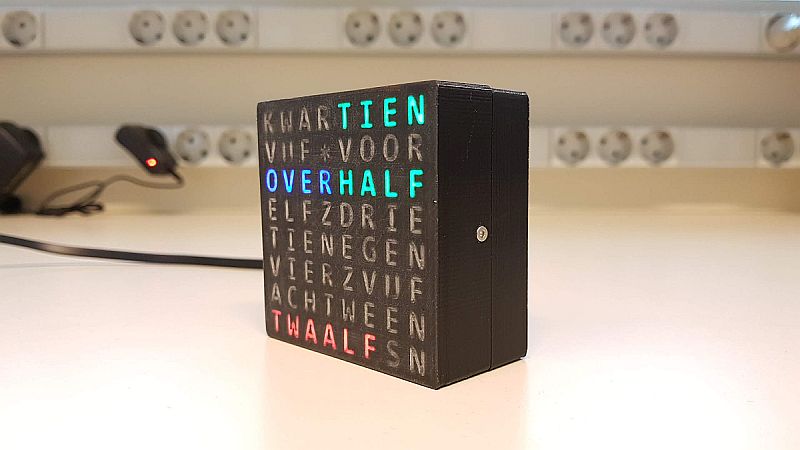
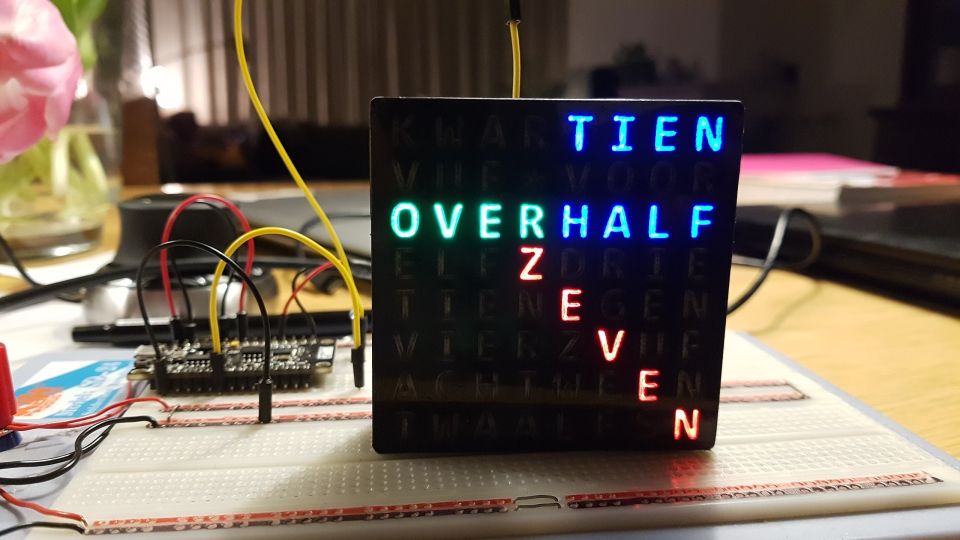
A clock that tells time in plain text. In Dutch, e.g. "TIEN OVER HALF TWAALF".
Commercial products exist, but I'm making my own.
Here is a demo video of all animations, or look at just none, wipe, dots, pulse, or mist.
There is a video looking at the mechanics (casing) of the WordClock, and a video comparing it to a DCF77 clock.
I also made a white version.
This is the playlist of all WordClock videos.
- 1. Introduction - What is this project about
- 2. Model 1 - My first experiment
- 3. Model 2 - Improved lettering
- 4. 3D printing - 3D printed lettering
- 5. NeoPixel power - How much power is needed for NeoPixels
- 6. Model 3 - Using the 3D printed lettering
- 7. Keeping time - How to keep time with NTP
- 8. Timing - Disable interrupts disables time keeping
- 9. Power architecture - How to provide power to the NeoPixels
- 10. Modding the board - Selecting an ESP8266 board
- 11. Model 4 - Assembling the electronics and 3D printed case
- 12. Model 5 - Adding the time keeping software
- 13. Model 6 - End-user application "WordClockFull"
- 14. User manual - The user manual of "WordClockFull"
- 15. Replication - Making one more
- 16. Delay - Determining the timing between first and last NeoPixel
Notes
- There are several Arduino sketches used during development.
- There are some Python scripts used during development.
- There are STL files for 3D printing.
I had seen WordClocks before, e.g. here. However, doing the mechanics for 100 LEDs, isolating them (light bleed), wiring them - too much work.
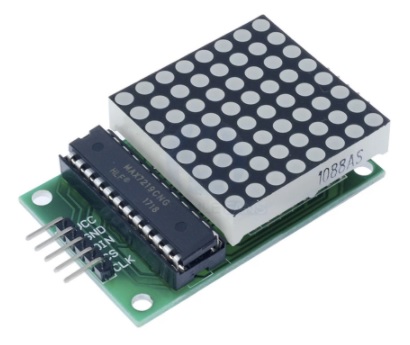
Then I stumbled on a simpler version. It uses an 8×8 LED matrix (and a MAX7219 controller), so very little mechanics to do. The downside is that 8×8 LEDs means we are very restricted on the lettering: which letters (words) are placed where and how.
I want a Dutch word clock. I do not like vertical text. Is it possible to fit all this on 8×8?
For the hours, we need words een (1) to twaalf (12). That is 48 characters - note we are writing vijf, not vijf.
This means that we can not have words for all 60 minutes. Let's try to go for multiples of 5 only.
In Dutch this means vijf (over), tien (over), kwart (over), tien (voor half), vijf (voor half), half, vijf (over half), etc.
That is 24 characters.
Oops, 24+48 is 72, and we only have 64.
But we can save a bit, for example, for tien and negen, we only need tienegen.
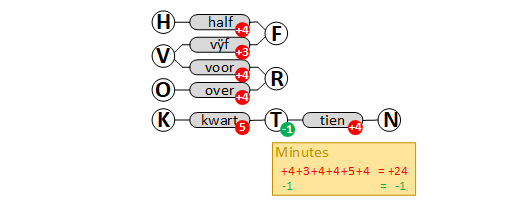
For my first prototype, I made a graph, coupling first letters to last letters of words. I started with the minutes:
We can only save 1 character, but that doesn't help, we go from 24 to 23. But 24 is 3 rows, and saving one character on the last row doesn't help, we can not fit an hour there.
Two solutions are shown below. They fit in three rows.
  vijfkwart     kwartien
  tienvoor     vijf_voor
  overhalf     overhalf
Note that vijf, tien, and kwart need to come before over and voor, and only then we can have half.
So there is not much room for alternatives.
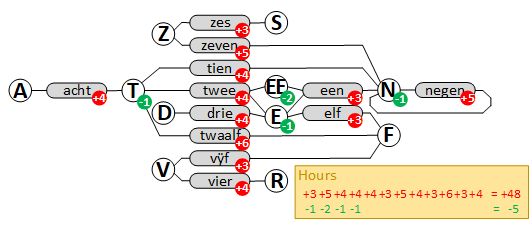
Let's next look at the hours. They need to come after the minutes. The complete graph is shown below.
We have a problem. Full words require 48 characters. We can, at best, save 5, which still requires 43. But we only have 40 (5 rows of 8), so we need to get rid of 3 more characters.
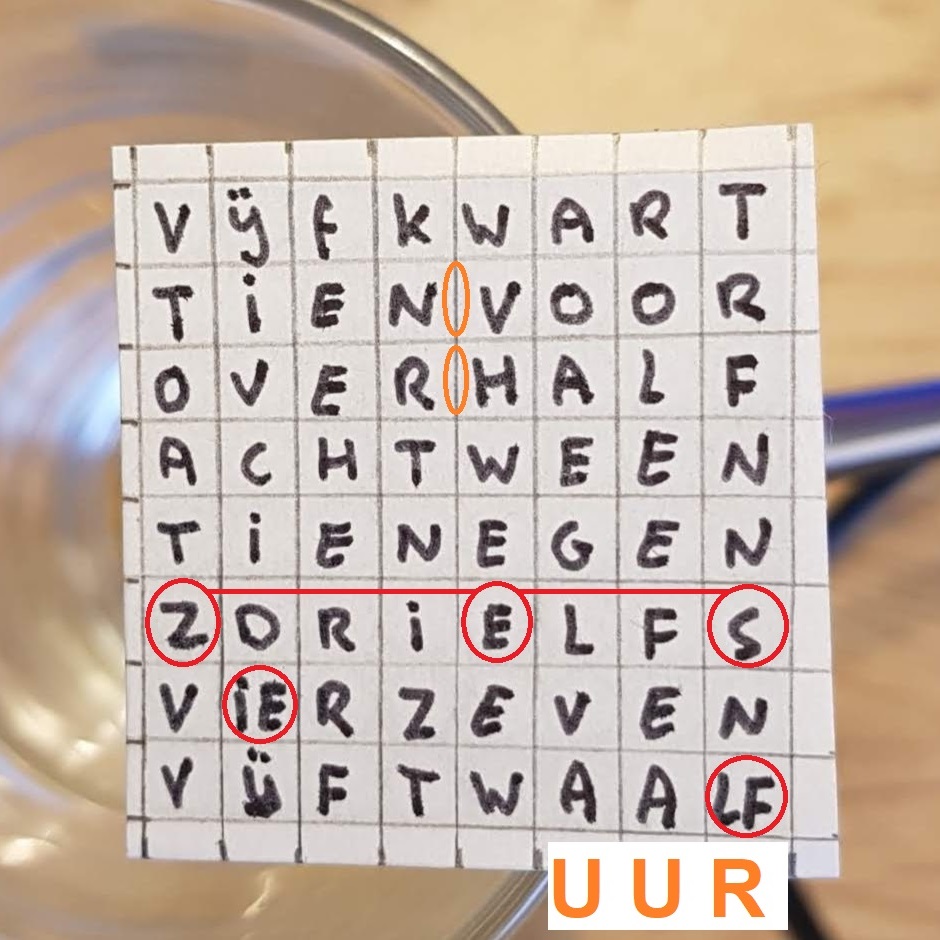
I cheated in my first prototype: two paired letters vIEr and twaaLF, and one split word Z-E-S.
There are also some minor problem: two times a space missing (between tien and voor, and between over and half)
and the word uur missing (for every full hour).
This is my first attempt.
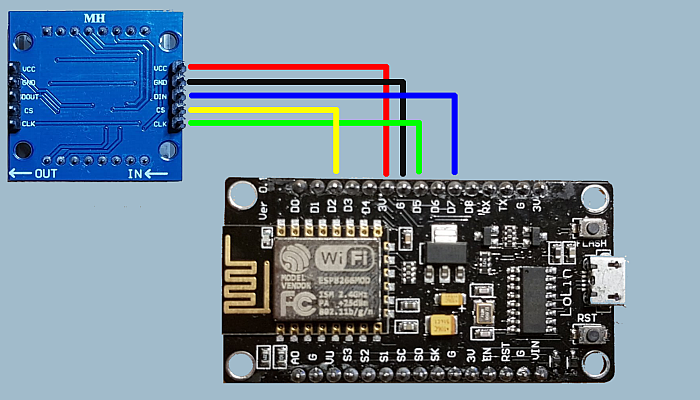
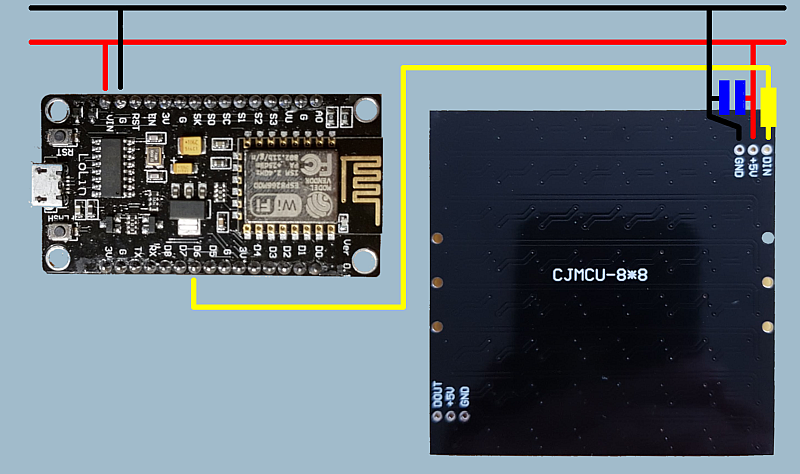
The first prototype was made with an ESP8266, and an 8×8 LED matrix. The wiring is straightforward:
I made a video that runs at approximately 600× so that all states appear in a one minute movie.
I also made a real clock and a video that captures one state change. This really keeps the time (based on the ESP8266 crystal). At startup the user can press the FLASH button to set the hour and minute.
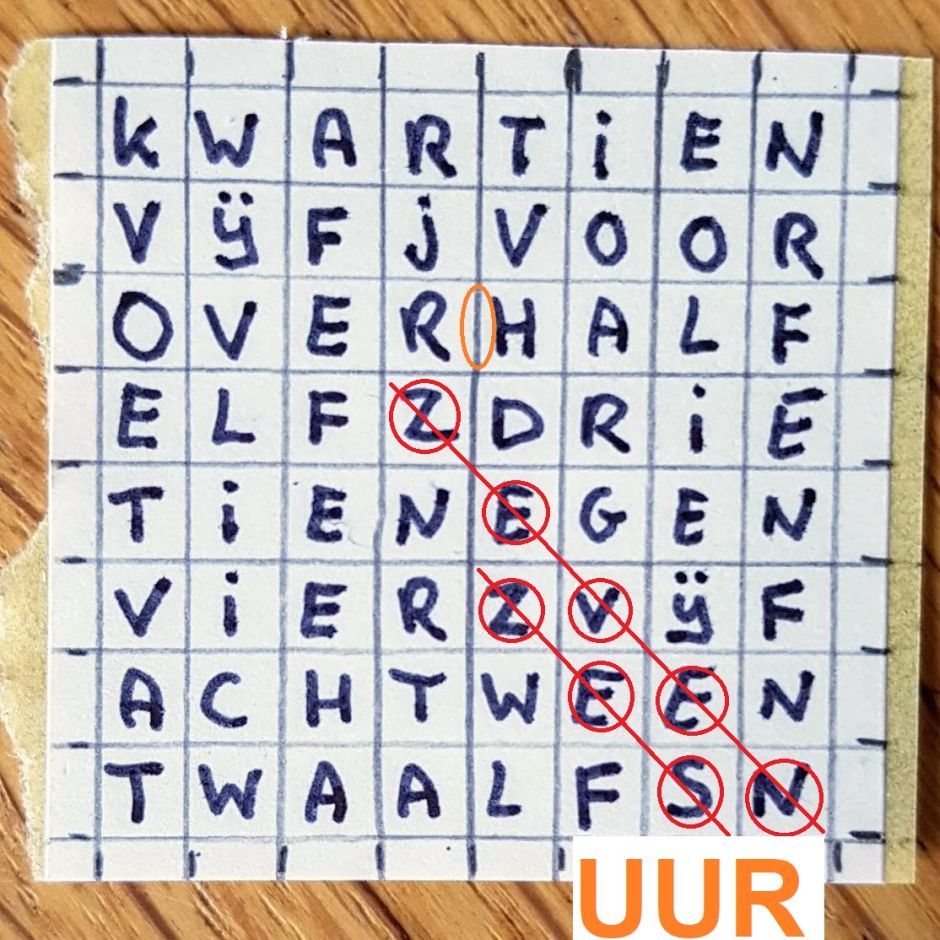
Marc relaxed the rules, he allows diagonal words. He wrote a solver algorithm and found the below lettering solution.
This eliminates the paired letters and split words. Still a missing space, and still uur missing.
My next prototype uses Marc's lettering. It is supported by the same sketch as the first prototype.
At startup you can not only set hour and minute, but also mode: clock or a fast demo. Here is the video of the fast mode.
The good thing of the 8×8 LED matrix is that hardly any mechanics are needed. The downside of the 8×8 LED matrix, is that the 8×8 matrix is small, in my case 32×32 mm².
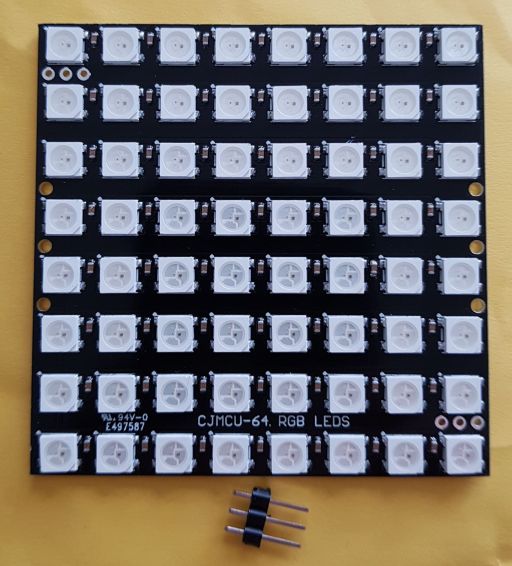
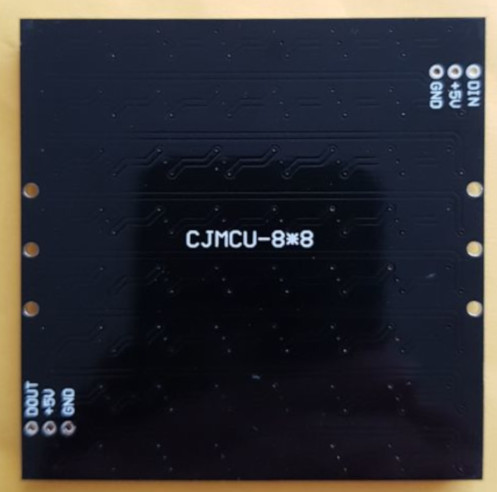
However, there are also 8×8 NeoPixel boards. Twice as big (65×65 mm²), fully assembled and still affordable (~3 euro/dollar). On top of that: the LEDs are full RGB and only a single wire to control all LEDs.
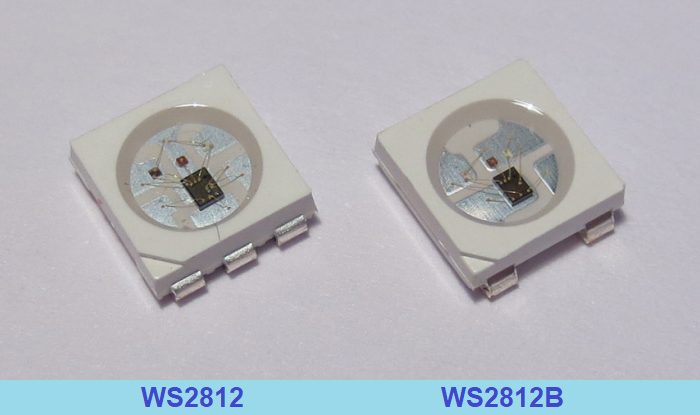
Note that most new NeoPixel boards use the WS2812B. This is a 4 pin device. Its predecessor is known as WS2812 (without the B). This is a 6 pin device.
The 4 pin devices are easy to control: 2 pins for power (VCC, GND), one pin to clock in the 24 bits RGB values (data-in), and one pin to clock out RGB data, which allows NeoPixels to be daisy-chained.
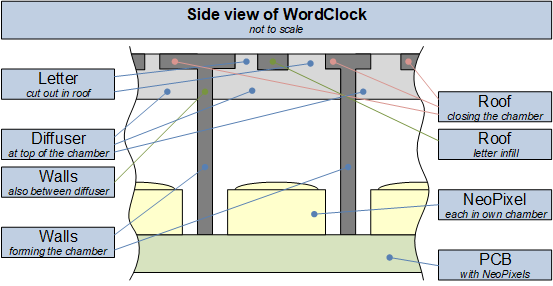
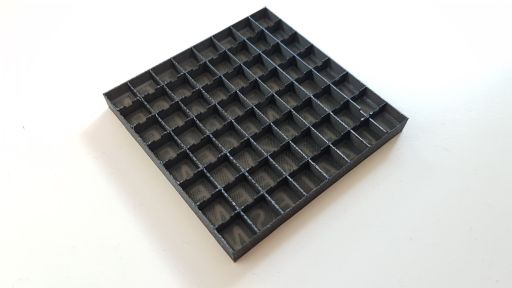
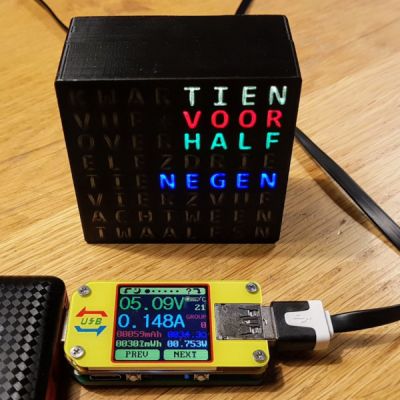
The 8×8 NeoPixel matrix is big enough to allow the clock to be 3D printed. I used a printer with two heads. The first head prints the black encasing, the second head prints a transparent diffuser (also inside the letters). This should prevent light bleed.
The design is made in Fusion 360. I was quite pleased with the result. The print resolution is sufficient to print the letters. And the transparency is enough to see through.
I did not yet receive the NeoPixel matrix from AliExpress, so I had to guess where to leave a notch for the resistors.
One thing that worries me about the NeoPixels is power usage. I tasked myself with measuring it.
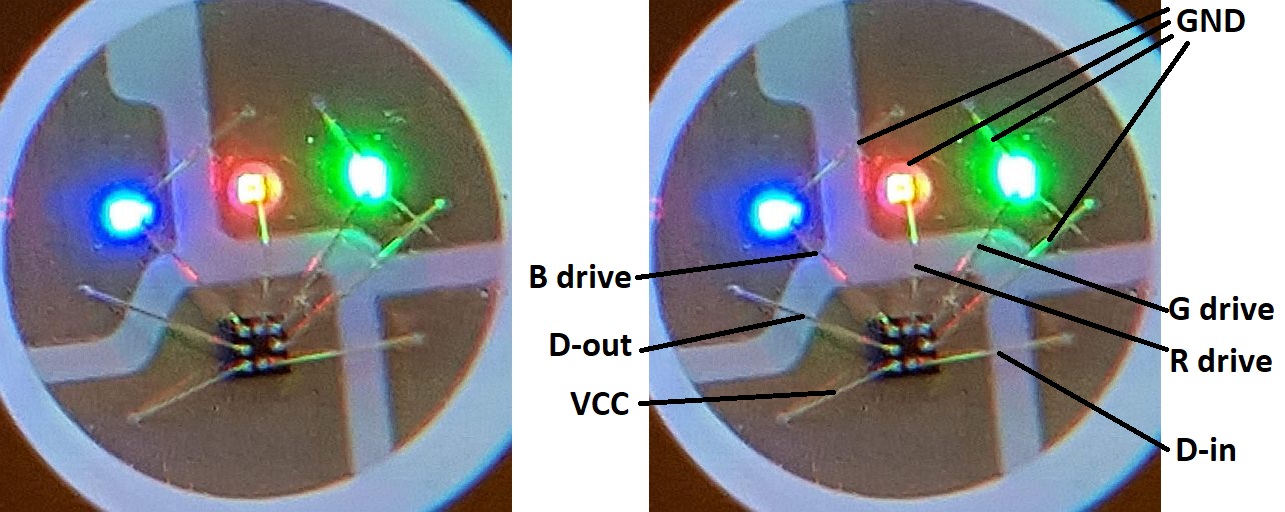
It is helpful to understand the inner workings of a NeoPixels. It contains a controller and three LEDs.
Note that the LEDs are "glued" on the 4 "copper" leads. The controller is powered (two bond wires coming from two leads), and it drives the three LEDs (three bond wires going from controller to the LEDs, and the LEDS then wired to GND). Finally the controller is bond wired to the data-in and data-out leads. Note that my annotation is guessed, VCC and GND could be swapped, so could data-in and data-out.
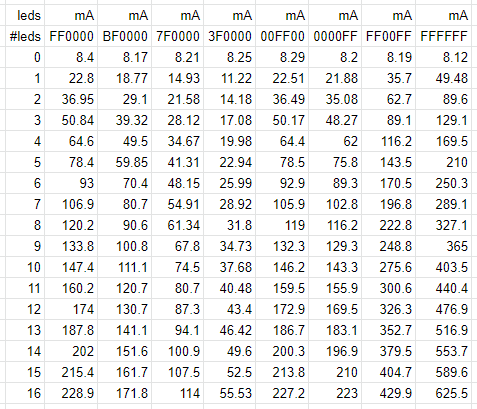
I did have a 4×4 NeoPixel board, and I investigated the power usage on that board. I measured the current when 1 NeoPixel is red (0xFF0000). I measured also for 2, 3, ... 16 NeoPixels. I measured the current when 1 NeoPixel is red but dimmed a bit (0xBF0000), and also for 2, 3, ... 16 NeoPixels. I measured the red at half brightness (0x7F0000) and at quarter brightness (0x3F0000), for 1 to 16 NeoPixels. All these experiments use just the red LED in the NeoPixel, so for the next two experiments I used the other two LEDs in the NeoPixels: green (0x00FF00) and blue (0x0000FF) for 1 to 16 NeoPixels. Finally I measured when more than 1 LED is on: purple (0xFF00FF) and white (0xFFFFFF).
All in all, 8 experiments, each with 1 to 16 NeoPixels. The script was short, but doing all the measurements took quite some time. I manually logged all results, and then tabulated them in Excel:
Here is the usage graphed:
Conclusions:
- There is a off current of 8 mA (0.5mA per NeoPixel), probably due to the controllers in the 16 NeoPixels
- A NeoPixel LED consumes 12.9mA when fully powered (0xFF).
- The power usage of a NeoPixel LED is linear in the control value (00..FF).
- The power usage of a NeoPixel sequence is linear in the number of NeoPixels switched on.
- A 4×4 at full white (0xFFFFFF) thus consumes 16x3x12.9 + 16x0.5= 627 mA
- A 8×8 at full white will likely consume 64×3×12.9 + 64×0.5 = 2509 mA or 2.5 A.
For the final product, the power usage can be estimated as follows.. Let's assume the display shows 17 characters (TIEN VOOR HALF NEGEN), each in a primary color (red, green, blue), and each at 20%. This comes close to the default configuration. Recall that a 100% / LED consumes 13mA, the 64 NeoPixels have standby current of 32mA and the ESP8266 NodeMCU uses 80mA. This results in an operating current of 20% × 13 × 17 + 32 + 80 ≈ 156 mA. This is well within standard USB specification, which says 500mA max.
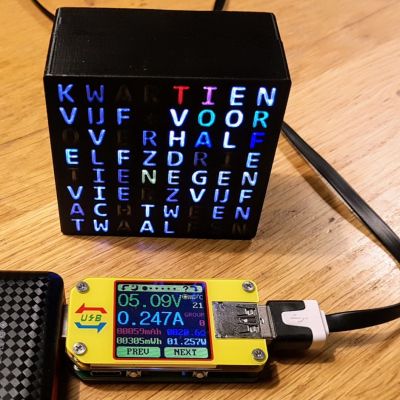
The mist animation switches nearly all pixels on, to gray. The default mist color is 0x222222, which means 0x22 or 34 per color channel. This is 34/255 or 13% of full power. During mist, the pixels vary from 13% to 0%,so let's estimate 7% average for 50 pixels for all three LEDs (gray). This means the power estimate is 7% × 13 × 50 × 3 + 32 + 80 ≈ 250 mA. Still half of the max USB spec (500mA).
This figures match quite well with actuals. We measure 148 where we estimated 156, and we measure 247 where we estimated 250.
Finally, I received the NeoPixels matrix.
Unfortunately, the resistors are not centered. Also the matrix is not equal in horizontal and vertical direction: in horizontal direction the spacing is ~8.1mm and in vertical direction the spacing is ~8.3mm. Result: the 3D print does not fit well. I needed to make a new 3D model.
See below for the wiring; the resistor is 470 Ω, the capacitor 1000 µF (see Adafruit). Note: The Neopixels run at 5V0, and the required signal level is at 70%, or 5V0 × 70% = 3V5. Since the ESP8266 runs on 3V3, we are actually below spec.
I adapted the software and did a try-out.
I made a video of it.
Now that the NeoPixel solution with 3D printed enclosure seems to work, we needed to tackle the next biggest problem. Keeping track of time. There are several solutions:
- Hand set the time, and use the built-in CPU crystal
Plus: No extra components needed.
Minus: Needs hand setting. Does not know about daylight saving time ("DST"). - Use a DS1307 or DS1302 time tracking chip
Plus: Keeps time, even when not mains powered (small battery).
Minus: Needs hand setting once and does not know about daylight saving time. - Use time stamp from webservers (e.g. http HEAD of google.nl)
Plus: No extra components needed (assuming ESP8266), no hand setting needed.
Minus: Web servers publish UTC, not local time. So adaptations for time zone and DST needed. - Use NTP servers
Plus: Servers are made for it. No extra components needed (assuming ESP8266), no hand setting needed.
Minus: NTP servers publish UTC, so again, adaptations for time zone and DST are needed.
When I found out the ESP8266 <time.h> actually includes NTP
and that the implementation has a single string parameter to configure time zone as well as DST,
I decided to use the last solution.
It basically boils down to telling <time.h> which NTP servers to use and what the timezone and DST configuration is.
Actually up to three servers can be passed. The timezone and DST configuration is passed as the first parameter:
configTime(TZ, SVR1, SVR2, SVR3);
The first parameter (TZ) is a quite compact string. As an example, let's examine the string for Amsterdam.
#define TZ "CET-1CEST,M3.5.0,M10.5.0/3" // Amsterdam
The first part of this string, before the comma, defines the (standard) timezone and the daylight saving timezone.
In the example, the (standard) timezone is known as CET, and you need to subtract 1 (-1) to get to UTC.
The daylight saving timezone is known as CEST, and since it is not explicitly included,
it defaults to one (1) on top of the standard time.
After the comma we find the start moment of the daylight saving period: it starts at month 3 (March), week 5, on Sunday (day 0).
The M tells that the month, week, day notation with . is used.
After the next comma, we find when daylight saving stops: at month 10 (October), week 5, day 0 (Sunday).
Also here in M and . notation.
The start is at 02:00:00 (default), the stop is explicit at 03:00:00 (/3).
See the source for more
details
on this string. The easiest way to play with this yourself is to change the string so that the timezone change (to or from DST)
is a couple of minutes from now. For this it is good to know that you can enter M3.5.0/17:34.
Also, the ESP8266 comes with standard time zones, see C:\Users\maarten\AppData\Local\Arduino15\packages\esp8266\hardware\esp8266\3.0.2\cores\esp8266\TZ.h.
Here is the output of the script
time-keeping - NTP with TZ and DST
Not yet synced - 1970-01-01 09:00:00 (dst=0)
Not yet synced - 1970-01-01 09:00:01 (dst=0)
Not yet synced - 1970-01-01 09:00:02 (dst=0)
Not yet synced - 1970-01-01 09:00:03 (dst=0)
SET
2020-02-17 12:43:48 (dst=0)
2020-02-17 12:43:49 (dst=0)
2020-02-17 12:43:50 (dst=0)
2020-02-17 12:43:51 (dst=0)
2020-02-17 12:43:52 (dst=0)
2020-02-17 12:43:53 (dst=0)
2020-02-17 12:43:54 (dst=0)
2020-02-17 12:43:55 (dst=0)
2020-02-17 12:43:56 (dst=0)
2020-02-17 12:43:57 (dst=0)
2020-02-17 12:43:58 (dst=0)
2020-02-17 12:43:59 (dst=0)
DEMO >>> WiFi off: time continues
2020-02-17 12:44:00 (dst=0)
2020-02-17 12:44:01 (dst=0)
2020-02-17 12:44:02 (dst=0)
2020-02-17 12:44:03 (dst=0)
2020-02-17 12:44:04 (dst=0)
DEMO >>> Clock reset: time continues from reset val
SET
Not yet synced - 2000-11-22 11:22:34 (dst=0)
Not yet synced - 2000-11-22 11:22:35 (dst=0)
Not yet synced - 2000-11-22 11:22:36 (dst=0)
Not yet synced - 2000-11-22 11:22:37 (dst=0)
Not yet synced - 2000-11-22 11:22:38 (dst=0)
DEMO >>> WiFi on: time syncs again
Not yet synced - 2000-11-22 11:22:39 (dst=0)
Not yet synced - 2000-11-22 11:22:40 (dst=0)
Not yet synced - 2000-11-22 11:22:41 (dst=0)
SET
2020-02-17 12:44:14 (dst=0)
2020-02-17 12:44:15 (dst=0)
2020-02-17 12:44:16 (dst=0)
2020-02-17 12:44:17 (dst=0)
... many lines deleted
2020-02-17 13:44:10 (dst=0)
2020-02-17 13:44:11 (dst=0)
2020-02-17 13:44:12 (dst=0)
2020-02-17 13:44:13 (dst=0)
SET
2020-02-17 13:44:15 (dst=0)
- At first, the time is not yet set, so we get "random" value (probably the date/time corresponding with value 0). My sketch uses the heuristic that any time before 2020 means 'not synced'. Note that the time keeping (stepping a second every second) happens, even though the time has not yet been SET.
- It takes 5 seconds before we receive the first message from one of the NTP servers.
- At 2020-02-17 12:43:48, an NTP message arrives (see the SET). The time is known.
Since 17 Feb is before DST start "month 3 (March), week 5, on Sunday (day 0)", daylight saving is indeed off
(dst=0). - At around 12:44:00 the script executes a test: it switches off WiFi. The time is maintained by the CPU (probably: crystal, timer, interrupt). So even without network, time is kept.
- At 12:44:05 a second test kicks in. The local clock is hand written to 2000-11-22 11:22:33. Note the SET popping up, this time caused by hand-setting, not an NTP message. Since there is no WiFi, the hand-set time is maintained.
- At 12:44:10 WiFi is switched on (step 3 of the test). Since there is not an immediate NTP message, the old hand-set time is still maintained.
- At 2020-02-17 12:44:14 an NTP message is received. The clock is back to real time, and locally maintained.
- Note that one hour later (2020-02-17 13:44:14) the system (asks for and) receives the next NTP message. See the SET. The local clock is synced.
All in all, we have a firm basis for having an accurate time.
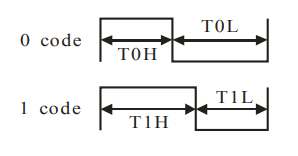
NeoPixels are controlled via a single serial line. One NeoPixel has three LEDs (red, green and blue), whose brightness can be controlled from 0..255. So to configure one NeoPixel, it needs to be send 3×8 bits. Since there is no clock, biphase encoding is used: every bit uses a low and a high signal, so every bit has an edge (actually two). The datasheet WS2812B or WS2812 shows this picture of biphase encoding:
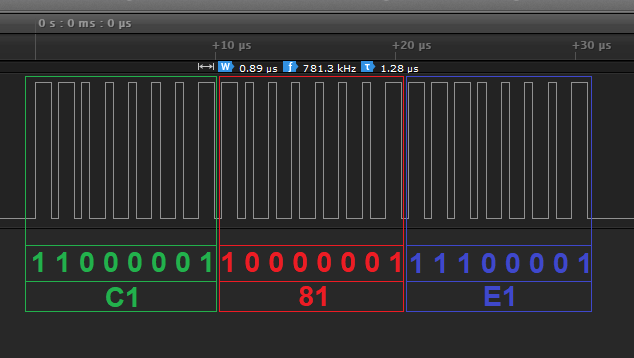
I did an experiment where I configured one NeoPixel, to have color 0x81c1e1 (that is red 0x81, green 0xc1, and blue 0xe1).
I captured the clock signal on my logic analyser.
We notice the following
- The bit clock is ~781kHz, which is close to the 800kHz from the documentation.
- Note that the measured T1H is 0.89 µs, seems out of spec. It should be 0.7µs ± 150ns, that is 550ns..850ns, so 890 is too long.
- The protocol is simple: the 3×8 bits are send, no overhead bits.
- One NeoPixel thus takes 24/800k = 30µs to configure.
- Pixel timing is confirmed in the capture: the whole transmission takes just over 30µs.
- The bits are send MSB first, but in an unconventional order: GRB.
- The datasheet WS2812B or
WS2812 confirms the order
 .
.
Next experiment is to send an RGB value to all 64 NeoPixels. This is my capture.
On this zoom level we can no longer see the indvidual bits. But sending 24 bits to each of the 64 neoPixels is expected to take 30µ × 64 = 1.92 ms. The capture confirms this: 1.99 ms.
Why is this relevant?
On the ESP8266, this string is bit-banged: all bits are generated by software.
That is feasible: each bit is ~1µs, and the ESP8266 runs on 80MHz (say 80 instructions per µs).
However, it should not service an interrupt half-way.
For this reason, the NeoPixel library seems to disable interrupts.
This means that during an update of the 64 NeoPixel string, interrupts are disabled for 2ms.
During this 2ms, all interrupts are disabled, so millis() might miss ticks.
How realistic is this problem? I found this topic. It states that there is a timer interrupt every 1 ms, so if the disable-interrupt-time is 2ms we miss interrupts and thus have clock drift. And 64 NeoPixels need about 2ms without interrupts. So again. Are we at risk?
It seems that the above discussion is for plain Arduinos; the situation for the ESP8266 is a bit different.
It has a function micros_overflow_tick() which seems to be called periodically.
It seems to monitor a hardware timer system_get_time() for overflows.
If there is an overflow, it increments a variable micros_overflow_count.
Check the code on your PC, or
here.
The function millis() uses system_get_time() and micros_overflow_count to
compute
the elapsed milliseconds.
So, can the ESP8266 also lose time?
For that it needs to lose a tick on micros_overflow_count.
It loses that when system_get_time() overflows without micros_overflow_tick() having been called.
It seems that system_get_time() counts micro seconds and it has a range of 32 bits.
So system_get_time() overflows every 2³² µs or 1.2 hour.
I expect the monitor function micros_overflow_tick() to be called much more frequently (say every second).
So losing one interrupt causes no harm at all, there would be 3599 to detect the overflow.
My guess is that on ESP8266 we do not suffer from losing time. Marc did an experiment, continuously flashing NeoPixels, and indeed found no time drift.
We are going to use an ESP8266 for the WordClock. ESP8266s are easily and cheaply available, and they have WiFi. That allows us to use NTP (time syncing) which makes them well suited for maintaining time for our clock.
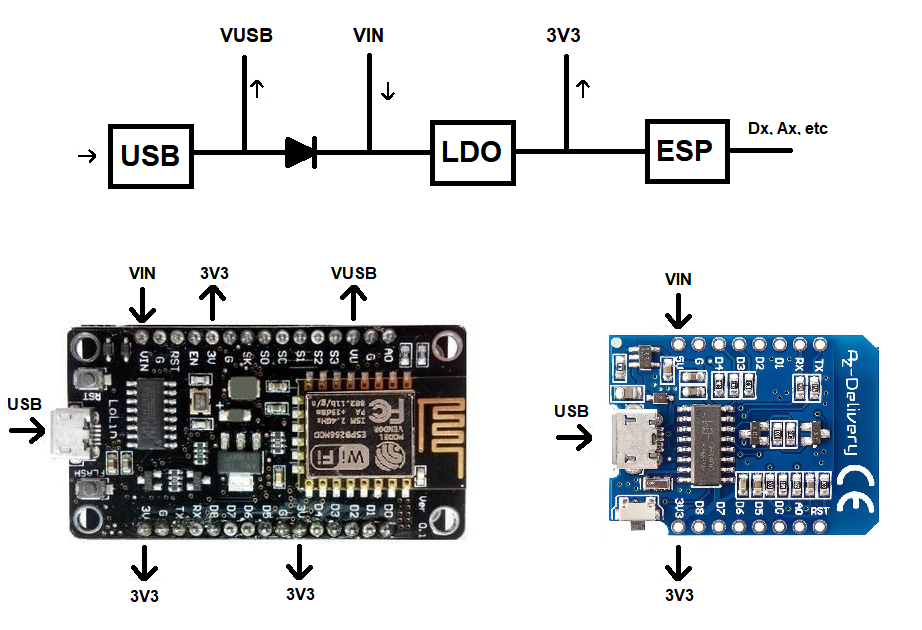
The ESP8266 runs on 3V3, but typically comes on boards that are powerd via USB (and thus 5V). These boards have a voltage regulator (LDO) that converts 5V to 3V3. The boards also have a VIN that connects to the regulator. This allows us to use an external power supply (4.3V-12V) instead of power over USB.
Note that there is a diode between the USB port and VIN. If you would externally power the NodeMCU board via VIN (say 9V), and you would also have connected the USB port to a PC (e.g. for debugging using the Serial port) the external 9V would also be on the PCs USB port, possibly damaging it. The diode protects your PC's USB port against over-voltage.
There is an extra effect: the diode has a voltage drop. Typically, a Schottky diode is used, which has a voltage drop of only 0.3V. So if you plug in USB (5V), the voltage regulator has 4V7 as input, which is still enough to have 3V3 out. The side effect is that VIN will be at 4V7.
The NeoPixels need 5V. It would be easiest to tab that from the USB port. Some boards do have a pin for that. I call it VUSB in the diagram above. However not all (big) boards do have a VUSB pin, and the smaller boards typically never have one.
We could use VIN as output instead of input, and power the NeoPixels with VIN. This means the NeoPixels run on 4V7, which is acceptable. That level is actually interesting, because the NeoPixel data pin (DIN) requires at least 70% of VDD. And that would now be 70% × 4V7 = 3V29, which is below the signaling level of the ESP8266, which runs on 3V3.
However, before we get enthusiastic about this setup, there is one major drawback. The whole NeoPixel chain would draw current through the diode. The diode is typically limited to 250mA. That does not match well with the (above) computed maximum current of 2500mA (the power the tiny diode would need to dissipate would be 0.3V × 2.5A = 0.7W).
The bigger boards with VUSB pins are too big for our 3D printed case. So I propose to use a small board (e.g. Wemos D1 mini), remove the diode, and replace it with a wire. In this way, the VIN is actually converted into a VUSB, and we can use that pin to power the NeoPixels
Of course we lose the protection, but in our case, the VIN port will wire to the NeoPixels, and will not be used as input anymore.
The Wemos D1 mini takes up half the width/height of the 3D printed case. So we have some room for other components. But the Wemos mini has several drawbacks:
- There is no VUSB - which we need to power the NeoPixels
- There is no (flash) button - which we need to configure the clock
- There are no mounting hole.
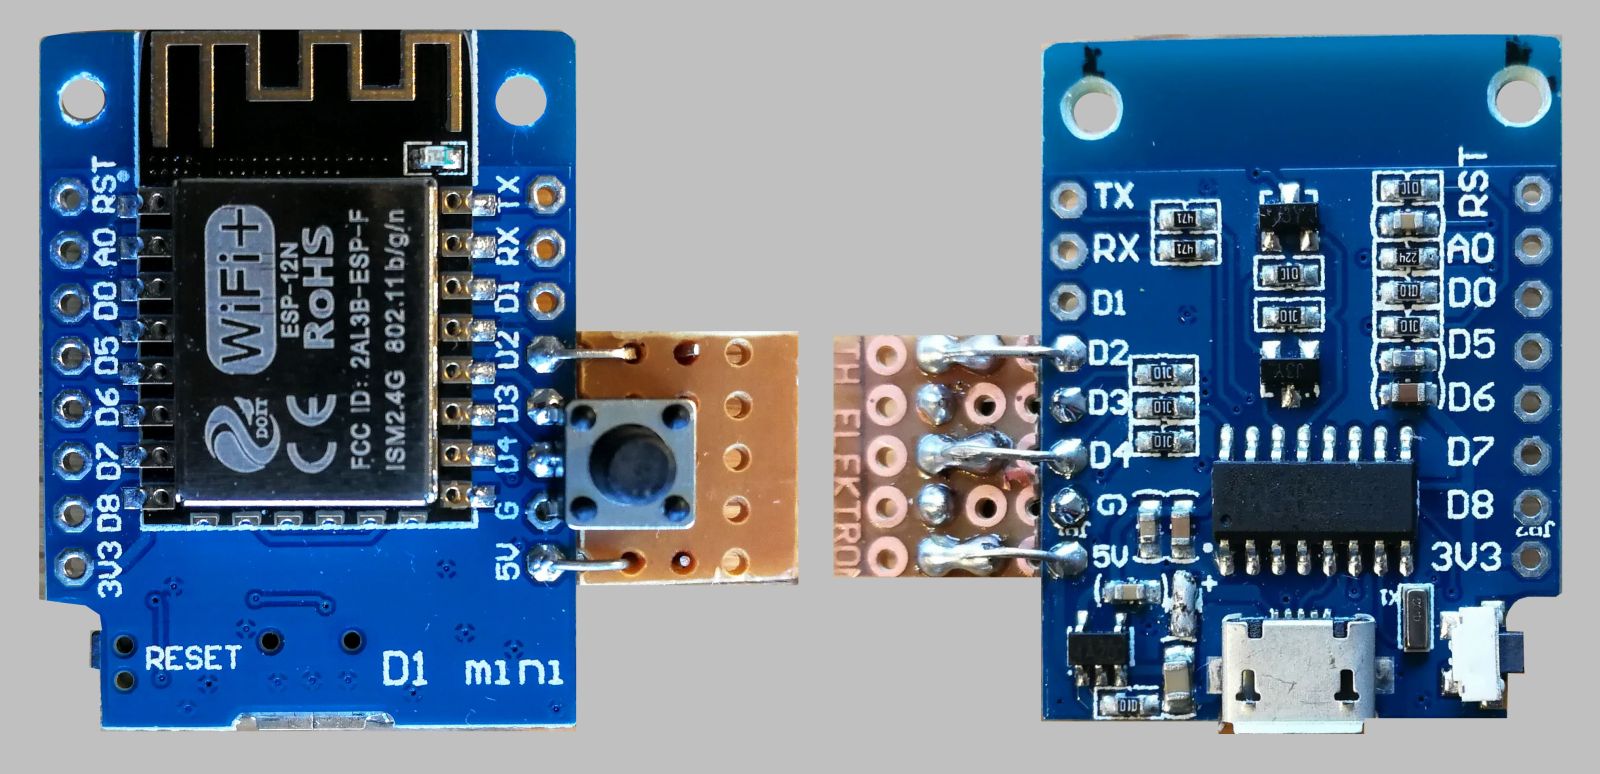
The VUSB problem is solved by replacing the diode with a wire as described in the previous section. See below a photo strip of my soldering.
The flash button is easily added: just solder a button between GND and D3. I rely on the internal pull up, to have the input high when the button is not pressed. I added a small board and soldered extra wires, just for mechanical strength; we are going to push that button, and the mounting holes are in the Wemos board.
Finally I drilled holes next to the ESP8266 module. See below the end result of my mods.
We need to hook the NeoPixel board to our modded Wemos mini. I originally did not intend to, but I did, in the end, add a level shifter. The breadboards suggested it was not necessary, the data sheet said it was. I played safe, a level shifter is not that expensive, the bigger problem was putting all the electronics together; I did not yet feel like making a PCB myself.
This is the schematics I came up with - do note that I replaced the diode with a wire as described in modding.
Some notes, added after the project was finished.
- The breadboard version suggests that the level shifter is not needed at all.
- With the level shifter, it is working fine. But the claim "playig safe" is naive; the level shifter spec suggests it can not keep up with the signaling speed (800kHz).
- I have found another level shifting trick. Did not try it out myself, but a quick measurement seems to validat it.
I added the level shifter in a similar manner as that I added the expansion board for the button. But this boards has no mechanical stress, so I used only two wires to tie it to the ESP board.
I used the button expansion board (I should have made it bigger) for the other two components: the resistor to protect the NeoPixels against over-voltage and the capacitor to mitigate current swings (when the whole NeoPixel board switches on). See Adafruit for details on these two components.
I added one more "component" on the button expansion board: a four pin header as the connector towards the NeoPixel board. Pin three is a dummy, so that the connector can not be inserted up-side-down. The resulting board, the Wemos mini with the two expansion boards, is shown in the photo below.
Next step is to fit this board in a 3D printed case. Of course, we already had the front side, but I still needed to make the back side. In the figure below, we see the main board screwed to the back side (left). On the right, the NeoPixel board is plugged into the board.
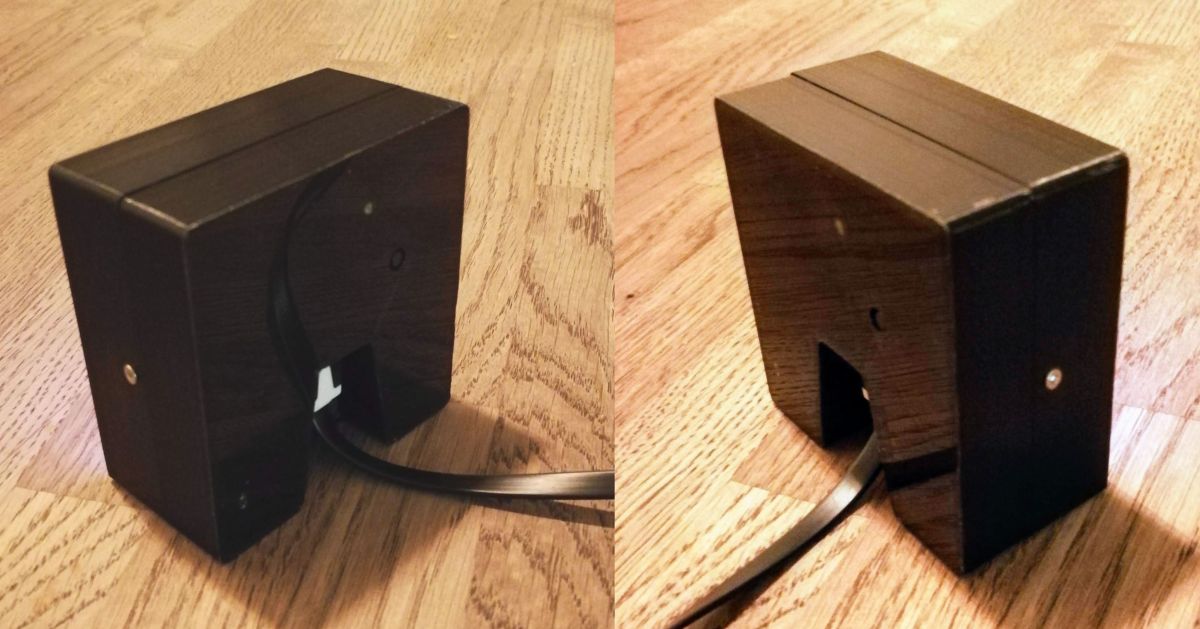
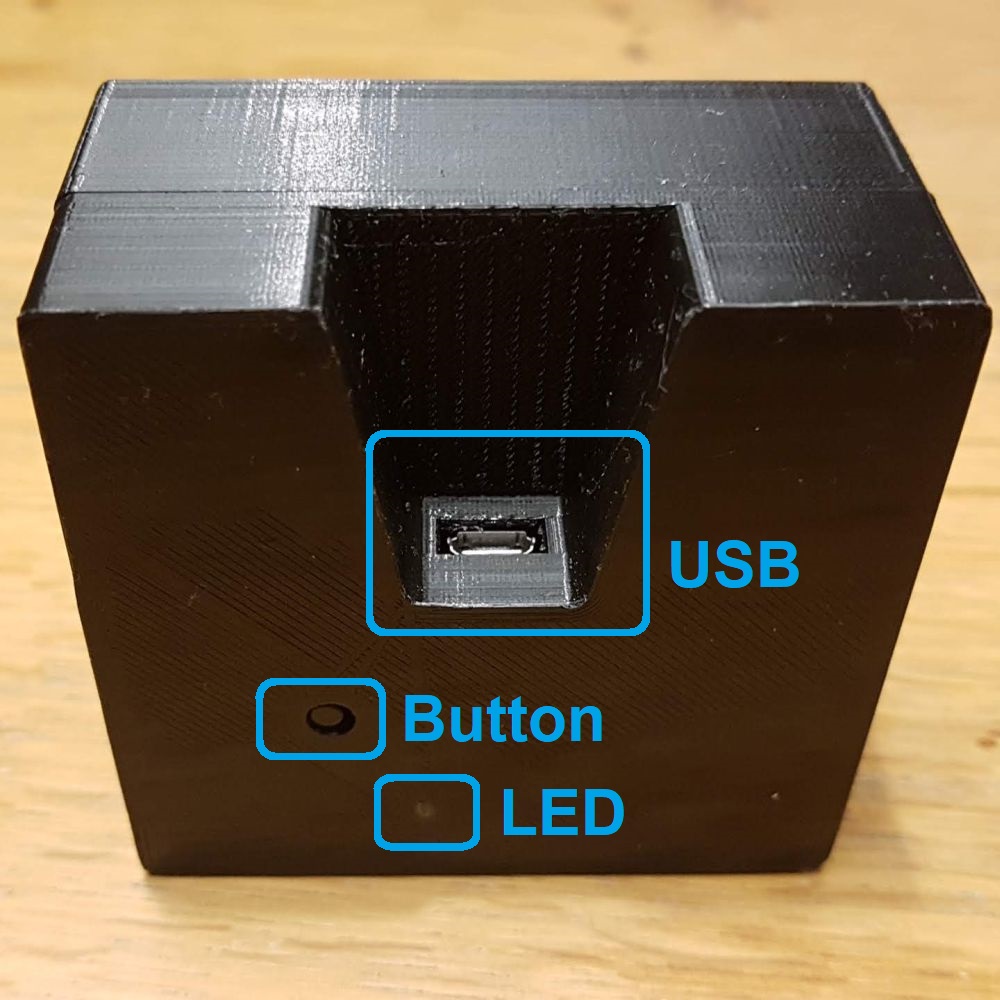
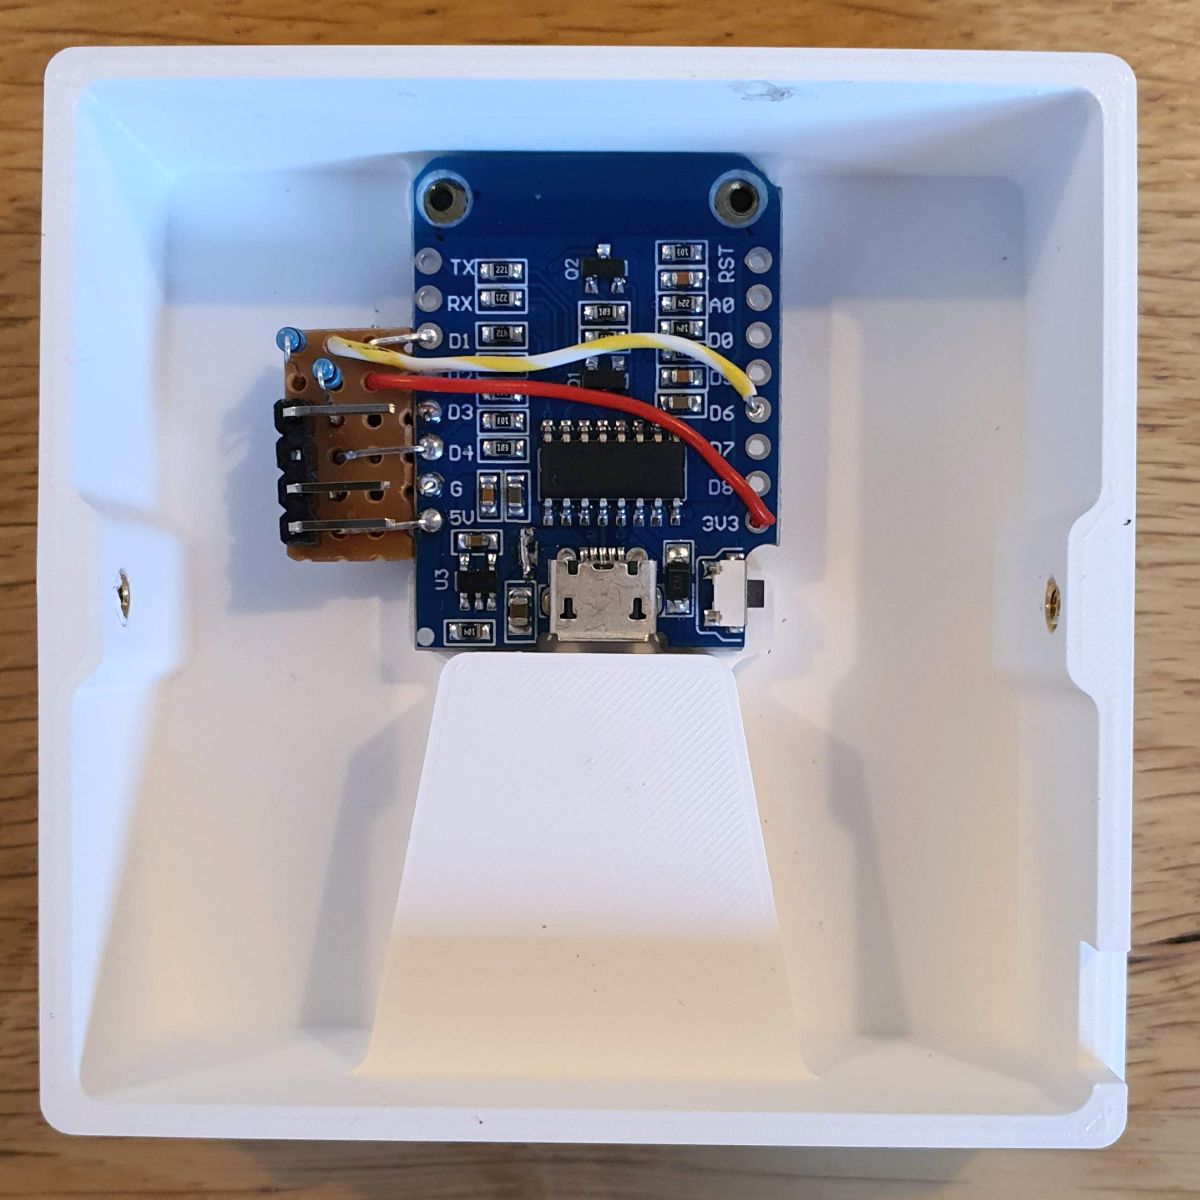
Below you find a photo showing the back of the device. We see (lower center) the recess for the USB plug. On the top center, we find the light guide towards the LED and the hole where the FLASH button surfaces.
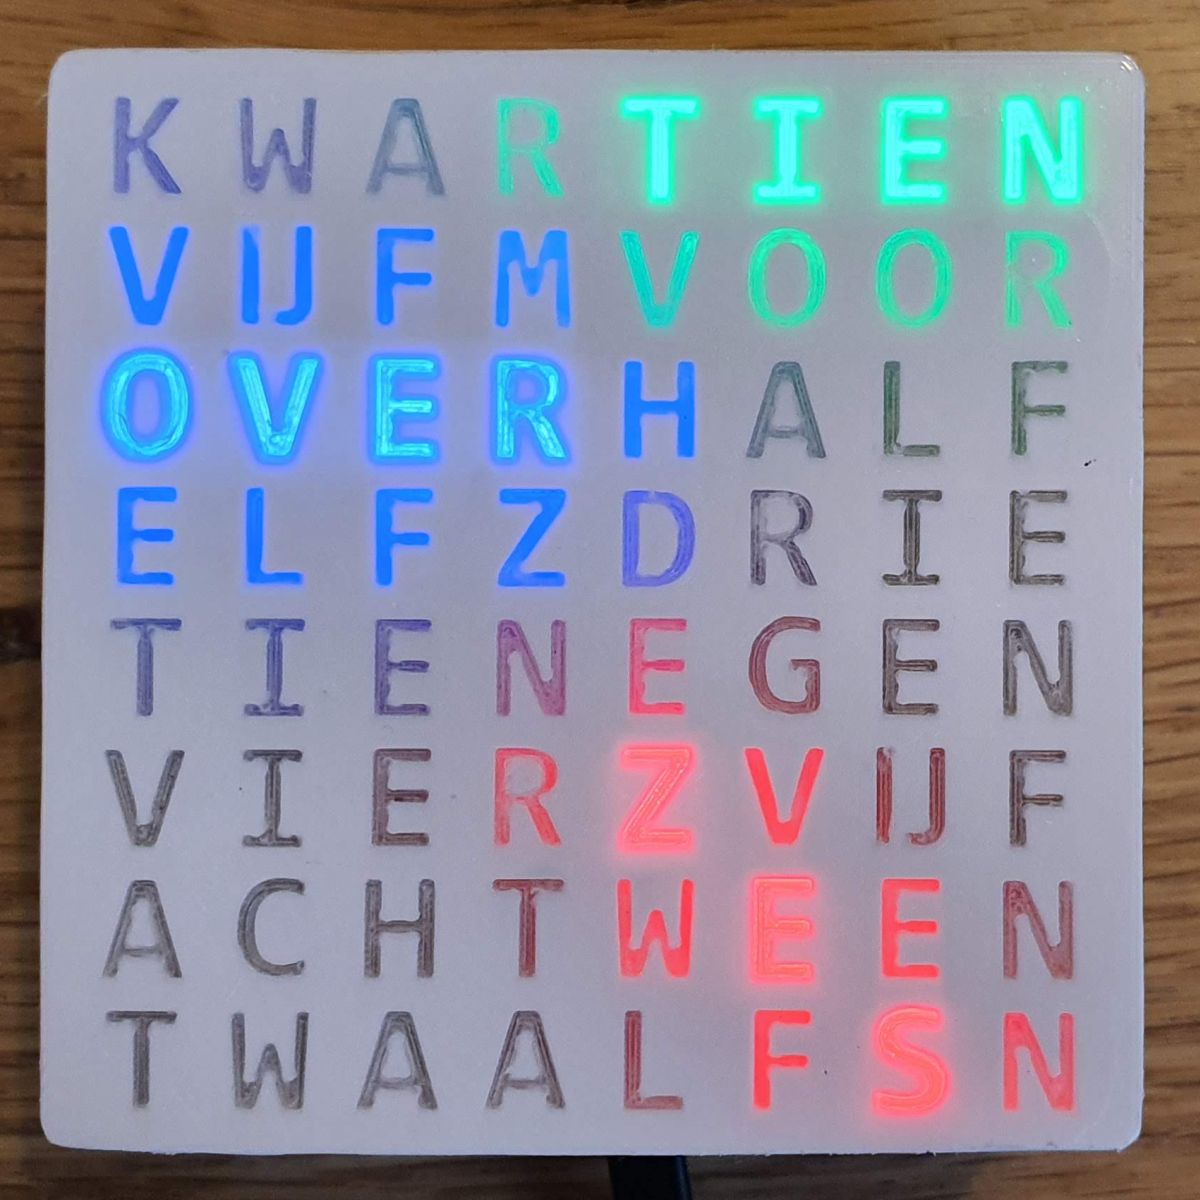
To test the electronics, I wrote a small Arduino sketch that switches every LED in every NeoPixel on. This allows us to see that the electronics works, and whether all individual LEDs are OK. The photo below shows the fully assembled WordClock running the self-test.
There is also a video of the device running the self-test.
Mechanics is complete, let's now add the time keeping software. I decided to make a "simple" version first. No (dynamic) configuration, no animations. Find this sketch in WordClockSimple.
Here is a video looking at the case - back and front - and the status LED.
Here is a video with the clock running, comparing it to a DCF77 clock.
Some notes on the video
- The blue LED at the back switches on when the clock is powered and initialized.
- The blue LED switches off as soon as an NTP sync has occurred, i.e. when the local time is known.
- The time is then displayed in 5 min resolution.
- At 10:52:30 (see the DCF77 clock) the WordClock switches from 10:50 (TIEN-VOOR-ELF) to 10:55 (VIJF-VOOR-ELF).
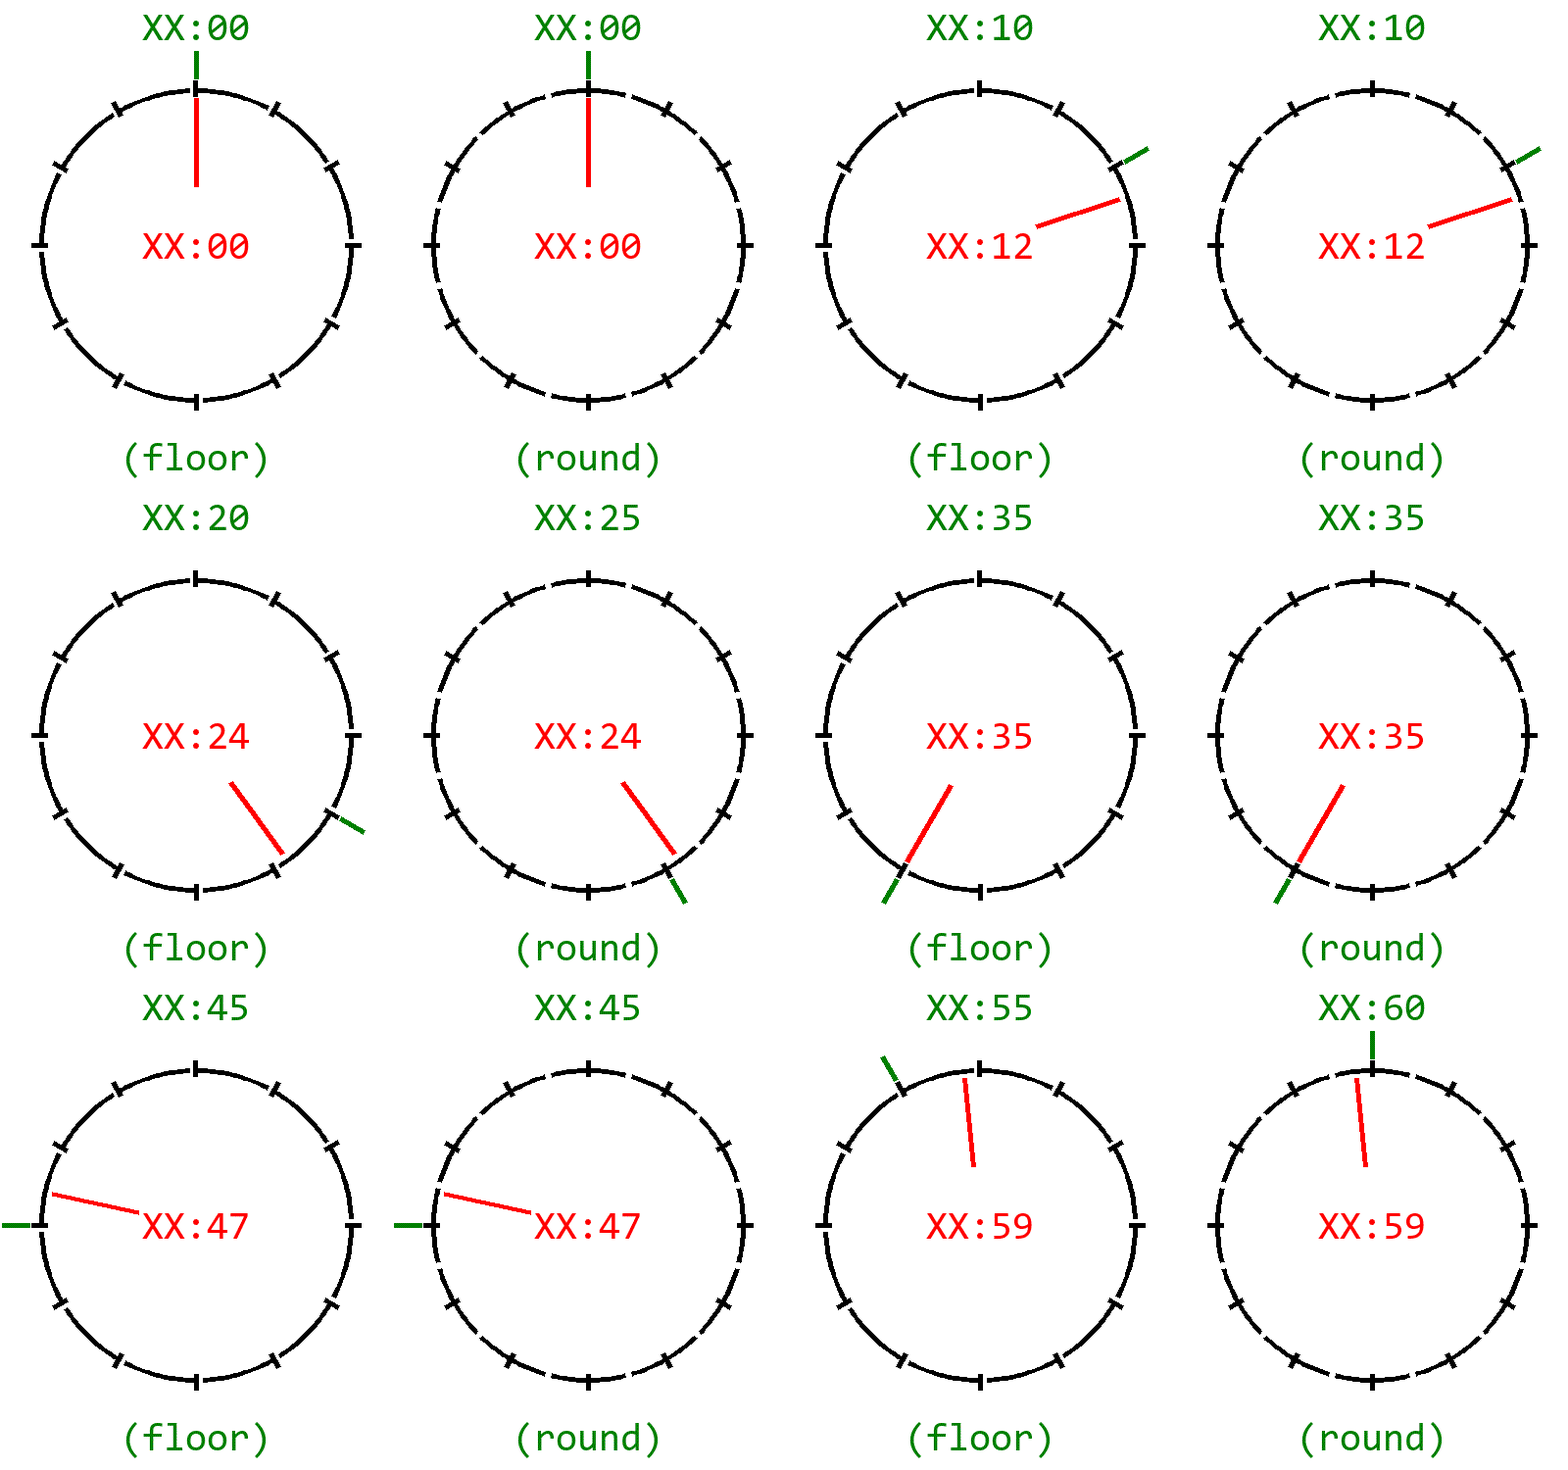
By the way, I made the choice that time is rounded up (instead of floored). See the following animation (made in python) for the difference.
If you don't like that 10:52:30 is rounded up to 10:55, ..., it's just a #define in the code (CLK_ROUND).
Find below the output generated over Serial (when there are ..., I removed lines)
main: WorkClockSimple v1

neo : init
led : init
clk : init
wifi: init

clk : 1970-01-01 09:00:00 (dst=0) [no NTP sync yet]
clk : 1970-01-01 09:00:01 (dst=0) [no NTP sync yet]
clk : 1970-01-01 09:00:02 (dst=0) [no NTP sync yet]
clk : 1970-01-01 09:00:03 (dst=0) [no NTP sync yet]
wifi: connected, IP address 192.168.179.102
clk : 2020-02-24 23:23:42 (dst=0) 23:26 vijf-voor-half-twaalf
clk : 2020-02-24 23:23:43 (dst=0) 23:26
clk : 2020-02-24 23:23:44 (dst=0) 23:26
clk : 2020-02-24 23:23:45 (dst=0) 23:26
...
clk : 2020-02-24 23:24:27 (dst=0) 23:26
clk : 2020-02-24 23:24:28 (dst=0) 23:26
clk : 2020-02-24 23:24:29 (dst=0) 23:26
clk : 2020-02-24 23:24:30 (dst=0) 23:27 vijf-voor-half-twaalf
clk : 2020-02-24 23:24:31 (dst=0) 23:27
clk : 2020-02-24 23:24:32 (dst=0) 23:27
clk : 2020-02-24 23:24:33 (dst=0) 23:27
...
clk : 2020-02-24 23:25:27 (dst=0) 23:27
clk : 2020-02-24 23:25:28 (dst=0) 23:27
clk : 2020-02-24 23:25:29 (dst=0) 23:27
clk : 2020-02-24 23:25:30 (dst=0) 23:28 vijf-voor-half-twaalf
clk : 2020-02-24 23:25:31 (dst=0) 23:28
clk : 2020-02-24 23:25:32 (dst=0) 23:28
clk : 2020-02-24 23:25:33 (dst=0) 23:28
...
clk : 2020-02-24 23:26:27 (dst=0) 23:28
clk : 2020-02-24 23:26:28 (dst=0) 23:28
clk : 2020-02-24 23:26:29 (dst=0) 23:28
clk : 2020-02-24 23:26:30 (dst=0) 23:29 vijf-voor-half-twaalf
clk : 2020-02-24 23:26:31 (dst=0) 23:29
clk : 2020-02-24 23:26:32 (dst=0) 23:29
clk : 2020-02-24 23:26:33 (dst=0) 23:29
...
clk : 2020-02-24 23:27:27 (dst=0) 23:29
clk : 2020-02-24 23:27:28 (dst=0) 23:29
clk : 2020-02-24 23:27:29 (dst=0) 23:29
clk : 2020-02-24 23:27:30 (dst=0) 23:30 half-twaalf
clk : 2020-02-24 23:27:31 (dst=0) 23:30
clk : 2020-02-24 23:27:32 (dst=0) 23:30
clk : 2020-02-24 23:27:33 (dst=0) 23:30
Notes on the output
- The first line identifies the program and version.
- The next 4 lines signal the initialization of the hardware blocks (
setup()). - Then the device is operational (switches to
loop()). - We see that the first couple of seconds, there is no WiFi yet.
- The WiFi connect occurs, and we see the assigned IP number.
- Quickly after that, we have the first NTP sync, and the clock knows local time.
- As output we see
clk : 2020-02-24 23:23:42 (dst=0) 23:26 vijf-voor-half-twaalf- The
clkidentifies the "driver" that prints the message. - The
2020-02-24 23:23:42 (dst=0)is the full (local) date and time locally known,
also see we do not yet have daylight saving ((dst=0)). - The
23:26is the "rounded-up" time (since we have a resolution of 5 min, 2.5min is added). - Each time when hours or minutes change, the display is updated, the text
vijf-voor-half-twaalfshows which NeoPixels
- The
- At 23:24:30 there is another minutes change (to
23:27) and the display is refreshed tovijf-voor-half-twaalf. - At 23:25:30 there is another minutes change (to
23:28) and the display is refreshed tovijf-voor-half-twaalf. - At 23:26:30 there is another minutes change (to
23:29) and the display is refreshed tovijf-voor-half-twaalf. - At 23:27:30 there is another minutes change (to
23:30), so now the display is updated tohalf-twaalf.
The hardware is done, the clock is running. The final step is to add software features. The application WordClockFull is the end-user application. That directory also contains a complete binary release.
WordClockFull contains the following features
-
Color modes
The colors used for the hours and minutes can be configured. What's more, the color mode can be configured: fixed, cycling or random. And the refresh can be every 5 minutes (when the text changes) but also every minute (to have the clock more lively). -
Display animations
When the time changes, the display is refreshed. This might mean that the time is drawn in a different color (see previous feature: color mode). It is also possible to animate the "old time text" to the "new time text". The app has five animations built in: none, wipe, dots, pulse and mist. -
Demo mode
To show off the clock (the color modes and display animations) there is now a demo mode. By pressing the (flash) button, the clock starts running at 15× speed. -
A configuration interface
When powering the WordClock, you have some time to press the (flash) button of the ESP8266. If you do that, the actual clock app will not start, instead the configuration app starts. This means the ESP8266 starts a WiFi access point (plus DNS and DHCP server), and a web server. When you connect to the web server with a laptop or smart phone, you get a web page with configuration parameters. Typical parameters are: the SSID and password of your home wifi network, the time zone, the colors for the hours and minutes and the animations to be used. When you commit the configuration, the parameters are stored persistently, and the clock app will use them (even after a power cycle). -
A NeoPixel test
All LEDs in all NeoPixels are switched on one by one, to test if they are working.
The Dutch WordClock running the WordClockFull firmware has the following characteristics.
On the front side, we have 8×8 letters with RGB LEDs behind them. They form words that tell the time. This clock is made for the Dutch language.
At the back side there are three user parts. There is the status LED, a user button and a micro USB connector.
The status LED has multiple functions, described in more detail in the "Normal operation" section below. It blinks rapidly to signal that the user can press the button to enter configuration mode. In configuration mode it blinks slowly. In normal mode it is on when searching for WiFi or off when WiFi is connected.
The button also has two functions. Firstly, at startup, when the status LED is blinking, a press on the button enters configuration mode. When running the clock app, pressing the button toggles between normal clock mode and demo mode (15× speed).
Finally the USB connector has dual use. Its main use is power supply to the WordClock. For normal usage standard 500mA USB is more than sufficient. If you want all LEDs full bright white, you would need 2500mA. The power usage can be estimated, see section on power.
The second use of the USB connector is software development. When the USB connector is connected to a PC, and a CH340 USB to serial driver is installed, and you have a terminal program (115200/8/N/1), the WordClock log can be examined. You get something like this
main: WordClockFull v5

Cfg: Press button on pin 0 to enter configuration mode
main: No configuration requested, started WordClockFull

neo : init
neo : tested
but : init
led : init
wifi: init: GuestFamPennings MaartenAP dePracht
clk : init: pool.ntp.org europe.pool.ntp.org north-america.pool.ntp.org
clk : timezones: CET-1CEST,M3.5.0,M10.5.0/3
clk : round: 150 sec
ltrs: init
col : palette: 120000 001200 0C0C00 000018 222222
col : max: R12 G12 B18
col : modes: one cycle mist
anim: init

clk : 1970-01-01 09:00:05 (dst=0) [no NTP sync yet]
clk : 1970-01-01 09:00:06 (dst=0) [no NTP sync yet]
clk : 1970-01-01 09:00:07 (dst=0) [no NTP sync yet]
wifi: connected to GuestFamPennings, IP address 192.168.179.102
clk : 1970-01-01 09:00:08 (dst=0) [no NTP sync yet]
clk : 2020-03-15 20:31:13 (dst=0) 20:33 (mist) half/0C0C00 negen/120000
clk : 2020-03-15 20:31:14 (dst=0) 20:33
clk : 2020-03-15 20:31:15 (dst=0) 20:33
anim: mist - stop (2360 ms)
clk : 2020-03-15 20:31:16 (dst=0) 20:33
clk : 2020-03-15 20:31:18 (dst=0) 20:33
clk : 2020-03-15 20:31:17 (dst=0) 20:33
clk : 2020-03-15 20:31:19 (dst=0) 20:33
clk : 2020-03-15 20:31:20 (dst=0) 20:33
clk : 2020-03-15 20:31:21 (dst=0) 20:33
clk : 2020-03-15 20:31:22 (dst=0) 20:33
clk : 2020-03-15 20:31:23 (dst=0) 20:33
clk : 2020-03-15 20:31:24 (dst=0) 20:33
clk : 2020-03-15 20:31:25 (dst=0) 20:33
Maybe more importantly, the USB connector can be used to upgrade the firmware.
There is a complete binary release that you can flash yourself. A PC program to flash is provided.
As an alternative you can build the binary yourself.
There are plenty of sites explaining how to install Arduino apps, even from myself .
Download and install Arduino IDE and then the ESP8266 compiler and libraries.
Download the WordClockFull. It does need the Adafruit NeoPixel library, that you find in the Arduino Library manager. It does need the configuration library Cfg and the persistent storage library Nvm
The libraries need to be stored in the Arduino library directory
(mine is here C:\Users\Maarten\Documents\Arduino\libraries) and the WordClock app
itself can be stored anywhere, but most people store it in the Arduino directory
(thus C:\Users\Maarten\Documents\Arduino\ for me).
When the WordClock is powered it should start with a blank (dark) display. Sometimes it powers with the display showing the last time (this is due to the large internal capacitor which causes the NeoPixel display to retain state). But the firmware will immediately switch off the display.
After power up, the WordClock first gives the user the option to enter configuration mode. Entering configuration mode is achieved by pressing the button at the back while the status LED at the back is blinking rapidly. If the button is not pressed during the rapid blinking (which takes about one second), the WordClock app starts. We will describe that first. Configuration mode is described below.
The WordClock app starts with the status LED steadily on. This indicates the WordClock has no WiFi connection (yet). The first step of the WordClock app is a NeoPixel test: all red LEDs are turned on one-by-one, then all green LEDs and finally all blue LEDs.
After the NeoPixel test finishes, the display blanks. The display stays blank until time is known. For this, the WordClock needs to connect to WiFi. Once that is successful, the status LED switches off (normal state). Next step is to sync with NTP services. If that is successful, WordClock knows time, and shows that on the display.
If later, the WiFi connection is lost, the status LED switches on again (until the next WiFi connect). When there is no WiFi, there is no NTP sync. But if time has been synced once, the internal processor keeps track of time itself (with a drift of ±1s per day). NTP syncs occur once per hour (if WiFi is connected).
There is one feature while running: the button at the back toggles demo mode. In demo mode, time runs at 15× speed. This shows off the animations. Demo mode starts with current time, but quickly deviates because it runs faster. When the button is pressed again, demo mode is off, and the clock shows the real time again.
When the WordClock is correctly configured (the Timezone field in the configuration),
it will also switch to daylight saving time and back to standard time at the correct moment.
Note that the WordClock app logs all steps over the UART connection, which is available over USB.
When the user presses the back button at power up (with the status LED blinking rapidly) the WordClock enters configuration mode. In configuration mode, the WordClock starts a WiFi Access Point, a DNS server, DHCP server and a web server. Once the web server is running, the status LED will blink slowly (1Hz) showing configuration mode is active.
Connect your laptop or smart phone to this Access Point. The SSID starts with WordClock, and is followed by a part of its MAC address.
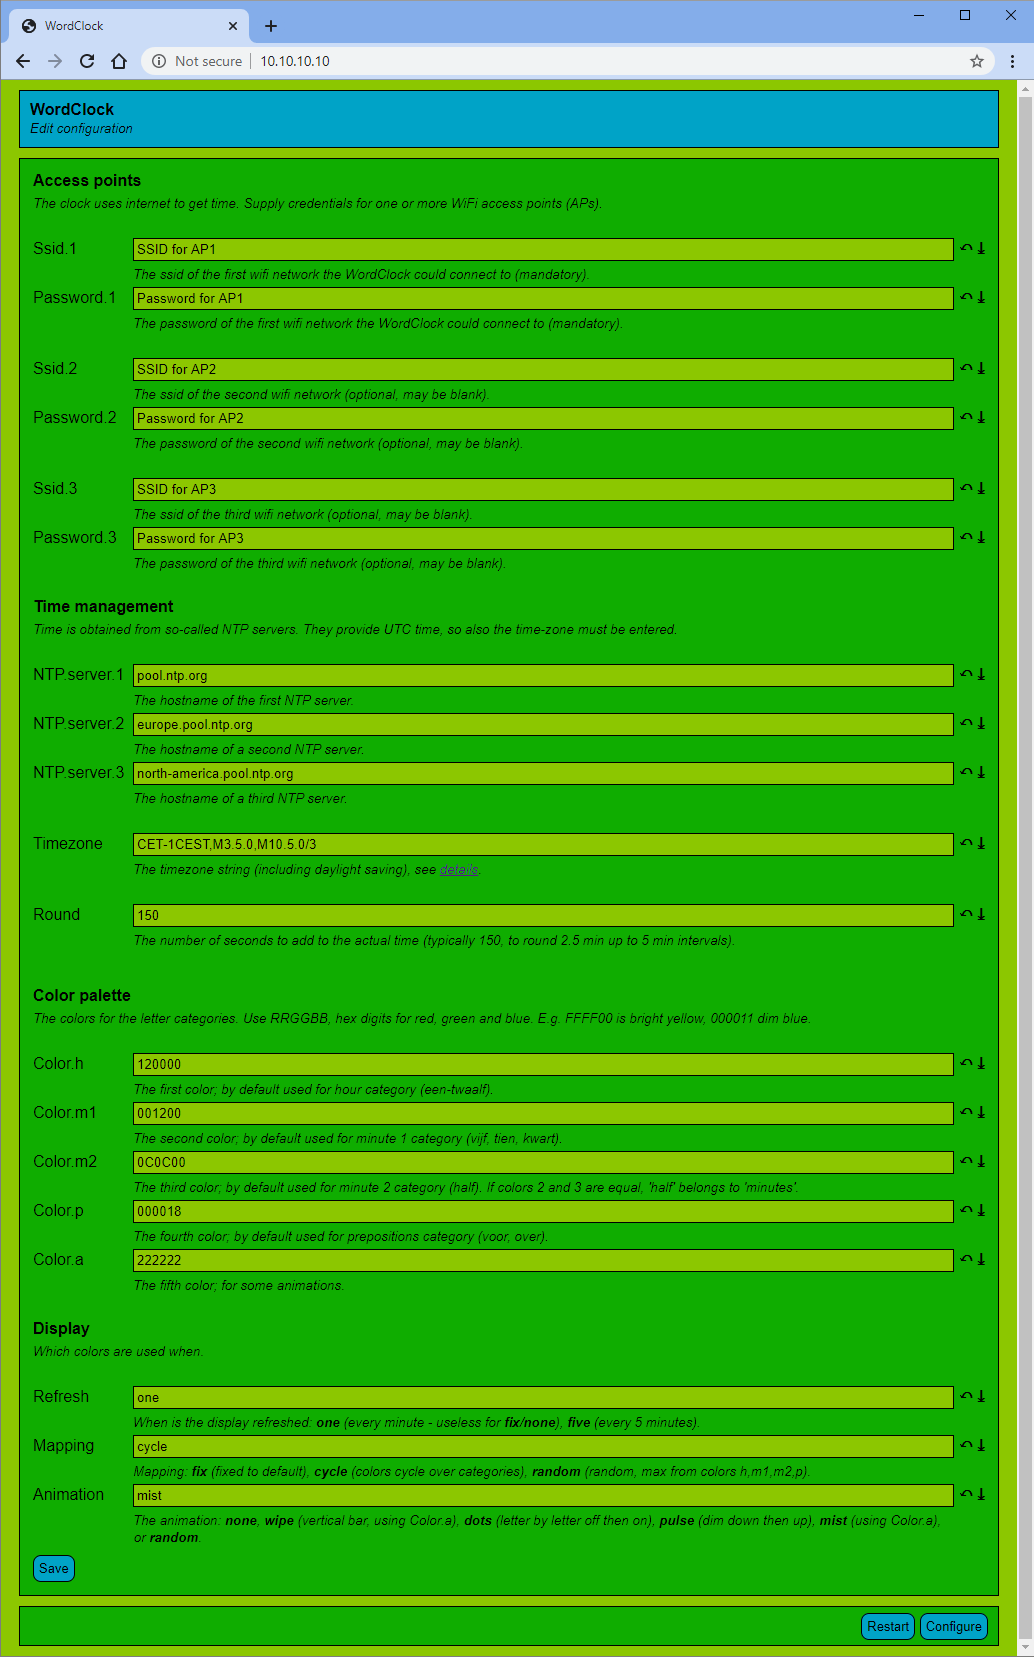
Start a browser (on your laptop or smart phone) and visit site 10.10.10.10. You will get the configuration page.
The configuration page consist of sections. Each section contains fields.
Each field has a name (like Round), a value (like 150), and some help
(The number of seconds to add to the actual time (typically 150, to round 2.5 min up to 5 min intervals).)
At the end of each field you find two arrows: an undo arrow, which undoes all edit action and reverts to the current value.
The down error reverts to the default of the field.
Once you have entered all configuration settings to you liking, press Save.
The settings will be saved persistently, and the WordClock restart.
The first section is Access Points.
Here you can enter up to three access points; the SSID (Ssid.1, Ssid.2, and Ssid.3) and
the associated passwords (Password.1, Password.2, and Password.3) .
I typically enter home, work, and the tethering Access Point of my mobile phone.
If you have fewer than three, just leave them blank.
The next section is Time management.
Here you type the host name of three NTP servers (NTP.server.1, NTP.server.2, and NTP.server.3).
Probably the default servers are ok.
The Timezone field defines the standard timezone you want (with respect to UTC). It also defines the daylight
saving timezone (DST) and when it starts and stops. The syntax of this field is described
here.
The Round field adds seconds to time to do the rounding up. See details above.
The third section is Color palette.
All fields should have 6 hexadecimal digits (0..9, A..F), with two digits for red, two for green and two for blue.
The first color (Color.h) is used for the hour word.
The second color (Color.m1) is used for the minutes ("vijf", "tien", "kwart").
The third color (Color.m2) is used for the word "half".
The fourth color (Color.p) is used for the prepositions ("voor" and "over").
If Color.m1 and Color.m2 are equal, "half" will always be colored the same as "vijf", "tien" and "kwart"
(in "cycle" and "random" mapping).
If mapping is "random", the RGB components of the generated random colors will always be
below the maximum of Color.h, Color.m1, Color.m2, Color.p.
The last color (Color.a) is used for animations that need an extra color ("wipe" and "mist").
The last section is Display.
This section determines the animations.
Refresh is either "one" or "five". It determines how often the display is refreshed:
either every minute ("one") or every five minutes ("five"). Note that only every five minutes the
time reading actually changes (since the clock display resolution is 5 minutes).
So selecting "one" makes no sense when mapping is "fix" and animation is "none", but when mapping
is not "fix" or animation is not "none" there is a color change and/or animation every minute.
Mapping determines the colors used for the words. "fix" uses the colors as defined in the color palette section.
The "cycle" mapping also uses the colors, but every refresh the colors are cycled.
Finally, the "random" mapping generates random colors for the words (never duplicates, never black).
The Animation setting determines the animation for every refresh.
The "none" animation instantly removes the old time and adds the new time.
The "wipe" animation moves a column (in Color.a) from left to right erasing the old time in front of it and adding the new time behind it.
The "dots" removes the old time one pixel at a time, then adds the new time one pixel at a time.
The "pulse" animation dims the old time down, then dims the new time up.
The "mist" animation covers the old time be adding mist pixels (Color.a), then uncovers the new time by removing mist pixels.
Finally, the animation "random" randomly chooses one of none, wipe, dots, pulse or mist.
I made one extra, for Marc. I made some changes.
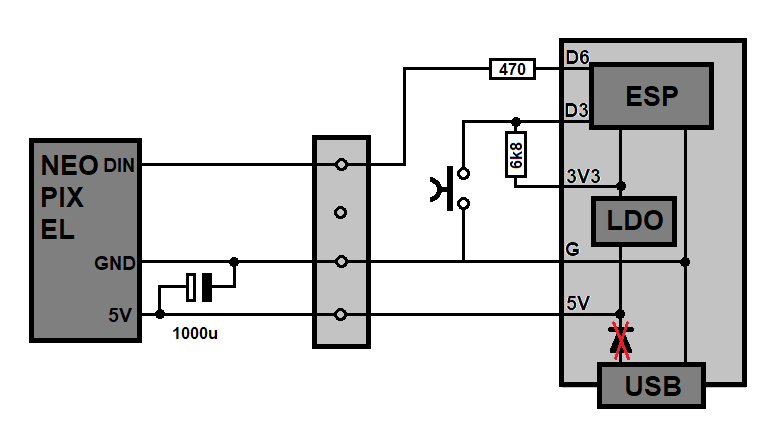
Firstly, I got a 6V capacitor, which is much smaller than the 35V one I used before, although it has the same capacity (1000 µF). I attached the capacitor to the neopixel board instead of to the ESP board.
Secondly, I made changes to the schematic. I got rid of the level shifter, and I added a pull-up to the D3 button. The reason for the pull-up is that the first version does not always pick-up button presses for configuration.
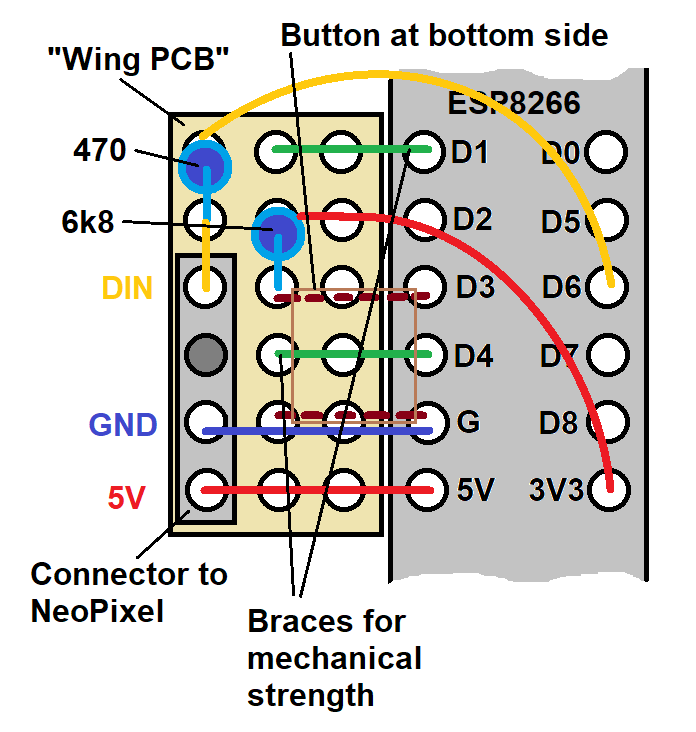
I also made the "Wing PCB" a little bit bigger.
In the photo below, you see the wing PCB in its casing. Note that the button is on the bottom side of the wing PCB.
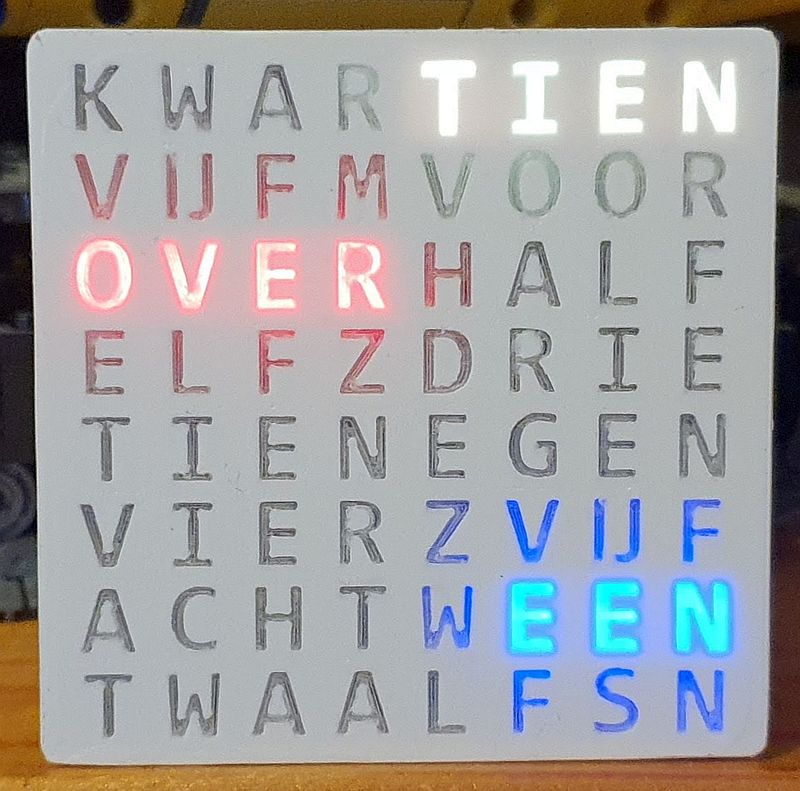
The above photo shows another change: I made the case white. That is a mistake. The white PLA clearly does not isolate the light. We suffer from bleed.
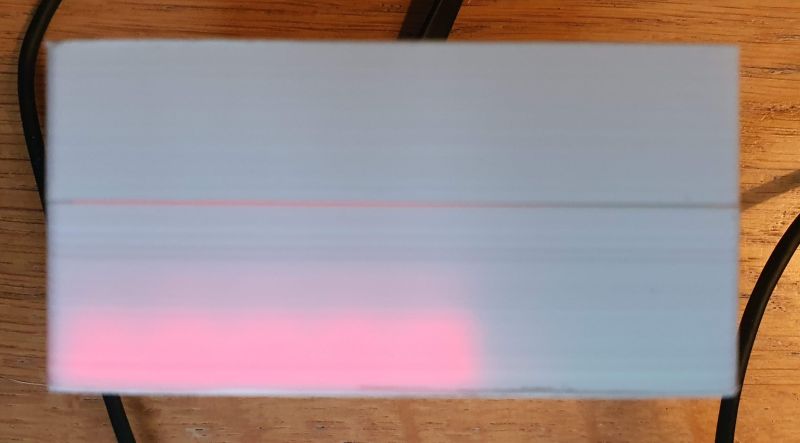
This is also very clear from the top.
I painted the inner walls that separate the LEDs with black paint. It does help a bit.
Hmm, guess I have to print in the old color.
As a follow-up to the NeoPixel timing experiments in 8. Timing I did a final experiment. The goal is to determine the delay caused by the daisy chain of NeoPixels.
I took the "production" NeoPixel board with 64 NeoPixels. I put a probe of a logic analyzer on the data-in pin of the board, which is the data-in of NeoPixel 0. I put a second probe on the data-out pin of the board, which is the data-out of NeoPixel 63 - or data-in of the non-existing NeoPixel 64.
  #define NUMPIXELS      65
  for( int i=0; i<NUMPIXELS; i++ ) pixels.setPixelColor(i, i*0x010203 );
  pixels.show();
I wrote the above small test loop. It configures 65 pixels (numbered 0 up to and including 64). Since this is one more pixel than is present on the board, the data-out pin of the board will show the data send to this non-existing NeoPixel 64.
Note that the loop sets the red value of NeoPixel i to the value i, the green value to 2×i,
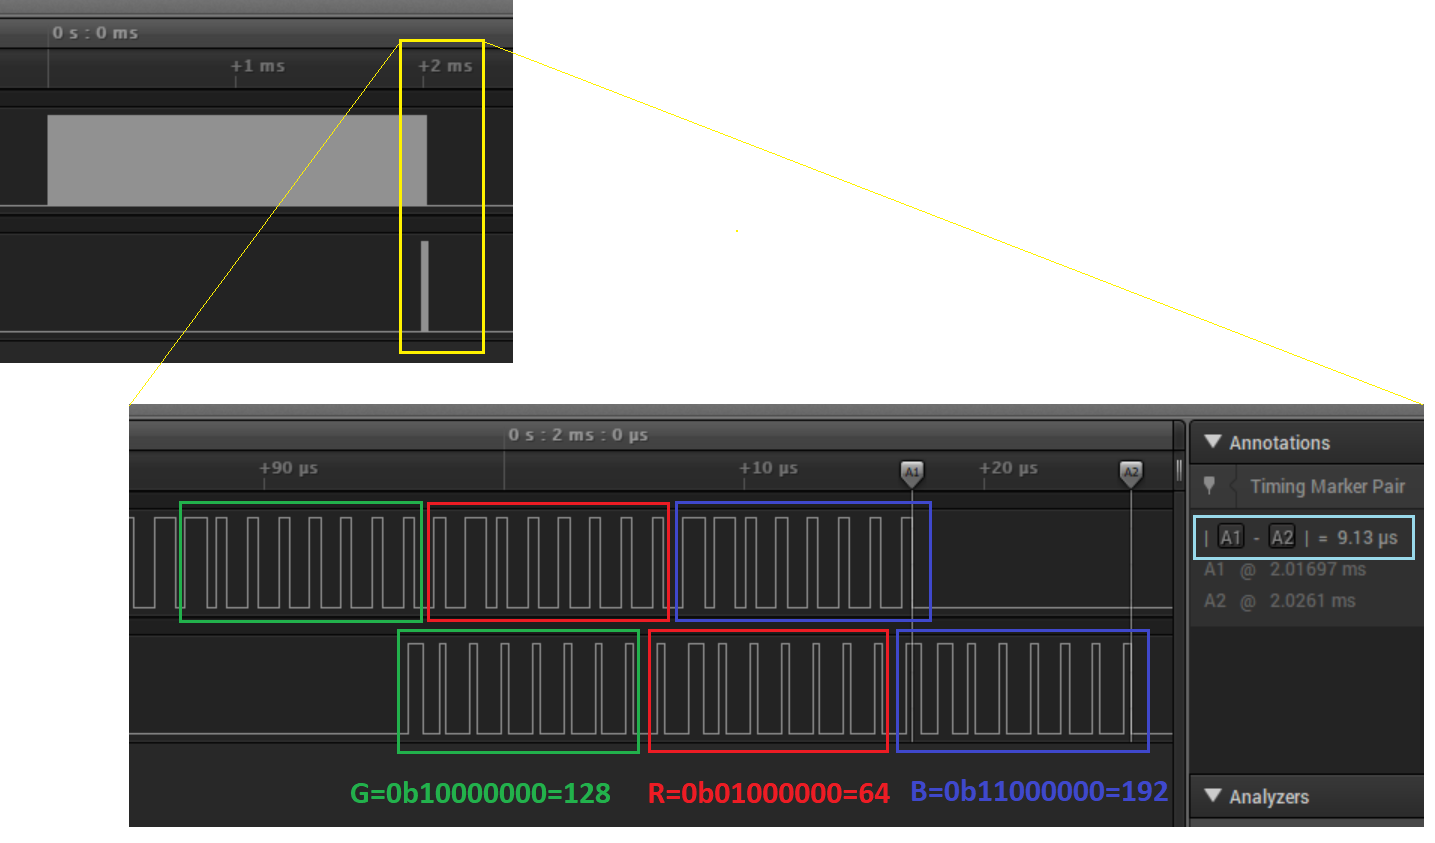
and the blue value to 3×i. In other words, NeoPixel 64 will be configured to R=64, G=128, B=192.
The call to pixels.show() we start transmitting the 3×8×65 pulses to the board.
- The top of the picture shows a trace of the two signals: the signal on board data-in (NewPixel 0 data-in) and the signal on board data-out (NeoPixel 63 data-out, NeoPixel 64 data-in).
- Sending the RGB data to the board takes, as before ~2ms (the wide gray rectangle in the top trace).
- All the 3×8×65 pulses pass NeoPixel 0, but NeoPixel 64 only sees the remaining 3×8×1 pulses for itself (the small gray rectangle in the top trace).
- The bottom of the picture shows the same trace, but zoomed in (as indicated in yellow) on the end of the trace.
- NeoPixel 64 will be configured to G=128, R=64, B=192; we see those pulses pass as the last ones on data-in of NeoPixel 0. This does mean that the daisy-chained NeoPixels are not one big shift register: the data for NeoPixel 64 is not shifted-in as first, but as last. This is confirmed by the WS2812B datasheet: "the first pixel collect initial 24bit data then sent to the internal data latch, the other data [...] sent to the next cascade pixel".
- The pulses are passed on by NeoPixel 0 to NeoPixel 1, which passes it on to 2, etc, until they arrive on the data-in of NeoPixel 64.
- We see that the chain of 64 NeoPixels causes a delay of 9.13µs (cyan rectangle for marker pair A1-A2).
- It could be that a NeoPixel is "activated" - starts illuminating using its new settings - once the data is in "the internal data latch" as the datasheet mentions. This would mean that the activation of the first and last NeoPixels is ~2000µs apart.
- It could also be that a NeoPixel is only activated (settings copied from latch to the RGB led drivers) when the RET code is detected (a silent period of 50 µs). This would mean that the activation of the first and last NeoPixels is only 9.13µs apart.
In an attempt to determine the activation moment, I've changed the setup a bit.
I added a third probe, an analogue measurement of Vcc.
Secondly, the Arduino script is changed: all pixels are set to full brightness pixels.setPixelColor(i,0xffffff).
Thirdly, I power the board now via a powered USB hub.
The idea is that setting all NeoPixels from off to maximum causes a drop in voltage (due to power suddenly going from 100mA to 2500mA). The question being: is this voltage drop gradual during the configuration, or abrupt when the RET signal comes in.
The above capture shows a rather constant voltage of 4V4 before sending the pulses. When all pulses are send, at 2ms after T=0 (green arrow in left image), the voltage gradually drops to 3V3. This seems to support the hypothesis that NeoPixels are activated when the RET code is received.
Especially, because if we zoom in on the green arrow (right image), we see a plateau at the original 4V4 that has a width of about T_RET (50us). This seems to indicate that T_RET us after the end of configuration, the LEDs are switched full on and the voltage starts to drop.
- add cfg option for pulsating seconds
- add animation slide (letters out of view)
(end)
