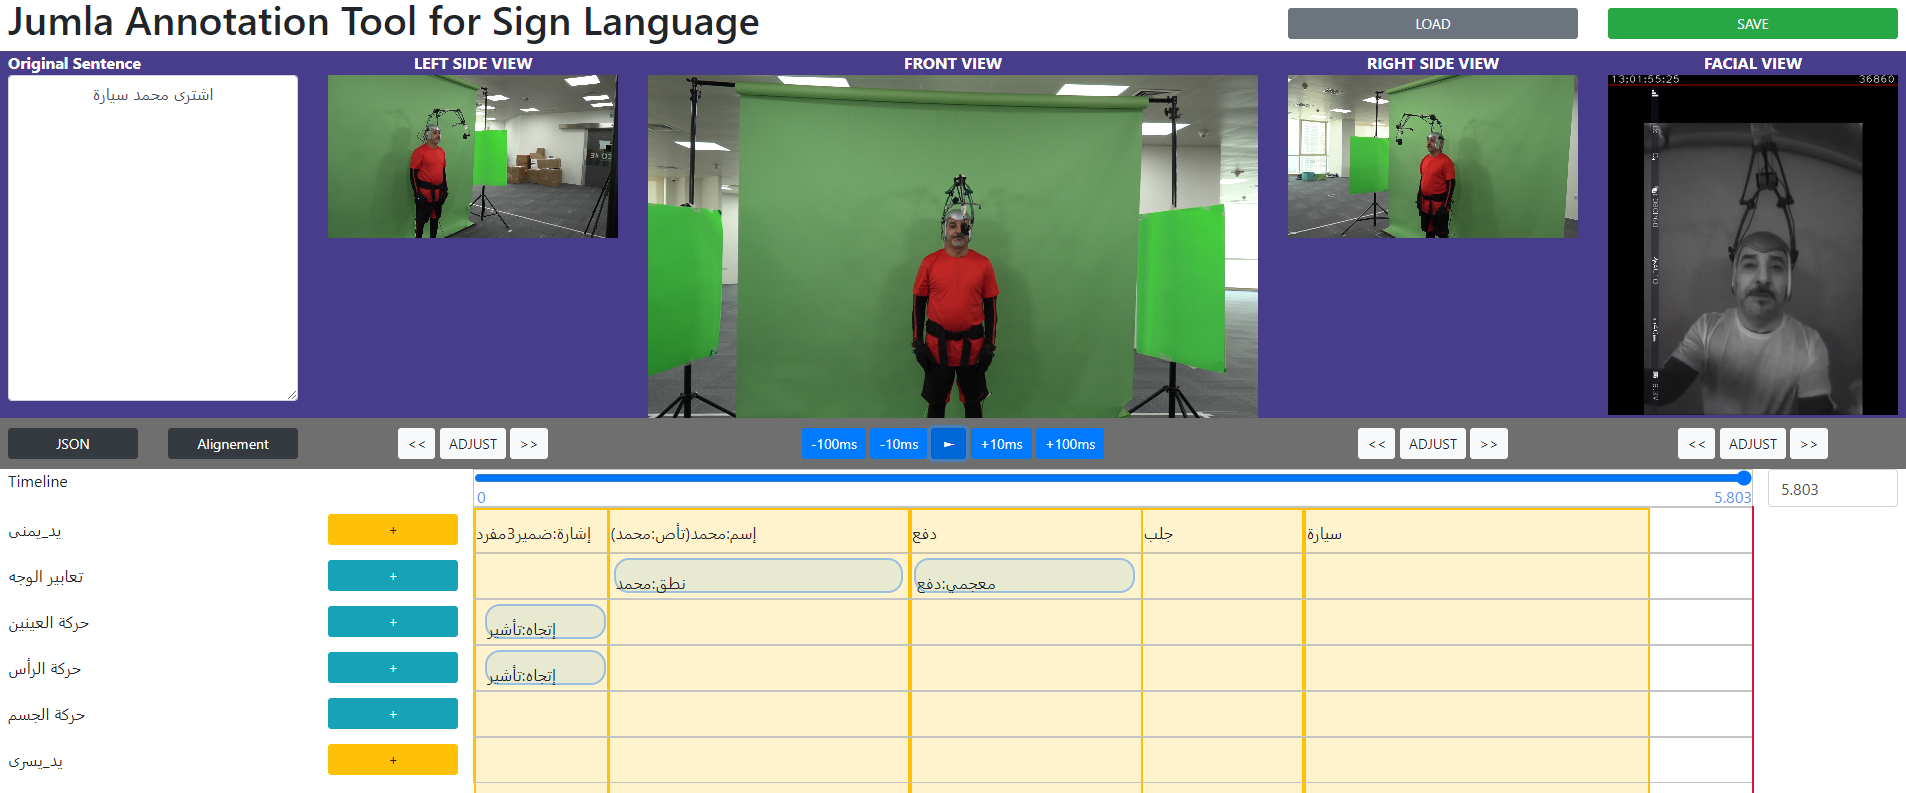
Below all required instruction to setup a server in order to run the Jumla Sign Language Annotation Tool.
- Apache - 2.2.41(Latest Version)
- PHP - 7.4.3(Depending on the Laravel requirement)
- MySQL - 8.0.26(Latest Version)
- Node - 14.16.1(Depending on some frontend packages)
- Npm - 6.14.4(Latest version)
- Composer - 1.10.5(Latest version)
- Laravel - 8.12(Latest stable version from Laravel framework)
To update the local package index with the latest changes made in the repositories.
sudo apt updateThe Apache HTTP server is the most widely used web server in the world. It provides many powerful features including dynamically loadable modules, robust media support, and extensive integration with other popular software.
sudo apt install apache2This command is used to install the apache2 web server.
sudo systemctl status apache2This command is used to view the status of a service.
qBefore test Apache, need to modify our firewall to allow outside access to the default web ports. During installation, Apache registers itself with UFW to provide a few application profiles. We can use these profiles to simplify the process of enabling or disabling access to Apache through our firewall.
sudo ufw allow in "Apache Full"mod_rewrite operates on the full URL path, including the path-info section. A rewrite rule can be invoked in httpd.conf or in .htaccess. The path generated by a rewrite rule can include a query string, or can lead to internal sub-processing, external request redirection, or internal proxy throughput.
sudo a2enmod rewriteHere we need to activate mod_rewrite using the above command. It's available but not enabled with a clean Apache 2 installation, this command will activate the module or alert you that the module is already enabled. To put these changes into effect, restart Apache.
sudo systemctl restart apache2Step 2 - Enter the URL http://YOUR-IP/
MySQL is a powerful database management system used for organizing and retrieving data. It's more friendly with PHP Language.
sudo apt install mysql-serverFinish up by running the MySQL set up script:
sudo mysql_secure_installationYDuring the installation, MySQL will ask you to set a root password. If you miss the chance to set the password while the program is installing, it is very easy to set the password later from within the MySQL shell.
1To set the password security level. Recommended level is 1
[AnyPassword]To set the required password
YBy default, a MySQL installation has an anonymous user, allowing anyone to log into MySQL without having to have a user account created for them. This is intended only for testing, and to make the installation go a bit smoother. You should remove them before moving into a production environment.
YNormally, root should only be allowed to connect from 'localhost'. This ensures that someone cannot guess at the root password from the network.
YBy default, MySQL comes with a database named 'test' that anyone can access. This is also intended only for testing and should be removed before moving into a production environment.
YReloading the privilege tables will ensure that all changes made so far will take effect immediately.
YPHP is an open source web scripting language that is widely used to build dynamic webpages.
sudo apt install php libapache2-mod-php php-mysqlAfter you answer yes to the prompt twice, PHP will install itself.
PHP also has a variety of useful libraries and modules that you can add onto your virtual server.
sudo apt install php7.4-common php7.4-cli php7.4-gd php7.4-mysql php7.4-curl
php7.4-intl php7.4-mbstring php7.4-bcmath php7.4-imap php7.4-xml php7.4-zip- php7.4-common The common is includes common files for PHP
- php7.4-cli The cli command-line interpreter for the PHP scripting language
- php7.4-gd The gd Graphics Library is a graphics software library for dynamically manipulating images
- php7.4-mysql The MySQL module for PHP
- php7.4-curl The curl makes HTTP request in PHP
- php7.4-intl The intl Internationalization module for PHP
- php7.4-mbstring The mbstring Multibyte encoding in PHP
- php7.4-bcmath The bcmath Binary Calculator is used to working with float values in PHP
- php7.4-imap The imap is used to connect with mailbox in PHP
- php7.4-xml The xml eXtensible Markup Language for structured document interchange on the web
- php7.4-zip The zip is used to transparently read or write ZIP compressed archives and the files inside them.
sudo nano /etc/apache2/mods-enabled/dir.confDirectoryIndex index.php index.html index.cgi index.pl
sudo systemctl restart apache2Step 2 - Enter the URL http://YOUR-IP/
Composer is a popular dependency management tool for PHP, created mainly to facilitate installation and updates for project dependencies. It will check which other packages a specific project depends on and install them for you, using the appropriate versions according to the project requirements.
php -r "copy('https://getcomposer.org/installer', 'composer- setup.php');"apt-get install curl php-cli php-mbstring git unzipphp composer-setup.php --install-dir=/usr/local/bin --filename=composerWhen we create a repository on GitHub, it exists as a remote repository. We can clone our repository to create a local copy on our Droplet and sync between the two locations.
git config --global user.name "YOUR-NAME"
git config --global user.email "YOUR-EMAIL"cd/var/www/html
git clone git@github.com:madainnovation/Jumla-Sign-Language-Annotation-Tool-By-Mada-Center.git Yescd/var/www/html/Jumla-Sign-Language-Annotation-Tool-By-Mada-Center
composer installThe web server should now have the permissions it needs to serve content, and our user should be able to create content within the necessary folders.
chmod -R 777 /var/www/html/Jumla-Sign-Language-Annotation-Tool-By-Mada-Center/storage
chmod -R 777 /var/www/html/Jumla-Sign-Language-Annotation-Tool-By-Mada-Center/bootstrap
chmod -R 777 /var/www/html/Jumla-Sign-Language-Annotation-Tool-By-Mada-Center/publicmv /var/www/html/Jumla-Sign-Language-Annotation-Tool-By-Mada-Center/.env.example /var/www/html/Jumla-Sign-Language-Annotation-Tool-By-Mada-Center/.env
touch /var/www/html/Jumla-Sign-Language-Annotation-Tool-By-Mada-Center/storage/logs/laravel.log
chmod -R 777 /var/www/html/Jumla-Sign-Language-Annotation-Tool-By-Mada-Center/storage
nano var/www/html/Jumla-Sign-Language-Annotation-Tool-By-Mada-Center/.env- change
- [APP_NAME, APP_URL, DB_DATABASE,DB_USERNAME,DB_PASSWORD and all mail configuration]
press CTRL+x and press y to save the change
php artisan key:generate
php artisan config:cacheEach domain or individual sites known as "Virtual Hosts".
rm /var/www/html/index.html nano /etc/apache2/sites-available/000-default.conf
change DocumentRoot /var/www/html to DocumentRoot /var/www/html/Jumla-Sign-Language-Annotation-Tool-By-Mada-Center/public- at the bottom add
<Directory /var/www/html/Jumla-Sign-Language-Annotation-Tool-By-Mada-Center/public/>
Options Indexes FollowSymLinks
AllowOverride All
Require all granted
</Directory>
press bash CTRL+X and press bash y to save the change
sudo systemctl restart apache2sudo mysql -u root -p and use root password CREATE DATABASE DBNAME; USE DBNAME;
CREATE USER 'DBUSER'@'localhost' IDENTIFIED BY 'USER_PASSWORD'; GRANT ALL ON DBNAME.* to 'DBUSER'@'localhost';FLUSH PRIVILEGES;ExitTo give your application a speed boost, you should cache all of your configuration files into a single file using the config:cache Artisan command. This will combine all the configuration options for your application into a single file which will be loaded quickly by the framework.php artisan migrate Update the key stored in the application's environment file.
php artisan config:cache
php artisan migrate --seedAchraf Othman, Oussama El Ghoul, “Syntactic and semantic annotation tool for Qatari Sign Language Corpus”, 8th International Conference on Information and Communication Technology and Accessibility ICTA’21, December 8-10, 2021 [online].