A motion poem using random number generation and velocity applied to circles...
Also at: http://bit.ly/op-spark-circularity
Table of Contents
- Circularity
Create a new Cloud9 workspace and clone the project from github.com:
-
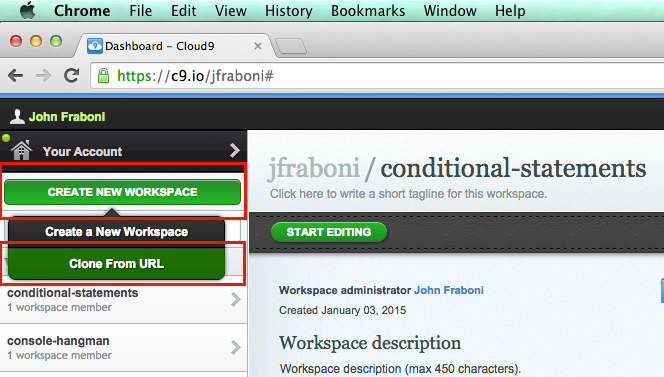
From your Cloud9 Dashboard, find in the upper left corner and click the green button, "Create New Workspace" > "Clone From URL":
-
In the "Source URL" form input, copy and paste in the following URL (see A):
https://github.com/OperationSpark/circularity.gitThen, in the environment selection box, select "HTML5" (see B). Finally, click the green button "Create" (see C).

-
Wait for the workspace to finish spooling (while spooling up, you'll see a spinning gear on the newly created workspace in the sidebar), and once the workspace is completed, click the green button, "START EDITING".

-
Now, when the workspace is loaded, select the command-line in the bottom window pane, and enter the command
bower install, then pressEnter, like this:
You'll see some test flying by on the command-line as some required files are installed... and when complete, you'll see something like this:

Nice, you're in business...
The portrait of the programmer as a young artist continues, using random number generation, color, and velocity applied to circles in this little motion poem. As usual, we're going to be drawing to an HTML5 Canvas element using the drawing API of the CreateJS module, EaselJS, and our helper library, draw, that simplifies the drawing process somewhat.
Using the draw line API to create a cool randomized piece of art.
Some concepts you'll learn are:
- Drawing with CreateJS and our draw utility.
- Leveraging the power of built-in and 3rd party API (DRY), like Math and opspark-draw.
- Variable declaration and initialization.
- Function invocation and passing arguments to functions.
- The while and for loop.
- Conditional statements - making decisions in code.
- Recognizing code blocks.
- Calculating coordinates in a cartesian system.
- Calculating boundaries.
- Animating.
- Pair programming.
As we work through the app, you'll find // TODO // notes in our app.js file, and under these TODO lines is where you'll enter the code we need to type. It's important you enter the code you need to type for the step under these TODO place markers, because code is executed in a particular order.
So, to complete a lesson step, find the TODO place marker in the appropriate JavaScript file:
EXAMPLE

...then put your cursor on the line below the TODO, and enter the code from the current lesson step:
EXAMPLE

Sweet!
Note that this app will run in a web browser, preferably Chrome.
All of our coding will happen in the and write your code in the <script id="motion-poem"> tag located at the bottom of the index.html file.
So, open the file at:
index.html
Starting up an application often takes a few steps of:
- Importing some libraries of code.
- Loading some external data.
- Declaring and initializing some variables for use in our app.
We've setup the app a little bit already, importing some libraries and initializing the basic plumbing in the background, and we won't be loading any external data in our app, so let's move on to declaring, initializing and using our variables.
Our motion poem will contain 100 randomly drawn circles, arranged randomly within the area of our canvas. The big takeaway in this project is DRY: Don't repeat yourself!
We want to draw 100 circles, but we don't want to write the code to do so 100 times. That would be a silly waste of time and effort, making the code very difficult to maintain.
Every programming language comes with features built-in to help you implement repetative processes, like looping over a list of data, or drawing a circle 100 times. If we want to do anything more than once, we can use a loop, and is most often best practice to do so.
JavaScript comes with a number of built in loops, like for for-in and while, and many 3rd party libraries, like lodash, have implementations of other types of loops.
We're going to use the while loop to accomplish our task. It works like this:
var i = 0;

while (i < 100) {
    console.log(i);
    i++;
}
The while loops checks first if a condition is true: while (i < 100). So while i is less than 100, the code block between the braces { //... } will execute.
After executing the code block, the while loop loops-back to check the condition again, and will continue to loop until that condition is false.
To break out of the loop, we need the condition to return false, and by incrementing our i counter on each loop using i++;, the value of i increases by one on each loop. i++; is shorthand for i = i + 1;, and you'll see the ++ or -- operators used often in code to accomplish this type of pattern.
In fact, most loops use this exact same pattern: some counter checked against the length of a collection (an Array or Object), and incremented or decremented on each loop, depending on if you want to loop forward or backwards through a collection.
So then, looking at the above snippet of code, what would be the result of running that code?
Blocks of code belong to functions, loops and conditional statements.
Code blocks are always encased within the braces { // code block... }, and the code inside them is always indented by one tab. The { } braces around code blocks might seem confusing because these braces also represent Object literals. You will, however, come to know when they stand for an Object, and when they represent a code block: it has everything to do with the keyword that precedes the braces, as well as what we do within the code block.
For example:
var myObject = {nameFirst: 'John'};Above, the keyword var tells you you're creating a variable, and the assignment opporator, =, points to an object literal, {nameFirst: 'John'}; The braces in this case encapsulate the key/value pairs of the Object, in this case, nameFirst and 'John'.
Whereas:
var i = 0;

while (i < 100) {
    console.log(i);
    i++;
}
In this last example, the keyword while tells us we're opening a while loop, so the { } braces that follow it represent the body or code block of the while loop. The code inside these braces is the block of code that will be executed each time the condition of while (i < 100) is true.
This is the same pattern with function definitions:
function add(a, b) {
    return a + b;
}
Same thing here, the keyword function tells us we're declaring a function, and the { } braces that follow it represent the body or code block of the function. The code inside these braces is the block of code that will be executed each time the function is invoked.
Pay close attention to blocks of code and their { } braces: you MUST always have an opening AND closing brace, otherwise the JavaScript interpreter will throw an error or your IDE will complain.
Great stuff, we're going to use the while loop to draw and initialize our circles. Before we get there, let's first declare our app's required variables.
For our app, the things we'll need are:
i: a counter for our while loop.circle: we will use this variable to hold the circle shape we create using thedrawlibrary.circles: this variable will be an Array to hold all of our circles so we can loop through them all and update each.
Ok, we can take care of declaring our variables all in one statement: Find TODO 1 and declare our variables like so:
// other code...

// TODO 1: Declare our variables //
var i, circle, circles;

// other code...Sweet, next let's initialize our counter and the circles Array. Find TODO 2 and initialize our counter i to 0 and the circles variable to [], an empty Array:
// other code...

// TODO 2: Initialize our variables //
i = 0;
circles = [];

// other code...
Excellent! Now witness the power of computation:
We know we want to draw 100 circles, and that the while loop is the way go, so let's go ahead and put the while loop in place. Once we've got that done, we'll circle back to draw our circles and add each of them as children of our view, positioned somewhere randomly within the area of our canvas - we'll do all of this initializing within the code block of the while loop.
We've stub out the while loop for you; it looks like this:
// other code...

while (i < 100) {
    // TODO 3 : YOUR CODE STARTS HERE //////////////////////////


    // TODO 3 : YOUR CODE ENDS HERE ////////////////////////////

	/*
	 * IMPORTANT NOTE:
	 * The statement i++; increments our counter by 1 on each loop.
	 * If we did not do this, the conditional check of while (i < 100)
	 * would never return false, and we would loop forever!
	 *
	 * Leave this as the last statement in the while loop
	 */
    i++;
}

// other code...
Ok, now, inside the code block of the while loop, we're going to initialize our circle shape!
Implement the following code such that your while loop now looks like this:
// other code...
while (i < 100) {
    // TODO 3 : YOUR CODE STARTS HERE //////////////////////////
    circle = draw.randomCircleInArea(canvas, true, true, '#999', 2);

    if (circle.alpha < .2) {
    	draw.blurFilterOn(circle);
    }

    physikz.addRandomVelocity(circle, canvas);
    circles.push(circle);
    view.addChild(circle);

    // TODO 3 : YOUR CODE ENDS HERE ////////////////////////////

	/*
	 * IMPORTANT NOTE:
	 * The statement i++; increments our counter by 1 on each loop.
	 * If we did not do this, the conditional check of while (i < 100)
	 * would never return false, and we would loop forever!
	 *
	 * Leave this as the last statement in the while loop
	 */
    i++;
}

// other code...
First, we're going to use the API of our draw utility to draw a randomCircleInArea(). This method will draw a circle random in its color, radius, transparency and position, and add a cross shape to the circle. Why the cross shape? You'll see...
The API of this function is:
randomCircleInArea(area, randomizeAlpha, addCross, borderColor, borderThickness, randomRadialProps)
...and we're passing in the arguments:
circle = draw.randomCircleInArea(canvas, true, true, '#999', 2);
The area in this case is the canvas, so our circle will be given a randomly generated x and y coordinate within the area of our canvas. Next we pass in two boolean values of true, which means we want to randomize its transparency (alpha) and add a cross shape to our circle. Finally, the last two values, '#999', 2, represent the color and thickness of the circle's border.Circularity
Next, we check if (circle.alpha < .2), which says if the transparency of the circle happens to be less than .2, which would be almost fully transparent, we use again our draw utility to add a blur filter to our circle. This will produce a neat effect on the circles such that those almost transparent will appear to be off in the distance.
After this, we create some magic: We pass in our newly created circle and the area of the canvas to the addRandomVelocity() method of the physikz library, and this will add some randomly generated velocity properties, giving our circle a speed and direction within the area of our canvas:
physikz.addRandomVelocity(circle, canvas);
Finally, we push our initialized circle into the the circles Array. push is part of the API of a JavaScript Array, and this is the method we use to add elements to an Array. We do this for all our circles created within the while loop, so we can have all the circles collected into a list which we can loop through at a later time, and update the properties of each circle. In doing so, we can easily update the x and y properties of
###Run the App
Alrighty, to run the app, YOU MUST open the file at:
index.html
And with the index.html tab selected in the editor (see A), you can simply press the green play button (see B).
This will start an Apache web server in a new tab of the Console View, the bottom window pane of the Cloud9 IDE. Once Apache has booted, you can click the URL https://circularity-jfraboni.c9.io/index.html (see C) - this will open a new tab with the appliation running.

Once this tab opens, we recommend popping out the tab into Chrome, into a separate browser tab. To do so, click on the popout button on the right side of the preview tab (see A), like so:

This will give you the app running in a separate Chrome tab. As you save your future work, changes to your code will be reflected in the app > you don't have to press "Run" again - as long as the Apache web server is still running - you need only press the refresh button on the Chrome tab with the app running in it. In this image, we also have the Chrome debugger console open, which will tell you if there's any problems with your code. Have a look:

Awesome, let's do some fun stuff with our circles now. Remember that in our motion poem apps (the series of apps to which this app belongs), our update() method is called 60 times per second, so it gives us the perfect place to update properties of our display objects in order to create the illusion of motion, otherwise known as, animation!
Given this, the rest of our work will take place within the update() function. Right now, it's stubbed out like this:
function update() {
    for (var i = 0; i < circles.length; i++) {
        // TODO 4 : Access one circle at time from the circles Array //

        // TODO 5 : Update the circles position //

        // TODO 6 : YOUR CODE STARTS HERE //////////////////////

        if ( / * test for right-side * / ) {
            // your code to place circle exactly off the stage at the left-side //
        } else if ( / * test for left-side * / ) {
            // your code to place circle exactly off the stage at the right-side //
        } if ( / * test for top * / ) {
            // code to place circle exactly off the stage at the bottom //
        } else if ( / * test for bottom * / ) {
            // your code to place circle exactly off the stage at the top //
        }

        // YOUR TODO 6 CODE ENDS HERE //////////////////////////
    }
}
The thing to notice here is that we're utilizing another type of loop: the for loop. The syntax of loop looks like this:
for (var i = 0; i < circles.length; i++) {
    // this is the code block or body of the for loop //
}
Following the keyword for the first part of the for loop within parenthesis, (var i = 0; i < circles.length; i++), configures the condition for the loop. In fact, there's three parts to it:
- var i = 0; : This initializes a counter i to 0.
- i < circles.length; : This statement is the condition against which we check on each loop. If i is less than the length of the circles Array, the code block for the for loop will execute.
- i++ : This statement increments the counter i. We could loop backwards, in which case we'd do something like i--.
Finally, we have our code block within the braces { }.
All your code for TODO 4, TODO 5 and TODO 6 will go within the code block of this for loop, so keep that in mind!
It's time to do a little problem solving:
Use the Array syntax to pull out the circle at index i.
Arrays are zero-indexed lists of objects. Basically, an Array acts as a container, into which we can throw objects, like strings, numbers, or circles. We call the things we throw into Arrays, items or elements, as in, the elements of our Array.
To retrieve an individual element from an Array, we can use Array syntax, which uses the name of the Array, followed by square brackets that enclose a number representing the position of the element.
So, if we literally created an Array like this:
var friends = ['John', 'Max', 'George', 'Ben', 'Steve', 'Brian'];Then we can access the elements of the friends Array like so:
var name = friends[1];
console.log(name); // prints Max
So, above, we used Array syntax to access the second element of the friends Array, friends[1], which equates to Max. Because Arrays are zero-indexed, the first element is at index 0, the second element is at index 1, and so on.
So, we know our that when we created our circles, each circle was pushed into our Array of circles, and we know that our for-loop is incrementing an index, i on each loop, once for each element in the circles Array. So, using the Array syntax we discussed earlier in the lesson, what do we need to do to pull-out and assign an individual circle as we loop over the Array of circles?
// other code...


// TODO 4 : Access one circle at time from the circles Array //
circle = ???

// other code...Okay, now we have our circle, let's use the updatePosition() API of the physikz library to update the position of the circle:
// other code...

// TODO 5 : Update the circle's position //
physikz.updatePosition(circle)

// other code...We need to check each circle's position as we loop through the Array of circles to keep the circles coming back onto the canvas.
So, if a circle leaves the canvas along the bottom border, we need to place the circle fully off the canvas at the top border.
So, write a test for each border of the canvas that checks if the circle has fully exited the canvas by that border. Using a chain of if, else-if statements, you'll need one test for each border, right-side, left-side, top, and bottom. If a circle leaves the canvas by one of its borders, you need to place the circle fully off the canvas at the opposite border. Dig?
The best way to start this is to hack away, testing one border at a time!
To do this, you'll have to lean on what you know:
canvas.width    // The the width of our canvas.
canvas.height   // The height of our canvas.
circle.x        // The circle's position along the x-axis, good for testing the right and left side borders.
circle.y        // The circle's position along the y-axis, good for testing the top and bottom borders.
circle.radius   // Each circle is of a different size, so the radius will provide this information to you. ALSO, the circle is centered around its own x and y position, so we can find where its outer edges are located within the canvas by adding or subtracting its radius from its own x or y value.  But you'll see this as you hack away to acheive the expected results.
We've stubbed a chain of if, else-if statements for you, all you need to do is replace the comments between the () parentheses with your check for that particular border:
So, for example, replace:
/ * test for right-side * /
With:
circle.x > canvas.width + circle.radius
So that your if statement looks like:
if (circle.x > canvas.width + circle.radius) {
    // your code to place circle exactly off the stage at the left-side //
}
The full stub code for our if, else-if statements is here:
// TODO 6 : YOUR CODE STARTS HERE //////////////////////

if ( / * test for right-side * / ) {
    // your code to place circle exactly off the stage at the left-side //
} else if ( / * test for left-side * / ) {
    // your code to place circle exactly off the stage at the right-side //
}

if ( / * test for top * / ) {
    // code to place circle exactly off the stage at the bottom //
} else if ( / * test for bottom * / ) {
    // your code to place circle exactly off the stage at the top //
}

// YOUR TODO 6 CODE ENDS HERE //////////////////////////© Operation Spark 2015