Requirements
- Domain name (Domain name can be registered for free from freenom.com - Steps below)
- Cloudflare free account to manage dns for the domain name)
- An Ubuntu server (We will run docker container on this server to generate certificate, Tested on Ubuntu 18.04 but may work on other versions too)
Get free domain name from freenom.com
- Navigate to freenom.com
- Search for a domain name (It supports .tk, .ml, .ga, .cf and .gq top level domain, popular names may not be free)
- Register the domain for 12 months (more than 12 months is not free but it can be renewed after 12 months for free again)
Move the DNS name server from freenom to Cloudflare
The DNS management on freeenom is very slow and does not support API for adding dns records and automating certificate generation. Cloudflare’s DNS management is much faster, easier and it supports API we need later to generate certificate for the domain.
- Create a free account on cloudflare
- After logging in to cloudflare it will ask to add the domain. Once the domain is registered it may take some time for cloudflare to detect the domain, if you get an error, please wait for 30 mins and try to add the domain name again.
- Add an A record in the next page where cloudflare asks to add a dns record and click Continue.
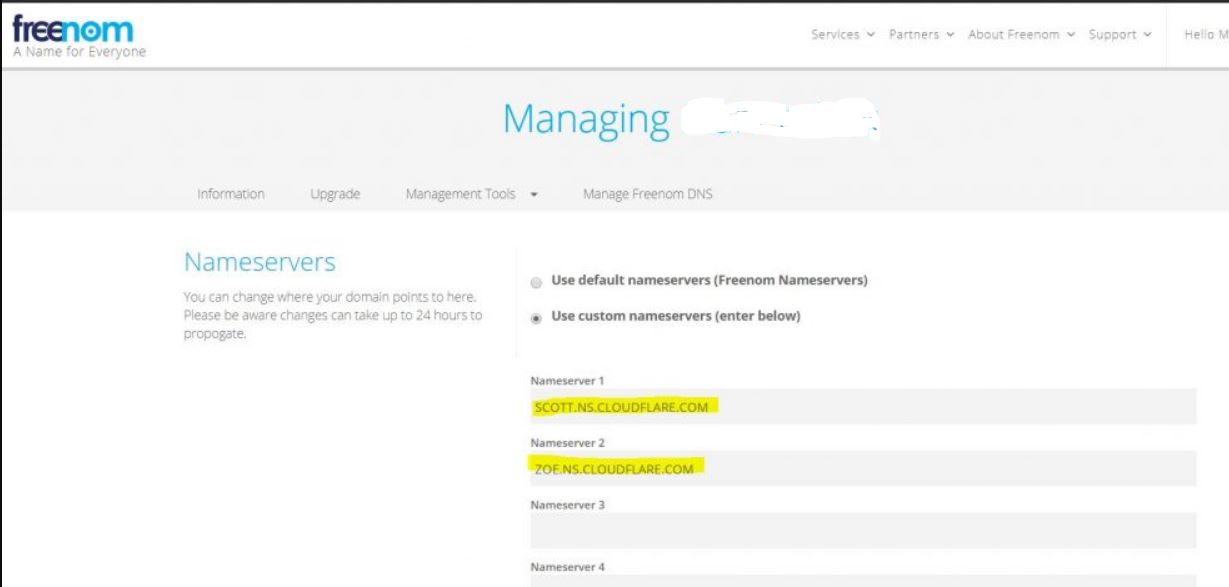
- Once domain is added cloudflare will give 2 nameservers to add to freenom to migrate the dns management. Add these 2 name servers in your freenom account in your domain management under Management Tools >> Nameservers
- On cloudflare click Done, Check Nameservers button. It will take 5 mins to 30 mins for the nameservers to update, cloudflare will send an email once the nameserver is active and the domain is added to cloudflare
- Once the domain name is activated in cloudflare the dns entries can be added in DNS tab under the domain name in cloudflare

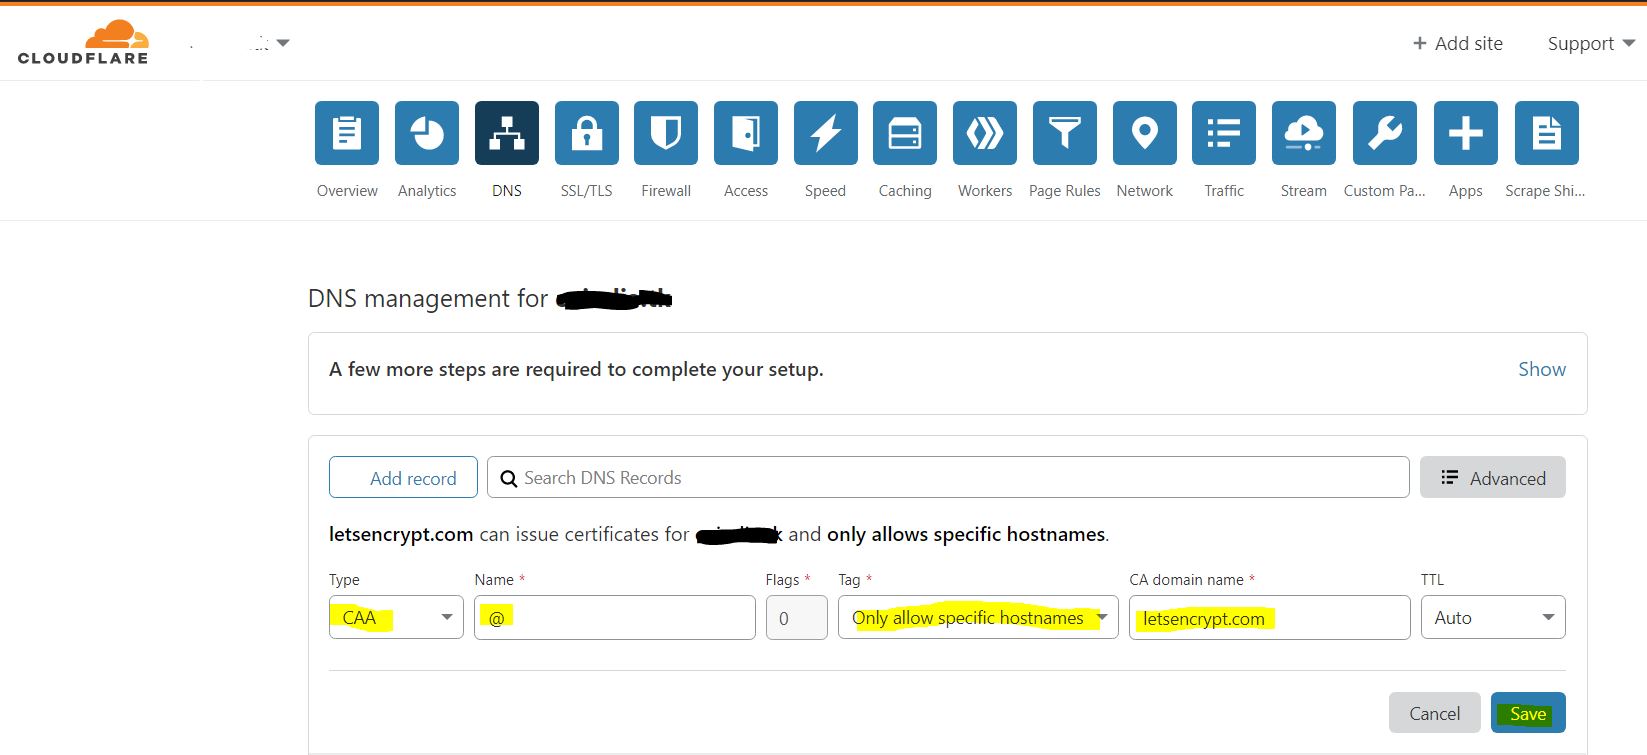
- Add a CAA record to the domain as shown in the below screenshot. Using CAA records we are authorizing letsencrypt to generate certificate for this domain.
Get API key from Cloudflare
- From your cloudflare account get the global api key from the page

- Clicking on View button will ask to verify your cloudflare account password and once verified will show a hexadecimal API key ( The API key is as important as cloudflare account password, keep it secure)
Generate certificate using a Linux server and Docker
Install docker on a linux server
Run the following commands to install docker on the linux server (The command may change based on your Ubuntu server setup, these commands are for reference)
$ sudo apt update
$ sudo apt install apt-transport-https ca-certificates curl software-properties-common
$ curl -fsSL https://download.docker.com/linux/ubuntu/gpg | sudo apt-key add –
$ sudo add-apt-repository "deb [arch=amd64] https://download.docker.com/linux/ubuntu bionic stable"
$ sudo apt update
$ sudo apt install docker-ce
On the Linux server cli, run the following commands to run docker container to generate certificate
$ cd ~
$ mkdir ~/certificates
$ cd certificates
$ nano domains.conf
In the domains.conf file add the domain for which you want to generate certificate, you can either enter the top level domain ( example.com) or wild card domain (*.example.com) to create certificate for single top level domain or for wildcard domain
Once the domains.conf has the domain name added, save the file (ctrl+o) and exit the file (ctrl+x).
Run the docker container to generate the certificate by running the below command. It’s a single command in multiple lines for readability. Please add your email address, cloudflare account email address, cloudflare global api key in the below command whereever mentioned.
sudo docker run \
    --name letsencrypt-dns \
    --volume ~/certificates:/etc/letsencrypt \
    --env 'LETSENCRYPT_USER_MAIL=<EMAIL ADDRESS>' \
    --env 'LEXICON_PROVIDER=cloudflare' \
    --env 'LEXICON_CLOUDFLARE_USERNAME=<CLOUDFLARE ACCOUNT EMAIL ADDRESS>' \
    --env 'LEXICON_CLOUDFLARE_TOKEN=<CLOUDFLARE ACCOUNT GLOBALAPI KEY>' \
    adferrand/letsencrypt-dns
This will take approx 2 mins to verify ownership of domain and generate certificate. If the certificate is generated successfully you will see below output after running docker container
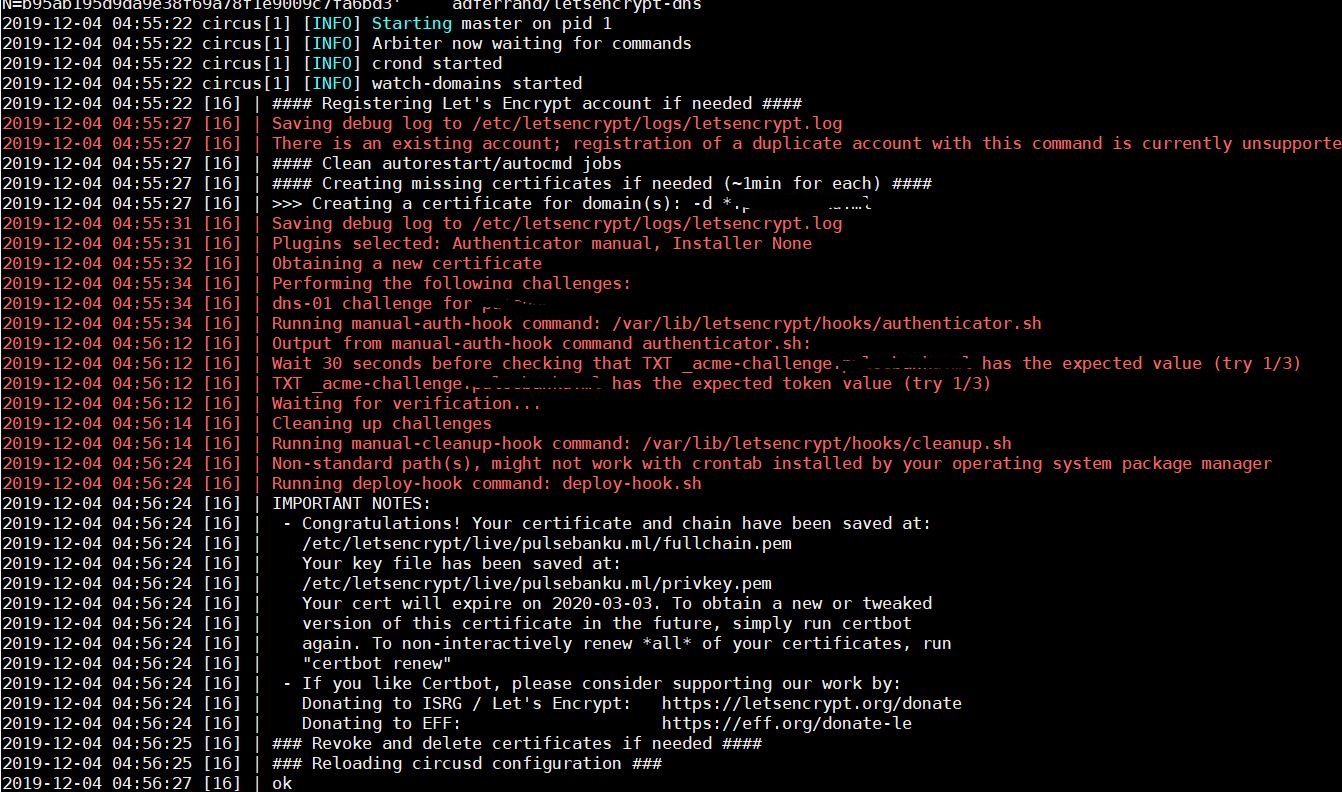
Once the certificate is generated enter ctrl+c to stop the container. The certificate and private key will be stored in below location
/home/[UserName]/certificates/archive/[DomainName]/
Only root account has access to this path so change the user to root before accessing this directory.
The directory will contain 4 files (cert1.pem, chain1.pem, fullchain1.pem, privkey1.pem)
- cert1.pem > End Server certificate file
- chain1.pem > Intermediate cert
- fullchain1.pem > End Server certificate + Intermediate
- privkey1.pem > Private key of the certificate
The certificate will be valid for 3 months from the date of generation
Letsencrypt will send an email to remind to renew the cert when the certificate is about to expire on the email address provided while generating the certificate