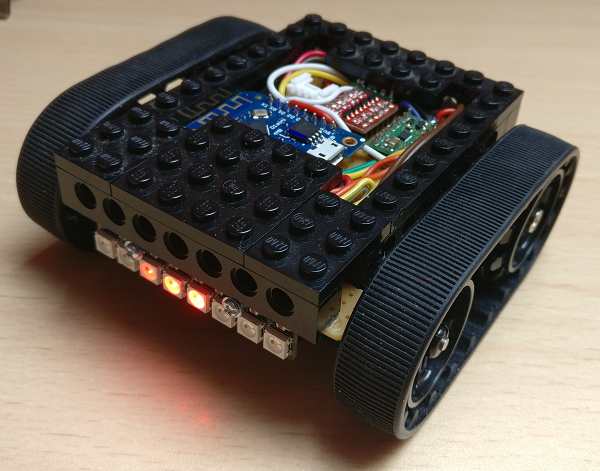
After https://github.com/manuito/robot-large I wanted to make something smaller for kids, with basic drive support through the https://github.com/manuito/wifi-pilote.
A small robot :
The base kit is once again a (very good) pololu one : Zumo (https://www.pololu.com/product/1418) + two pololu Low Power micro motors (https://www.pololu.com/product/992).
The feature are limited :
- Driving (Track 2WD)
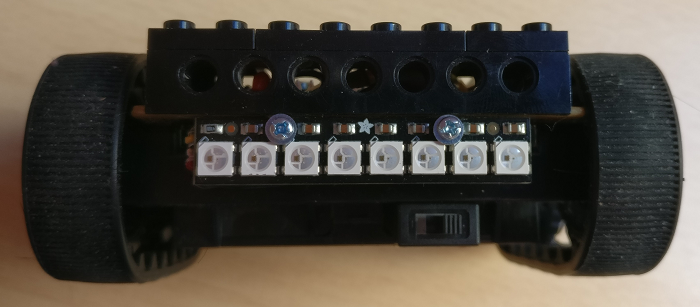
- Light (1 RGB Band with 8 NeoPixels)
And that's it ! Enough for "rc like" fun for kids, easy to program. I expect to glue so lego on it to make it possible to build anything they want over it. It will not be fast but OK.
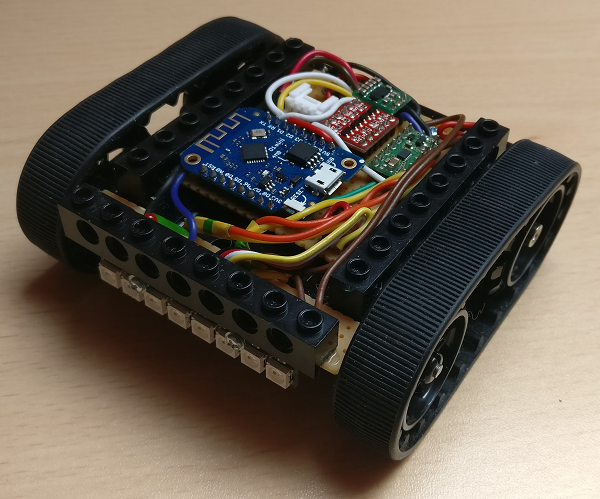
For MCU, it's also simpler : ESP8266 with D1 Mini. Plus a pololu "2 motors driver", 1 pololu 5v regulator (even if ESP8266 is 3.3V, it's easier to manage a 5V input in combined electronic plateform like a robot, and the D1 mini includes a 3.3V regulator itself.
I will use a Proto PCB. I hope to start to create custom PCB for my next projects, as using this kind of (cheap) proto board is not fun and it make you loose a lot of space ... And I hope to be able to buy also a better solder iron : mine is a cheap one, and it's already almost dead :'(
Some lego technique bricks are glued to the robot base. The electronic is conceived to be shorter than a lego brick height : this way everything can be "hidden" under some lego bricks. And the kids can build whatever they want.
I was not able to have everything under one lego brick of height. I had to add borders (1/3 of lego brick hight) to fix and put everything in place.
Here we can see the 3 glued bricks (1 front, 2 sides) :
A 5v compliant Serial port is available through a groove connector. The idea is to program and add later a Serial Camera Kit, and make the robot able to take pictures (and maybe to display a low FPS real time rendering of what it is able to see). Integration was a bit complicated with the small space and the fact I used a proto board for support (so with many wires to link everything together), but result is OK.
Various power are managed :
- VIN => The bateries direct output. Can be somewhere between 4 x 0.9 v (empty NiCad bateries) and 4 * 1.5 v (new AA bateries).
- VCC 5V => VIN regulated by a pololu step-up step-down board.
- VCC 3.3V => D1 Mini (ESP8266) operating voltage + IO level. Provided by the D1 Mini regulator
Available power is different on each source : VIN has max power (whatever the batteries can handle), 5V is from 0.500A to 1A. Most of the time it will be somewhere between 0.500 and 0.700A. 3.3v is very weak : arround 200mA (provided by D1 Mini board)
How it is distributed :
- VIN provided to regulator + Motor VIN in the motor driver
- VCC 5V provided by regulator to D1 Mini VIN + a Level shifter V High + The RGB Band VIN + Serial port VCC
- VCC 3.3V is provided by the D1 Mini to the level shifter low V and to the motor driver input voltage IN
The Level Shifter was no supposed to be their but :
- The kids wanted to be allowed to add a camera later. I only have a groove camera kit working at 5V, so the serial port needs to be pushed to a 5V level (instead default 3.3V level from ESP8266). It uses 2 Level Shifter IO
- The RGB band works with a 5V VIN + 3.3V data input. Put it is not recommanded by Adafruit doc, and I have seen some "interferences" maybe related to the motor noises or whatever. So to have a clean data signal, I use 1 level shifter IO for data input instead of standard 3.3V.
I should add 330 resistances before the status led, but what I have seen is that the 3.3v from D1 Mini is weak and doesn't seem to need any resistance.
For the RGB Band, a resistance is recommanded to lower the power of input. As it is provided by a level shifter (so power is high), it is good to add one. Adafruit recommands a ~ 400 ohms resistance.
I added 2 ceramic capacitor between V+/V- of motors. See this good article from Pololu site
In front of the robot : the 8 NeoPixel band + a power switch. A status led is also hidden behind one hole in brick. RGBBand + status led are Fixed through a band of protoboard and then fixed with 2 screws. The power switch is glued to robot base.
Programmed with Arduino. Code is based on "robot-large" : processing is managed in steps for real-time apply of new behaviors (for driving) and update of animations in the same time.
Motor driver code is fully custom. See Pololu driver details for PWM management.
A very basic webserver is used for piloting features. The code organization and definition of actions is copied from my "big-robot" project. Actions are process with a very basic REST service with a query param + 1 number (example : "action?G=2" to GO with speed 2, "action?L=4" for enabling light animation number 4 ...)
Camera code is included but not yet used. Copied from another old project on Arduino Mega. Will be droped : Serial Camera is painfull to use and not powerfull. I prefer to invest on an other solution for futur robot projects, for example based on openCV with Raspberry camera.
Robot-large is driven with an Arduino Mega 2560 MCU board + a Raspberry Pi W. Here we have a much simpler D1 Mini, with ESP8266 MCU. The NeoPixel library seems to have some issues with ESP8266 : so i migrated code to NeoPixelBus library instead of AdaFruit NeoPixel. And the only working GPIO seems to be D4 with this library. Anyway, the project code is now fully working
I use my Wifi Pilote remote for driving the robot (see Project here). It works
I'm currently (september 2018) trying something new with this already working robot : I'm creating a new "option" using the serial port I added into the robot. This port wasn't used yet and I didn't what I will do with that. I made it 5V compliant (thanks to the free io from the level shifter) and I have imaginated something : A Arduino Nano based extension board for the robot.
This board is based on :
- An Arduino Nano clone (costs something like 2.5 € on aliexpress)
- 1 HC-SR04 (cheap ultrasonic distance sensor - less than 1 €)
- 1 passive buzzer (0 €? - found from a cheap kit)
- (maybe) 1 cheap 3 axis I2C GY521 sensor (less than 1 €)
- 1 integrated SG90 microServo (1 €)
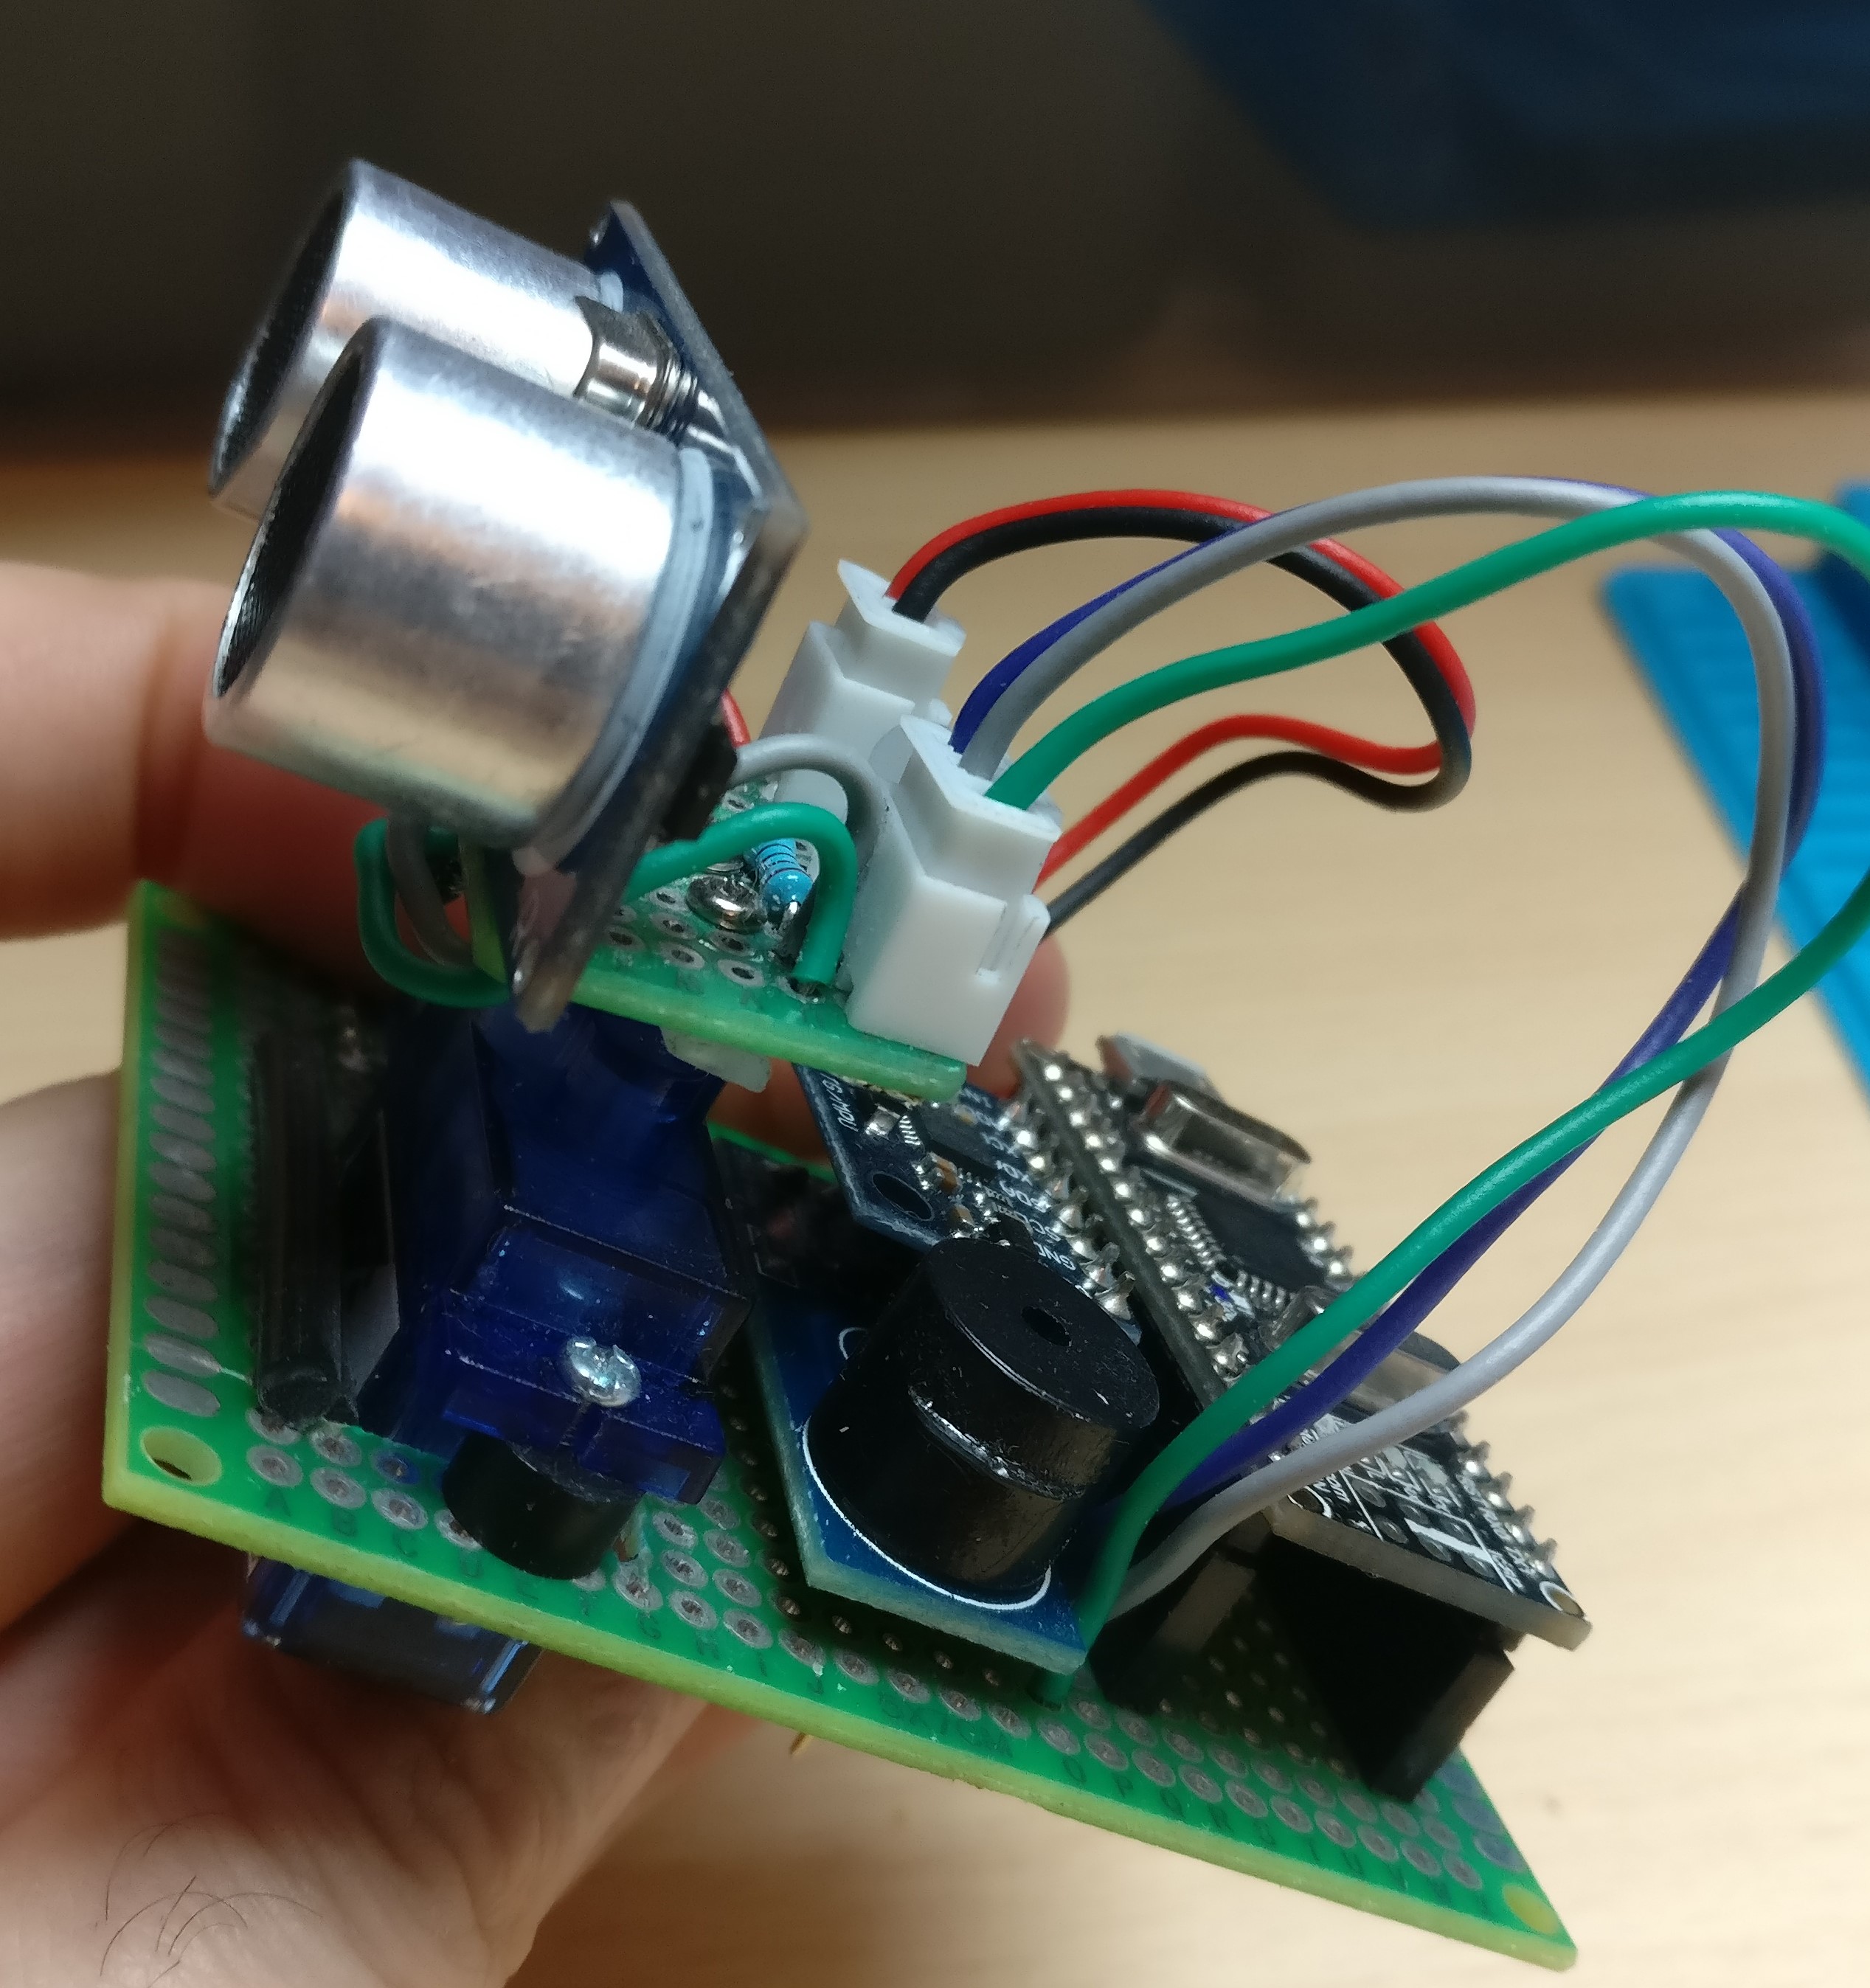
All merged together in 2 customized perma proto boards (1 "fix", 1 "moving"). The idea is to have the HC-SR04 rotating on 120° for basic distance scanning (and for kids fun), fixed on a larger board glued to some lego bricks. This extension can be then linked through serial port (which provides also power) and just fixed with legos.
I'm currently still working on this board.
I'm pretty sure I should have problems with power but for now, it seems ok... The serial 5v in the robot is directly provided by the polulu bulk step up / step down converter, which can provides max 1A. Motors voltage is direct battery output, so the power converter has to manage the NeoPixel band (8 leds) + 1 D1 Mini with Wifi service On + 1 Nano + 1 SG90 Servo (which is driven directly from the nano) + 1 Buzzer + 1 HC-SR04 + 2 Leds + 1 GY521. I will see what will happen ... (I'm still new in the electronic world, I haven't "burned" anything yet so ...)
I have started the code for the extension Nano. It will communicate over serial with D1 Mini board (Software Serial for Nano, Serial for ESP8266). It will use a simplified "monitoring" data flow similar to the one used in my "big" large-robot project. Driving of sensors will be handled by the nano, the ESP8266 will simply send basic commands and receive real time sensor flow.
Then I will try to create an "auto-pilote" mode for the ESP8266 (basic obstacle avoidance and multi step programming). And I expect to be able to add some feedback to the wifi remote : maybe it will even be more "visual" like a "radar" view based on the HC-SR04 data flow (with a very low FPS rate).
I'm adding a sub module named "option" : it's a permaproto with :
- A HC-SR04 sensor fixed on a Servo
- A cheap giroscope
- An active buzzer
Driven with a arduino nano, which "talk" with the small-robot ESP8266 through the included 5V Serial line. It will be glued to lego blocks for easy addition to the robot base.
Work in progress :
I want to make it "almost" plug'n play : the robot detect at startup if the option is their, and then enable it. With option the robot can now move autonomously (thanks to the rotating HS Sensor and the giroscope). It can also beep when it's angry
The code for the arduino nano is in the sub folder arduino/option
To do my testing, for the first time I wanted to go further in prototyping. So I started to use a Xprotolab Plain (http://www.gabotronics.com/oscilloscopes/xprotolab-plain.htm). I don't think a less expensive "oscilloscope" could exist, and it seems very promising... until it stoped to work :'(
It did crash when processing a logic protocol identification, and was "bricked" after that : no more green light, impossible to make it available on computer as usb device.
After many check on documentation, I finally find a way to fix it : as explained on Gabotronics site, the bootloader is never droped, you just have to reset the firmware to make everything back to normal.
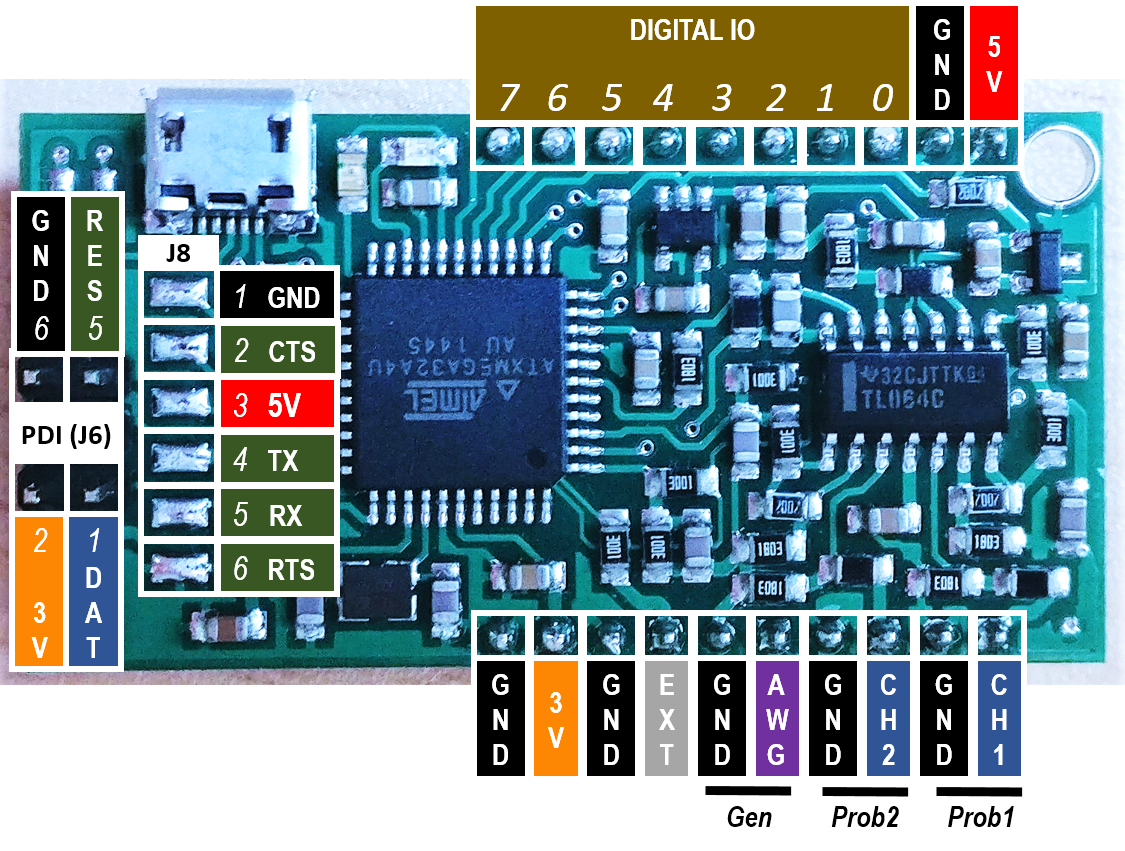
To add / upgrade the firmeware, you first need to "link pin 1 to 6 in J8 connector" but what is the "J8 connector" is not clear. So I have made deep searchs, and finally identified this PIN Diagram :
So yes you have to solder a connector to the 6 soldering points next to the MCU, and then link together the 1st and 6th pins on it before inserting USB. Once connected to computer, you will see a blinking red light : remove the wire from PIN 1 / 6, and start to follow documentation manual about how to upgrade firmeware. As the Atmel website is gone, you have to search into archive.org for the FLIP tool (https://web.archive.org/web/20150929050646if_/http://www.atmel.com/images/JRE%20-%20Flip%20Installer%20-%203.4.7.112.exe) Once restarted everything is back to normal, and this fun little device is ready to go :-)
