These requirements are for the host that is running the Ansible playbooks.
$ brew install hudochenkov/sshpass/sshpass # or other package manager
$ pip3 install jmespath
$ pip3 install ansible_merge_vars
NOTE: I had to specifically brew install ansible@6 and use the master
version of mitogen in order for this to work in 2023.
NOTE: I dont think I actually completed the UEFI functionality of the bootstrap playbooks.
In order to easily be able to merge host specific variables with default variables, we're using ansible-merge-vars. We can use this the following way:
group_vars/servers.yml
# Firewall Configuration.
servers_firewall_allowed_tcp_ports__to_merge:
  - 22
  - 25
host_vars/testbed.addeo.net.yml
# Firewall Configuration.
testbed_firewall_allowed_tcp_ports__to_merge:
  - 3260
server.yml
  # ...
  pre_tasks:
    - name: Merge firewall_allowed_tcp_ports
      merge_vars:
        suffix_to_merge: firewall_allowed_tcp_ports__to_merge
        merged_var_name: firewall_allowed_tcp_ports
        expected_type: list
  # ...
In this example we've got the default firewall configuration that applies to all servers, and a host specific firewall configuration that extends the default. To accomplish this we name our variables we intend to merge with the following convention:
<host or group name>_<final var name>__to_merge
Finally, we merge the variables into the final usable variable in the playbooks
pre_tasks.
This setup is based on this guide and will provision a Debian 11 Bullseye server with ZFS root which is optionally encrypted, and optionally booted via iSCSI.
- The IP addresses used in the setup of the host should be the final desired static IPs for the host.
In order to provision a server with Debian 11 Bullseye with ZFS root first boot to the live cd, and perform the following manual steps to prepare the environment:
- Run through the setup utility, and close out of the Getting Started help page.
- Go to Settings (Drop down in top right corner > Settings) > Power and disable Automatic Suspend so that the server doesn't suspend/shut down during provisioning.
- Go to the Networking Settings and configure the server with a static IP so that Ansible can reboot and continue running commands. Make sure to set the DNS server. Cycle the wired connection in the GUI to switch from DHCP to static.
- (Optional) If booting from ISCSI, also configure the network adapter with the desired static IP address and netmask.
- Open a terminal.
$ gsettings set org.gnome.desktop.media-handling automount false
$ sudo passwd root # Set to 'live'
$ sudo sed -i 's/bullseye main$/bullseye main contrib/g' /etc/apt/sources.list
$ sudo apt update
$ sudo apt install --yes openssh-server
$ sudo sed -i 's/#PermitRootLogin prohibit-password/PermitRootLogin yes/g' /etc/ssh/sshd_config
$ sudo systemctl restart ssh
Now, using the static ip you can ssh into the server using the credentials
root:live.
In order to boot from an iSCSI target, we first need to manually configure the live cd environment to be able to access the target and allow us to determine the disk identifiers for the playbook.
$ ip link set eno1 mtu 9000 # Enable jumbo frames on the SAN NIC
$ apt install --yes open-iscsi
$ systemctl start open-iscsi
$ iscsiadm -m discovery -t st -p <target host ip>
$ sed -i 's/node.startup = manual/node.startup = automatic/g' /etc/iscsi/nodes/<iscsi target id>/<ip info>/default # (tab complete this) e.g iqn.iscsi-test.addeo.net\:lun1/172.1.0.15\,3260\,1/default
$ systemctl restart open-iscsi
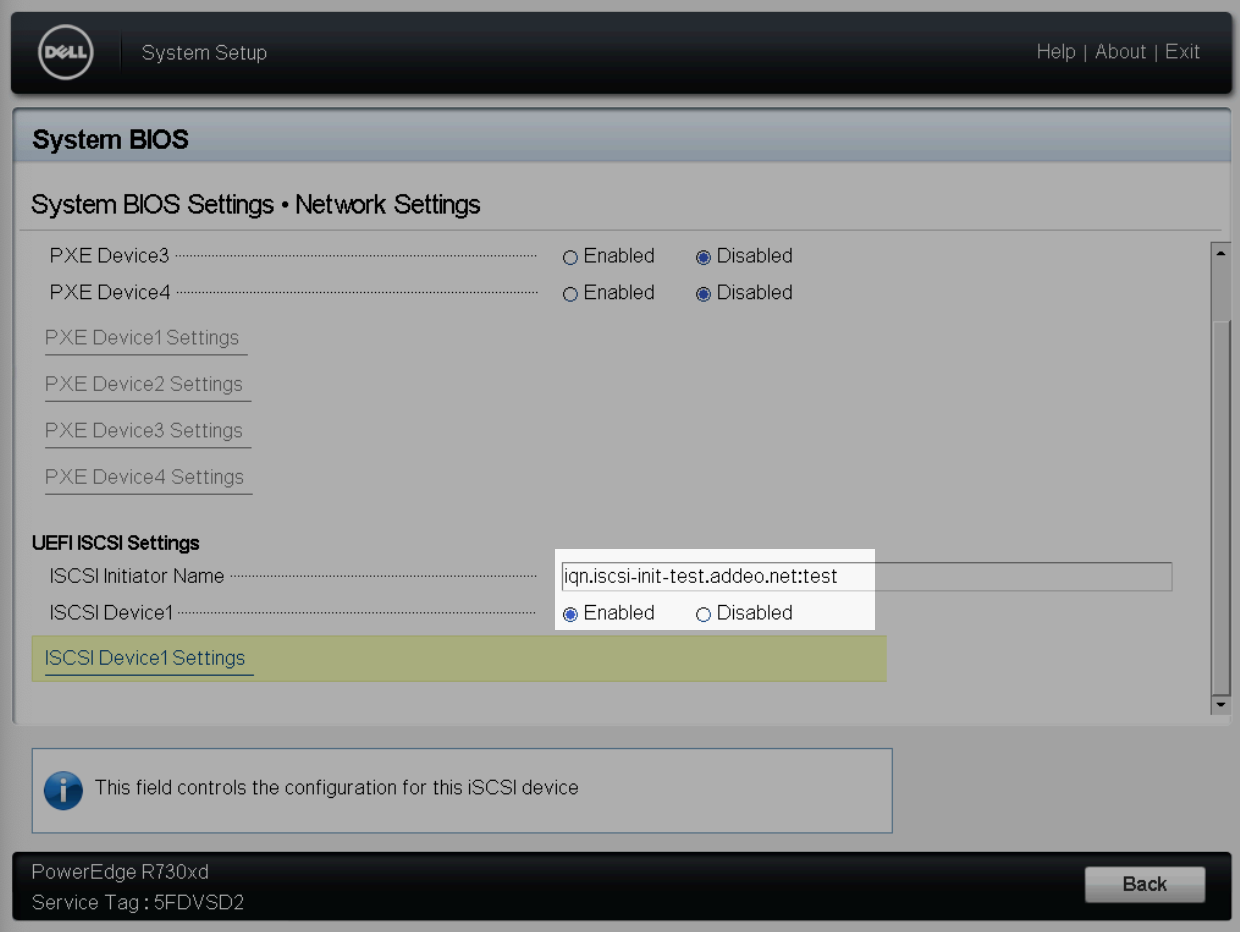
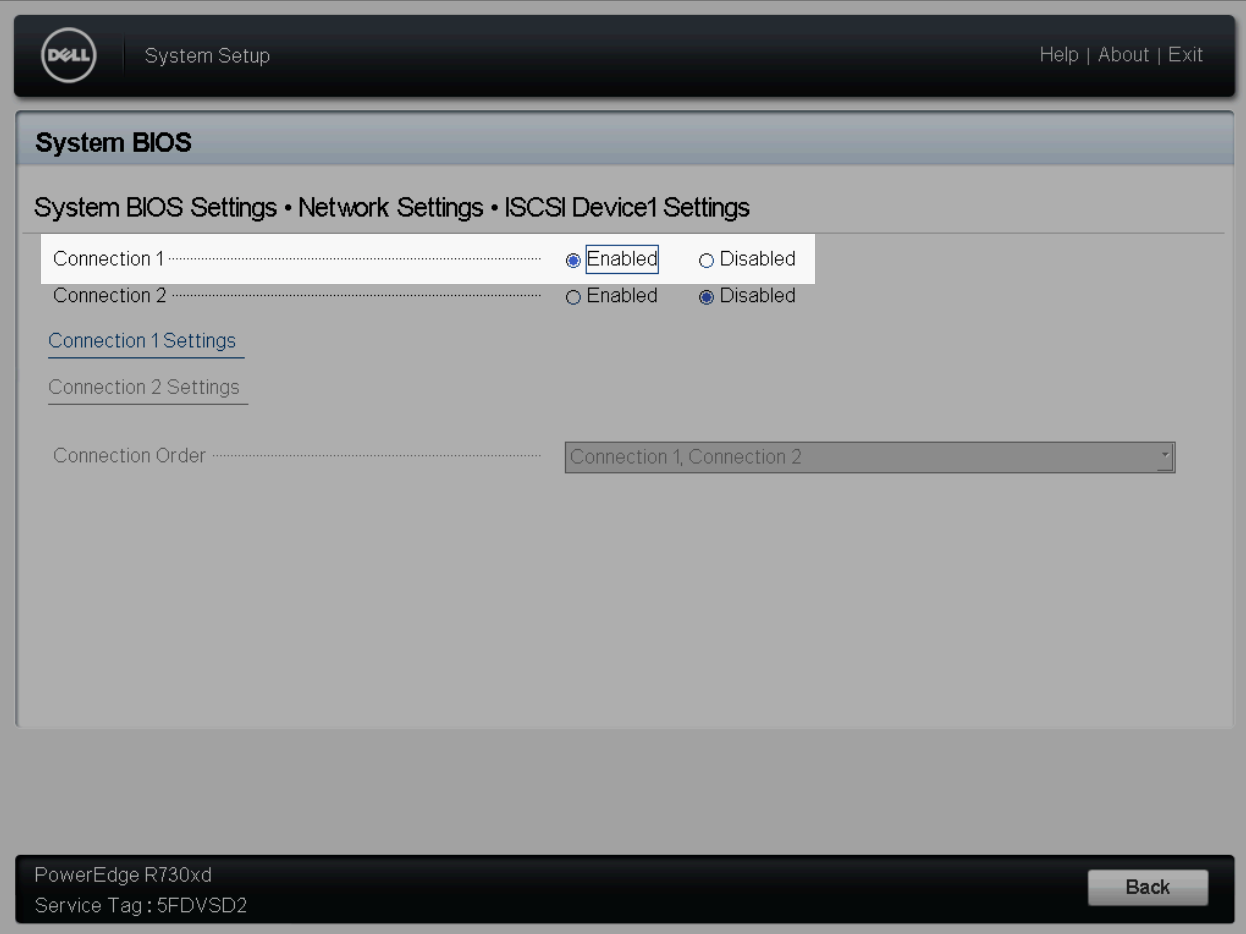
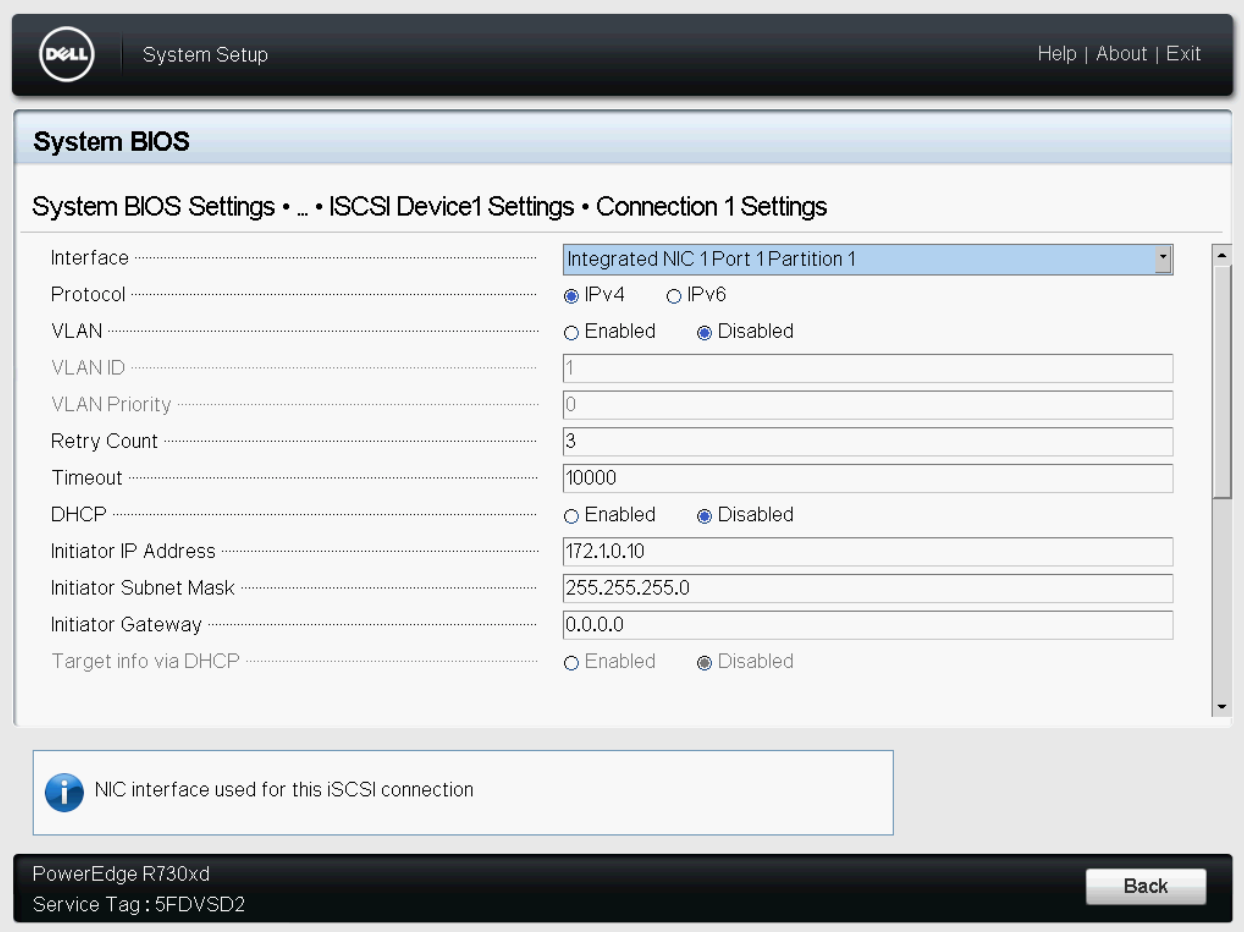
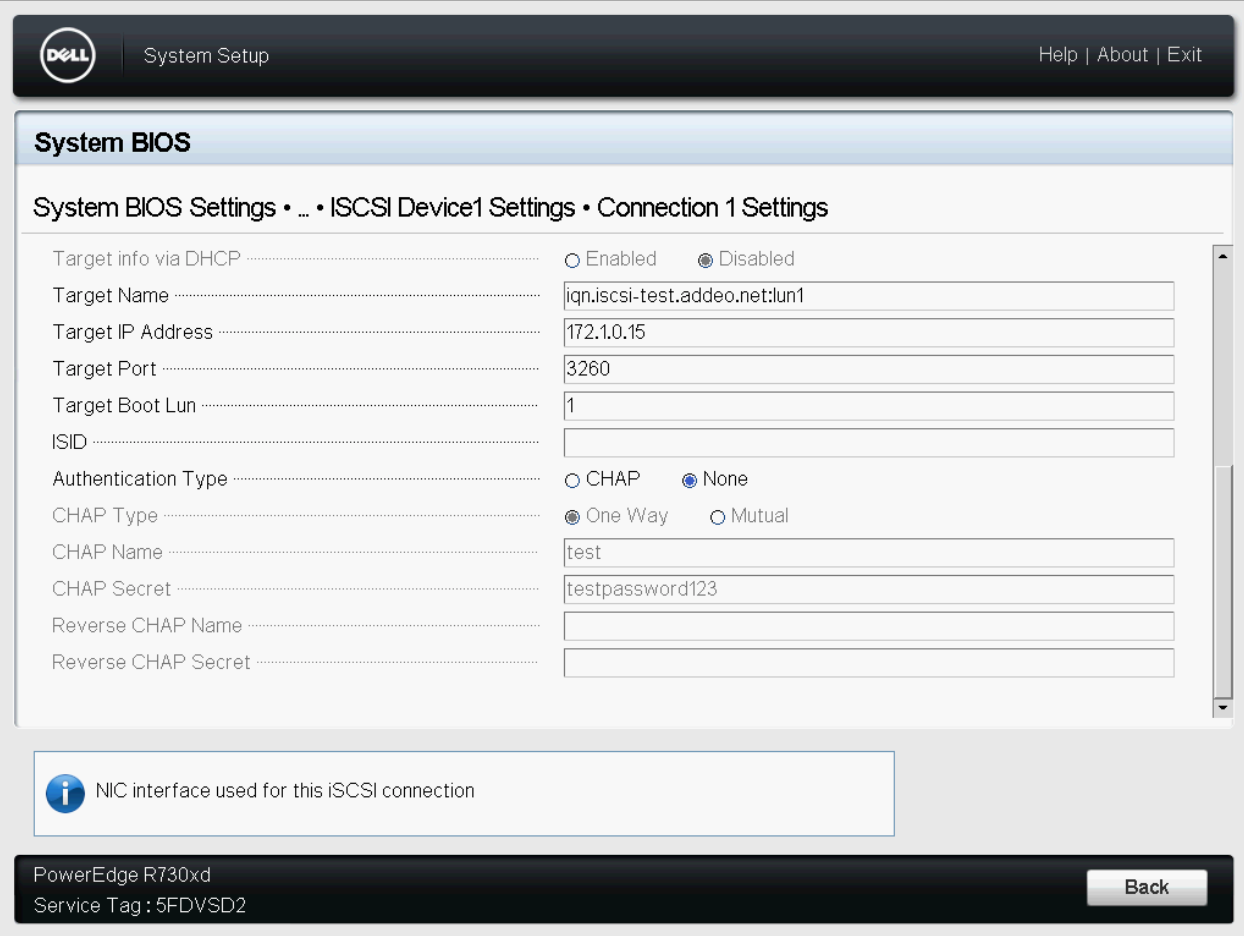
The servers BIOS will also need to be updated to configure booting from the iSCSI target.
Create a new entry in the desired environments playbook and place the new host
in the boostrap group.
[bootstrap]
the.new.host.com ansible_host=10.1.15.65
If the hosts IP address has already been added to DNS, the
ansible_host=10.1.15.65 variable can be omitted.
Next, create a host_vars file for the new host, e.g.
host_vars/the.new.host.com.yml.
Override any of the default bootstrap variables (group_vars/bootstrap.yml) to
configure the host how you like, e.g. enabling ZFS encryption on root, iSCSI
booting, etc.
Next, we need to determine which disks will be used for boot and root and put
their identifiers into the servers host_vars file. We can use fdisk and ls -l /dev/disk/by-id/* to do so. We also need to define the pool type, which can
be: single, mirror, raidz ,raidz2, or raidz3. If using raidzX,
ensure you have the correct number of disks.
zpool_type: mirror
zpool_disk_identifiers:
  - /dev/disk/by-id/scsi-0QEMU_QEMU_HARDDISK_drive-scsi0
- /dev/disk/by-id/scsi-0QEMU_QEMU_HARDDISK_drive-scsi1If booting from iSCSI, you should use ls -l /dev/disk/by-path/* for the disk
identifiers:
zpool_type: single
zpool_disk_identifiers:
- /dev/disk/by-path/ip-172.1.0.15:3260-iscsi-iqn.iscsi-test.addeo.net:lun1-lun-1After you've determined which disks you'll be using, you must manually zap the partition tables:
sgdisk --zap-all /dev/disk/by-id/<disk identifier>
# or
sgdisk --zap-all /dev/disk/by-path/<iscsi target disk path>
Note: This should be run for each disk
Finally, run through each playbook and you'll have a provisioned Debian server
with ZFS root. Two users will be created; ansible and marc. Their passwords
are changeme and should be changed immediately.
$ ansible-playbook -i dev bootstrap/debian-zfs-root-part1.yml -e 'ansible_user=root ansible_ssh_pass=live' --ssh-common-args='-o userknownhostsfile=/dev/null'
$ ansible-playbook -i dev bootstrap/debian-zfs-root-part2.yml -e 'ansible_user=root ansible_ssh_pass=live' --ssh-common-args='-o userknownhostsfile=/dev/null'
$ ansible-playbook -i dev bootstrap/debian-zfs-root-part3.yml -e 'ansible_user=root ansible_ssh_pass=live' --ssh-common-args='-o userknownhostsfile=/dev/null'- Load up a Live CD and run through the steps to prepare the live CD above
- Install ZFS packages as in debian-zfs-root-part1
- sudo zfs import -f rpool
- sudo zfs rollback -rR rpool/root/debian@bootstrap
- reboot
- initramfs will come up, manually import with
zpool import -f rpoolbecause it was previously mounted on another system reboot -f -d 0
no password necessary??
In this setup we're using Shavee to allow us to use a passphrase + YubiKey HMAC for encrypted zfs datasets with MFA.
To add a new encrypted dataset, or decrypt an existing one, you will need to physically be at the server.
$ zfs create -o encryption=on -o keylocation=prompt -o keyformat=passphrase spool/data
# Enter a temporary encryption passphrase.
$ shavee -c -y 1 -z spool/data
# Enter real passphrase.
Next, add the new dataset to the zfs_datasets list on the appropriate
servers host_vars. All other properties of the dataset should be managed via
Ansible going forward.
zfs_datasets:
  spool/data:
    properties:
      quota: 50G
      compression: lz4
      sharenfs: false
      # Encryption is enabled, but is manually managed.
      # encryption: true
    state: present
Finally, add the dataset to the list of shavee targets (replacing / with
-):
shavee_encrypted_datasets:
  - spool-data
And re-run the server playbook:
$ ansible-playbook -i dev server.yml -l <the server hostname> --tags=zfs,shavee


