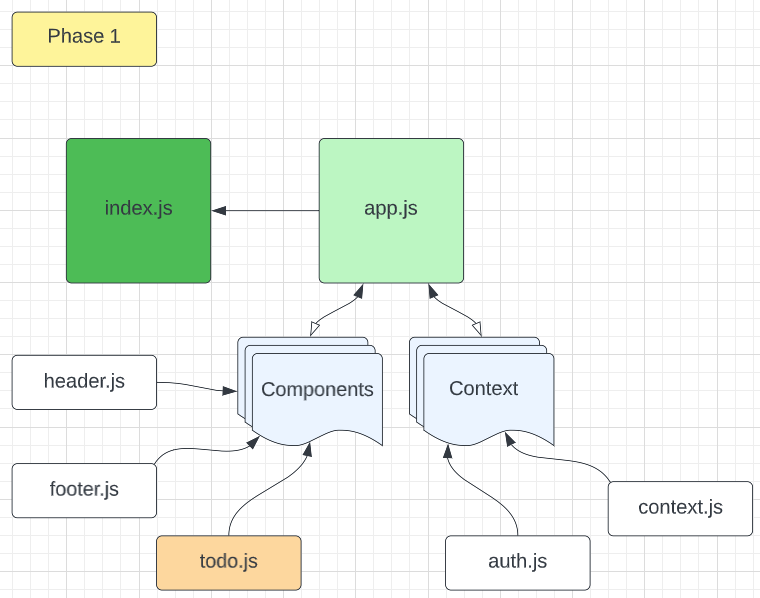
Perform some refactoring of the To Do application as built by another team. This application mixes application state and user settings at the top level and passes things around. It was a good proof of concept, but we need to make this production ready.
-
Style the application using the Blueprint Component API{target:_blank}
-
Properly modularize the application into separate components
-
Implement the Context API to make some basic application settings available to components
-
How many To Do Items to show at once
-
Whether or not to show completed items
-
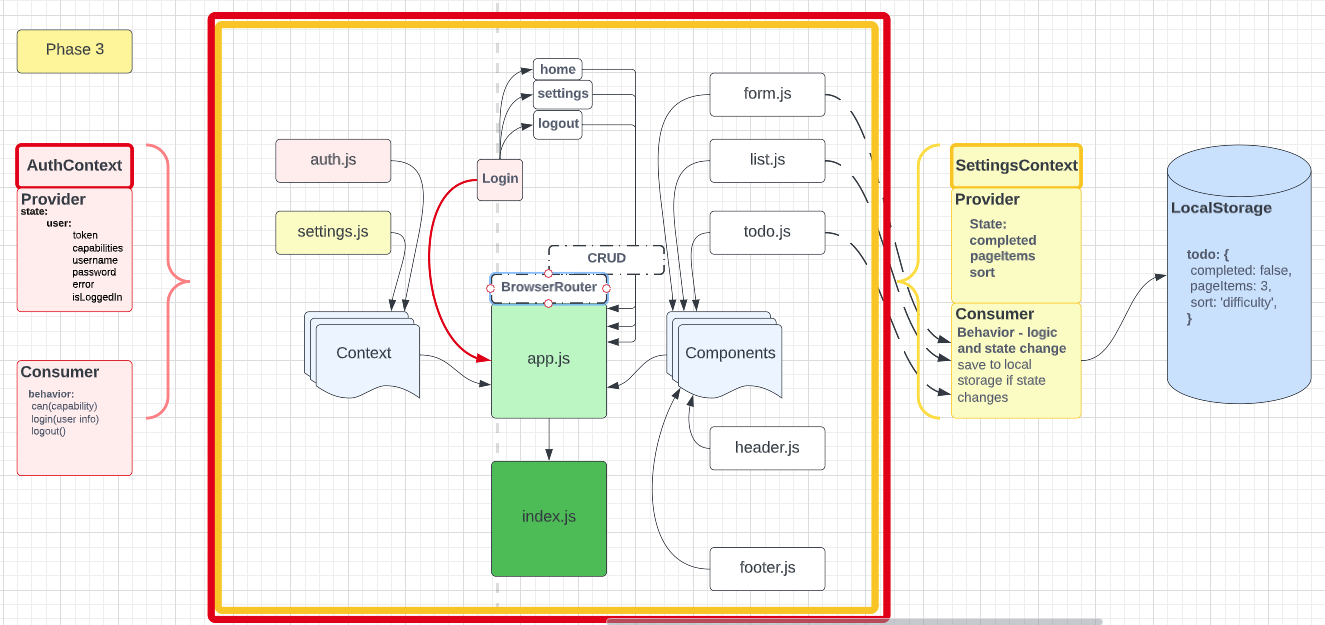
Create a settings Context that can define how our components should display elements to the User.
- Implement the React context API for defining settings across the entire application.
-
Create a context for managing application display settings and provide this at the application level.
-
Display or Hide completed items (boolean).
-
Number of items to display per screen (number).
-
Default sort field (string).
-
Manually set (hard code) those state settings in the context provider’s state, they should not be changeable.
- Consume and utilize context values throughout your components
-
Show a maximum of a certain number of items per screen in the component
- Provide “next” and “previous” links to let the users navigate a long list of items
-
Hide or show completed items in the list
-
Optional: Sort the items based on any of the keys (i.e. difficulty)
Pagination Notes:
-
Only display the first n items in the list, where n is the number to display per screen in your context.
-
If you have more than n items in the list, add a button labeled Next that will replace the list with the next n items in the list.
-
If you are past the first n items (i.e. on page 2 or higher), add a button labeled Previous that will replace the list with the previous n items in the list.
-
-
Tests should assert all behavioral functionality
-
Do a deep mount of the app, and set tests to make assertions on the child components that consume context from the Provider.
- Can they see context?
In Phase 2, we’re going to extend the functionality of our application by allowing the user to make some decisions on how they would like the application to function. Specifically, we’ll let them make changes to 2 settings.
-
Implement the Context API to make some basic application settings available to components
-
How many To Do Items to show at once
-
Whether or not to show completed items
-
-
Provide the users with a form where they can change the values for those settings
-
This should be given in the form of a new component, perhaps linked to from the main navigation
-
Hint: Use Browser Router to create the page/route/component for this
-
-
Save the users choices in Local Storage
-
Retrieve their preferences from Local Storage and apply them to the application on startup
Technical requirements for the core application are unchanged from the prior phases, with the addition of context behaviors defined in our global Context Provider
- Extend your context provider to include all of the following features:
-
Create a context for managing application settings and provide this at the application level.
-
Display or Hide completed items (boolean).
-
Number of items to display per screen (number).
-
Default sort field (string).
-
Create a function in your context that saves user preferences (for the above) to local storage.
-
Implement a useEffect() (or componentDidMount()) in your context to read from local storage and set the values for those 2 state properties on application load.
Note: You will need to stringify your state prior to saving to local storage, and parse it when you retrieve it.
- Consume and utilize Context values throughout your components:
-
Show a maximum of a certain number of items per screen in the component.
- Provide “next” and “previous” links to let the users navigate a long list of items.
-
Hide or show completed items in the list.
-
Optional: Sort the items based on any of the keys (i.e. difficulty).
Pagination Notes:
-
Only display the first n items in the list, where n is the number to display per screen in your context.
-
If you have more than n items in the list, add a button labeled Next that will replace the list with the next n items in the list.
-
If you are past the first n items (i.e. on page 2 or higher), add a button labeled Previous that will replace the list with the previous n items in the list.
-
Extend the functionality of the application by requiring users be logged in to view items and also restrict access based on user type. The user stories from Phases 1, and 2 remain unchanged. For this phase, we are now adding the following new user stories.
-
As a user, I want to provide a way for other users to create new accounts
-
As a user, I want to provide a way for all users to login to their account
-
As a user, I want to make sure that my To Do items are only viewable to users that have logged in with a valid account.
-
As a user, I want to ensure that only fellow users that are allowed to “create”, based on their user type, can add new To Do Items
-
As a user, I want to ensure that only fellow users that are allowed to “update”, based on their user type, can mark To Do Items complete
-
As a user, I want to ensure that only fellow users that are allowed to “delete”, based on their user type, can delete new To Do Items
Technical requirements for the core application are unchanged from the prior phases, with the addition of an Authentication Context Provider and Components that consume the Context Values and Behaviors.
- Implement a Login/Auth React Context, “protect” the To Do application by restricting access to the various application features based on the users’ login status and capabilities.
-
Define a function that can simulate a login event.
- Parameters: username and password as strings.
- Sets a User on the auth context, and changes login status to true.
-
Define a function that can simulate a logout event.
- Resets the User object and changes login status to `false.
-
Define a function that can authorize a User based on a capabilty.
-
Parameters: a capability as a string.
-
Returns a boolean whether the user has the capabililty parameter.
-
- Create an component with the following features:
-
Given a capability prop of type string, conditionally render components based on the user stored in context.
-
Hide the entire interface until the user has logged in.
-
Implements the following RBAC rules:
-
Logged In Users with ‘read’ permissions can see the summary/count.
-
Logged In Users with ‘read’ permissions can see the list of To Do Items.
-
Logged In Users with ‘update’ permissions can click the records to mark them as complete.
-
Logged In Users with ‘create’ permissions can create new items.
-
Logged In Users with ‘delete’ permissions can delete items.
-
- Implement a Component that has the following features:
-
Provide an account login screen with a form.
-
Accepts Username and Password
-
On successful login, store the token as a cookie
-
-
If a user returns and has a valid login cookie, hide the login form and consider them “Logged In”
- Display a logout button instead of a form if they are “Logged In”.
In Phase 4, we will finalize the functionality of the application by connecting to live servers for login, authorization, and data access
Technical requirements for the core application are unchanged from the prior phases, with the addition of Performing actual HTTP requests with an Authenticated API server:
- Alter the Add, Toggle Complete, and Delete functions within your to do application to use your API instead of in memory state.
-
Fetch the current list of items from the database on application start
-
Whenever you add/update/delete an item, refresh the state so the user can instantly see the change
-
Consider: Do you re-fetch from the server every time you make a change?
-
If so, how?
-
If not, how will you stay in sync?
-
-
- Alter the Login Context to use the server to login users instead of our mock users list.
- Be sure to store the token in state as well as in a cookie so you can reference it later.
-
You will need deployed API Server, which implements a todo item data model
-
GET /todo: Gets a list of all items
-
‘POST /todo’: Adds an item
-
‘PUT /todo’: Updates an item (you’ll use this to mark them as complete)
-
‘DELETE /todo/:id’ : Deletes an item
-
-
You will need a deployed Authenticated API Server, which supports:
-
Registration (/signup)
-
Login (/signin)
-
Authorization (via Bearer Token)
-
ACL (using user roles)
- Make sure you have created the user roles and permissions lists that your front-end is expecting to tap into
-
To Do data model for storing the actual to do items
-
Abdinasir Yussuf
Ryan Gallaway
Beau Hibbert
Dylan Ullrich
Elizabeth Hammes
Cody Davis
Bryant Davis
Brady Davenport

