$ npm install react-native-sweet-alert --save
$ react-native link react-native-sweet-alert
In the AndroidManifest.xml file
Below this line:
xmlns:android="http://schemas.android.com/apk/res/android"
add this:
xmlns:tools="http://schemas.android.com/tools"
And in the <application> tag, add this property:
tools:replace="android:icon"
so it will look like:
<application
  android:name=".MainApplication"
  android:allowBackup="true"
  android:label="@string/app_name"
  android:icon="@mipmap/ic_launcher"
  tools:replace="android:icon"
  android:theme="@style/AppTheme">
Since the vendor library is written in Swift, apart from doing usual react-native link react-native-sweet-alert, you will also have to create a Bridging Header for Swift file, which is also pretty easy:
-
ou have to create at least a
.swiftfile in your project. It can be an empty Swift file, but it must exist. After that, XCode will ask you to "Create bridging header?" which enables Swift Bridging Header in Build Settings below. -
Open the project with XCode (don't forget to open XCode, since using other editors won't be enough), create a new
.hfile. I recommend to create something like<Your-App-Name>-Bridging-Header.h, for example, if your app is namedCuteApp, then it should beCuteApp-Bridging-Header.h -
Paste in following code into that newly created
.hfile:
#import <React/RCTBridgeModule.h>
#import <React/RCTEventEmitter.h>
#import <React/RCTViewManager.h>
#import <React/RCTConvert.h>
#import <React/RCTUtils.h>
Or you can just see Example-Bridging-Header.h and copy and paste in.
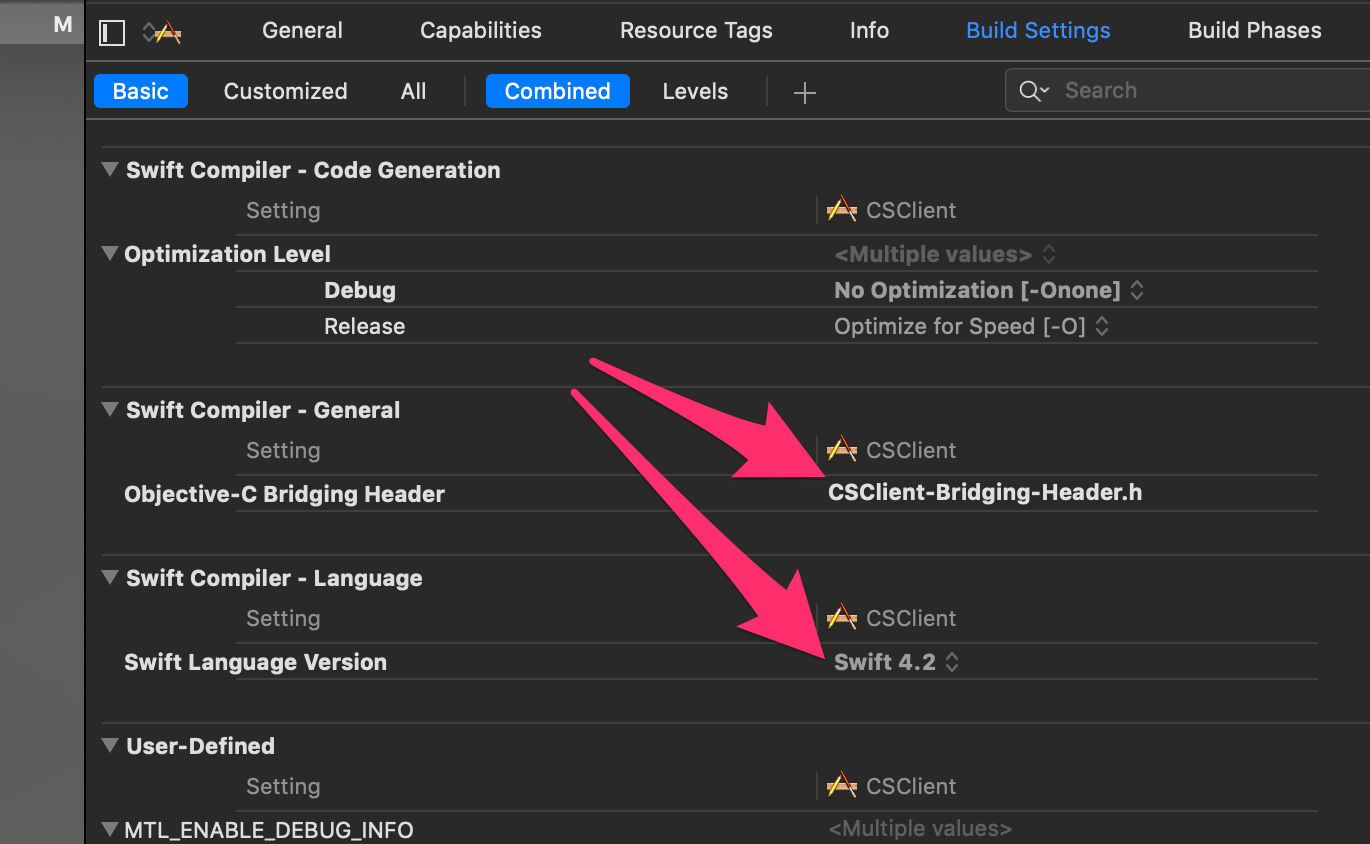
- In XCode, make sure you chose your app target. Go to
Build Settings:
- Now to the important part: In
Objective-C Bridging Header, double-click on it and type in your created.hfile earlier. In the above example it isCuteApp-Bridging-Header.h.
-
Make sure the path is relative. For example, if
CuteApp-Bridging-Header.his iniosfolder, you only have to typeCuteApp-Bridging-Header.h, but if it's in a sub-folder, you have to add the path too, e.g:some-path/CuteApp-Bridging-Header.h. -
In
Swift Language Version, choose4.2. Yeah I had to convert the syntax of original library from Swift 2 to Swift 4.
And then you can use the library like so:
import SweetAlert from 'react-native-sweet-alert';
SweetAlert.showAlertWithOptions({
  title: '',
  subTitle: '',
  confirmButtonTitle: 'OK',
  confirmButtonColor: '#000',
  otherButtonTitle: 'Cancel',
  otherButtonColor: '#dedede',
  style: 'success',
  cancellable: true
},
  callback => console.log('callback'));
-
The first parameter is dialog option with above available properties. Please note that
confirmButtonColorandotherButtonColoris only available on iOS. -
The second parameter is callback, which returns a boolean value. Use it as you wish.
resetCount() Reset the counter of the progress.
isSpinning(): Promise Get spinning status of the progress bar.
spin(): Start spinning.
setBarColor(type: string) Changes the progress bar color. Argument must be a hex color string like #ff0000
MIT License
Copyright (c) 2018 Clip-sub
Permission is hereby granted, free of charge, to any person obtaining a copy of this software and associated documentation files (the "Software"), to deal in the Software without restriction, including without limitation the rights to use, copy, modify, merge, publish, distribute, sublicense, and/or sell copies of the Software, and to permit persons to whom the Software is furnished to do so, subject to the following conditions:
The above copyright notice and this permission notice shall be included in all copies or substantial portions of the Software.
THE SOFTWARE IS PROVIDED "AS IS", WITHOUT WARRANTY OF ANY KIND, EXPRESS OR IMPLIED, INCLUDING BUT NOT LIMITED TO THE WARRANTIES OF MERCHANTABILITY, FITNESS FOR A PARTICULAR PURPOSE AND NONINFRINGEMENT. IN NO EVENT SHALL THE AUTHORS OR COPYRIGHT HOLDERS BE LIABLE FOR ANY CLAIM, DAMAGES OR OTHER LIABILITY, WHETHER IN AN ACTION OF CONTRACT, TORT OR OTHERWISE, ARISING FROM, OUT OF OR IN CONNECTION WITH THE SOFTWARE OR THE USE OR OTHER DEALINGS IN THE SOFTWARE.


