map-stylizer
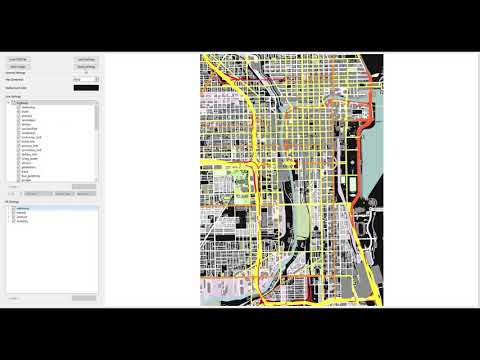
GUI written in Python to parse OSM (OpenStreetMap) files and render them onscreen. Layers may be toggled on/off and drawing may be customized.
This program allows a user to render OSM files within the GUI. The GUI enables the user to easily modify which layers are visible and the style of these layers.
Basic Demo Video
Steps
- Download the source code open the program by typing
python main.pyin the command line. - Open your browser of choice to OpenStreetMap.
- Click the "Export" tab and select the "Manually select a different area" link. Shape and place the box over the region from which you want map data. Click "Export" to download the OSM file for the box you've drawn. If you get an error that you've selected too many nodes, you may alternatively click "Overpass API."
Note: Ensure your downloaded OSM file is around 30MB. Larger files will noticeably slow the program. - Open your OSM file using the GUI.
- Edit away!
Editing
- Choose which layers you want visible
Note: Layers are grouped by OSM keys (i.e., "highway," "waterway," etc.) - Change the style of line or fill layers
- Line layers are QPen objects, so you can specify the line's width, color, style, cap style, and join style
- Fill layers are QColor objects, so you can only specify their color
- When you save an image, the resulting configuration is saved into the "configs" folder so you can reimport these settings for another project
- You can also automate the creation of configurations via your own script, where you use the Configuration class to set colors of layers en masse
Adding Additional Layers
When you import an OSM file and begin manipulating it, you will likely notice warnings on your command prompt indicating there are additional layers not rendering because they need to be added. This is okay, as I've added the majority of layers you would be interested in; however, if you would like to add the layers mentioned, follow the below steps:
- In the constants.py file:
- Create a unique (both variable name and variable value) VAL variable under the appropriate KEY group
- Create a unique (both variable name and variable value) CONFIG_STYLE variable under the appropriate KEY group
- Connect the new VAL and new CONFIG_STYLE in the DATA_GROUPS dictionary
- Finally, in the configuration.py file, connect the CONFIG_STYLE to a QPen (for a layer to be rendered as a line) or QColor (for a layer to be rendered as a fill)