ACTORS is a small framework explicitly built for Unity3d. It is used to ease the pain of decoupling data from behaviors without tons of boilerplate code. It relies on Unity3d scripting monobehavior concept but without unnecessary overhead.
WARNING : README is outdated.
 public class ActorPlayer : Actor, ITick
{

	[FoldoutGroup("Setup")] public DataMove dataMove;

    	     protected override void Setup()
		{
			Add(dataMove);
			Add<BehaviorInput>();
		}

} [System.Serializable]
public class DataMove : IData
{
public float x;
public float y;
public void Dispose()
{
}
} public class BehaviorInput : Behavior, ITick
{
[Bind] private DataMove dataMove;
public override void OnTick()
{
dataMove.x = Input.GetAxis("Horizontal");
dataMove.y = Input.GetAxis("Vertical");
}
}
- Setup
- Basic stuff
From Source
- Clone this repo and open it as a new Unity3D project.
The project consists of several folders :
- [-]Common : for in-house libraries, framework pluggables.
- [0]Framework : the framework code. You generally don't need to touch here anything.
- [1]Source : the game code.
- [2]Content : the game content such as scenes, graphics, audio and so on.
- [3]ThirdParty : libraries you use from asset store.
- Plugins : unity3d plugin folder.
The framework heavily rely on Unity3D additive scenes. To use it in the way it was designed you need to make some preparations.
-
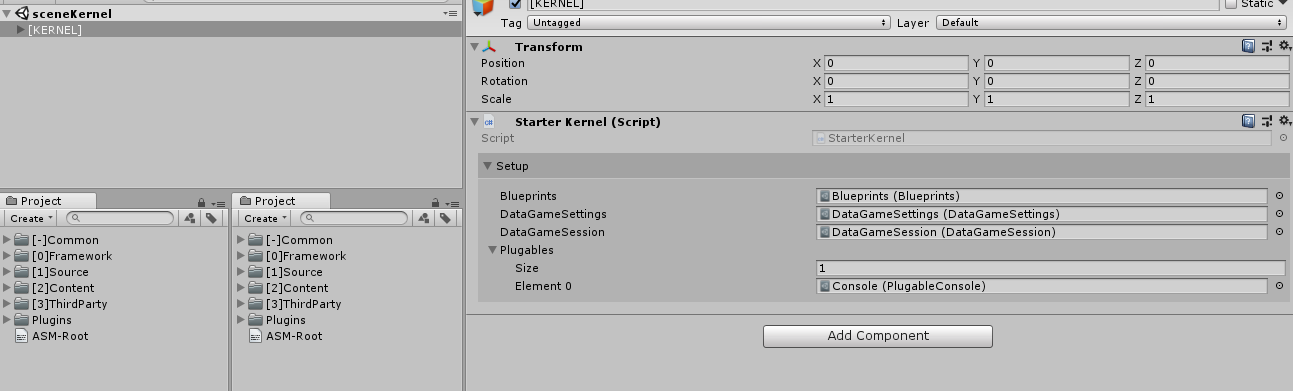
Open sceneKernel scene. You can find it in Assets/[2]Content/Scenes It has one transform in the view called [KERNEL] - this is the root object of all your game. For convenience, I've attached the camera to it ( but you don't have to if you don't want )
-
Look on StarterKernel script attached to [KERNEL]. By starters, I call scripts that initialize your game, libraries, and scenes.
StarterKernel has few public variables you can set up:
- ScriptableObject Blueprints: a blueprint is a container for all game blueprints. I call customizable game-data scriptable object as "blueprint.
- ScriptableObject DataGameSettings: use this to add some game settings related stuff.
- ScriptableObject DataGameSessiom : in-game session blackboard. Customize it as you need.
- Pluggable: a list of all used pluggables. Pluggable is a wrapper for a custom third-party asset you want to link with game and framework and initialize from the start. By default, you have a pluggable called PlugableConsole that add debug game console in the project.
Add new scenes in game from File->New Scene command. You will notice that scene will be generated differently from normal unity3d scene setup. A scene doesn't have camera or light. It's because you add them additively from other scenes. ( sceneKernel by default )
All scenes have essential objects that you don't want to change.
- [SETUP]: this is a root object for starter scripts and any settings related objects.
- [SCENE]: this is a root object for your game-related game objects in a scene. Put all your level here.
- [SCENE]/Dynamic: this is an object to hold all game objects that will be created at runtime. It's essential to separate loaded stuff from static to ease the process of debugging in hierarchy view.
A starter is a monobehavior component that you attach to [SETUP] game object. Starter controls scene loading&setup. You can inherit from starter component to extend it and add your custom logic. For example "startLevelOne."
Starter variables :
- Factories: by a factory, I call scriptable object that handles of creating complex objects. (For example factory player - spawn player object + spawn and setup player UI bars: hp, attack and so on.)
- Scenes to keep: add scenes you want to save after this scene close. Usually, you would always want to save sceneKernel.
- Scenes depend on: scenes that need to be added when this scene starts. Typically, you would always want to depend on sceneKernel.
Each time you create and save a new scene it will be automatically added to build settings and a new scriptable object will be created at path [2]Content->Scenes called as data_YOURSCENENAME this is the objects that you put in the starters to Scenes to keep/Scenes depend on.
The Scenes.cs script will be autogenerated after saving scene at path [-]Common->Scenes.cs - it's a special helper type that allow to choose scenes in code with ease without typing the string name or knowing index.
To manually generate data_scenes and refresh scenes.cs click on Scenes Names->Save Scenes Names in options.
It's super simple. Use extension method TO after scene name that you get from Scenes.cs
Scenes.sceneLevel1.To();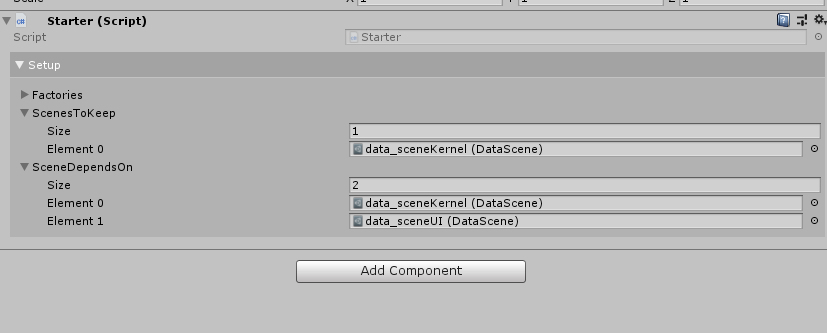
So from this point we are ready to go and add new gameobjects.
Instead of using Monobehaviors it's recommended to use Monocached classes. You can customize destroy time and pool type for your object. If pool is set the object will be deactivated and cached. If pool is set to none the object will be destroyed. Pooling is a great concenpt for objects that instantiate constantly. Bullets for example.
Base class for your game actors. Inherit from Monocached. It's basically a container for your data and behaviors. When you want to add new game entity inherit from Actor. For Example: ActorPlayer : Actor. Actor is the ONLY game-logic monobehavior you will need on the game object.
// inherit from Actor. Inherit from ITick interface to mark that this object must be updated.
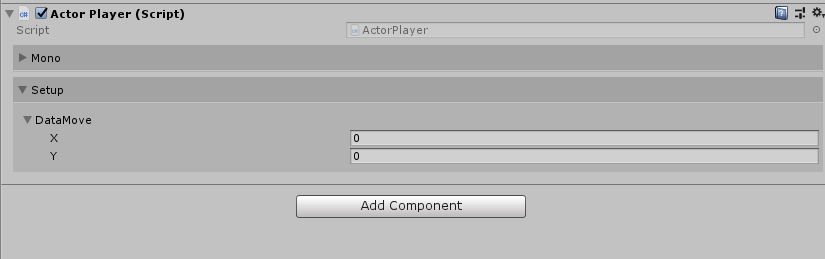
public class ActorPlayer : Actor, ITick
{
// add serializable data classes to ActorPlayer so we can inspect them in the Inspector
// Use [FoldoutGroup("Setup")] to make nice foldable groups of variables in the inspector
[FoldoutGroup("Setup")] public DataMove dataMove;
// Use protected override void Setup to initialize Actor.
// Setup is used to add data into Actor's container and create behavior scripts for an Actor.
protected override void Setup()
{
// use Add(object) to add already created object into Actor's container. For example data.
Add(dataMove);
// use Add<T>() to create new object and add into Actor's container. For example behavior.
Add<BehaviorInput>();
}
}
You don't need to write any logic inside of actor classes. Use behavior classes instead. Normally your actor class should look like this:
	public class ActorHero : Actor, ITickFixed, ITick, ITickLate
	{
		[FoldoutGroup("Setup"), SerializeField]
		private DataBlueprint dataBlueprint;
		[FoldoutGroup("Setup"), HideInInspector, SerializeField]
		private DataAnimationState dataAnimationState;
		[FoldoutGroup("Setup"), SerializeField]
		private DataInput dataInput;
		[FoldoutGroup("Setup"), SerializeField]
		private DataHealth dataHealth;
		[FoldoutGroup("Setup"), SerializeField]
		private DataDepthRender dataDepthRender;


		protected override void Setup()
		{
			Add(dataBlueprint);
			Add(dataAnimationState);
			Add(dataDepthRender);
			Add(dataHealth);
			Add(dataInput);

			Add<DecorateDamageReturn>();
			Add<DecorateBloodFloor>();
			Add<DecorateDamageBlink>();
			Add<DecorateBloodSplats>();

			Add<BehaviorTurn>();
			Add<BehaviorMove>();
			Add<BehaviorRoll>();

			Add<BehaviorPlayerInput>();
			Add<BehaviorDamageble>();

		}
}When you are working with actors/behaviors use Get instead of GetComponent. Get method tries to find component inside of actor container. Example:
Get<DataMovement>().facingYou can get unity components as well by adding path to child transform
labelScore = Get<TextMeshProUGUI>("anchor_left/label_score");Data components are serializable, plain c# classes inherited from IData interface. All game variables are held in data components. The same data components may be shared through various of behaviors.
// Always put [System.Serializable] to all data components and be sure to inherit from IData
	[System.Serializable]
    // Inhe
	public class DataMove : IData
	{
		public float x;
		public float y;

		public void Dispose()
		{
		}
}Sometimes your data containers might need extra setup from code instead of Unity3d Inspector. In this case, use this interface for your data components. When data component is added to an actor he will check all components for ISetup interface and trigger them.
	[System.Serializable]
	public class DataMove : IData, ISetup
	{
		public float x;
		public float y;

		public void Dispose()
		{
		}

		public void Setup(Actor actor)
		{
			x = actor.selfTransform.position.x;
		}
}Behaviors are plain c# classes that need data components to work and can't live without actors. Behaviors are workhorses of actors and define how actor behaves.
// Inherit from ITick to mark this behavior for updates
		public class BehaviorInput : Behavior, ITick
	{
        // use [Bind] attribute for lazy initialization from Actor
		[Bind] private DataMove dataMove;

        // Update analogue, populating dataMove variables.
		public override void OnTick()
		{
			dataMove.x = Input.GetAxis("Horizontal");
			dataMove.y = Input.GetAxis("Vertical");
		}
	}
Signals are in-memory publish/subscribe system and effectively replace Unity3d SendMessage. There are two layers of signal disptachers : local is implemented inside Actor class. Global can be reached from ProcessingSignals.Default.
Steps to use signals :
- Create a new structure. I prefer to call them like SingalYourName. The structure holds all your arguments you want to pass.
public struct SignalCameraShake
{
	public int strength;
}- Add an IReceive to an object interested in receiving your signal. T is a type of your signal. A method HandleSignal(T arg) will be added to your script. It's an entry point for your signal.
  public class ProcessingShakeCamera : IDisposable, IMustBeWipedOut, IReceive<SignalCameraShake>
  {
	public void HandleSignal(SignalCameraShake arg)
		{
			if (arg.strength == 0)
				tweenShakeAverage.Restart();
			else if (arg.strength == 1)
				tweenShakeStrong.Restart();
			else if (arg.strength == 2)
				tweenShakeVeryStrong.Restart();
		}
}- Add subscription to your signal dispatcher.
  public class ProcessingShakeCamera : IDisposable, IMustBeWipedOut, IReceive<SignalCameraShake>
  {

	public ProcessingShakeCamera()
		{
		        // subscribe this object on global signal dispatcher.
			ProcessingSignals.Default.Add(this);
	        }

	public void HandleSignal(SignalCameraShake arg)
		{
			if (arg.strength == 0)
				tweenShakeAverage.Restart();
			else if (arg.strength == 1)
				tweenShakeStrong.Restart();
			else if (arg.strength == 2)
				tweenShakeVeryStrong.Restart();
		}
}- Provide unsubscribe logic
  public class ProcessingShakeCamera : IDisposable, IMustBeWipedOut, IReceive<SignalCameraShake>
  {

	public ProcessingShakeCamera()
		{
		        // subscribe this object on global signal dispatcher.
			ProcessingSignals.Default.Add(this);
	        }

	public void HandleSignal(SignalCameraShake arg)
		{
			if (arg.strength == 0)
				tweenShakeAverage.Restart();
			else if (arg.strength == 1)
				tweenShakeStrong.Restart();
			else if (arg.strength == 2)
				tweenShakeVeryStrong.Restart();
		}

		// We don't want object to recieve signals when it's destroyed.
			public void Dispose()
		{
		        // Unsubscribe
			ProcessingSignals.Default.Remove(this);
		}

  }
Please note that you don't need to implement subscribe/unsubscribe logic that when you inherit from behavior or actor class. Just add IReceive interfaces :
	public class DecorateDamageBlink : Behavior, IReceive<SignalDamage>
  {

  	public void HandleSignal(SignalDamage val)
  	{
  		Blink();
  	}

}There are several interfaces in the framework to extend entity functionality.
The framework use single monobehavior update for ALL entities. Because of that we don't use any Update methods in actors/behaviors. Instead we mark actors and behaviors with interfaces to define update type. Use ITick if you have code that needs to run per frame.
public class BehaviorExample : Behavior, ITick{
    public override void OnTick() { }
}Use it when you have code that needs to run every fixed framerate frame.
public class BehaviorExample : Behavior, ITickFixed{
    public override void OnTickFixed() { }
}Use it when you have code that needs to run after all other updates.
public class BehaviorExample : Behavior, ITickLate{
    public override void OnTickLate() { }
}Use it when you want mark class as a data container. Remember that you need use [System.Serializable] attribute for data containers.
[System.Serializable]
public class DataExample : IData{
    public override void Dispose() { }
}Sometimes your data containers might need extra setup from code instead of Unity3d Inspector. In this case, use this interface for your data components. When data component is added to an actor he will check all components for ISetup interface and trigger them.
[System.Serializable]
public class DataRender: ISetup, IData
{
	public MaterialPropertyBlock matPropBlock;
	public int ID = 0;

	public void Setup(Actor actor)
	{
			var rend = actor.Get<SpriteRenderer>("view");
			matPropBlock = new MaterialPropertyBlock();
			rend.GetPropertyBlock(matPropBlock);
	}

	public void Dispose()
	{
		source = null;
	}
}
IMustBeWipedOut interface marks processings that must be cleaned from toolbox when scene changed.
  public class ProcessingShakeCamera : IDisposable, IMustBeWipedOut
  {
  }
IReceive interface is used when you want entity to recieve a signal with type of T from local signal dispatcher. IReceive normally used inside of Actors for local communication.
  public class ProcessingShakeCamera : IDisposable, IMustBeWiped, IReceive<SignalCameraShake>
  {
	public void HandleSignal(SignalCameraShake arg)
		{
			if (arg.strength == 0)
				tweenShakeAverage.Restart();
			else if (arg.strength == 1)
				tweenShakeStrong.Restart();
			else if (arg.strength == 2)
				tweenShakeVeryStrong.Restart();
		}
  }
IReceiveGlobal interface is used when you want entity to receive a signal with type of T from global signal dispatcher.
  public class ProcessingShakeCamera : IDisposable, IMustBeWiped, IReceiveGlobal<SignalCameraShake>
  {
	public void HandleSignal(SignalCameraShake arg)
		{
			if (arg.strength == 0)
				tweenShakeAverage.Restart();
			else if (arg.strength == 1)
				tweenShakeStrong.Restart();
			else if (arg.strength == 2)
				tweenShakeVeryStrong.Restart();
		}
}The toolbox is a singleton that contains all processings, global data and everything you want to get from global access. Think of toolbox as a "global actor."
To add a new instance of a class to a toolbox use Add method Example:
Toolbox.Add<ProcessingInputConnect>();To get something from a toolbox use Get method Example:
data = Toolbox.Get<DataGameSession>();Processing more known as "managers," "controllers." Processings are classes that can be used like systems in ECS or to do some global work. For example, camera follow script is a good candidate for processing script.
There are few predefined processings in the framework. You can find them in StarterKernel script. The best place to add your custom processings is Starter scripts or pluggables.
Processings must live only inside of a toolbox.
Typically, processing should be inherited from ProcessingBase, but it's ok to use them without a base. Processing base is required to use the script as an ECS system. Also, it automates routine of subscribing/unsubscribing for signal events.
public class ProcessingGroupEnemies : ProcessingBaseThe IMustBeWiped interface says to the toolbox that this processing must be destroyed when the scene changed. Usually, you would use it with all "local" processing scripts that are related to one scene only. Sometimes it's better to kill object and recreate it in the new scene.
public class ProcessingGroupEnemies : ProcessingBase, IMustBeWipedUse IDisposable interface when you want to clean processing object before destroying it.
public class ProcessingShakeCamera : IDisposable, IMustBeWiped
{

	        private Tween twShakeFromShootCamera;
		private Tween twShakeAverage;
		private Tween twShakeStrong;
		private Tween twShakeVeryStrong;


		public ProcessingShakeCamera()
		{
			ProcessingSignals.Default.Add(this);
                }

	        public void Dispose()
		{
			ProcessingSignals.Default.Remove(this);
			twShakeFromShootCamera.Kill();
			twShakeAverage.Kill();
			twShakeStrong.Kill();
		}
}
Don't use IDisposable when inheriting from ProcessingBase. It's already included there, and you get virtual method OnDispose to make all necessary cleaning.
Don't forget to use ITick, ITickFixed, and ITickLate interfaces with processings you want to be updated per frame. Use ProcessingUpdate.Default.Add to register this object as Tickable.
ProcessingUpdate.Default.Add(this);// don't forget to mark type of update. Here we use ITickLate
public class ProcessingCameraFollow : ProcessingBase, ITickLate, IMustBeWiped{
public ProcessingCameraFollow()
{
transformCamera = Camera.main.transform;
// use ProcessingUpdate.Default.Add to register this object as Tickable.
// In our example it will be added as TickLate
ProcessingUpdate.Default.Add(this);
}
}The framework wouldn't work without some predefined processings, and you should know about them as you will use them a lot.
Important processing that controls all updates in game. When ProcessingUpdate is created it adds a ComponentUpdate monobehavior inside of [KERNEL] root object to get Unity Update methods. All actors,timers,processings should work from ProcessingUpdate.
While Monobehavior update method can be used only with inherited mono components, you can use ProcessingUpdate with ANY script. You can do that in 2 steps:
- Inherit from interaces you need.
- ITick for Update
- ITickFixed for FixedUpdate
- ITickLate for LateUpdate
- Call ProcessingUpdate.Default.Add(this); in script, somewhere in initializing.
- Normally, all updates are killed when scene changes but if you want to kill Update earlier call ProcessingUpdate.Default.Remove(this);
public class MyCustomClass : ITick{

 public MyCustomClass(){
   ProcessingUpdate.Default.Add(this);
 }

 public void Tick(){

 }

}Every time you create/destroy object memory is allocated. The more complex object is the bigger allocation will be. It's not a big deal to create the object once or several times, but when you need to spawn hundreds of objects, or you want to generate them rapidly, you want to use object pooling. You can find more info about pooling on Unity3d site.
There are two types of pools in the Framework :
- For gameobjects - any game related game objects on a scene with monobehavior classes.
- For c# objects - any plain c# classes. For example timers.
The control of gameobject pool goes through the ProcessingGoPool script and PoolStash script. Pools are predefined and included inside monocached objects. There are 4 types of gameobject pools:
- Pool.UI - for any UI related entities
- Pool.Projectiles - for any fx, small objects such as bullets.
- Pool.Entities - for gameobjects and actors
- Pool.Audio - for audiosource gameobjects
You can add more pool types through ProcessingGoPool if you want.
Step one. Choose your actor or monocached object in the inspector. Open Mono foldout group. Set pool time you want.
Thats all. For now on when you will try to destroy object it will be deactivated and send to desired pool instead. In your scene you may notice [POOLS] object. This object holds all deactivated entities for you.
Step two. ( Optional ) In case you want to provide some particular logic when object spawned/despawned inherit your class from IPoolable interface. It's needed most when you want to reset object states. You don't want your enemy to spawn with zero HP for example.
public class ActorEnemy : Actor, ITick, IPoolableThen add override methods to behaviors that are used with this Actor:
protected override void OnSpawn(){}protected override void OnDespawn(){
}If you override from Actor class don't forget to add base.OnSpawn()/OnDespawn() You need to do that because of base Actor class loops through behaviors and pass OnSpawn/OnDespawn methods to them.
protected override void OnSpawn(){
base.OnSpawn();
}
protected override void OnDespawn(){
base.OnDespawn();
}In this way, if you plan and design carefully, you can do pooling for even very complex objects.
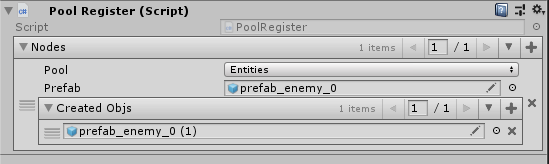
If you added objects to the scene via edit mode and you want them to be part of the pooling routine add PoolRegister component. I usually attach it to [SETUP] object. That define pool nodes: set pool type, prefab of the object from Project ( not from the scene ) And a list of all prefab clones on the scene. In future, I plan to automate this routine.
You can make a special temporary pool container to work with later. Useful when you need to deactivate/activate specific group of entities in a lazy way.
ProcessingGoPool.AddToTemp(Pool.Entities, gameobject);ProcessingGoPool.ReleaseTemp(Pool.Entities);To get all benefits of the pooling system and to be sure objects will be spawned in the right places I wrote some instantiate shortcuts. In ANY script you want just use
var pool = Pool.Entities;
var obj = this.Populate(pool, prefab);
You can provide extra params as well:
var pool = Pool.UI;
var obj = this.Populate(pool, prefab, Vector3.zero, Quaternion.identity, null, WorldParenters.Level);
You can spawn from Resources by providing string id name.
var pool = Pool.UI;
var obj = this.Populate(pool, "myObject" , Vector3.zero, Quaternion.identity, null, WorldParenters.UI);
Parameteres that are used : Pool - the type of pool. Use Pool.None if you don't want to spawn from pool. Prefab or string id - the object you want to spawn. Position - the initial position. Vector3.Zero by default. Rotation - the initial rotation. Quaternion.identity by default. Parent - parent transform. Use it if you want to set special parent. WorldParenters - WorldParenters.Level by default. Created object is put inside of particular world container if no other parent is registered.
By default it's dynamic object inside [SCENE] object.

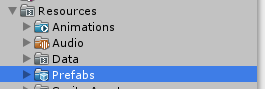
When you spawn from string ID ProcessingResources starts to work. It looks inside of Resources/Prefabs folder and tries to find the desired object. Than ProcessingResources caches it and provide it to the spawn logic. Next time it will give this object from the cache instead of looking again inside of ResourcesFolder.
To destroy an actor or monocached object use HandleDestroyGO() method.
actor.HandleDestroyGO()If the object belongs to pool it will be deactivated for further reuse. If the object doesn't belong to a pool, it will be destroyed. You can delay destroy by adding destroy delay time in the Inspector.

Use override of OnBeforeDestroy() method to provide some logic for and Actor before destroying. Useful for adding some effects related stuff. Also OnBeforeDestroy works well to reset data if object is pooled.
protected override void OnBeforeDestroy()Timers are great for making delayed actions. I strongly recommend to use them instead of coroutines if you need to make single delay action.
There are two ways of using timers. You can create a new timer each time you need from a pool or cache timer and reuse it. Set timer execute time and action when timer executed. The timer will be automatically recycled after playing.
Example of timers:
// Create new timer from a pool.
Timer.Add(0.1f, actor.HandleDestroyGO);
// Create and cache timer. In this case timer won't work untill Restart Method.
var alarm = new Timer(() => { Debug.Log("Alarm"); }, 10f);
// Set Timer to work.
alarm.Restart(); Timer.Add(0.1f, ()=>
{
Debug.Log("Killed");
actor.HandleDestroyGO();
}); You may add ID to the timer. After this you will be able to sort timers and get the list of timers with the same ID. You can use any object for your ID.
Timer.Add(0.1f, actor.HandleDestroyGO).AddID(actor);For example you may want find all timers of freezed actor and changed timescale.
var timers = Timer.FindAllTimers(actor);

	if (timers != null)
	 for (var i = 0; i < timers.Count; i++)
	    {
		timers[i].timeScale = 0.5f;
}You can cache timer and reuse it in future.
 private Timer timerBlink;
 timerBlink = new Timer(BlinkFinish, 0.15f);

 void Blink(){
 timerBlink.Restart();
 }
You can change the time or even action while restarting
 private Timer timerBlink;
 timerBlink = new Timer(BlinkFinish, 0.15f);

 void Blink(){
 timerBlink.Restart(10f);
 timerBlink.Restart(10f, AnotherAction );
 }
 void AnotherAction(){
}If you need to destroy a timer use kill method.
timerBlink.Kill();Normally, you want to do it inside OnDispose method.
protected override void OnDispose()
 {
   timerBlink.Kill();
 }
OnDispose method provided inside of behaviors by default.
Blueprints are scriptable objects that are used for defining common data for similar actors. Their setup is similar to actors setup.
Step 1. Create a new script and inherit it from Blueprint. Step 2. Add [CreateAssetMenu] tag with fileName and menuName. Step 3. Define data components you want and add them via Setup method to the blueprint container.
   [CreateAssetMenu(fileName = "BlueprintCreature", menuName = "Blueprints/BlueprintCreature")]
   public class BlueprintCreature : Blueprint
   {
   	[FoldoutGroup("Setup")]
   	public DataCreature dataCreature;

   	[FoldoutGroup("Setup")]
   	public DataDeathAnimations dataDeathAnimations;


   	public override void Setup()
   	{
   		Add(dataCreature);
   		Add(dataDeathAnimations);
   	}
   }
Step 4. Create a new blueprint object in Project.

Step 5. Create a blueprint data wrapper for all actors ( you need to do that only once ) and add this data to all actors you need.
	[Serializable]
	public class DataBlueprint : IData
	{
		public Blueprint blueprint;

		public void Dispose()
		{

			blueprint = null;
		}

		public T Get<T>() where T : class
		{
			return blueprint.Get<T>();
		}

	}
Step 6. Assign from the Inspector view a desired blueprint to the actor.
Step 7. Find Blueprints scriptable object inside of Resources folder and populate it with your new blueprint object. You can automate this process by clicking "populate blueprints" in tools menu. In this case your blueprints should be in Assets/[2]Content/Blueprints folder


It's easy and straightforward : use get method inside your behaviors.
// Get<DataBlueprint>() returns the blueprint wrapper.
// Get<DataWeapon> returns desired data from the blueprint.
var weaponData = Get<DataBlueprint>().Get<DataWeapon>();All variables you add to your game objects cost something. For example, creating 1 000 000 objects with one int variable will require about 4MB of memory. Scriptable objects are created only once and shared among your actor copies. For example, you want to add an audio sound variable to your monster object. Instead, you can use monster blueprint and define the audio variable there. In this case, no matter how much copies of monsters you have on the scene their audio variable will be created only once.
Tags are the glue for your game: You can identify your actors with tags or use them as arguments for your signals to check game logic. Tags are simple cont INT variables.
Step 1. Create a new static script called Tag or what do you prefer. I prefer to use partial classes to divide my tags to different files. Populate your tags with unique int ID.
public static partial class Tag
	{
		 public const int SignalStasisOn = 10001;
		 public const int SignalStasisOff = 10002;
        }
public static partial class Tag
{
public const int WeaponGun = 9000;
public const int WeaponLaser = 9001;
}
Step 2. Add [TagField(categoryName = "YOURNAME")] before your const int. Use '/' to add tag in child group.
	public static partial class Tag
	{
		[TagField(categoryName = "Weapons")] public const int WeaponGun = 9000;
		[TagField(categoryName = "Weapons/BigGuns")] public const int WeaponLaser = 9001;
	}
Step 3. Add your tag to Actor. To do that use tags.Add(YOUR_TAG);
public class ActorPlayer : Actor{
	protected override void Setup()
		{
			Add(dataAnimationState);
			Add(dataCurrentWeapon);
			// always add tags at the end of your Actor setup.
			tags.Add(Tag.GroupPlayer);
		}
}
Step 4. You can edit your tags in the Inspector view. To do that add int variable where you want and attach attribute [TagFilter(typeof(TYPE_OF_CLASS_WHERE_TAGS))]
public class ActorPlayer : Actor{
[TagFilter(typeof(Tag))] public int tag;
	protected override void Setup()
		{
			Add(dataAnimationState);
			Add(dataCurrentWeapon);
			// always add tags at the end of your Actor setup.
			tags.Add(tag);
		}
}
Actors have special processingTags component.
// add one tag.
tags.Add(tag);
// add as many tags as you want.
tags.Add(tag, tag2, tag3); // remove one tag.
tags.Remove(tag); // remove all similar tags.
tags.RemovAll(tag); // all tags must be included.
bool valid = tags.ContainAll(tag,tag2); // at least one tag must be included.
bool valid = tags.ContainAny(tag,tag2); // tag must be included.
bool valid = tags.Contain(tag);You can add similar tags to the actor. It's useful in case when you have several actions with the same logic, and you want to validate something.
// Add stun marker from the mighty hammer of doom.
tags.Add(Tag.Stunned);
// Add stun marker from falling off the tree.
tags.Add(Tag.Stunned);
// remove effect caused by the mighty hammer of doom.
tags.Remove(Tag.Stunned);
bool condition_stunned = tags.Contain(Tag.Stunned);
In the example above condition_stunned will be true because we have added the same tag twice but deleted it only once.
Simple ECS pattern for working with actors. My approach can be used only with actor classes at the current moment and is far less powerful than clean ECS approaches and it's used more for structuring than gaining performance boost.
I call all systems or global "controllers" as Processings.
When you need to activate ECS system inherit your processing from ProcessingBase
public class ProcessingCameraFollow : ProcessingBase, ITick, IMustBeWipedTo use Processing you need to add it to the Toolbox. I usually add them via Starter scripts.
	public class StarterLv1 : Starter
	{
		[FoldoutGroup("Setup"), SerializeField, HideInInspector]
		private DataLevel dataLevel;

		protected override void Setup()
		{
			Toolbox.Get<DataGameSession>().currentLevel = 1;

			Toolbox.Add<ProcessingGroupPlayers>();
			Toolbox.Add<ProcessingGroupEnemies>();

			Toolbox.Add<ProcessingSortDepth>();
			Toolbox.Add<ProcessingShakeCamera>();
			Toolbox.Add<ProcessingCameraFollow>();

			Toolbox.Add<ProcessingInputConnect>();
			Toolbox.Add<ProcessingMenuHome>();

		}
	}
Remember, you can inherit from Starter if needed.
When a new Actor entity is added ProcessingEntities script decide in what groups of actors it should be placed. The group is a list of actors that share a common filter.
public class ProcessingCameraFollow : ProcessingBase, ITick, IMustBeWiped{

private Group groupPlayers;

}To populate your group you need to provide some filters. Think of a filter as a key lock, if the key matches this lock - than an actor is added to the group. You can filter actors by Data component types or by int tags.
To populate a group add GroupBy attribute above the group variable. All your groupby filters must be valid in order to add an actor to a group.
public class ProcessingCameraFollow : ProcessingBase, ITick, IMustBeWiped{
[GroupBy(typeof(DataPlayer))]
private Group groupPlayers;
}
You can use several filters as well :
public class ProcessingCameraFollow : ProcessingBase, ITick, IMustBeWiped{
[GroupBy(typeof(DataPlayer), typeof(DataKnight) )]
private Group groupPlayersKnights;
}You don't have to use types of data components for filtering. Instead, you can use Tag. A tag is a simple const int variable. It's very similar to GameObject tags in Unity3D but more powerful.
// make a static Tag class and define all your const there.
	public static partial class Tag
	{
		[TagField(categoryName = "Groups")] public const int GroupPlayer = 2001;
		[TagField(categoryName = "Groups")] public const int GroupEnemy = 2002;
		[TagField(categoryName = "Groups")] public const int GroupPlayerSpawner = 2003;
		[TagField(categoryName = "Groups")] public const int GroupDragable = 2004;
		[TagField(categoryName = "Groups")] public const int GroupPlayerUI = 2005;
		[TagField(categoryName = "Groups")] public const int GroupBorders = 2006;
		[TagField(categoryName = "Groups")] public const int GroupCameraStartPosition = 2007;
		[TagField(categoryName = "Groups")] public const int GroupCounterAttacked = 2008;
	}
public class ProcessingCameraFollow : ProcessingBase, ITick, IMustBeWipedOut{
[GroupBy(Tag.GroupPlayer)]
private Group groupPlayers;
}public class ActorPlayer : Actor{
protected override void Setup()
{
Add(dataAnimationState);
Add(dataCurrentWeapon);
// always add tags at the end of your Actor setup.
tags.Add(Tag.GroupPlayer);
}
}You can be more specific by adding a GroupExclude filter. If any of group exclude filter match than an actor can be no longer be in the group.
public class ProcessingCameraFollow : ProcessingBase, ITick, IMustBeWipedOut{
[GroupBy(Tag.GroupPlayer)]
[GroupExclude(Tag.StateDead)]
private Group groupPlayersAlive;
}You can provide extra logic when group is changed ( a new actor is added or removed from the group )
public class ProcessingCameraFollow : ProcessingBase, ITick, IMustBeWipedOut{
[GroupBy(Tag.GroupPlayer)]
private Group groupPlayers;

   public ProcessingCameraFollow()
   {
      groupPlayers.OnGroupChanged += OnGroupPlayersChanged;
   }

   void OnGroupPlayersChanged()
   	{
   		 for(var i=0;i<groupPlayers.length;i++){
   		    Debug.Log("Actor: " + groupPlayers.actors[i]);
   		 }
   	}
}To update your processing inherit from ITick, ITIckFixed, ITickLate. Use group.length to get the container length. Use group.actors[i] - to receive one of the group actors.
public class ProcessingCameraFollow : ProcessingBase, ITick, IMustBeWipedOut{
[GroupBy(Tag.GroupPlayer)]
private Group groupPlayers;

   public ProcessingCameraFollow()
   {
      groupPlayers.OnGroupChanged += OnGroupPlayersChanged;
   }

   void OnGroupPlayersChanged()
   	{
   		 for(var i=0;i<groupPlayers.length;i++){
   		    Debug.Log("Actor: " + groupPlayers.actors[i]);
   		 }
   	}

   public void Tick()
   {
         for(var i=0;i<groupPlayers.length;i++){
   		    DoSomething(groupPlayers.actors[i]);
            }
    }

    void DoSomething(Actor a){
    }

}