A collection of causal resources for psychologists and social scientists accompanying the paper:
'A Causal Research Pipeline and Tutorial for Psychologists and Social Scientists' (blinded for peer review).
This repository includes a Tutorial notebook causal_pipeline_tutorial.ipynb which steps through the analysis.
Utilises data acquired with permission from https://www.icpsr.umich.edu/web/ICPSR/studies/37404/summary
To follow the steps of the pipeline, a variety of causal tools/packages are required. When running analyses with a wide variety of packages, dependency conflicts often arise. I therefore recommend a docker container is used (more on this below). In any case, the following steps for the installation of the packages using a common package manager such as anaconda are presented below.
A complete example with a conda environment, and jupyter notebook (assumes nvidia-docker is already installed and working):
The installation is quite involved because the pipeline itself integrates tools from a wide variety of packages.
IMPORTANT: If you are using nvidia-docker, do not forget to commit/save the docker image when you are done!
- If using docker, open an nvidia-docker container:
nvidia-docker run -ti -v /GitHub/Psych_ML/causalPipelineTEST:/tmp/CausalPipelineTEST -p 8889:8888 90d21486fcc7 cd /tmp- Update the docker:
apt-get -y updateandapt-get -y install git apt-get install wget- Download anaconda
wget https://repo.anaconda.com/archive/Anaconda3-2023.07-0-Linux-x86_64.sh - Install anaconda (keep defaults and set up
bash Anaconda3-2023.07-0-Linux-x86_64.sh - Initialise conda
source /root/anaconda3/bin/activate - Create new conda environment
conda create -n causalPipeline_env python=3.7Note python 3.7 is required.
- Activate new environment
conda activate causalPipeline_env cd /tmp/CausalPipelineTEST- Clone the CDT repo:
git clone https://github.com/FenTechSolutions/CausalDiscoveryToolbox.git cd CausalDiscoveryToolbox- Install packages:
python3 -mpip install -r requirements.txt python3 setup.py install develop --user
cd /tmp/CausalPipelineTEST- Clone the causall effect package
git clone https://github.com/pedemonte96/causaleffect cd causaleffect- Install the package:
python3 setup.py install
This is useful at least for following the tutorial file.
- Activate the conda env (if not already activated):
conda activate causalPipeline_env conda install -c anaconda jupyter -ypip3 install chardetconda install -c conda-forge matplotlib -y(may take some time)conda install -c anaconda seaborn -y
- Activate the conda env (if not already activated):
conda activate causalPipeline_env - Select working directory
cd /tmp/CausalPipelineTEST - Launch jupyter notebook
jupyter notebook --ip 0.0.0.0 --no-browser --allow-root - [optional] if you get a 500 server error message, close the jupyter session Ctrl+C and try
conda update jupyterthen try step 3 again - Go to your internet browser:
http://localhost:8889/ - Login using the token given when you launched the notebook
- In a new terminal window, type
docker psthis will tell you what is running - Identify the container you've just been working in, and commit it with a new name:
docker commit <containerID> causalpipeline
This analysis uses SAM[1] which is included in the Causal Discovery Toolbox https://fentechsolutions.github.io/
The toolbox includes about 20 methods which are both python and R based, and which may use GPU.
Therefore, I recommend using a docker container, in particular with the nvidia-docker.
An example tutorial for docker is here: https://zetcode.com/python/docker/
And one for nvidia GPU is here: https://towardsdatascience.com/use-nvidia-docker-to-create-awesome-deep-learning-environments-for-r-or-python-pt-i-df8e89b43a72
Once docker and nvidia-docker have been successfully installed, and sufficient permissions have been granted, run docker pull xxxx for the most recent
version of CDT.
You can list the available docker images by running docker images
The (non nvidia-) docker image can be run interactively via
docker run -ti -v /folder/to/mount/:/tmp/folder -p 8889:8888 e5c643806d03
where the -p flag will enable you to run:
jupyter notebook --ip 0.0.0.0 --no-browser --allow-root
whilst accessing the associated jupyter server on the local host at:
localhost:8889/
After you exit the interactive docker image, you can save the image in its current state by first checking the container ID:
docker ps
and then commit it:
docker commit <containerID> <new_name>
If you want to remove/delete an image:
docker rmi -f <image id>
For example, once everything is installed (assuming also that conda and jupyter notebook are being used):
nvidia-docker run -it --init --ipc=host -v /GitHub/Psych_ML/causalPipeline:/tmp/causalPipeline -p 8889:8888 8ee31bfa53e6 /bin/bash

cd /tmp/causalPipeline

conda activate causal_env

jupyter notebook --ip 0.0.0.0 --no-browser --allow-root
Then, access this via host with a browser: localhost:8889/tree
Pyhal uses rpy2==3.2.1 to call functions in R (rpy2 can be installed with python3 -mpip install rpy2==3.2.1).
There is a list of packages needed in the rpacks.txt file. These can be installed by running:
while IFS=" " read -r package version;
do
  R -e "install.packages('"$package"', lib='/usr/local/lib/R/site-library')";
done < "rpacks.txt"
and
while IFS=" " read -r package version;
do
  R -e "install.packages('"$package"', lib='/usr/lib/R/site-library')";
done < "rpacks.txt"
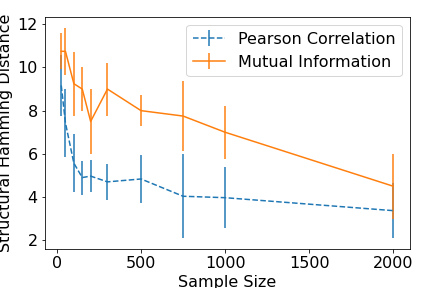
In the figures below we show extra results which are not included in the accompanying paper for the well-known PC algorithm Spirtes et al. 2000 The results illustrate the differences in performance (across a range of sample sizes) between a linear, correlation-based conditional independence test, and a nonparametric, k-nearest neighbours conditional mutual information based conditional independence test (Runge et al., 2018).
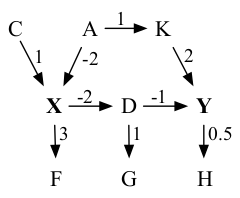
We show below the true, 9-node, 9-edge graph for the underlying data generating structure. All exogenous (not shown) variables are Gaussian.
In the next figure we show the Structural Hamming Distance, which is a measure of how successful the algorithm was at correctly inferring the graph (smaller the better).
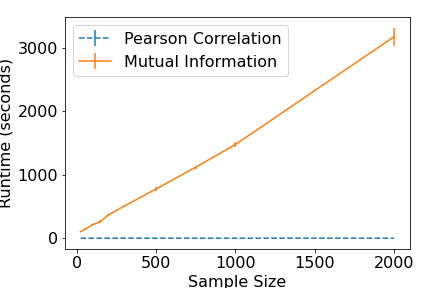
Finally, below we show the algorithm runtime (in seconds). Firstly, it can be seen that the correlation based measure is notably better at inferring the structure than the mutual information based approach, particularly for small sample sizes. It can also be seen that the time taken to run the nonparametric version increases linearly with the sample size (over 50 minutes for a sample size of 2000) vastly exceeding the runtime of the correlation approach (which has a run of 0.26 seconds for a sample size of 2000). Thus, the price paid for not having to make parametric assumptions is one of both computation time and, for a parametric data generating process, accuracy. Of course, one expects that in cases where the parametric assumption does not hold, the advantages of non-parametric conditional independence tests become self-evident.
[1] Kalainathan, Diviyan & Goudet, Olivier & Guyon, Isabelle & Lopez-Paz, Dav


