Jitsi Meet on Docker
Jitsi is a set of Open Source projects that allows you to easily build and deploy secure videoconferencing solutions.
Jitsi Meet is a fully encrypted, 100% Open Source videoconferencing solution that you can use all day, every day, for free — with no account needed.
This repository contains the necessary tools to run a Jitsi Meet stack on Docker using Docker Compose.
Table of contents
Quick start
In order to quickly run Jitsi Meet on a machine running Docker and Docker Compose, follow these steps:
- Create a
.envfile by copying and adjustingenv.example. - Run
docker-compose up -d. - Access the web UI at
https://localhost:8443(orhttp://localhost:8000for HTTP, or a different port, in case you edited the compose file).
If you want to use jigasi too, first configure your env file with SIP credentials
and then run Docker Compose as follows: docker-compose -f docker-compose.yml -f jigasi.yml up -d
Architecture
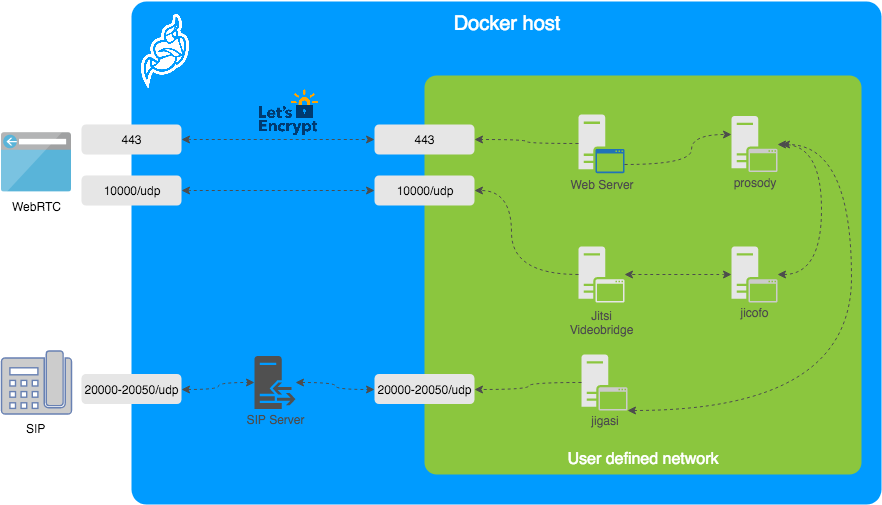
A Jitsi Meet installation can be broken down into the following components:
- A web interface
- An XMPP server
- A conference focus component
- A video router (could be more than one)
- A SIP gateway for audio calls
The diagram shows a typical deployment in a host running Docker. This project separates each of the components above into interlinked containers. To this end, several container images are provided.
Images
- base: Debian stable base image with the S6 Overlay for process control and the Jitsi repositories enabled. All other images are based off this one.
- base-java: Same as the above, plus Java (OpenJDK).
- web: Jitsi Meet web UI, served with nginx.
- prosody: Prosody, the XMPP server.
- jicofo: Jicofo, the XMPP focus component.
- jvb: Jitsi Videobridge, the video router.
- jigasi: Jigasi, the SIP (audio only) gateway.
Design considerations
Jitsi Meet uses XMPP for signalling, thus the need for the XMPP server. The setup provided by these containers does not expose the XMPP server to the outside world. Instead, it's kept completely sealed, and routing of XMPP traffic only happens on a user defined network.
The XMPP server can be exposed to the outside world, but that's out of the scope of this project.
Configuration
The configuration is performed via environment variables contained in a .env file. You
can copy the provided env.example file as a reference.
IMPORTANT: At the moment, configuration is not regenerated on every container boot, so
if you make any changes to your .env file, make sure you remove the configuration directory
before starting your containers again.
| Variable | Description | Example |
|---|---|---|
CONFIG |
Directory where all configuration will be stored | /opt/jitsi-meet-cfg |
TZ |
System Time Zone | Europe/Amsterdam |
HTTP_PORT |
Exposed port for HTTP traffic | 8000 |
HTTPS_PORT |
Exposed port for HTTPS traffic | 8443 |
DOCKER_HOST_ADDRESS |
IP address of the Docker host, needed for LAN environments | 192.168.1.1 |
NOTE: The mobile apps won't work with self-signed certificates (the default) see below for instructions on how to obtain a proper certificate with Let's Encrypt.
Let's Encrypt configuration
If you plan on exposing this container setup to the outside traffic directly and want a proper TLS certificate, you are in luck because Let's Encrypt support is built right in. Here are the required options:
| Variable | Description | Example |
|---|---|---|
ENABLE_LETSENCRYPT |
Enable Let's Encrypt certificate generation | 1 |
LETSENCRYPT_DOMAIN |
Domain for which to generate the certificate | meet.example.com |
LETSENCRYPT_EMAIL |
E-Mail for receiving important account notifications (mandatory) | alice@atlanta.net |
In addition, you will need to set HTTP_PORT to 80 and HTTPS_PORT to 443.
SIP gateway configuration
If you want to enable the SIP gateway, these options are required:
| Variable | Description | Example |
|---|---|---|
JIGASI_SIP_URI |
SIP URI for incoming / outgoing calls | test@sip2sip.info |
JIGASI_SIP_PASSWORD |
Password for the specified SIP account | passw0rd |
JIGASI_SIP_SERVER |
SIP server (use the SIP account domain if in doubt) | sip2sip.info |
JIGASI_SIP_PORT |
SIP server port | 5060 |
JIGASI_SIP_TRANSPORT |
SIP transport | UDP |
Authentication
Authentication can be controlled with the environment variables below. If guest access is enabled, unauthenticated users will need to wait until a user authenticates before they can join a room. If guest access is not enabled, every user will need to authenticate before they can join.
| Variable | Description | Example |
|---|---|---|
ENABLE_AUTH |
Enable authentication | 1 |
ENABLE_GUESTS |
Enable guest access | 1 |
Users must be created with the prosodyctl utility in the prosody container.
In order to do that, first execute a shell in the corresponding container:
docker-compose exec prosody /bin/bash
Once in the container, run the following command to create a user:
prosodyctl --config /config/prosody.cfg.lua register user meet.jitsi password
Advanced configuration
These configuration options are already set and generally don't need to be changed.
| Variable | Description | Default value |
|---|---|---|
XMPP_DOMAIN |
Internal XMPP domain | meet.jitsi |
XMPP_AUTH_DOMAIN |
Internal XMPP domain for authenticated services | auth.meet.jitsi |
XMPP_MUC_DOMAIN |
XMPP domain for the MUC | muc.meet.jitsi |
XMPP_INTERNAL_MUC_DOMAIN |
XMPP domain for the internal MUC | internal-muc.meet.jitsi |
XMPP_GUEST_DOMAIN |
XMPP domain for unauthenticated users | guest.meet.jitsi |
XMPP_MODULES |
Custom Prosody modules for XMPP_DOMAIN (comma separated) | mod_info,mod_alert |
XMPP_MUC_MODULES |
Custom Prosody modules for MUC component (comma separated) | mod_info,mod_alert |
XMPP_INTERNAL_MUC_MODULES |
Custom Prosody modules for internal MUC component (comma separated) | mod_info,mod_alert |
JICOFO_COMPONENT_SECRET |
XMPP component password for Jicofo | s3cr37 |
JICOFO_AUTH_USER |
XMPP user for Jicofo client connections | focus |
JICOFO_AUTH_PASSWORD |
XMPP password for Jicofo client connections | passw0rd |
JVB_AUTH_USER |
XMPP user for JVB MUC client connections | jvb |
JVB_AUTH_PASSWORD |
XMPP password for JVB MUC client connections | passw0rd |
JVB_STUN_SERVERS |
STUN servers used to discover the server's public IP | stun.l.google.com:19302, stun1.l.google.com:19302, stun2.l.google.com:19302 |
JVB_PORT |
UDP port for media used by Jitsi Videobridge | 10000 |
JVB_TCP_HARVESTER_DISABLED |
Disable the additional harvester which allows video over TCP (rather than just UDP) | true |
JVB_TCP_PORT |
TCP port for media used by Jitsi Videobridge when the TCP Harvester is enabled | 4443 |
JVB_BREWERY_MUC |
MUC name for the JVB pool | jvbbrewery |
JVB_ENABLE_APIS |
Comma separated list of JVB APIs to enable | none |
JIGASI_XMPP_USER |
XMPP user for Jigasi MUC client connections | jigasi |
JIGASI_XMPP_PASSWORD |
XMPP password for Jigasi MUC client connections | passw0rd |
JIGASI_BREWERY_MUC |
MUC name for the Jigasi pool | jigasibrewery |
JIGASI_PORT_MIN |
Minimum port for media used by Jigasi | 20000 |
JIGASI_PORT_MAX |
Maximum port for media used by Jigasi | 20050 |
DISABLE_HTTPS |
Disable HTTPS, this can be useful if TLS connections are going to be handled outside of this setup | 1 |
ENABLE_HTTP_REDIRECT |
Redirects HTTP traffic to HTTPS | 1 |
Running on a LAN environment
If running in a LAN environment (as well as on the public Internet, via NAT) is a requirement,
the DOCKER_HOST_ADDRESS should be set. This way, the Videobridge will advertise the IP address
of the host running Docker instead of the internal IP address that Docker assigned it, thus making ICE
succeed.
The public IP address is discovered via STUN. STUN servers can be specified with the JVB_STUN_SERVERS
option.
TODO
- Support container replicas (where applicable).
- Docker Swarm mode.
- More services:
- Jibri.
- TURN server.

