Welcome back guys, hope you enjoyed previous tutorial "MyToDo" (https://github.com/mchenna9624/MyToDo)
If you are first time here, please check below link to follow it. It is strongly recommended to follow previous post, becuase this tutorial repository is an extension of "MyToDo" repository.
The Firebase platform is a perfect fit for your Angular web or mobile application as it offers various useful backend services as real-time database, storage, notification, authentication etc.
In this tutorial we’ll learn how to make use of the Firebase authentication service in your Angular application. We’ll start from existing "MyToDo" application and add authentication to that application with step by step appraoch.
Authentication is a common task for most web and mobile application. By using the Firebase authentication service, authentication functionality can be easily integrated in your application. The Firebase service can be configured to make use of various authentication providers like Google, Facebook, Twitter or GitHub.
Since we have already developed "MyToDo" application, I am assuming we have development environment ready this tutorial. If in case you don't have installed follow below steps to install all needed software.
   1. $ npm install -g @angular/cli

   For AngularFire2 to work we will also need to install typings and typescript.

   2. $ npm install -g typings
   3. $ npm install -g typescript
clone MyToDo repository to local, so we can add authentication to that app.
    1. git clone https://github.com/mchenna9624/MyToDo.git
    2. npm install
    3. ng serve
    4. at this step you should see MyToDo application loaded in browser @ http://localhost:4200
In order to be able to make use of the Firebase authentication service, we need to set up a new Firebase project first. This step is done in the Firebase backend which is called Firebase console and available at Firebase Console
You first need to create a Firebase account, so that you’re able to login to the console. After having logged in you’ll be able to see the following screen:
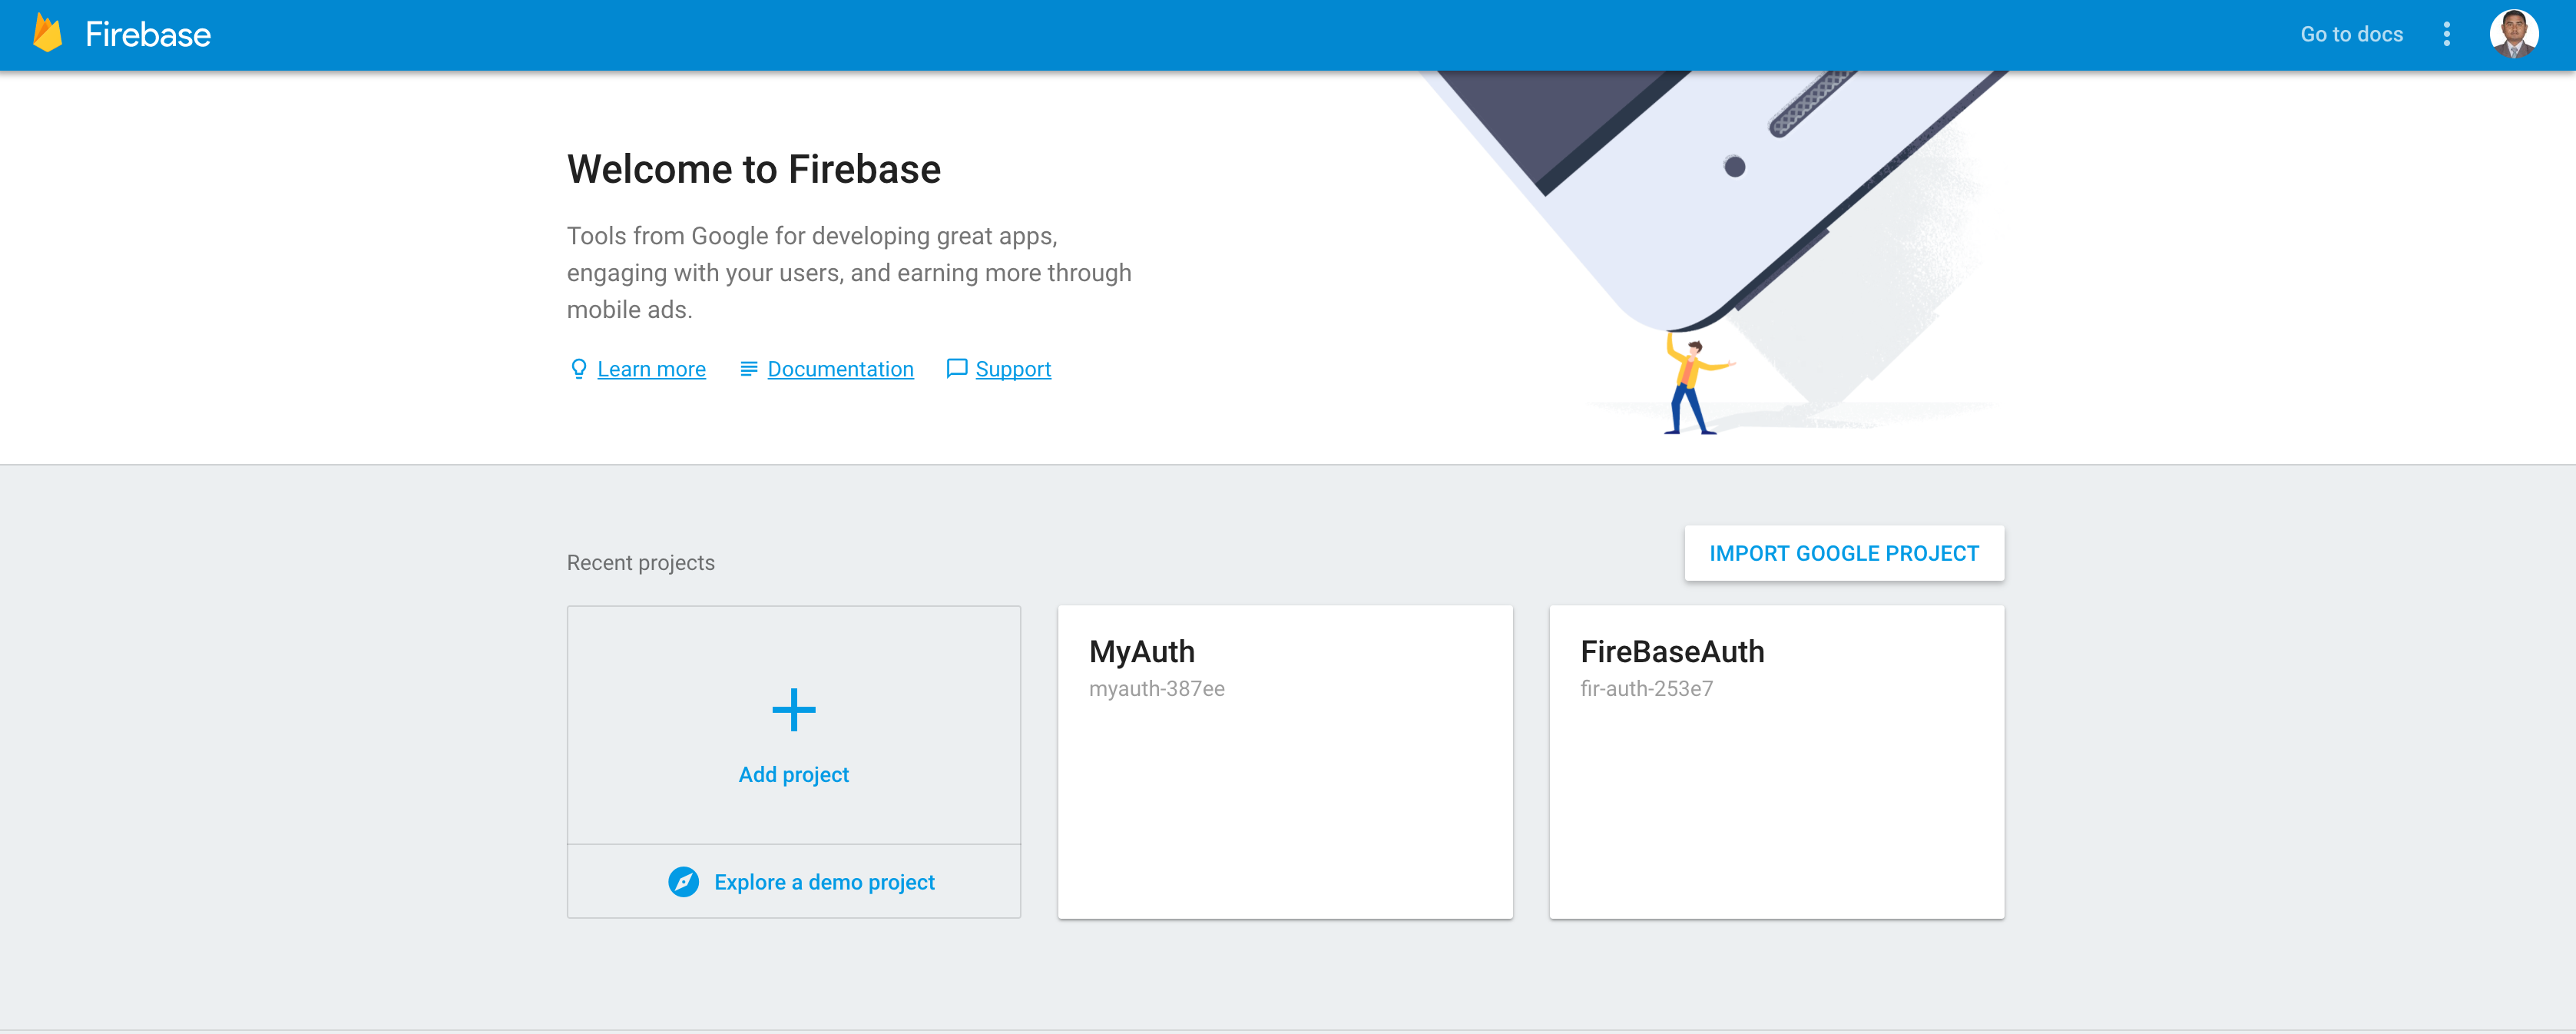
Click on button “Create New Project” or "Add New Projecrt" to create a new firebase project. Followng pop-up window opens. Here you can specify the project name and the country / region in which the project should be hosted:
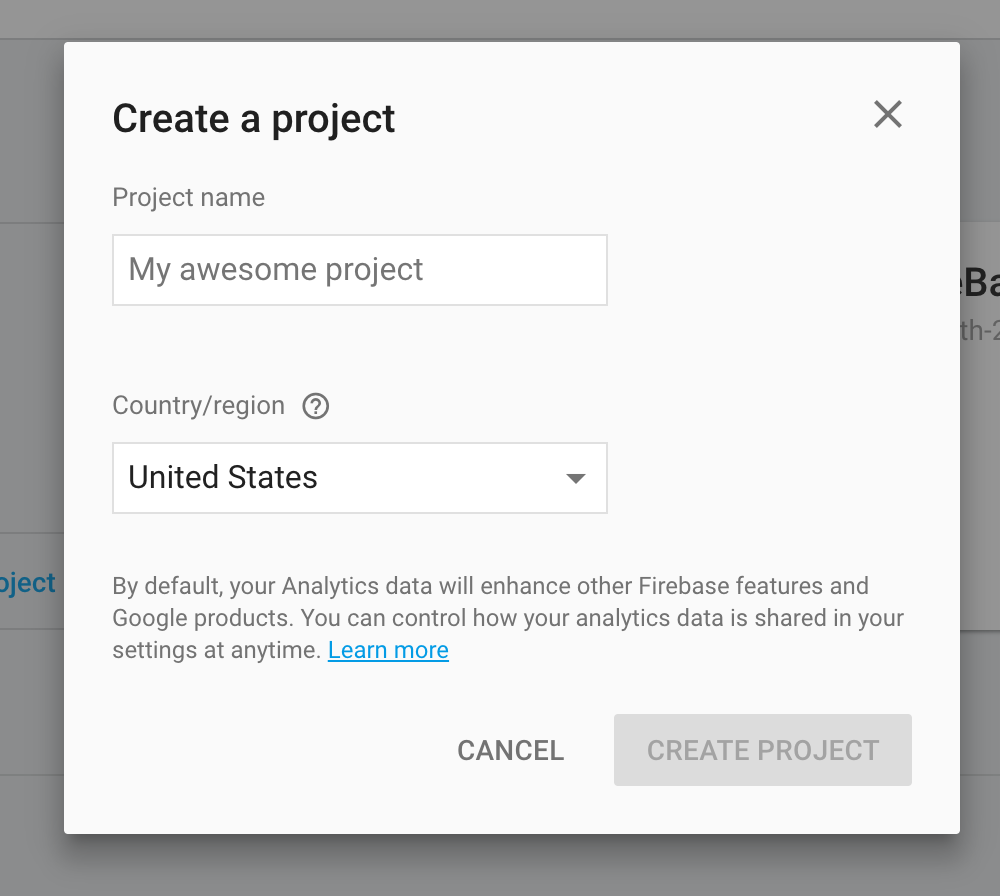
Click on button “Create Project” to initiate the creation process. Once the project is ready you’ll be forwarded to the project’s overview page in the Firebase console:
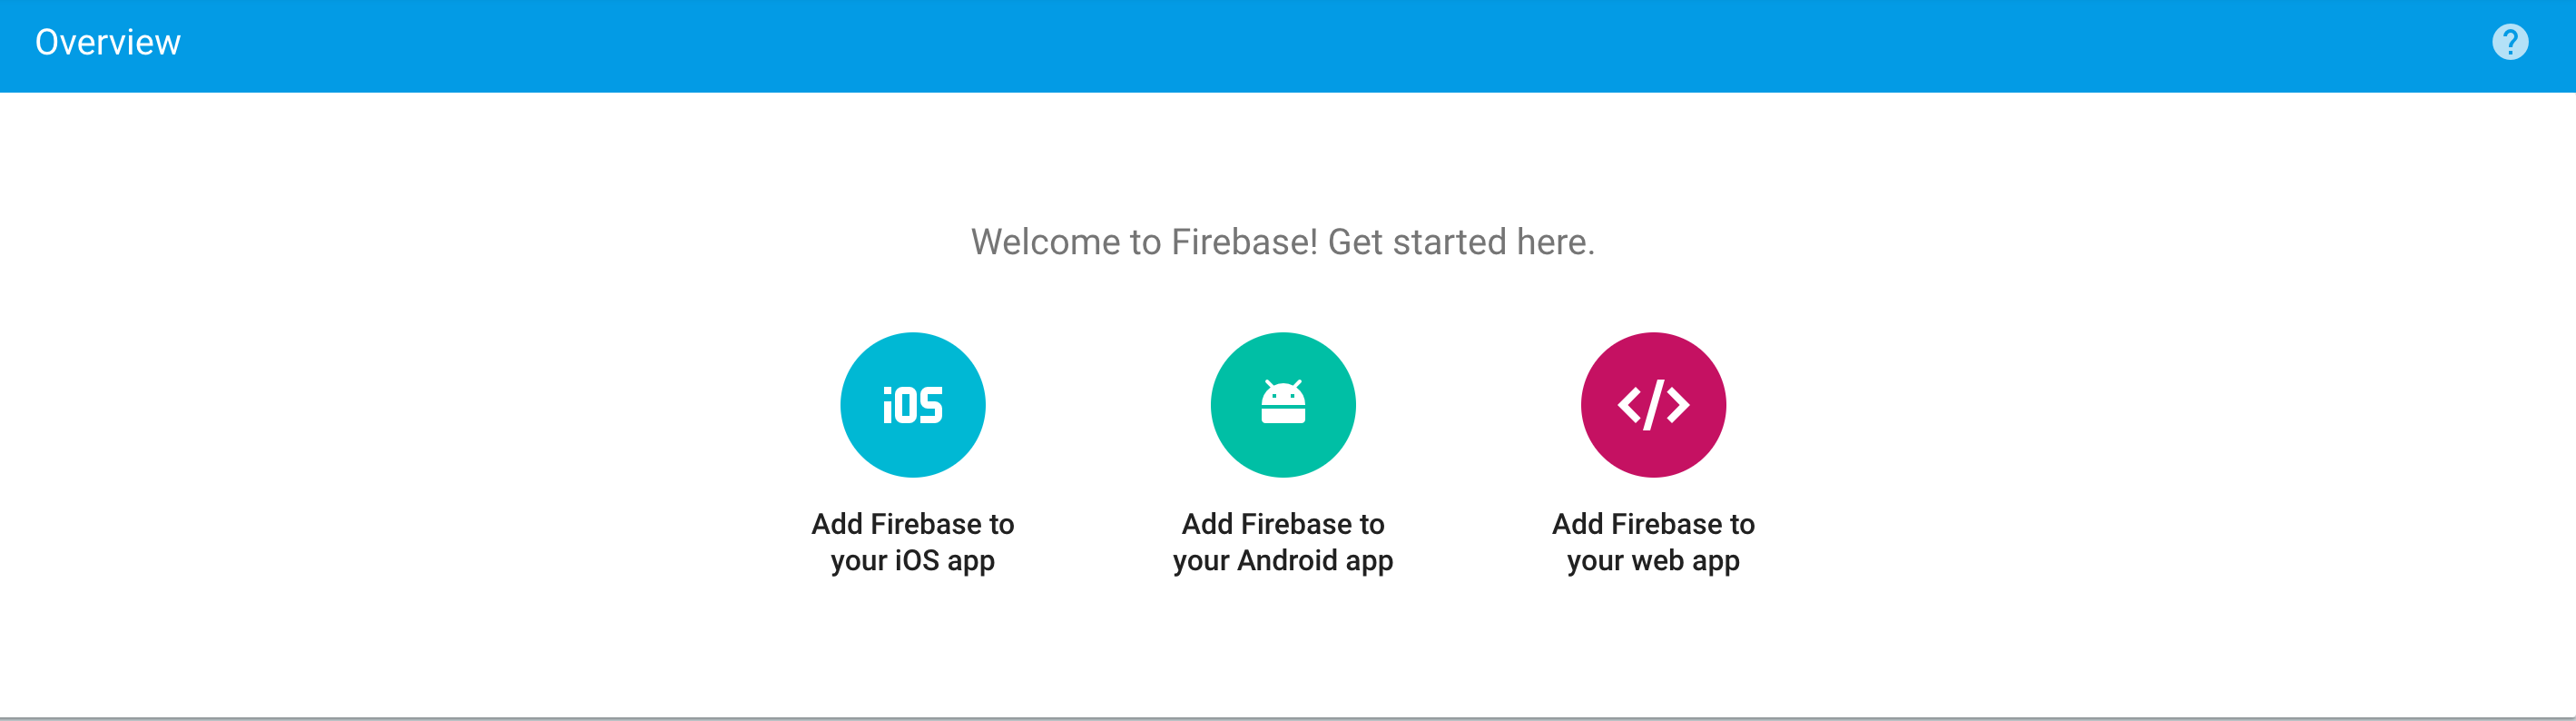
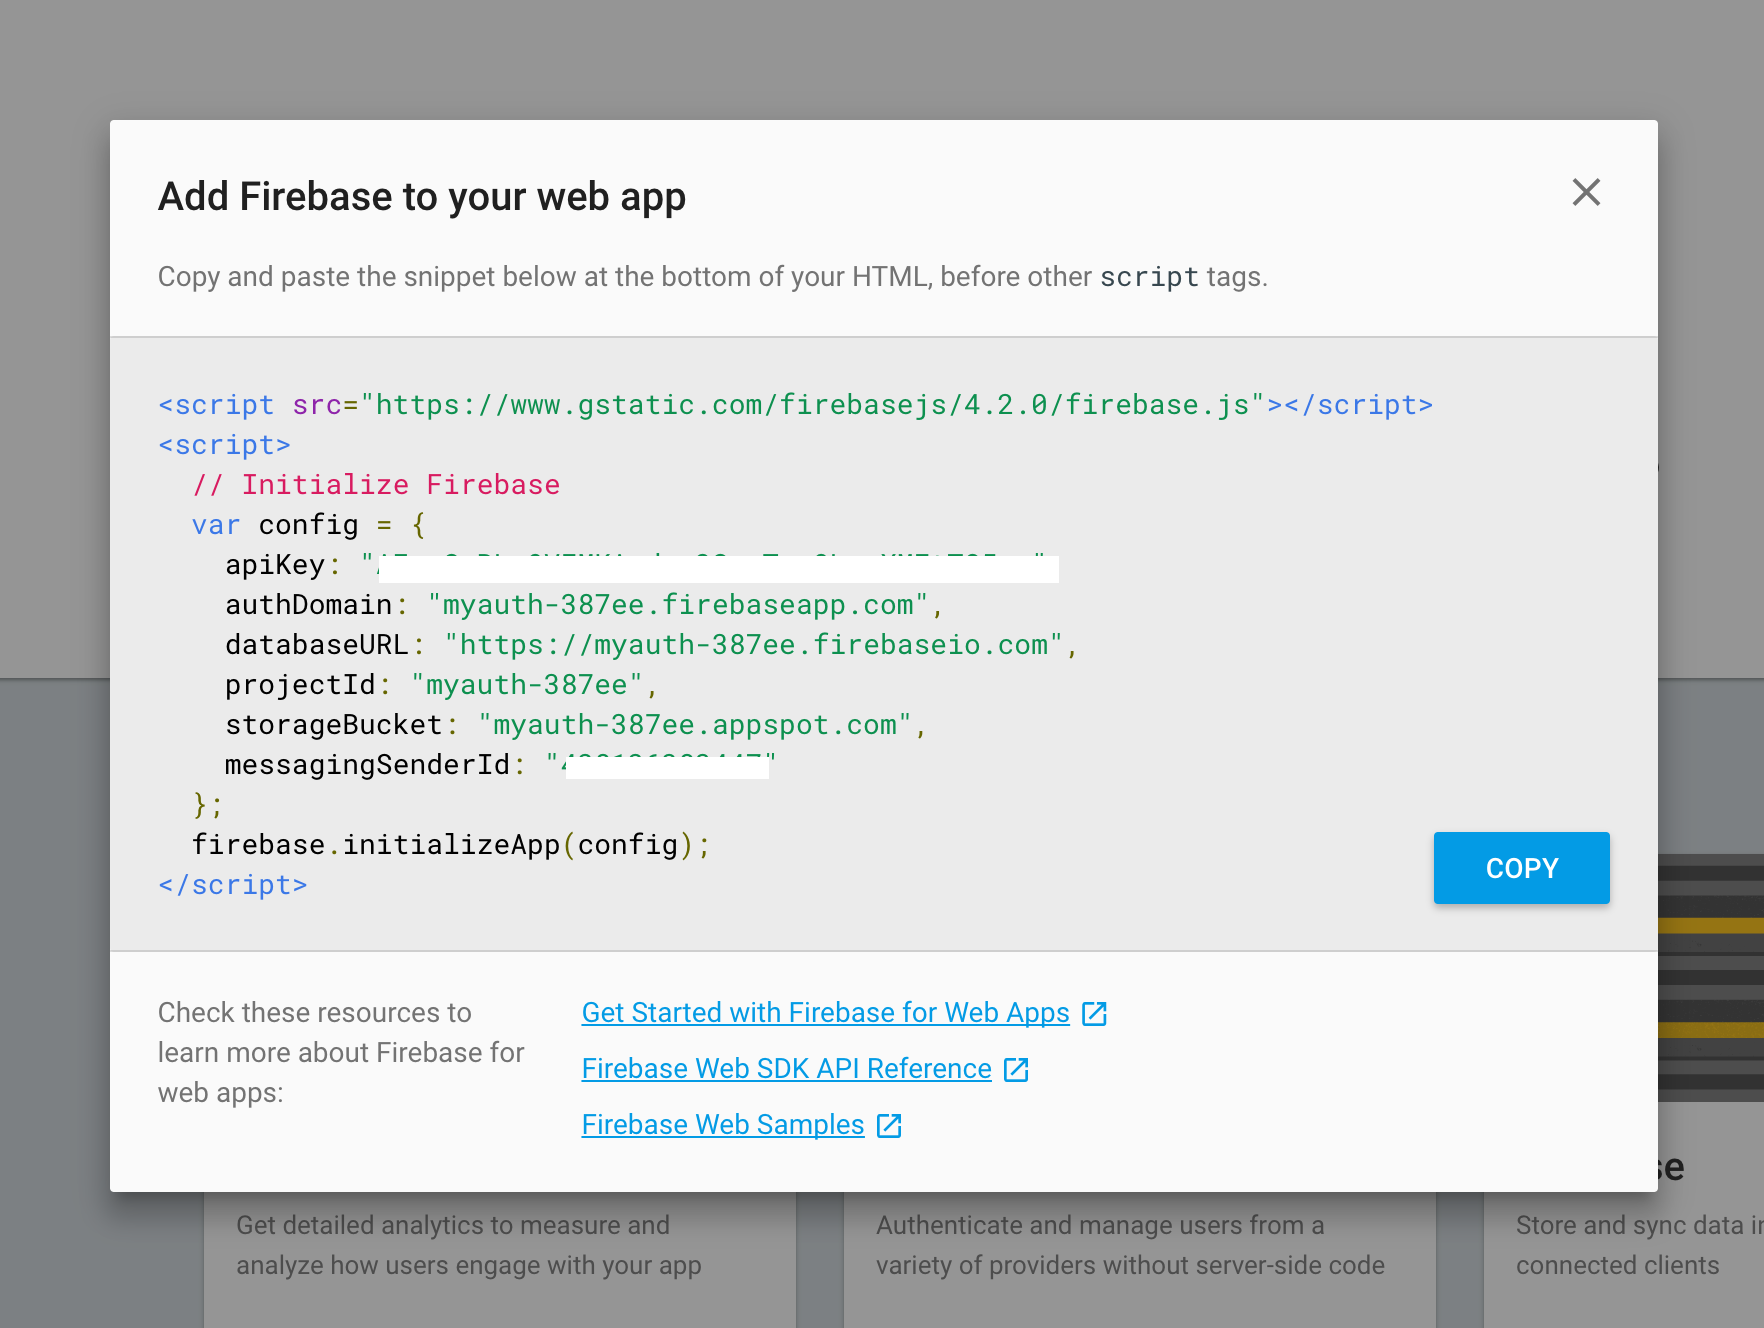
click on Add Firebase to your webapp link, third from left, you will see similar popup like below, copy config to some notepad, which you will refer soon.
In the left-side menu structure you’ll find the link “Authentication”. If you click on this link you’ll be taken to the configuration page of the Firebase authentication service. Switch to the tab “Sign-In Method”. Here you’ll find a list of all sign-in providers supported by the Firebase authentication service:
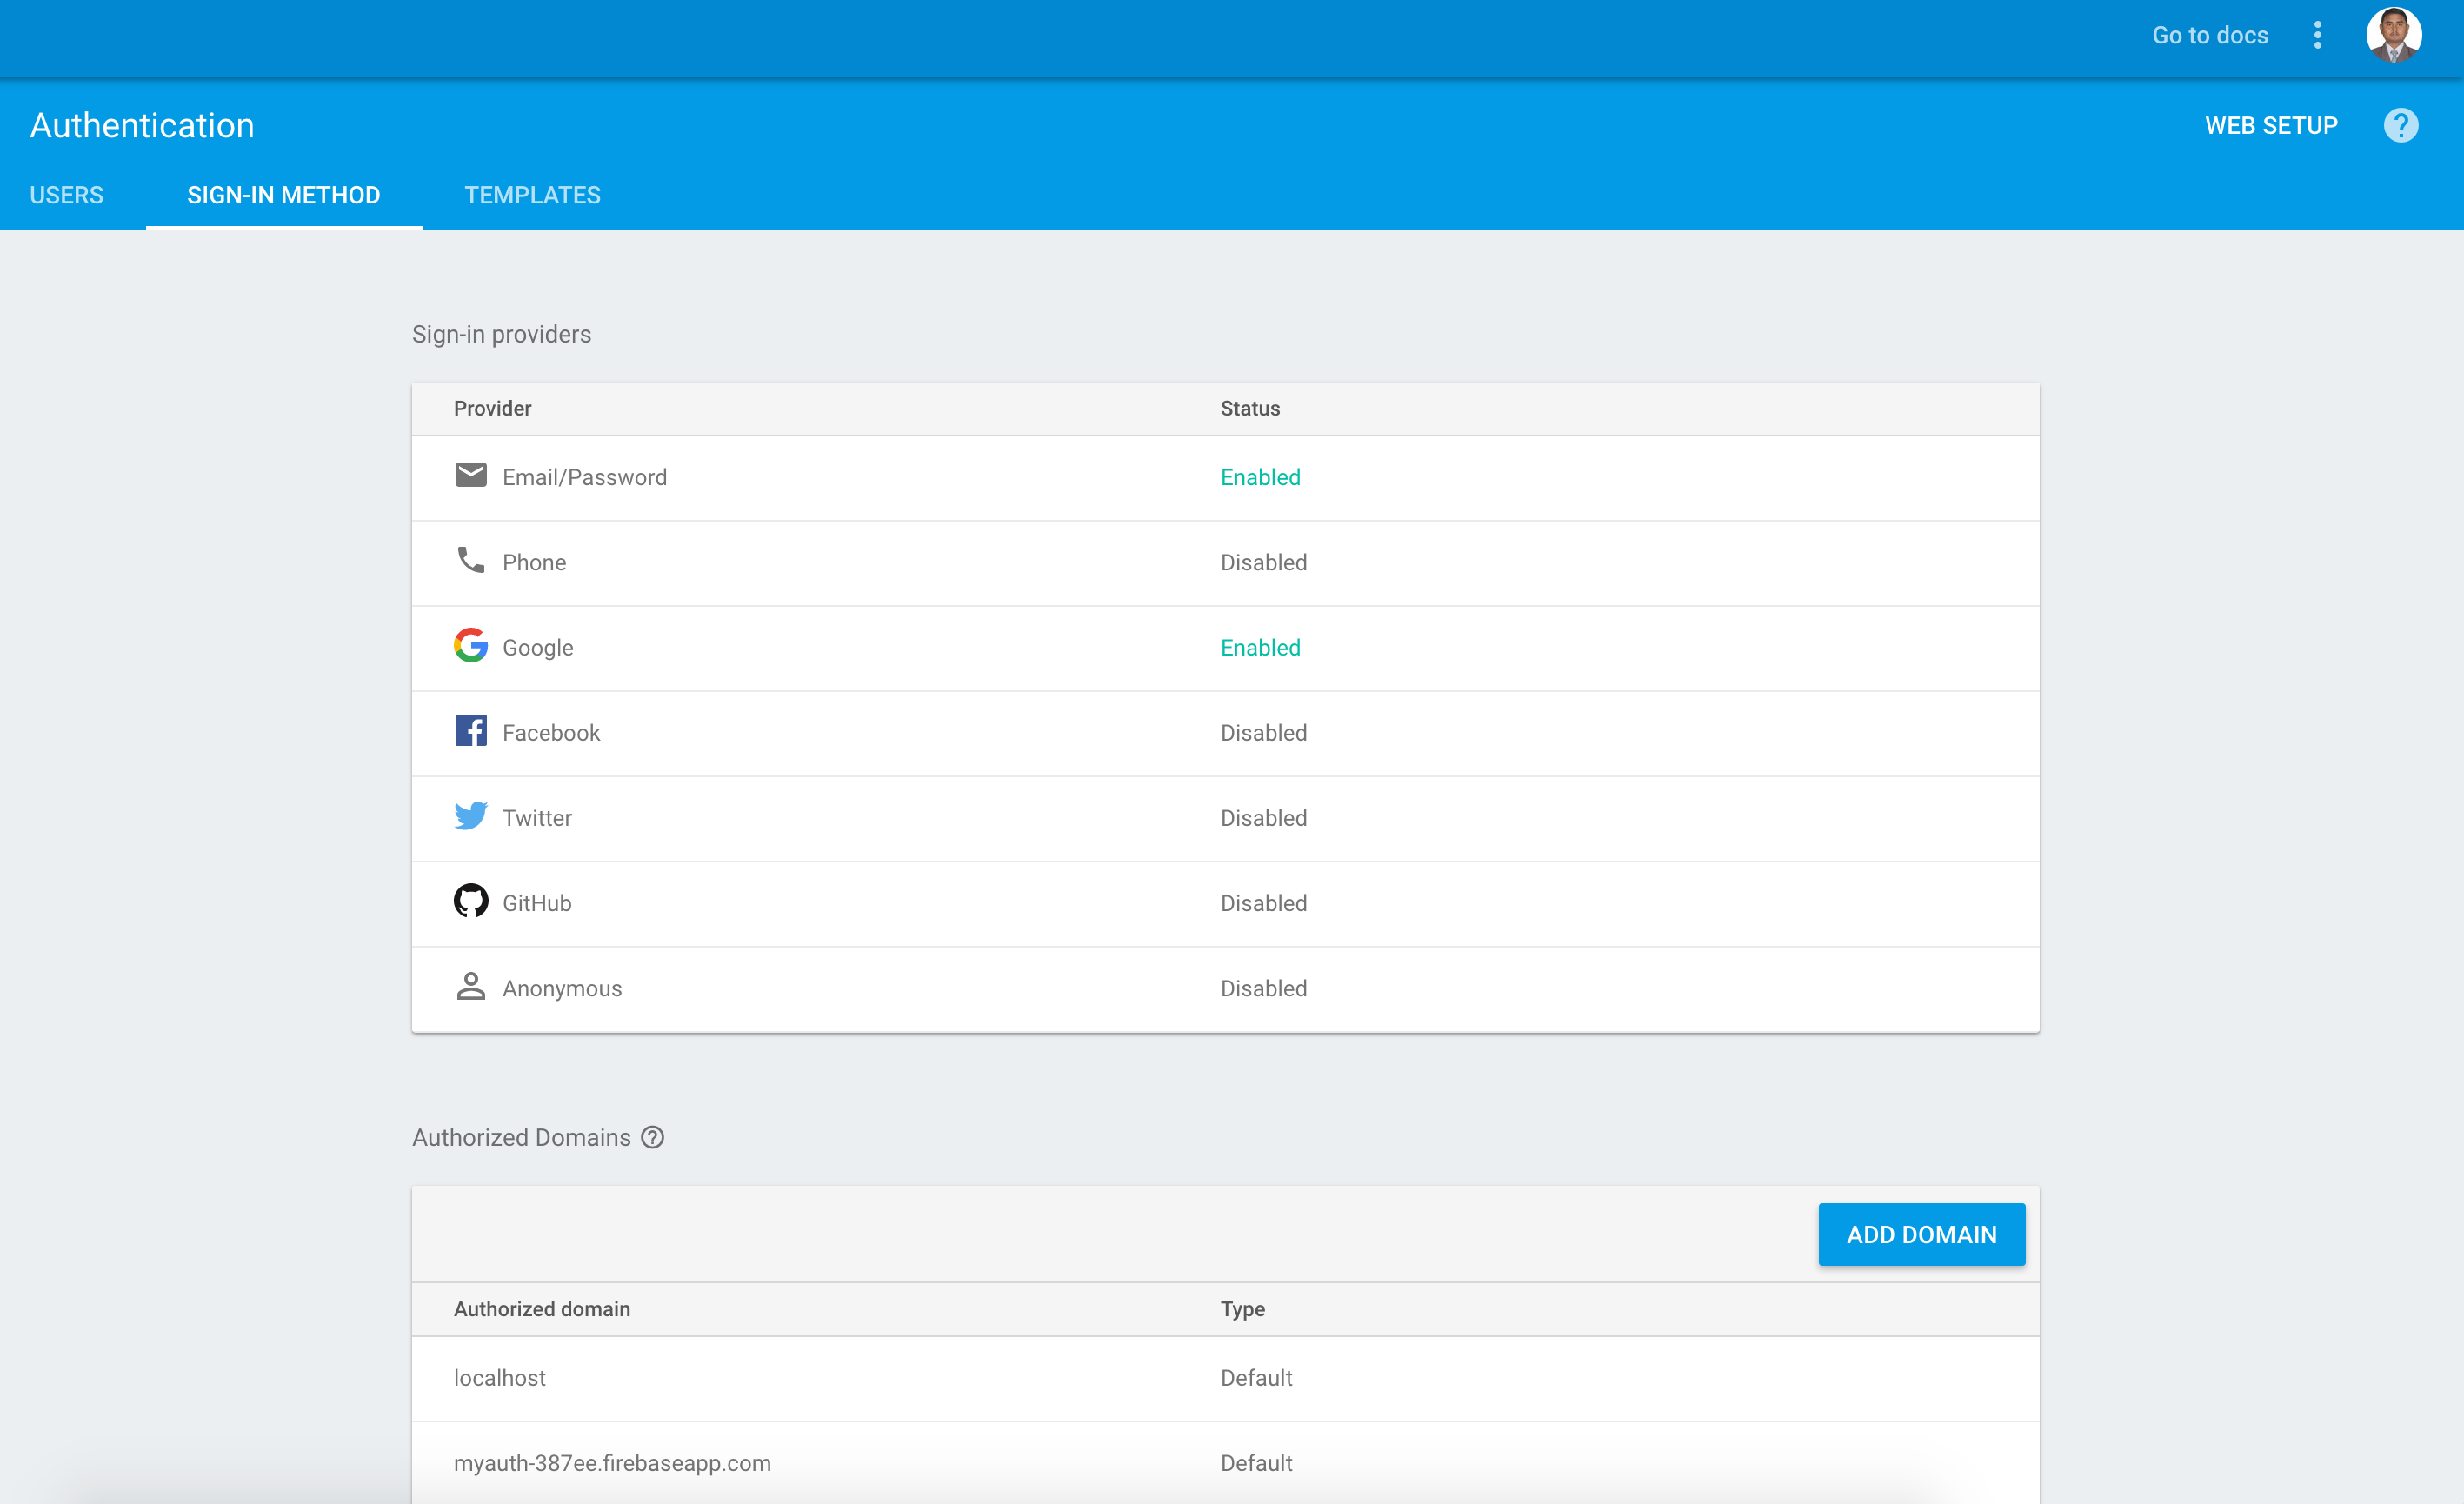
By default all of the providers are disabled. In this tutorial we would like to use Google authentication in our Angular 2 application, so we need to enable the Google authentication provider in this view:
I enabled Email/Password and Google providers. But in this tutorial I added only Google Provider. I will add Email/Password provider latter sometime. Also you will found button "Add Domain" which you have click to add domain, if have plans to publish this application somewhere else. In my case I added Heroku domain.
AngularFire2 is the official Firebase library for Angular 2. The project website can be found at AngularFire2 As we would like to use AngularFire2 to make use of the Firebase authentication service in our Angular 2 project we need to intall that library first:
1. $ npm install firebase angularfire2 --save
Running this command makes sure that both libraries - the Firebase core library and the AngularFire2 library - are added as dependencies to package.json and are downloaded to the node_modules folder.
In this step we are going to add Firebase configuration to environment.ts and environment.prod.ts. Please refer back to your note pad where you saved configuration and add to both environment files.
1. environment.ts

        export const environment = {
          production: false,
          firebase: {
            apiKey: "AIzaSyBLw9VEMKAnd_z2SnrTnn0LpyXMFtTG5cw",
            authDomain: "myauth-387ee.firebaseapp.com",
            databaseURL: "https://myauth-387ee.firebaseio.com",
            projectId: "myauth-387ee",
            storageBucket: "",
            messagingSenderId: "428126283447"
          }
        };

2. environment.prod.ts

        export const environment = {
          production: true,
          firebase: {
            apiKey: "AIzaSyBLw9VEMKAnd_z2SnrTnn0LpyXMFtTG5cw",
            authDomain: "myauth-387ee.firebaseapp.com",
            databaseURL: "https://myauth-387ee.firebaseio.com",
            projectId: "myauth-387ee",
            storageBucket: "",
            messagingSenderId: "428126283447"
          }
        };
In the next step we need to include the AngularFire library in our project. We do that in app.module.ts by first adding an import statement for AngularFireModule and then adding AngularFireModule to the array which is assigned to the imports property of the @NgModule decorator:
       import { AngularFireModule } from 'angularfire2';
       import { AngularFireDatabaseModule } from 'angularfire2/database';
       import { AngularFireAuthModule } from 'angularfire2/auth';
       import { environment } from 'environments/environment';
       ...........
       ..............

       add below modules to imports section

       AngularFireModule.initializeApp(environment.firebase),
       AngularFireDatabaseModule,
       AngularFireAuthModule,
Full version of AppModule
import { BrowserModule } from '@angular/platform-browser';
import { NgModule } from '@angular/core';
import { FormsModule } from '@angular/forms';
import { AppComponent } from './app.component';
import { TodosComponent } from './todos/todos.component';
import { Routes, RouterModule } from '@angular/router';
import { HttpModule } from '@angular/http';
import { BrowserAnimationsModule } from '@angular/platform-browser/animations';

import { AngularFireModule } from 'angularfire2';
import { AngularFireDatabaseModule } from 'angularfire2/database';
import { AngularFireAuthModule } from 'angularfire2/auth';
import { environment } from 'environments/environment';

import { AuthService } from './auth.service';
import { LoginComponent } from './login/login.component';


const routes: Routes = [
  { path: 'login', component: LoginComponent},
  { path: ':status', component: TodosComponent },
  { path: '**', redirectTo: '/all' }
];


@NgModule({
  declarations: [
    AppComponent,
    TodosComponent,
    LoginComponent
  ],
  imports: [
    BrowserModule,
    FormsModule,
    HttpModule,
    RouterModule.forRoot(routes),
    AngularFireModule.initializeApp(environment.firebase),
    AngularFireDatabaseModule,
    AngularFireAuthModule,
    BrowserAnimationsModule
  ],
  providers: [AuthService],
  bootstrap: [AppComponent]
})
export class AppModule { }
Note, that we’re adding the AngularFireModule to our application by calling the factory method initializeApp and passing in a configuration object. This firebase configuration object consists of a set of properties (apiKey, authDomain, databaseUrl, storageBicket, massagingSenderId). These settings are specific to the Firebase project and can be retrieved from the Firebase console.
In order to use the Firebase authentication service within our application it’s a good idea to create an Angular 2 service which encapsulates the code which is needed to deal with that service. Let’s create a new service by using Angular CLI again:
1. ng generate service auth
The following two files are added to the project structure:


    1. src/app/auth.service.ts
    2. src/app/auth.service.spec.ts
As we’re not focusing on setting up test cases, we’re not going to use file auth.service.spec.ts in this tutorial. The service implementation is done in file auth.service.ts:
import { Injectable } from '@angular/core';
import { AngularFireAuth } from 'angularfire2/auth';
import * as firebase from 'firebase/app';
import { Observable } from 'rxjs/Observable';

@Injectable()
export class AuthService {

  private authState: Observable<firebase.User>;
  private currentUser: firebase.User = null;

  constructor(public afAuth: AngularFireAuth) {
    this.authState = this.afAuth.authState;
  }
  getAuthState() {
    return this.authState;
  }

  loginWithGoogle() {
    return this.afAuth.auth.signInWithPopup(
      new firebase.auth.GoogleAuthProvider()).then((result) => {
      // This gives you a Google Access Token. You can use it to access the Google API.
      var token = result.credential.accessToken;
      // The signed-in user info.
      var user = result.user;
      // ...
      return true;
    }).catch(function(error) {
      // Handle Errors here.
      return false;
    });
  }

  logout(){
    return firebase.auth().signOut().then(function() {
      // Sign-out successful.
      return true;
    }).catch(function(error) {
      // An error happened.
    });
  }


}
We need to import AngularFire, AuthProviders and AuthMethods from the AngularFire2 library first. Next, the AngularFire service is injected into the constructor of the service. By using the public keyword we’re making sure that a public class member is created at the same time, so that the service instance is accesible from inside and outside of the service class.
The implementation of the AuthService class consists of two methods: loginWithGoogle() logout()
The loginWithGoogle() method is used to call the login() method of the auth object of the AngularFire instance. This login methods expects to get an configuration object which describes which authentication provider and which authentication method should be used. As we would like to use Google authentication the value AuthProviders.Google needs to be assigned to the provider property. When invoking the authentication process we would also like to display a pop-up window for signing in to the user. To achieve this application behaviour we need to assign the value AuthMethods.Popup to the method property.
The logout service method only consists of one line of code. We’re calling the method logout of the auth object of the AngularFire object to make sure that the user is logged out.
Now we now need to add our provider to app.module.ts as well. This is done by adding another import statement:
import { AuthService } from './auth.service';
Furthermore we need to add the providers property to the @NgModule decorator:
providers: [AuthService]
The providers property expects to get an array assigned. This array contains all service providers which should be made available. In our case this array contains one element: AuthService.
Next let’s add a login page to our application. We do that by generating a new component by using the following command:
$ ng generate component login
This command create a new folder src/app/login and in that new folder you'll find the following new files: login.component.ts login.component.css login.component.html login.component.spec.ts Note, when we’re using Angular 2 CLI to generate a new component, that component is automatically added to AppModule.
Let’s first implement the template of the component in login.component.html:
<div class="form-container">
  <img src="assets/images/lock.svg" id="lock">

  <span class="error" *ngIf="error">{{ error }}</span>


  <button (click)="loginGoogle()" id="google">Login With Google</button>
<!--  <button routerLink="/login-email" id="email">Email</button>

  <a routerLink="/signup" routerLinkActive="active" class="alc">No account? <strong>Create one here</strong></a>-->
</div>
Nothing unexpected here! The template is just consisting of a headline and button. The click event of the button is connected to the loginGoogle() method of the component. Let’s add the corresponding implementation to class LoginComponent in file login.component.ts:
import { Component, OnInit, HostBinding } from '@angular/core';
import {AuthService} from "../auth.service";
import { fadeInAnimation } from '../router.animations';
import { ActivatedRoute, Router } from '@angular/router';

@Component({
  selector: 'app-login',
  templateUrl: './login.component.html',
  styleUrls: ['./login.component.css'],
  animations: [fadeInAnimation],
  host: { '[@fadeInAnimation]': '' }
})
export class LoginComponent implements OnInit {
  error: any;

  constructor(private auth: AuthService, private router: Router, private route: ActivatedRoute){

  }

  ngOnInit() {

  }

  loginGoogle() {
    this.auth.loginWithGoogle().then((result) =>{
      if(result){
        location.replace('https://todo-firebaseauth.herokuapp.com');  // I choosed this way of location replace to overcome page refresh issue since I am not using hashing for routes
      }
    });
  }
}
The loginGoogle() method is implemented to make use of AuthService to initiate the Google login by using the service method loginWithGoogle. As this method is rerturning a Promise we can attach the then method to wait for the promise to be resolved. When the promise is resolved, we’re using the location replace to root of application.
we are going to add logic to make user coming to app is authenticated or not. If user authenticated he will see todo app, if not user will be redirected to login page.
app.component.ts
import {Component, OnInit} from '@angular/core';
import { Router } from '@angular/router';
import {AuthService} from "./auth.service";

@Component({
  selector: 'app-root',
  templateUrl: './app.component.html',
  styleUrls: ['./app.component.css']
})
export class AppComponent implements OnInit{
  title = 'MY TODOs';

  constructor(private auth: AuthService, private router: Router){

  }

  ngOnInit() {

    this.auth.getAuthState().subscribe(
      (user) => {
        if(!user){
          this.router.navigate(['/login']);
        }
      });

  }

}
#Summary
The Firebase authentication service makes it easy to integrate authentication functionality in your application. It support various authentication providers (like Google, Facebook, Github etc.) which can be activated and configured in the Firebase console. This makes it easy to use existing web accounts for authentication in your web or mobile application.
I have added couple of css to make login page looks pretty which I have not talked about in this tutorial as it is out of context. If you want to refer code you can refer from github repository.