elixir_ale provides high level abstractions for interfacing to GPIOs, I2C
buses and SPI peripherals on Linux platforms. Internally, it uses the Linux
sysclass interface so that it does not require platform-dependent code.
NOTE: elixir_ale is actively maintained. However, future work is focused on
elixir_ale 2.0 (aka Elixir Circuits). Elixir Circuits is more performant, has
API naming and return value changes that we couldn't put here, and supports
features like automatic I2C retries and GPIO pullups/pulldowns on some
platforms. I2C, SPI and GPIO are split up in 3 repositories. See Elixir
Circuits.
elixir_ale works great with LEDs, buttons, many kinds of sensors, and simple
control of motors. In general, if a device requires high speed transactions or
has hard real-time constraints in its interactions, this is not the right
library. For those devices, it is recommended to look at other driver options, such
as using a Linux kernel driver.
If this sounds similar to Erlang/ALE, that's because it is. This library is a Elixir-ized implementation of the original project with some updates to the C side. (Many of those changes have made it back to the original project now.)
If you're natively compiling elixir_ale, everything should work like any other
Elixir library. Normally, you would include elixir_ale as a dependency in your
mix.exs like this:
def deps do
  [{:elixir_ale, "~> 1.2"}]
end
If you just want to try it out, you can do the following:
git clone https://github.com/fhunleth/elixir_ale.git
cd elixir_ale
mix compile
iex -S mix
If you're cross-compiling, you'll need to setup your environment so that the
right C compiler is called. See the Makefile for the variables that will need
to be overridden. At a minimum, you will need to set CROSSCOMPILE,
ERL_CFLAGS, and ERL_EI_LIBDIR.
elixir_ale doesn't load device drivers, so you'll need to make sure that any
necessary ones for accessing I2C or SPI are loaded beforehand. On the Raspberry
Pi, the Adafruit Raspberry Pi I2C
instructions
may be helpful.
If you're trying to compile on a Raspberry Pi and you get errors indicated that Erlang headers are missing
(ie.h), you may need to install erlang with apt-get install erlang-dev or build Erlang from source per instructions here.
elixir_ale only supports simple uses of the GPIO, I2C, and SPI interfaces in
Linux, but you can still do quite a bit. The following examples were tested on a
Raspberry Pi that was connected to an Erlang Embedded Demo
Board. There's nothing special about
either the demo board or the Raspberry Pi, so these should work similarly on
other embedded Linux platforms.
A General Purpose Input/Output (GPIO) is just a wire that you can use as an input or an output. It can only be one of two values, 0 or 1. A 1 corresponds to a logic high voltage like 3.3 V and a 0 corresponds to 0 V. The actual voltage depends on the hardware.
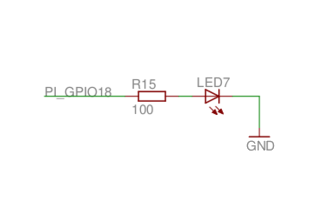
Here's an example of turning an LED on or off:
To turn on the LED that's connected to the net (or wire) labeled
GPIO18, run the following:
iex> alias ElixirALE.GPIO
iex> {:ok, pid} = GPIO.start_link(18, :output)
{:ok, #PID<0.96.0>}

iex> GPIO.write(pid, 1)
:ok
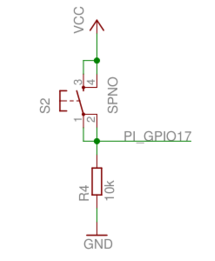
Input works similarly. Here's an example of a button with a pull down resistor connected.
If you're not familiar with pull up or pull down resistors, they're resistors whose purpose is to drive a wire high or low when the button isn't pressed. In this case, it drives the wire low. Many processors have ways of configuring internal resistors to accomplish the same effect without needing to add an external resistor. It's platform-dependent and not shown here.
The code looks like this in elixir_ale:
iex> {:ok, pid} = GPIO.start_link(17, :input)
{:ok, #PID<0.97.0>}

iex> GPIO.read(pid)
0

# Push the button down

iex> GPIO.read(pid)
1
If you'd like to get a message when the button is pressed or released, call the
set_int function. You can trigger on the :rising edge, :falling edge or
:both.
iex> GPIO.set_int(pid, :both)
:ok

iex> flush
{:gpio_interrupt, 17, :rising}
{:gpio_interrupt, 17, :falling}
:ok
Note that after calling set_int, the calling process will receive an initial
message with the state of the pin. This prevents the race condition between
getting the initial state of the pin and turning on interrupts. Without it,
you could get the state of the pin, it could change states, and then you could
start waiting on it for interrupts. If that happened, you would be out of sync.
The logic polarity of the gpio can be set to active-high or active-low via the :active_low? option flag.
Active-high is the standard behaviour, where a logical 1 maps to physical 1.
Active-low is when the logic is inverted, ie: logical 1 maps to physical 0.
Interrupts also follow this inversion; a physical transition of 0->1 is a rising edge, but in active-low logic this logically a falling edge.
This is useful as a layer of abstraction from hardware that allows you to think of a signal as true or false regardless of the physical value. Take for example a driver written for hardware device A and B that waits for some signal to be asserted true on a gpio line. On device A, the signal is physically 1 when true. On device B, the signal is physically 0 when true. The driver shouldn't have to care about the physical value, just that the logical value equates to 1. Thus by setting up the logic polarity for this pin in a hardware-specific configuration file, the core driver code is common to both A and B.
Using the example button with pulldown resistor,
iex> {:ok, pid} = GPIO.start_link(17, :input, active_low?: true)
{:ok, #PID<0.155.0>}

# button starts as open.  Physical gpio state is 0, but logically is 1
iex> GPIO.read(pid)
1

iex> GPIO.set_int(17, :both)
:ok

# flush any interrupts caused from setting up interrupts
iex> flush
{:gpio_interrupt, 17, :rising}
:ok

# button is closed.  Physical gpio state is 1, but logically is 0
iex> GPIO.read(pid)
0

# button released again.  check the interrupts
iex> flush
{:gpio_interrupt, 17, :falling}
{:gpio_interrupt, 17, :rising}
:okA Serial Peripheral Interface
(SPI) bus is a common multi-wire bus used to connect components on a circuit
board. A clock line drives the timing of sending bits between components. Bits
on the Master Out Slave In MOSI line go from the master (usually the
processor running Linux) to the slave, and bits on the Master In Slave Out
MISO line go the other direction. Bits transfer both directions
simultaneously. However, much of the time, the protocol used across the SPI
bus has a request followed by a response and in these cases, bits going the
"wrong" direction are ignored. This will become more clear in the example below.
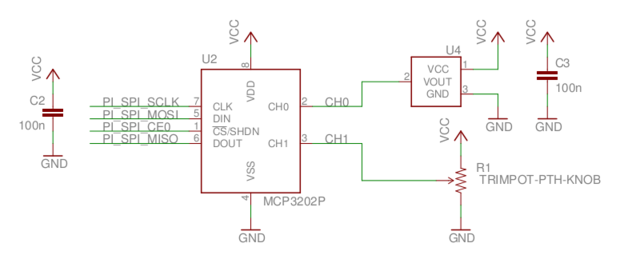
The following shows an example Analog to Digital Converter (ADC) that reads from either a temperature sensor on CH0 (channel 0) or a potentiometer on CH1 (channel 1). It converts the analog measurements to digital, and sends the digital measurements to SPI pins on the main processor running Linux (e.g. Raspberry Pi). Many processors, like the one on the Raspberry Pi, can't read analog signals directly, so they need an ADC to convert the signal.
The protocol for talking to the ADC in the example below is described in the MCP3002 data sheet. The protocol is very similar to an application program interface (API) for software. It will tell you the position and function of the bits you will send to the ADC, along with how the data (in the form of bits) will be returned.
See Figure 6-1 in the data sheet for the communication protocol. Sending a
0x68 first reads the temperature and sending a 0x78 reads the
potentiometer. Since the data sheet shows bits, 0x68 corresponds to 01101000b.
The leftmost bit is the "Start" bit. The second bit is SGL/DIFF, the third
bit is ODD/SIGN, and the fourth bit is MSBF. From table 5-1, if SGL/DIFF==1,
ODD/SIGN==0, and MSBF==1 then that specifies channel 0 which is connected to
the thermometer.
# Make sure that you've enabled or loaded the SPI driver or this will
# fail.
iex> alias ElixirALE.SPI
iex> {:ok, pid} = SPI.start_link("spidev0.0")
{:ok, #PID<0.124.0>}

# Read the potentiometer

# Use binary pattern matching to pull out the ADC counts (low 10 bits)
iex> <<_::size(6), counts::size(10)>> = SPI.transfer(pid, <<0x78, 0x00>>)
<<1, 197>>

iex> counts
453

# Convert counts to volts (1023 = 3.3 V)
iex> volts = counts / 1023 * 3.3
1.461290322580645
As shown above, you'll find out that Elixir's binary pattern matching is
extremely convenient when working with hardware. More information can be
found in the Kernel.SpecialForms documentation
and by running h <<>> at the IEx prompt.
An Inter-Integrated Circuit (I2C) bus is similar to a SPI bus in function, but uses fewer wires. It supports addressing hardware components and bidirectional use of the data line.
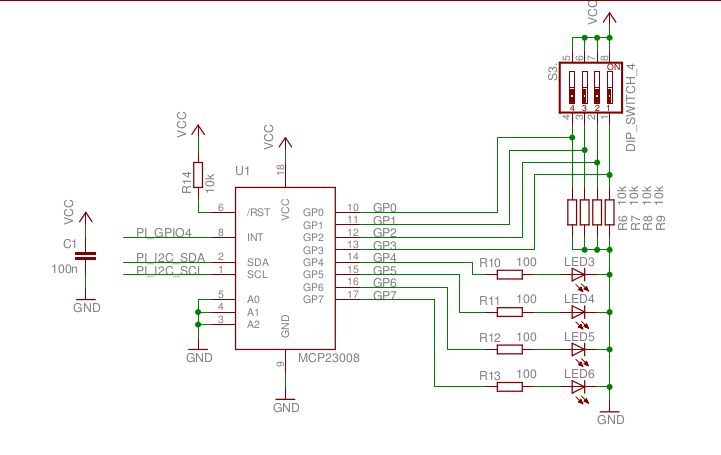
The following shows a bus IO expander connected via I2C to the processor.
The protocol for talking to the IO expander is described in the MCP23008 Datasheet. Here's a simple example of using it.
# On the Raspberry Pi, the IO expander is connected to I2C bus 1 (i2c-1).
# Its 7-bit address is 0x20. (see datasheet)
iex> alias ElixirALE.I2C
iex> {:ok, pid} = I2C.start_link("i2c-1", 0x20)
{:ok, #PID<0.102.0>}

# By default, all 8 GPIOs are set to inputs. Set the 4 high bits to outputs
# so that we can toggle the LEDs. (Write 0x0f to register 0x00)
iex> I2C.write(pid, <<0x00, 0x0f>>)
:ok

# Turn on the LED attached to bit 4 on the expander. (Write 0x10 to register
# 0x09)
iex> I2C.write(pid, <<0x09, 0x10>>)
:ok

# Read all 11 of the expander's registers to see that the bit 0 switch is
# the only one on and that the bit 4 LED is on.
iex> I2C.write(pid, <<0>>)  # Set the next register to be read to 0
:ok

iex> I2C.read(pid, 11)
<<15, 0, 0, 0, 0, 0, 0, 0, 0, 17, 16>>

# The operation of writing one or more bytes to select a register and
# then reading is very common, so a shortcut is to just run the following:
iex> I2C.write_read(pid, <<0>>, 11)
<<15, 0, 0, 0, 0, 0, 0, 0, 0, 17, 16>>

# The 17 in register 9 says that bits 0 and bit 4 are high
# We could have just read register 9.

iex> I2C.write_read(pid, <<9>>, 1)
<<17>>Most issues people have are on how to communicate with hardware for the first
time. Since elixir_ale is a thin wrapper on the Linux sys class interface, you
may find help by searching for similar issues when using Python or C.
For help specifically with elixir_ale, you may also find help on the
nerves channel on the elixir-lang Slack.
Many Nerves users also use elixir_ale.
While elixir_ale should never crash, it's hard to guarantee that weird
conditions on the I2C or SPI buses wouldn't hang the Erlang VM. elixir_ale
errors on the side of safety of the VM.
Please don't do that - there are so many better ways of accomplishing whatever you're trying to do:
- If you're trying to drive a servo or dim an LED, look into PWM. Many platforms have PWM hardware and you won't tax your CPU at all. If your platform is missing a PWM, several chips are available that take I2C commands to drive a PWM output.
- If you need to implement a wire level protocol to talk to a device, look for a Linux kernel driver. It may just be a matter of loading the right kernel module.
- If you want a blinking LED to indicate status,
elixir_alereally should be fast enough to do that, but check out Linux's LED class interface. Linux can flash LEDs, trigger off events and more. See nerves_leds.
If you're still intent on optimizing GPIO access, you may be interested in gpio_twiddler.
On the hardware that I normally use, PWM has been implemented in a
platform-dependent way. For ease of maintenance, elixir_ale doesn't have any
platform-dependent code, so supporting it would be difficult. An Elixir PWM
library would be very interesting, though, should anyone want to implement it.
There is a library available that supports the 1-wire protocol, see onewire_therm.
You'll need to fake out the hardware. Code to do this depends on what your hardware actually does, but here's one example:
Please share other examples if you have them.
The most common issue is communicating with an I2C or SPI device for the first time. For I2C, first check that an I2C bus is available:
iex> ElixirALE.I2C.device_names
["i2c-1"]
If the list is empty, then I2C is either not available, not enabled, or not
configured in the kernel. If you're using Raspbian, run raspi-config and check
that I2C is enabled in the advanced options. If you're on a BeagleBone, try
running config-pin and see the Universal I/O
project to enable
the I2C pins. On other ARM boards, double check that I2C is enabled in the
kernel and that the device tree configures it.
Once an I2C bus is available, try detecting devices on it:
iex> ElixirALE.I2C.detect_devices("i2c-1")
[4]
The return value here is a list of device addresses that were detected. It is still possible that the device will work even if it does not detect, but you probably want to check wires at this point. If you have a logic analyzer, use it to verify that I2C transactions are being initiated on the bus.
Options for debugging a SPI issue are more limited. First check that the SPI bus is available:
iex> ElixirALE.SPI.device_names
["spidev0.0", "spidev0.1"]
If nothing is returned, verify that SPI is enabled and configured on your system. The steps are identical to the I2C ones above except looking for SPI.
If you're having trouble with GPIOs, the files controlling them are in
/sys/class/gpio. ElixirALE is a thin wrapper on the files so if something can
be accomplished there, it usually can be accomplished in ElixirALE. One big
omission from the directory is support for internal pull-ups and pull-downs.
These are very convenient for buttons so that external resisters aren't needed.
Unfortunately, the way to handle pull-ups and pull-downs is device specific. If
you're on a Raspberry Pi, see gpio_rpi.
No. Elixir ALE only runs on Linux-based boards. If you're interested in controlling an Arduino from a computer that can run Elixir, check out nerves_uart for communicating via the Arduino's serial connection or firmata for communication using the Arduino's Firmata protocol.
Yes! If your life has been improved by elixir_ale and you want to give back,
it would be great to have new energy put into this project. Please email me.
This library draws much of its design and code from the Erlang/ALE project which is licensed under the Apache License, Version 2.0. As such, it is licensed similarly.


