Automatic code generation and execustion using Large Language Models
Codenator is a scalible AWS cloud solution for generating, testing, scanning and executing code.
It currently supports the following features:
- LLM Agent interaction Code generation using Bedrock or models hosted on Amazon SageMaker endpoints.
- Easy integration with new released models.
- Code security scan with Amazon CodeGuru or SemGrep.
- Code execution in sandboxed docker container with encrypted input powered by Amazon KMS.
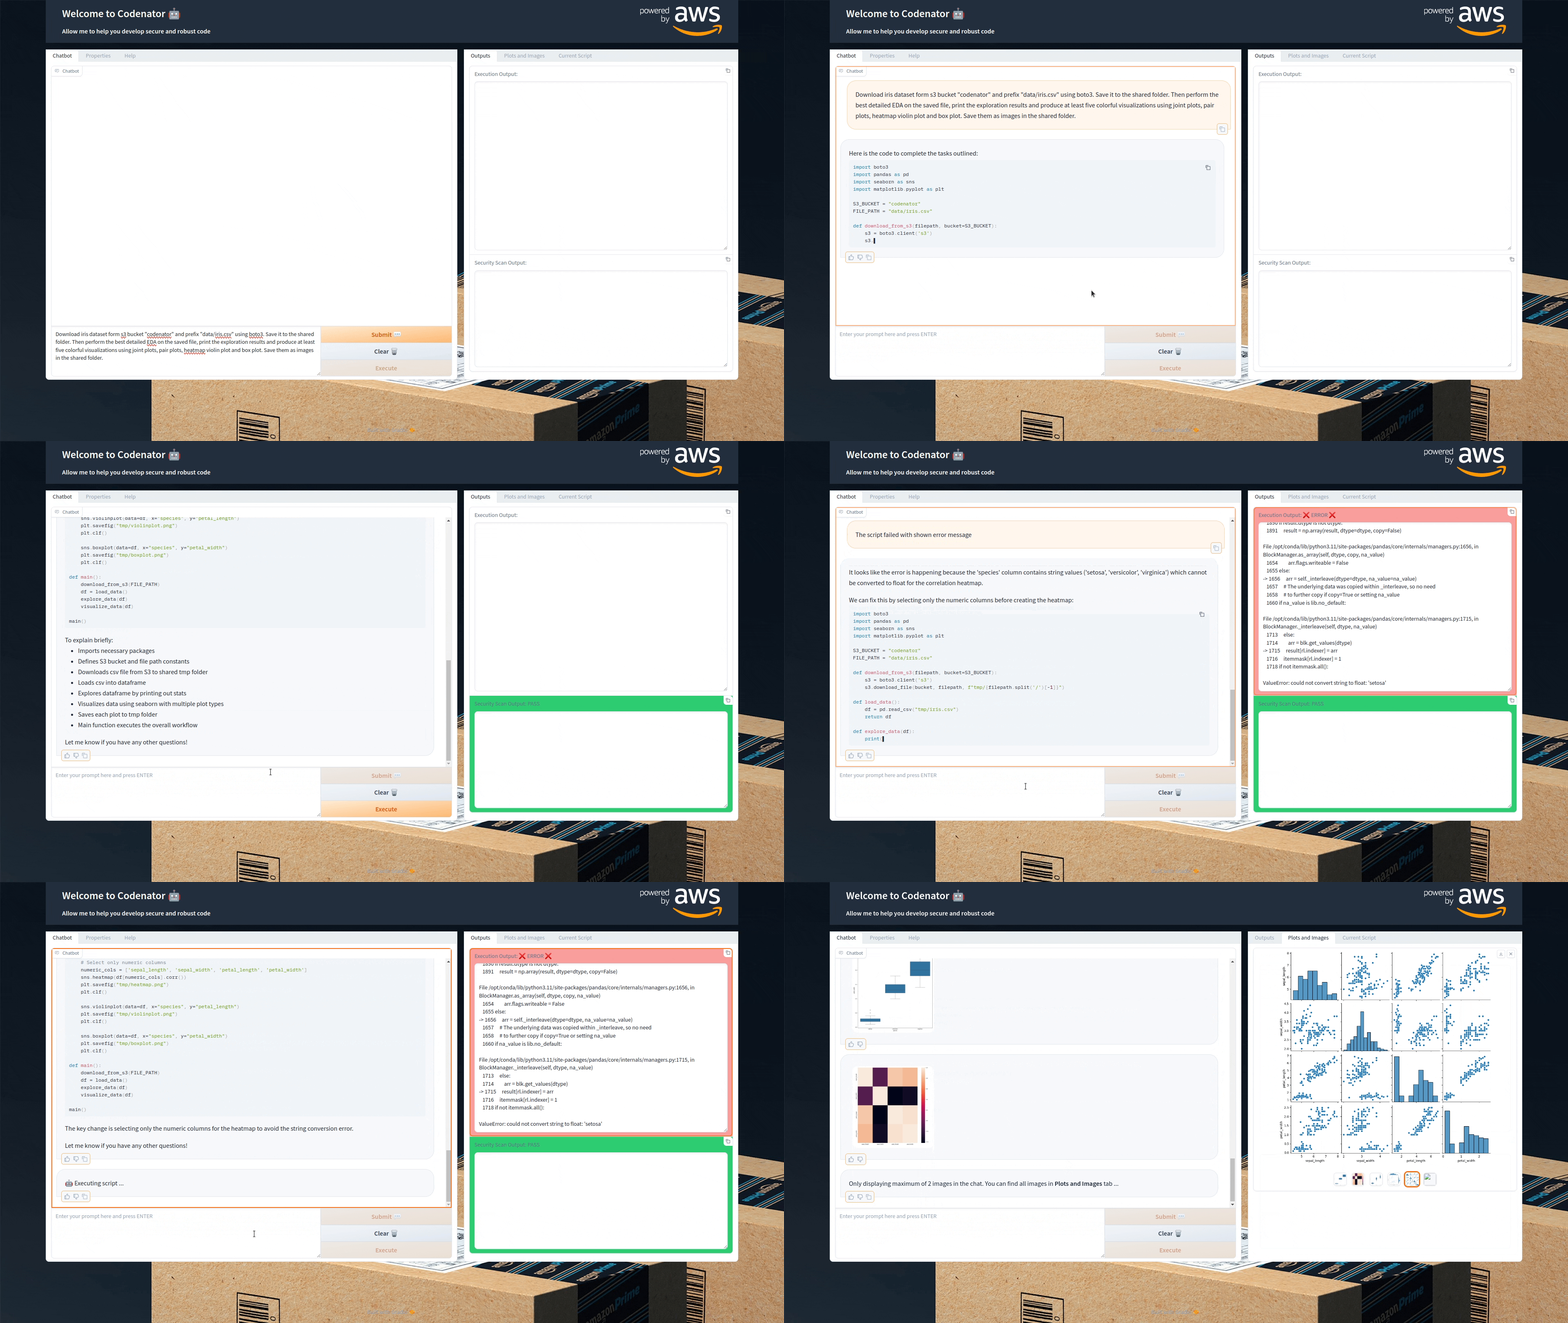
- Automatic execution failure feedback and correction.
- Code execution requires manual approval for increased security.
- Task storage and retrieval powered by Amazon Opensearch Serverless, to allow interaction with a task at later time.
- Shared storage folder to allow exchanging files between agent and code executor.

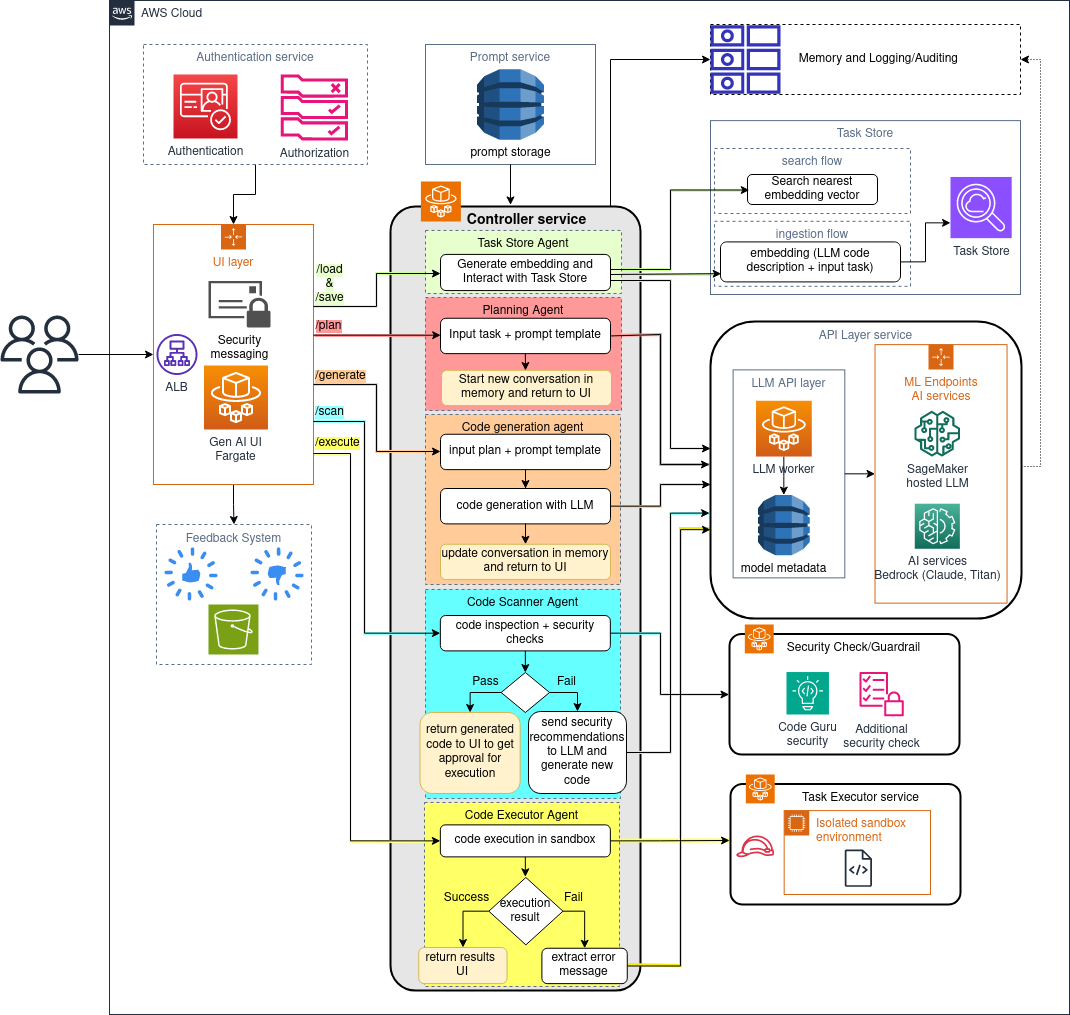
Below is an overview description of each component. To dive deep into each one, click on the provided link for each componsent.
- API layer (LLM Service): Responsible for unifing LLM invocations. It uses ECS Fragate and Amazon DynamoDB to interact with various LLM service providers and add new ones without the need to change code.
- Prompt Store: Powered by DynamoDB, enables storage, modification, versioning and retrieval of prompts at runtime.
- Controller (orchestration layer): Holds the the main logic for the Codenator agent and acts as a central component for the solution.
- WebUI (UI layer): Gradio app web ui.
- Code Executor (task executor): Executes code in sandbox, script must be encrypted with Amazon KMS. Currently supports Python, Java, JavaScript, R, Julia, Bash and Shell.
- Task store: Powered by Amazon Opensearch Serverless, to save and retrieve tasks.
- Code scanner (Security Check/Guradrail): Performs static code scanning to detect any vulnerabilities in generated code. Currently supports Amazon CodeGuru and SemGrep scanners.
- feedback: User feedback hosted on S3.
- logging: Conversation logging to S3.
- Authentication Layer: You can optionally to include an authentication layer to your application, which will enforce all users to get authenticated by Cognito Userpool prior to accessing this application. To use authentication, the following tempaltes will be used:
- auth-layer.yaml: This template is used to create Cognito Userpool and App Client to authenticate users coming to Web-UI Application Load Balancer
- web-ui-auth.yaml: This tempalte is built on top of web-ui.yaml with following changes to enforce all unauthenticated requests to send to Cognito Userpool for authentication.
- Add HTTPS Listener Rules to enforce unauthenticated requests to get authenticated by Cognito Userpool App Client.
- Updates default behaviour of HTTPS Listener to redirect all requests to get authenticated.
- root-tempalte-auth.yaml: This tempalte is built on top of root-template with following changes:
- Requires
PublicDomainNameandCertificateto integrate Cognito Userpool to Web-UI Application Load Balancer - Adds a new nested stack
AuthLayerStackwhich - Adds dependency of
AuthLayerStacktoWebUIService
- Requires
- Security certificate in AWS Certificate Manager. Used to access WebUI from public internet.
- Amazon CodeBuild can access GitHub. This usually means you created a CodeBuild project from AWS console and connected the project to GitHub in the past (see here)
For source code in a GitHub repository, the HTTPS clone URL to the repository that contains the source and the buildspec file. You must connect your AWS account to your GitHub account. Use the AWS CodeBuild console to start creating a build project. When you use the console to connect (or reconnect) with GitHub, on the GitHub Authorize application page, for Organization access, choose Request access next to each repository you want to allow AWS CodeBuild to have access to, and then choose Authorize application. (After you have connected to your GitHub account, you do not need to finish creating the build project. You can leave the AWS CodeBuild console.) To instruct AWS CodeBuild to use this connection, in the source object, set the auth object's type value to OAUTH.
The below setps assumes you are deploying the solution without Authentication layer. Use root-tempalte-auth.yaml in step 6 if you want to deploy to deploy the solution with Authentication layer.
- Clone this repository.
- Navigate to deployment folder:
cd codenator-automatic-code-generation-and-execution-using-llm-main/deployment/ - Inside the deployment folder, run upload-templates.sh script to upload the required CloudFormation templates to your specified S3 bucket in your current region, replacing <BUCKET_NAME> with your actual bucket name:
./upload-templates.sh <BUCKET_NAME> - Next, go to the CloudFormation console and create a new stack, specifying the object URL of the build-images.yaml template uploaded previously to your S3 bucket.
- When specifying the stack details for the CloudFormation stack you are creating from the build-images.yaml template, fill in the parameters as follows:
- For
ProjectBucket: Enter the name of the S3 bucket where you uploaded the CloudFormation templates earlier. This is the same bucket you passed to theupload-templates.shscript. - For
SourceRepo: Enter the GitHub repo URL where the sample application code is stored:https://github.com/aws-samples/codenator-automatic-code-generation-and-execution-using-llm.git
- For
- When specifying the stack details for the CloudFormation stack you are creating from the build-images.yaml template, fill in the parameters as follows:
- After the CloudFormation stack finishes creating successfully with a status of CREATE_COMPLETE, go back to the CodeBuild console to check on the image build project.
- Verify that the latest build status for the images shows as
Succeeded. - This indicates that the Docker images defined in the buildspec were built properly from the application code linked in the stack.
- If the build status is anything other than
Succeeded, check the build logs for errors and troubleshoot as needed.
- Verify that the latest build status for the images shows as
- Next, create another stack with root-template.yaml. Fill in the stack parameters as follows:
- For
Certificate: Enter the ARN of the certificate you want to use which must be located in AWS Certificate Manager. - For
ProjectBucket: Enter the name of the S3 bucket where you uploaded the templates. This should match what you specified for the previous stack.
- For
See CONTRIBUTING for more information.
This library is licensed under the MIT-0 License. See the LICENSE file.
