We deploy the 10X Genomics cellranger pipeline on AWS. This pipeline builds upon previous work done by Nick (following the AWS batch genomics example, office hour suggestions from solutions architects at the AWS loft in SOHO, and recommendations from the many brains that were picked.
This repository is not affiliated with 10X Genomics.
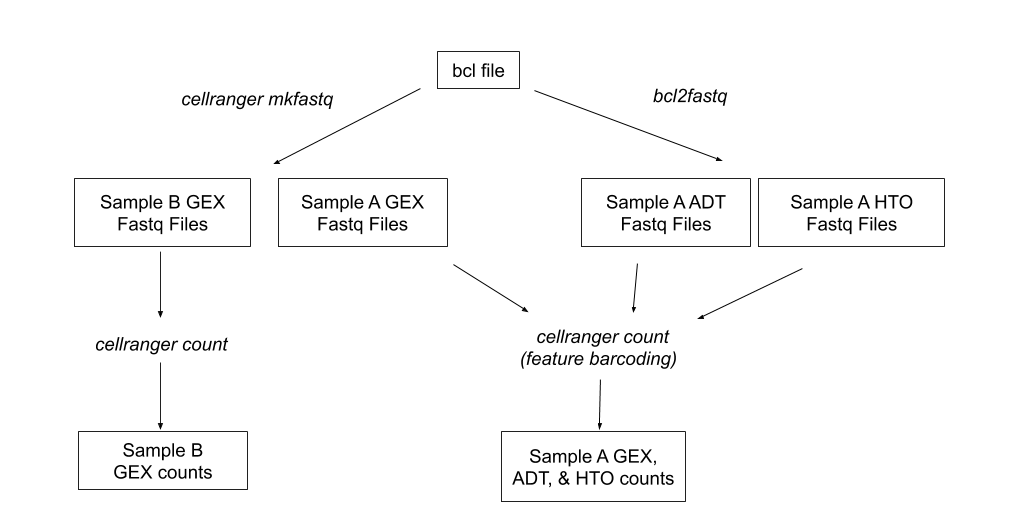
The pipeline takes us from bcl files to fastq files and finally to GEX UMI counts. If we use cellranger's feature barcoding option, we also get ADT and HTO counts.
For a high-level walkthrough of the components our pipeline uses, visit this document
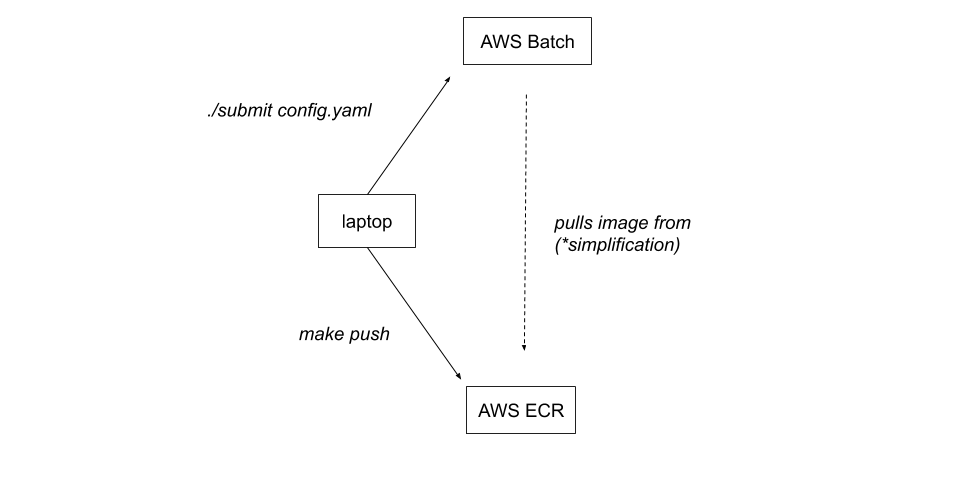
*Batch itself doesn't pull the image from ECR. Batch requests an EC2 instance and that EC2 instance pulls our image from ECR and runs it.
In order to run the pipeline, the user must do the following:
-
Set up a root directory for the experiment on AWS s3. For our team, that means creating a subdirectory in the
10x-data-backupbucket that follows the convention explained in the architecture document -
Create a
raw_datasubfolder in the root experiment directory and add the bcl file(s). -
Create a yaml configuration file for the experiment.
For more information on setting up your configuration file, please visit these annotated exaple configuration files:
- From the root of this repository, run the following command,
substituting the path to your yaml configuration file:
./scripts/submit configs/config.yaml
To check the status of your jobs, log into the AWS console and visit the AWS Batch
page. On the left-hand side of the page, select Jobs then select the appropriate
queue from the Queue dropdown menu. Jobs will be submitted to the
prod-cellranger-pipeline queue by default. Otherwise, check the queue corresponding
to your cellranger pipeline environment.
The current job status and cloudwatch logs will be available through this interface.
To run the pipeline during development, we recommend using a command like the below, substituting your own configuration yaml file. This will ensure that any changes are reflected in the Docker images on AWS ECR.
./scripts/make-all-versions.sh push-latest && ./scripts/submit configs/config.yaml
In development, we' always use the latest version of our images,
e.g. cellranger-3.0.2-bcl2fastq-2.20.0:latest. This is because the
particular image that a job uses is hard-coded in the job definition;
if we weren't using latest, then, every time we wanted to test a new
version of the image, we'd have to 1. push and then 2. update the job
definition's image tag to be the git commit tag that we just pushed .
To keep a tight feedback loop, it's best to perform as much
development as you can locally. For example, if you're making changes
to the ./bin/run_mkfastq script, you might be able to validate your
changes locally and not waste time waiting for Batch to do its thing;
you could use the following workflow:
-
Make the image you need using
make build(we won't runmake pushnow because we don't need to upload our image to ECR yet.) -
docker runthe image you just made. The following command is just one way that you might run mkfastq locally. To break it down:-e DEBUG=truehelps to get debug output from our scripts; the line after that allows us to pass our AWS credentials to the container, so that we can pull raw data from S3; the--memoryand--cpusoptions help us to ensure that the container doesn't use all of our computer's resources; the very last line, beginning withrun_mkfastq, shows the script that we want to run and the input JSON that we're passing to it.
docker run \
    -e DEBUG=true \
    $(< ~/.aws/credentials tail -2 | tr -d ' ' | sed -r 's/^(.*)=/-e \U\1=\E/' | tr '\n' ' ') \
    --memory 10g \
    --cpus $(( $(nproc) / 2 )) \
    cellranger-2.2.0-bcl2fastq-2.20.0:latest \
    run_mkfastq '{"bcl_file": "cellranger-tiny-bcl-1.2.0.tar.gz", "experiment_name": "runtinybcl_himc0_111618", "run_id": "tinybcl", "samples": [{"name": "test_sample", "index_location": "SI-P03-C9"}]}'
By default, cellranger will try to use as much resources as it can; we
use docker run's --memory and --cpus flag in order to limit the
resources available to the container, and by extension to cellranger,
the process running inside that container.
There are limits to local development, and at some point you'll have
to start testing your changes on our AWS infrastructure; you might
even have to make changes to the AWS infrastructure itself. Our AWS
infrastructure is defined in the ./infrastructure directory, and
changes should be applied by changing those files and running
terraform; see the infrastructure README
for details.
You can use the development pipeline by specifying the
CELLRANGER_PIPELINE_ENV environment variable in your submit
invocation, e.g. CELLRANGER_PIPELINE_ENV=dev ./scripts/submit ./configs/some-config.yaml
All remote development should be done against the dev pipeline; once the changes are known to be good, the changes should be merged into master and then applied to the prod pipeline.
10x Genomics has a toy dataset available. It can be found here
under the Example Data section. This tiny-bcl dataset is useful for developing
with a quick feedback loop.
We use the latest image tag in development, but in prod we pin the
image that we're using so that we can be sure of what is running. In
order to use a new image in prod, you'll need to update the
image_tag variable in the prod.tfvars file with the specific image
tag shown in the docker push output; this value will always be a short
git sha, e.g abc123.
- Automatically migrate fastq files from S3 to Glacier after 1 year
- Automatically migrate bcl file from S3 to Glacier after 1 month
- Account for feature barcoding experiments where the CITE-seq samples may come from a different combination of bcl files than the GEX samples.
- Use an AWS lambda function to auto-detect raw data and config files on s3 and initialize the pipeline
- Potentially utilize pipenv for this project and its local python dependencies, as yaml and boto3 are not in the stdlib

