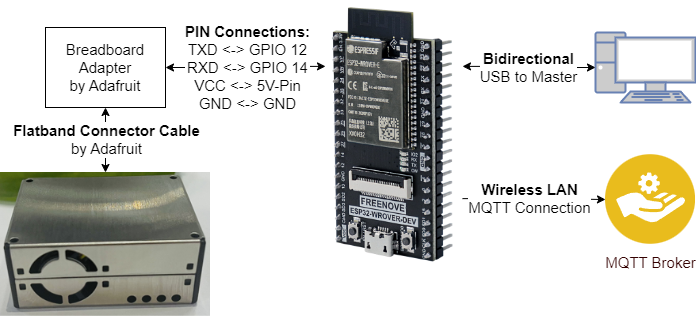
The Internet of Things (IoT) course at the Berliner Hochschule für Technik deals with various aspects and technologies to create the implementation of sensors, devices and software applications for a resource-saving, interoperable system landscape. With this in mind, the focus in the practical education is set on MQTT. MQTT is a communication protocol standardized by OASIS, especially for IoT applications. In the following, the use of MQTT is realized experimentally by means of a particle sensor and a microcontroller. The network and MQTT broker required for MQTT are provided by the laboratory and are not the subject of this repository. The aim is to read out the particle sensor data at regular intervals and send it to the broker using a separate topic.
| Contributor | Alias | Contact |
|---|---|---|
| Merlin Seela | IAmAMerlin |    |
| Thomas Zimmermann | Zimpto |  |
The folder dustlib contains code written by Aleksander Kurczyk. We are not owner of this code in any form or do we want to be. We included the code here for simplicity. All credit goes to the original creator.
The project is based on mqtt5 an example project from esp-idf.
For Licensing check out the individual code repositories as well as our License.
You can acquire the Source Code by simply installing git, opening a terminal and executing git clone https://github.com/merlinseela/ESP32_MQTT_PMS5003.git. It will download the source code.
Note: This is not binding but if you decide to get other Software and/or Hardware the Code most likely will not work without adjustments.
This project was build using Visual Studio Code and ESP-IDF Extension by Espressif.
Hardware:
- Setup the Hardware as shown in this map.
Note: It is assumed you have a working MQTT-Broker running.
- Download and install Visual Studio Code.
- Open Visual Studio Code.
- Open the Extension Tab and search for
ESP-IDF. Install the Extension. - In the Menu choose
File->Open Folder. Navigate to the Source Code Folder you cloned earlier and open it. - Open the Command Palette in VS-Code and Search for
ESP-IDF: SDK Configuration Editorand select the corresponding entry. A new Tab should open. (Note:May take a while due to server configuration.) - In the Configuration search with keyword
wifiand enter theWiFi SSIDandWiFi Passwordwhich hosts the MQTT Broker. - In the Configuration search with keyword
brokerand enter theBroker URLof you MQTT-Broker. - Assuming you already connected your ESP open the command Palette again, search for
ESP-IDE: Select Port to Useand select the right port. - Open the Command Palette again and search for
ESP-IDF: Build, Flash and Start a Monitor on your Deviceand execute it. Note: If asked which Protocol to use, selectUART.
If everything was setup right the application should be build, flashed and monitored on the PC while also sending data via MQTT to your Broker.
Happy Coding!
