This is a simple small and compact stopwatch created to measure lap times of an mBot arround a line-following circuit.
We needed a low-cost solution to measure lap times in a automatic, precise and simple way, so the kids could improve their work. This was designed and created with the EEI's Robot Competition held at the Universtiy of Vigo in mind, where up to 14 circuits are operated simultaneously!
Once the system is turned on, or reset (pushing the red button), it waits until the mBot (or any other thing) passes by the sensor and starts counting (showing it in real time). When the mBot passes again, it records the lap time, showing it for two seconds, but also keeps counting the next lap. Once the mbot performs the preconfigured number of laps (two by default), the system stops counting at all. At this moment, you can push the white button to see the stored lap times (round robin) or the red reset button to start all over again.
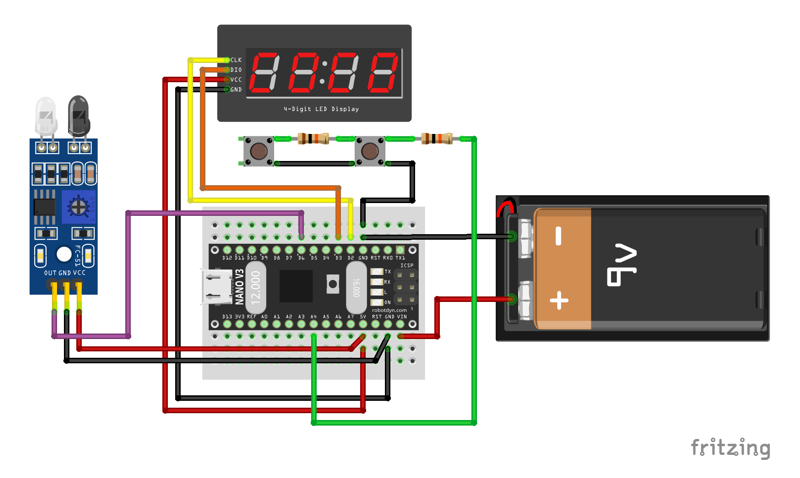
It uses an infrared sensor to detect de mBot passing by and a 4-Digit LED Display to display the time (current or lap). It's based on an Arduino Nano type board, although any other similar board could be used as well. Some parameters in the stopwatch program can be configured. Refer to the Code part to find out which/how.
In this folder you can find the FreeCAD model with all the parts, so you can adjust/modify/adapt the design to your own available parts (or desires). There is also an STL file of the frame, ready to be sliced and 3D-printed.
In this folder you can find the code, ready to be used with the PlatformIO core system: just execute the platformio run -t upload command from within the folder (or run the buildandupload.sh shell script). It makes use of the TM1637 library by Frankie Chue.
If you want to use it with the Arduino IDE, just place all the files in the /src and /lib/TM1637 folders together into a folder called /crono and then open the crono.ino file into de IDE itself: from there on, you can operate as usual with any other Arduino program.
In the top part of the crono.ino file there are some configurable parameters:
CLK,DIO: pins to which the display is connected (2 and 3 by default)IR_PIN: pin to which the IR sensor is connected (6 by default)KP_PIN: pin to which the keypad is connected (A4 by default)NUM_LAPS: number of laps to record/store (2 by default)SHOW_LAP_TIME: for how long do we show the previous lap time before resuming normal counting (milliseconds, 2s by default)CLEAR_WINDOW: security window during which the sensor is ignored after an initial detection, to prevent artifacts (milliseconds). Should be aproximately the size of the mBot passing time (1.5s by default)
In this folder you can find the assembled circuit (done with Fritzing), including the way to mount the switches and the resistors together to get them working with the code. All the connected pins correspond also to the default values in the code itself.
These are the parts I used during the creation of this project. Mentioned here as a reference (no affiliation).
-
1x 4-Digit LED display, green, clock double-dot, 0.36"
https://www.aliexpress.com/store/product/4-Digit-LED-0-36-Display-Tube-clock-doubledot-7-segments-GREEN-TM1637-disp-size-30x14mm/1950989_32797703570.html -
1x Mini Breadboard 170 pins, 3.5x4.5cm, black
https://www.aliexpress.com/store/product/Solderless-Mini-Breadboard-size-3-5x4-5cm-Black-color/1950989_32804715393.html -
1x Nano ATmega328P MicroUSB V3, compatible Arduino Nano V3
https://www.aliexpress.com/store/product/Nano-CH340-ATmega328P-MicroUSB-Compatible-for-Arduino-Nano-V3/1950989_32572612009.html -
9x Jumper wires 10 cm Male to Female
https://www.aliexpress.com/store/product/Jumper-Dupont-wire-4-100mm-Male-to-Female-M-F-3x40L-ribbon-3-ribbons-Totally-120/1950989_32802249806.html
-
1x Infrared Obstacle Sensor
https://www.aliexpress.com/wholesale?SearchText=infrared+sensor+obstacle -
2x B3F-4055 tactile switch with cap
https://www.aliexpress.com/wholesale?SearchText=b3f-4055+with+cap -
2x 10k Ohm resistor 1/4w
https://www.aliexpress.com/wholesale?SearchText=10k+resistor -
1x 9V battery connector
https://www.aliexpress.com/wholesale?SearchText=9+volt+battery+connector -
1x M3 5 mm screw
https://www.aliexpress.com/wholesale?SearchText=m3x5+screw
This work is licensed under a GNU General Public License v3.0: see the LICENSE file for details.


