Goal: Implement an isosurface created from metaballs using the marching cubes algorithm.
Metaballs are organic-looking n-dimensional objects. We will be implementing a 3-dimensional metaballs. They are great to make bloppy shapes. An isosurface is created whenever the metaball function crosses a certain threshold, called isolevel. The metaball function describes the total influences of each metaball to a given points. A metaball influence is a function between its radius and distance to the point:
f(point) = (radius * radius) / (distance * distance)
By summing up all these influences, you effectively describes all the points that are greater than the isolevel as inside, and less than the isolevel as outside (or vice versa). As an observation, the bigger the metaball's radius is, the bigger its influence is.
Marching cubes essentially voxelize the space, then generate triangles based on the density function distribution at the corners of each voxel. By increasing the voxelized grid's resolution, the surface eventually gets that blobby, organic look of the metaballs. Marching cubes can achieve a similar effect to ray marching for rendering implicit surfaces, but in addition to the rendered image, you also retain actual geometries.
Marching cubes are commonly used in MRI scanning, where you can generate geometries for the scans. Marching cubes are also used to generate complex terrains with caves in games. The additional geometry information can handily support collision and other physical calculation for game engines. For example, their bounding boxes can then be computed to construct the acceleration data structure for collisions.
Warning: this assignment option requires more effort than the ray marching option. The two base codes diverge significantly, so switching options midway can be costly for your time and effort.
We suggest reading the following resources before starting your assignment:
- Generating complex terrain from GPU Gems 3.
- Polygonising a scalar field by Paul Bourke.
- Marching squares by Jamie Wong.
We have provided a basecode as a reference. You are welcome to modify the framework for your project. The basecode implements metaballs on the CPU.
main.js:
App:
This is a global configuration object. All information for the marching cubes are stored here.
Note: App.visualDebug is a global control of all the visual debugging components. Even though it is helpful for development, it could be memory intensive. Toggle this flag off for better perforamance at high resolution.
marching_cubes.js:
-
class MarchingCubes: This class encapsulates everything about the metaballs, grid, voxels, and sampling information. -
class Voxel: This class contains information about a single voxel, and its sample points. Polygonization happens here.
inspect_point.js:
class InspectPoint: This class simply contains a single sample point that can output its value on the screen at its pixel location.
metaball.js:
class Metaball: This class represents a single metaball.
marching_cube_LUT.js:
This file contains the edge table and the triangle table for the marching cubes.
Implement the update for metaballs to move its position based velocity. Reverse the velocity whenever the metaball goes out of bounds. Since the metaball function is not well defined at the boundaries, maintain an additional small margin so that the metaball can reverse its moving direction before reaching the bounds.
Implement the metaball function inside sample of MarchingCubes. This function should return the total influences of all moving metaballs with respect to a given point.
In order to polygonize a voxel, generate new samples at each corner of the voxel. Their isovalues must be updated as the metaball function changes due of metaballs moving.
Implement polygonize inside Cell class. This function should return the list of vertices and normals of the triangles polygonized in the voxel.
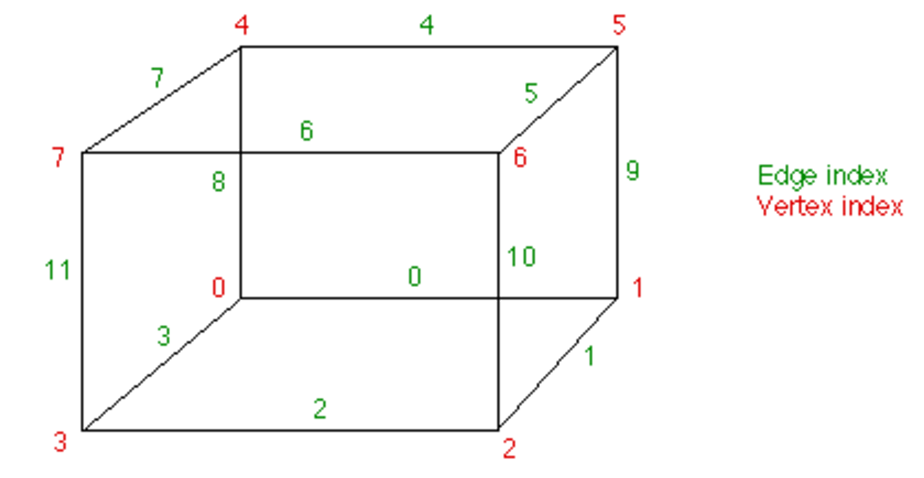
To compute the vertices, we have provided the look-up tables from Paul Bourke's. The table assumes the following indexing scheme:

-
The eight corners can be represented as an 8-bit number, where 1 means the isovalue is above or below the isolevel based on your implementation.
-
The twelve edges can be represented as a 12-bit number, where 1 means that the isosurface intersects with this edge.
-
EDGE_TABLE: This table returns a 12-bit number that represents the edges intersected by the isosurface. For each intersected edge, compute the linearly interpolated vertex position on the edge according to the isovalue at each end corner of the edge.
-
TRI_TABLE: This table acts as the triangle indices. Every 16 elements in the table represents a possible polygonizing configuration. Within each configuration, every three consecutive elements represents the indices of a triangle that should be created from the edges above.
Compute the normals using the gradient of the vertex with respect to the x, y, and z. The normals are then used for shading different materials.
The mesh for the metaball's isosurface should be created once. At each frame, using the list of vertices and normals polygonized from the voxels, update the mesh's geometry for the isosurface. Notice that the total volume of the mesh does change.
Interesting shader materials beyond just the provided threejs materials. We encourage using your previous shaders assignment for this part.
- Metaball can be positive or negative. A negative metaball will substract from the surface, which pushed the surface inward. Implement a scene with both positive and negative metaballs. (10 points)
- More implicit surfaces! For example: planes, mesh, etc.). Some very interesting ideas are to blend your metaballs into those surfaces. (5 points for each)
- Update
README.mdto contain a solid description of your project - Publish your project to gh-pages.
npm run deploy. It should now be visible at http://username.github.io/repo-name - Create a pull request to this repository, and in the comment, include a link to your published project.
- Submit the link to your pull request on Canvas.
npm run build- Add and commit all changes
npm run deploy- If you're having problems with assets not linking correctly, make sure you wrap you're filepaths in
require(). This will make the bundler package and your static assets as well. So, instead ofloadTexture('./images/thing.bmp'), doloadTexture(require('./images/thing.bmp')).