| page_type | languages | products |
|---|---|---|
sample |
csharp |
dotnet |
Build AD FS plug-in to block authentication or enforce MFA based on user risk level determined by Azure AD Identity Protection
Build your own plug-in with AD FS Risk Assessment Model that uses the risk level of a user determined by Azure AD Identity Protection to allow or block authentication or enforce additional authentication (MFA) while authenticating the user againsts AD FS.
The plug-in once registered with AD FS runs in line with AD FS authentication process. For any user authenticating against AD FS, the plug-in pulls in the Risk Level of the user using the Azure AD Identity Protection riskyUser API and initiates one of the follwing actions
- Blocks authentication if user's risk level is “high”
- Enforces additional authentication (MFA) if user's risk level is “low” or “medium”
- Allows authentication if user's risk level is "none", "hidden" or "unknownFutureValue"
Note
This sample is only to illustrate how cloud intelligence from Azure AD Identity Protection can be used to further strengthen the AD FS authentication process. By no means is this sample plug-in we are building an enterprise ready solution.
- AD FS 2019 installed and configured
- Synchronize AD (on-prem) users with Azure AD using synchronization tools such as Azure AD Connect
- Azure AD Premium P2 license to be able to call riskyUser API (https://graph.microsoft.com/beta/riskyUsers)
Note
This sample plug-in gets the complete list of risky users for each authentication which can cause delay in authentication process. Therefore, the plug-in should be tested against an Azure AD tenant with a few number of users to avoid delays or should be optimized to use Get riskyUser method that gets the details of a specific user
- Configure additional authentication method for AD FS such as Azure MFA
- .NET Framework 4.7 and above
- Visual Studio
The following procedure will walk you through building a sample plug-in dll.
-
Download the sample
-
Open the project
ThreatDetectionModule.slnusing Visual Studio -
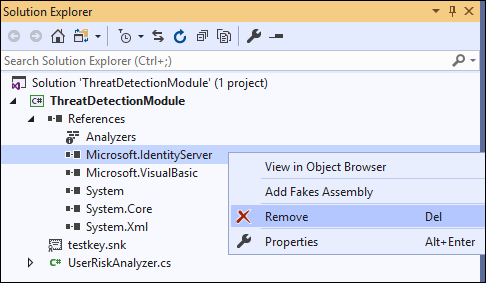
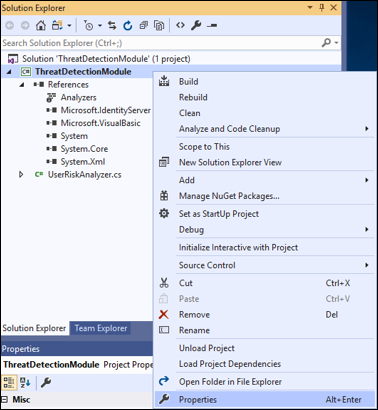
Remove the
Microsoft.IdentityServer.dllfrom the Solutions Explorer as shown below:
-
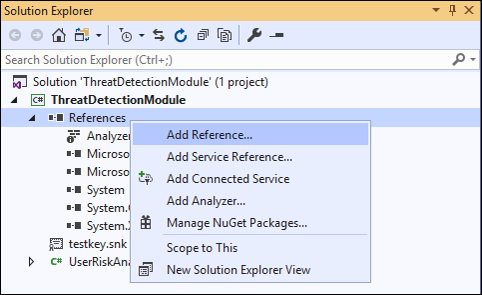
Add reference to the
Microsoft.IdentityServer.dllof your AD FS as shown belowa. Right click on References in Solutions Explorer and select Add Reference…
b. On the Reference Manager window select Browse. In the Select the files to reference… dialogue, select
Microsoft.IdentityServer.dllfrom your AD FS installation folder (in my case C:\Windows\ADFS) and click Add.[!NOTE] In my case I am building the plug-in on the AD FS server itself. If your development environment is on a different server, copy the
Microsoft.IdentityServer.dllfrom your AD FS installation folder on AD FS server on to your development box.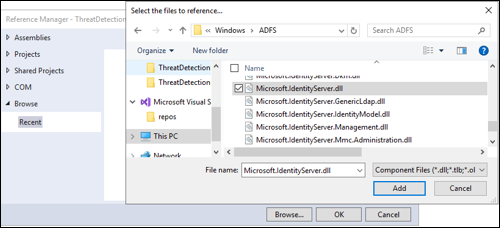
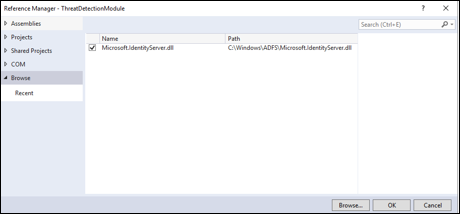
c. Click OK on the Reference Manager window after making sure
Microsoft.IdentityServer.dllcheckbox is selected
-
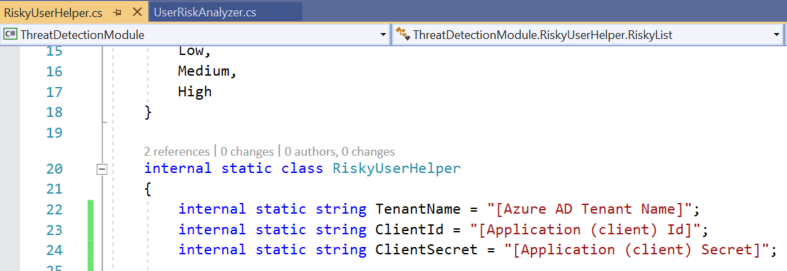
Open RiskyUserHelper.cs from the Solutions Explorer to update the Azure AD tenant name, Client ID and Client Secret
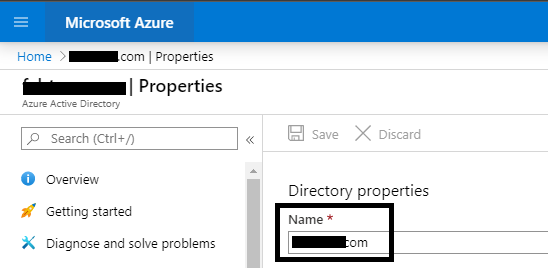
To get these perform the following steps as Administrator in Azure Portala. To get Azure AD tenant name, go to Azure Active Directory blade and select Properties from the Manage section on the left navigation pane. Tenant name is the value in Name field under Directory properties)
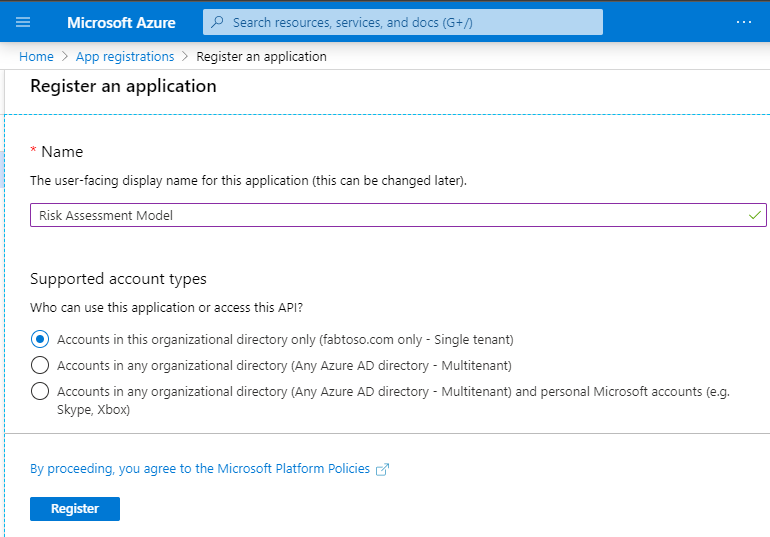
b. To get the Client ID we first need to register the plug-in in Azure Active Directory. To do so, go to App Registration, click New Registration

On New Registration, enter a name for the plug-in and click Register (Note - For other fields, I am keeping the default values)
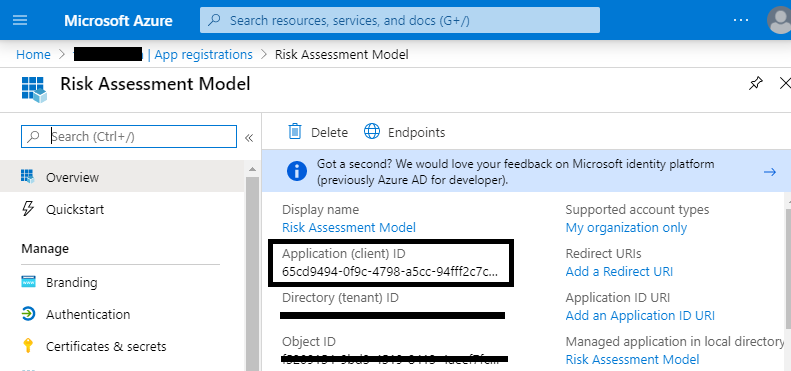
Once registered, get the Client ID for the registered plug-in as shown below
c. To get the Client Secret click Certificates & secrets from the Manage section on the left navigation pane as shown below

On Certificates & secrets blade, click New client secret and follow the process to generate the secret
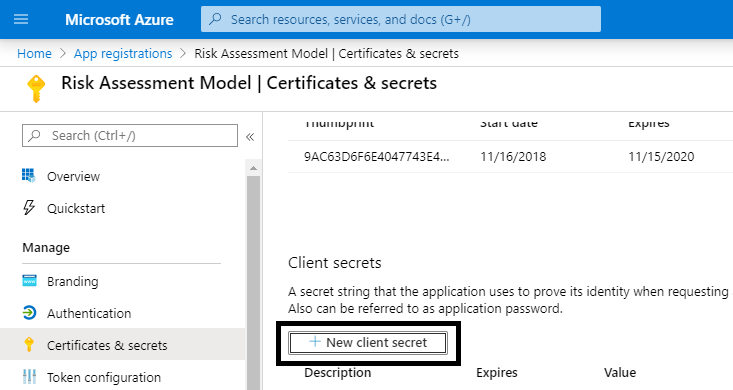
Once generated, get the secret to update in the RiskyUserHelper.cs file.
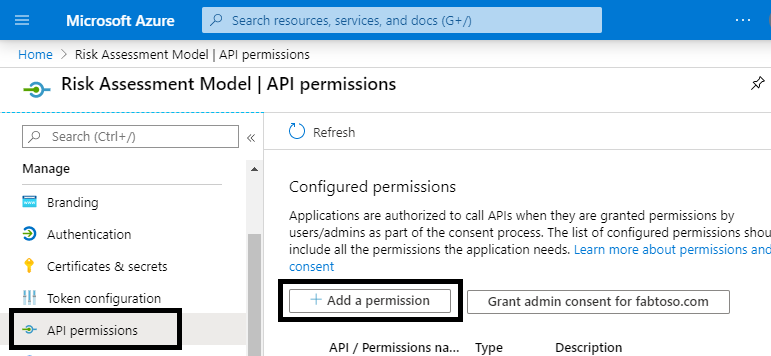
d. Though we have registered the plug-in in Azure Active Directory, we also need to provide it permission to call the Microsoft Graph API i.e. the riskyUser API
To provide permission, click on API permissions from the Manage section on the left navigation pane. Then click Add a permission
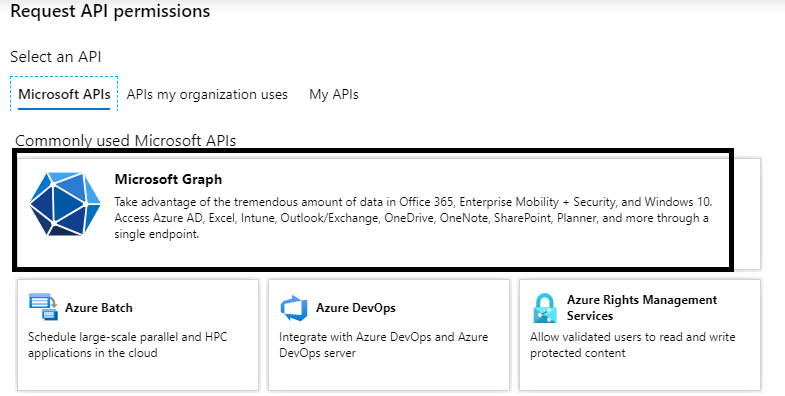
On Request API permissions blade, select Microsoft Graph
Next, select Application permissions and search identityriskyuser under Select permissions. Select checkbox for IdentityRiskyUser.Read.All permission and click Add permissions
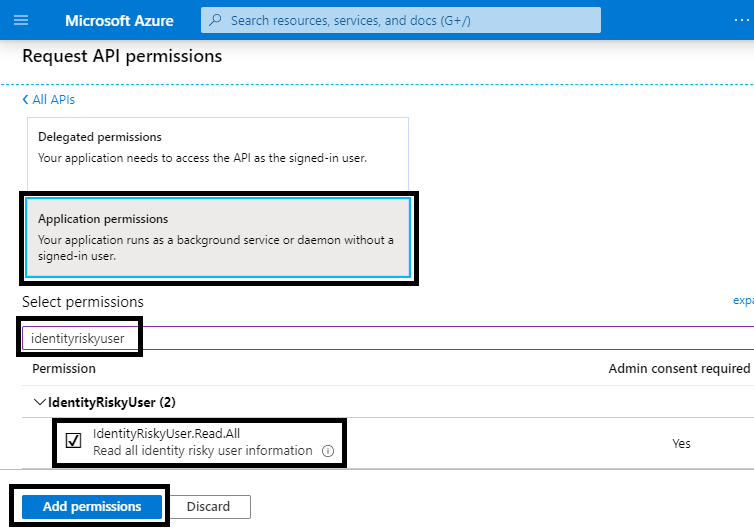
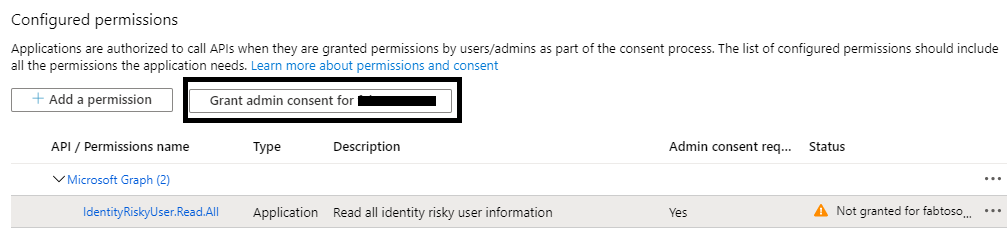
Lastly, click on API permissions from the Manage section on the left navigation pane. Select the IdentityRiskyUser.Read.All permission row and click on Grant admin consent for [tenant name]. Click Yes
-
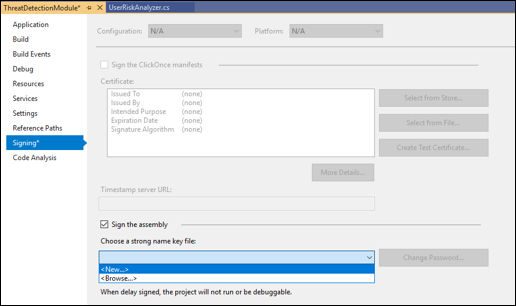
All the classes and references are now in place to do a build. However, since the output of this project is a dll, it will have to be installed into the Global Assembly Cache, or GAC, of the AD FS server and the dll needs to be signed first. This can be done as follows:
a. Right-click on the name of the project, ThreatDetectionModule. From the menu, click Properties.
b. From the Properties page, click Signing, on the left, and then check the checkbox marked Sign the assembly. From the Choose a strong name key file: pull down menu, select <New...>
c. In the Create Strong Name Key dialogue, type a name (you can choose any name) for the key, uncheck the checkbox Protect my key file with password. Then, click OK

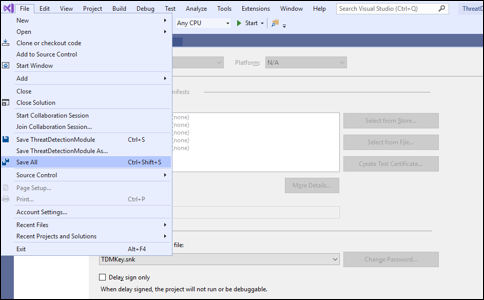
d. Save the project as shown below
-
Build the project by clicking Build and then Rebuild Solution as shown below
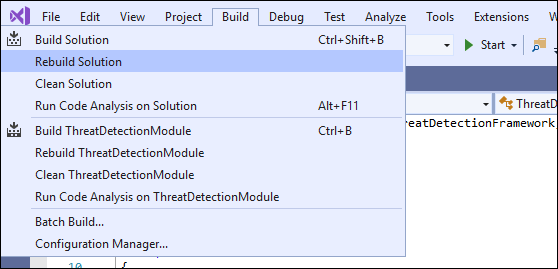
Check the Output window, at the bottom of the screen, to see if any errors occurred


The plug-in (dll) is now ready for use and is in the \bin\Debug folder of the project folder (In my case, that's C:\extensions\ThreatDetectionModule\bin\Debug\ThreatDetectionModule.dll).
The next step is to register this dll with AD FS, so it runs in line with AD FS authentication process.
We need to register the dll in AD FS by using the Register-AdfsThreatDetectionModule PowerShell command on the AD FS server, however, before we register, we need to get the Public Key Token. This public key token was created when we created the key and signed the dll using that key. To learn what the Public Key Token for the dll is, you can use the SN.exe as follows
-
Copy the dll file from the \bin\Debug folder to another location (In my case copying it to C:\extensions)
-
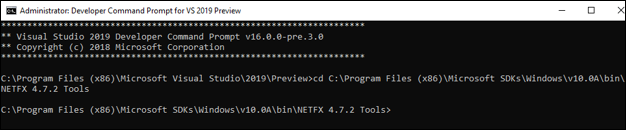
Start the Developer Command Prompt for Visual Studio and go to the directory containing the sn.exe (In my case the directory is C:\Program Files (x86)\Microsoft SDKs\Windows\v10.0A\bin\NETFX 4.7.2 Tools)
-
Run the SN command with the -T parameter and the location of the file (In my case
SN -T "C:\extensions\ThreatDetectionModule.dll")
The command will provide you the public key token (For me, the Public Key Token is 714697626ef96b35) -
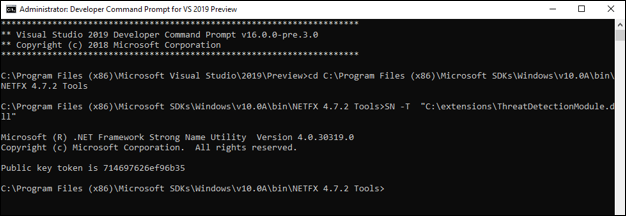
Add the dll to the Global Assembly Cache of the AD FS server Our best practice would be that you create a proper installer for your project and use the installer to add the file to the GAC. Another solution is to use Gacutil.exe (more information on Gacutil.exe available here) on your development machine. Since I have my visual studio on the same server as AD FS, I will be using Gacutil.exe as follows
a. On Developer Command Prompt for Visual Studio and go to the directory containing the Gacutil.exe (In my case the directory is C:\Program Files (x86)\Microsoft SDKs\Windows\v10.0A\bin\NETFX 4.7.2 Tools)
b. Run the Gacutil command (In my case
Gacutil /IF C:\extensions\ThreatDetectionModule.dll)
[!NOTE] If you have an AD FS farm, the above needs to be executed on each AD FS server in the farm.
-
Open Windows PowerShell and run the following command to register the dll
Register-AdfsThreatDetectionModule -Name "<Add a name>" -TypeName "<class name that implements interface>, <dll name>, Version=10.0.0.0, Culture=neutral, PublicKeyToken=< Add the Public Key Token from Step 2. above>"In my case, the command is:
Register-AdfsThreatDetectionModule -Name "RiskyUserPlugin" -TypeName "ThreatDetectionModule.UserRiskAnalyzer, ThreatDetectionModule, Version=10.0.0.0, Culture=neutral, PublicKeyToken=714697626ef96b35"[!NOTE] You need to register the dll only once, even if you have an AD FS farm.
-
Restart the AD FS service after registering the dll


That's it, the dll is now registered with AD FS and ready for use!
Note
If any changes are made to the plugin and the project is rebuilt, then the updated dll needs to be registered again. Before registering, you will need to unregister the current dll using the following command:
UnRegister-AdfsThreatDetectionModule -Name "<name used while registering the dll in 5. above>"
In my case, the command is:
UnRegister-AdfsThreatDetectionModule -Name "RiskyUserPlugin"
The last step in setting up the sample is to configure the policies in AD FS to trigger additional authentication (MFA) when the user risk level is either "low" or "medium". To do so, open Windows PowerShell on AD FS server and run the following command
Set-AdfsRelyingPartyTrust -TargetName <Add Relying Party Name> -AdditionalAuthenticationRules 'exists([Type == "http://schemas.microsoft.com/ws/2017/04/identity/claims/riskscore", Value == "low"])=>issue(Type = "http://schemas.microsoft.com/ws/2008/06/identity/claims/authenticationmethod", Value = "http://schemas.microsoft.com/claims/multipleauthn"); exists([Type == "http://schemas.microsoft.com/ws/2017/04/identity/claims/riskscore", Value == "medium"])=>issue(Type = "http://schemas.microsoft.com/ws/2008/06/identity/claims/authenticationmethod", Value = "http://schemas.microsoft.com/claims/multipleauthn"); exists([Type == "http://schemas.microsoft.com/ws/2017/04/identity/claims/riskscore", Value == "high"])=>issue(Type = "http://schemas.microsoft.com/ws/2008/06/identity/claims/authenticationmethod", Value = "http://schemas.microsoft.com/claims/multipleauthn");'
In my case, the command is:
Set-AdfsRelyingPartyTrust -TargetName Claimsxray -AdditionalAuthenticationRules 'exists([Type == "http://schemas.microsoft.com/ws/2017/04/identity/claims/riskscore", Value == "low"])=>issue(Type = "http://schemas.microsoft.com/ws/2008/06/identity/claims/authenticationmethod", Value = "http://schemas.microsoft.com/claims/multipleauthn"); exists([Type == "http://schemas.microsoft.com/ws/2017/04/identity/claims/riskscore", Value == "medium"])=>issue(Type = "http://schemas.microsoft.com/ws/2008/06/identity/claims/authenticationmethod", Value = "http://schemas.microsoft.com/claims/multipleauthn"); exists([Type == "http://schemas.microsoft.com/ws/2017/04/identity/claims/riskscore", Value == "high"])=>issue(Type = "http://schemas.microsoft.com/ws/2008/06/identity/claims/authenticationmethod", Value = "http://schemas.microsoft.com/claims/multipleauthn");'
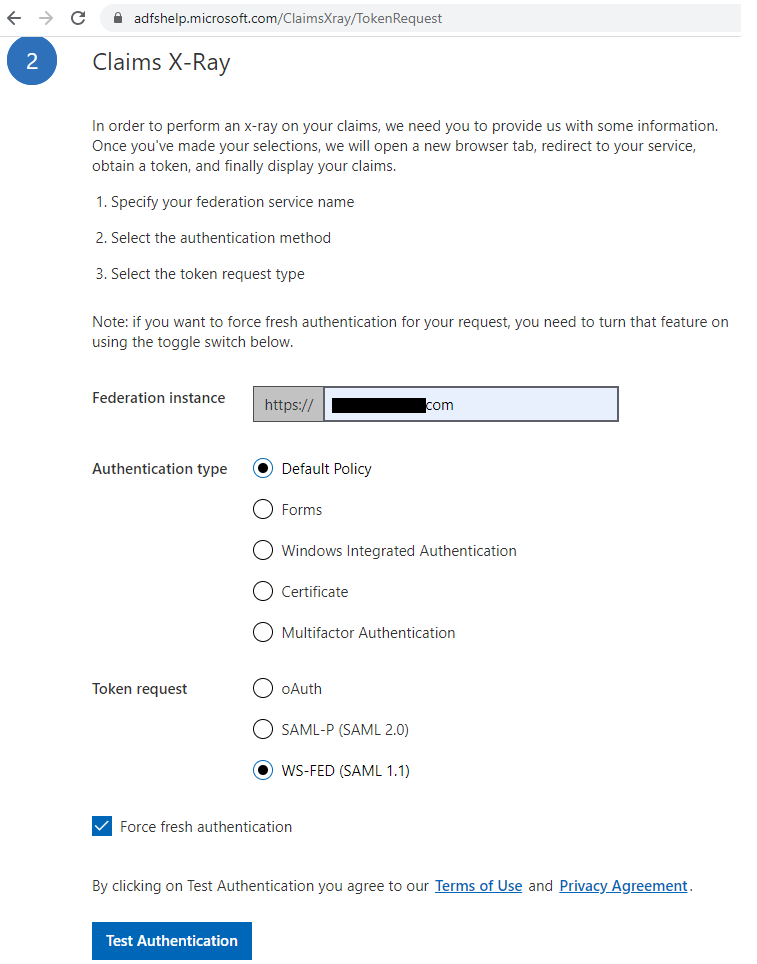
For this demonstration, I will be using AD FS Help Claims X-Ray tool to initiate authentication request. If you would like to use the X-Ray tool, please follow the instructions in step 1 Federation Services Configuration to create a relying party trust for the service in your federation deployment.
-
Enter federation server instance and hit Test Authentication in step 2 of Claims X-Ray tool
-
On the login page, enter the user id and password of a non risky user (risk level = none)
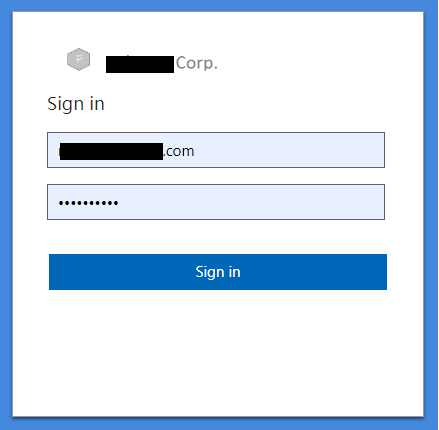
The user should be able to log in.
-
Repeat step 1 above and on the login page enter a user id and password of a low risk user (risk level = Low)
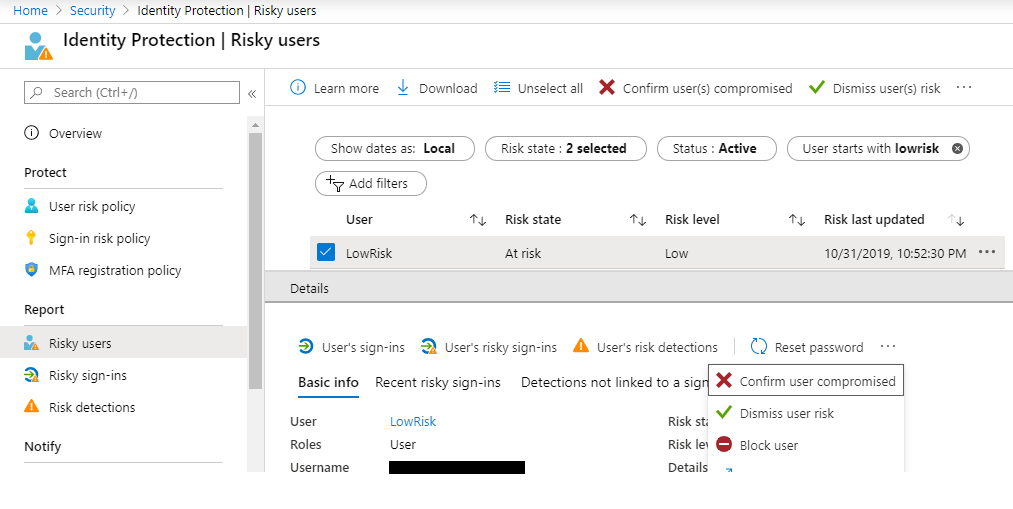
[!NOTE] To check the risk level of a user, go to Risky users report in Azure Portal.
For testing purpose, to make a user risky (with risk level = Low) login with user credentials to Azure Portal from a TOR browserThe plug-in will trigger additional authentication as per the configuration (In my case I have configured Azure MFA)

Once authenticated, the user should be able to log in.
-
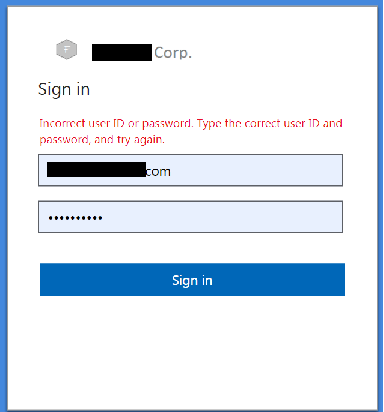
Repeat step 1 above and on the login page enter a user id and password of a high risk user (risk level = High)
[!NOTE] For testing purpose, to make a user risky (with risk level = High) login to Risky users report in Azure Portal as an Administrator. Select the user you want to change the risk level to High and click Confirm user compromised
The plug-in will block the user from authenticating


This project welcomes contributions and suggestions. Most contributions require you to agree to a Contributor License Agreement (CLA) declaring that you have the right to, and actually do, grant us the rights to use your contribution. For details, visit https://cla.opensource.microsoft.com.
When you submit a pull request, a CLA bot will automatically determine whether you need to provide a CLA and decorate the PR appropriately (e.g., status check, comment). Simply follow the instructions provided by the bot. You will only need to do this once across all repos using our CLA.
This project has adopted the Microsoft Open Source Code of Conduct. For more information see the Code of Conduct FAQ or contact opencode@microsoft.com with any additional questions or comments.