This example shows how to create production-ready EKS CLuster using the Crossplane.
Please make sure to install the following tools on your machine before moving on.
- Minikube, Kind, or EKS Cluster
- Kubectl
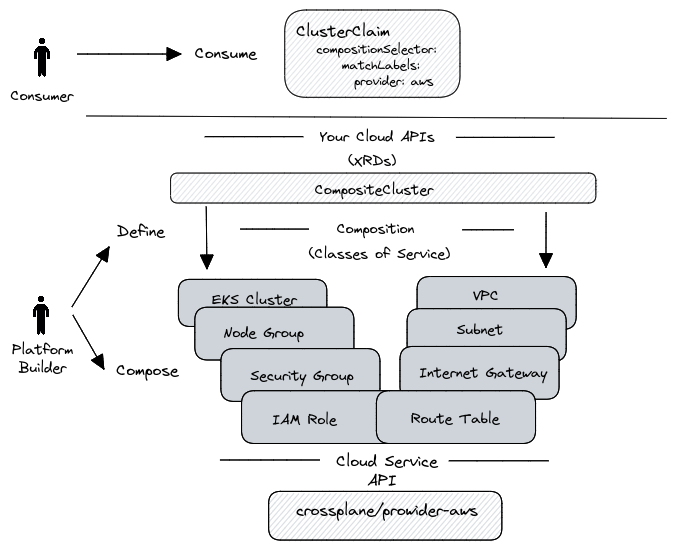
The figure below provides an overview of the configuration of the demo.
First create a namespaces crossplane-system and team-a with the following command:
After creating the "crossplane-system" namespace, write your AWS credentials to aws-creds.conf file and create a secret with the following command.
kubectl -n crossplane-system \
    create secret generic aws-creds \
    --from-file creds=./aws-creds.conf
After these steps are completed, Install the necessary tools and configuration files with the following commands.
helm upgrade --install \
    crossplane crossplane-stable/crossplane \
    --namespace crossplane-system \
    --create-namespace \
    --wait
kubectl apply \
    --filename crossplane-config/provider-aws.yaml
kubectl apply \
    --filename crossplane-config/provider-config-aws.yaml
⚠️ If the output is "unable to recognize," wait a couple of seconds and re-run the previous command!
kubectl apply \
    --filename crossplane-config/provider-helm.yaml
kubectl apply \
    --filename crossplane-config/provider-kubernetes.yaml
kubectl apply \
    --filename crossplane-config/config-k8s.yaml
Run the following command and wait until all packages are ready.
kubectl get pkgrev
Now it is time to provision our production-ready EKS cluster. Use the "aws-eks.yaml" file to provision the EKS cluster with the following command.
kubectl -n team-a apply -f aws-eks.yaml
The last step is to get the “kubeconfig” file to use our EKS cluster. Run the following commands to get and set the “kubeconfig” file.
kubectl --namespace crossplane-system \
    get secret team-a-eks-cluster \
    --output jsonpath="{.data.kubeconfig}" \
    | base64 -d >kubeconfig.yaml

export KUBECONFIG=$PWD/kubeconfig.yaml
Run the following command to destroy your resources.
unset KUBECONFIG

kubectl --namespace team-a delete \
    --filename examples/aws-eks.yaml
