- Windows Server 2016 or above with installed:
- Powershell
- IIS
- WireShark
- Chrome browser
- Assign your PC a hostname, for example
dev-example.- Restart of PC is required
- Active Directory
- Add your PC to a domain (for example to a test domain e.g.
contoso.com)- Requires DNS setup - in lab you can use hosts file.
- Sometime restart of PC is required before you will be able to ad it to domain.
- Add your PC to a domain (for example to a test domain e.g.
Run this command to generate required certificates and install them in proper (LM/CU) certificates stores.
.\generate-cert.ps1 -hostname "dev-example" -domain "contoso.com" -prefixName "CUST-0001-" -password 'Pa$$word'The script will output all crt, pfx files into Out dir.
Some scripts will be also automatically installed to Local-Machine and Current-User certificate stores.
- Run
Notepad.exeas Administrator and open from%systemroot%\System32\drivers\etca host file. (Use All Files (*.*)) - Add entry 127.0.0.1 and FQDN of your PC (e.g. dev-example.contoso.com)
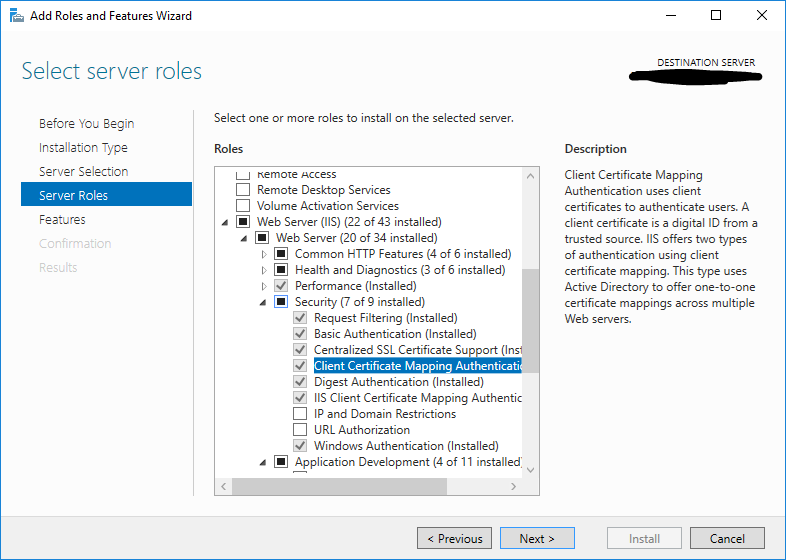
127.0.0.1 dev-example.contoso.comTo allow user to authenticate with client certificate authentication we need to enable Client Certificate Mapping Authentication in Windows Feature.
- Generate certificates by running script
generate-cert.ps1- Server Certificate
- Intermediate Certificate
- Private Key
- In IIS Manager in the left
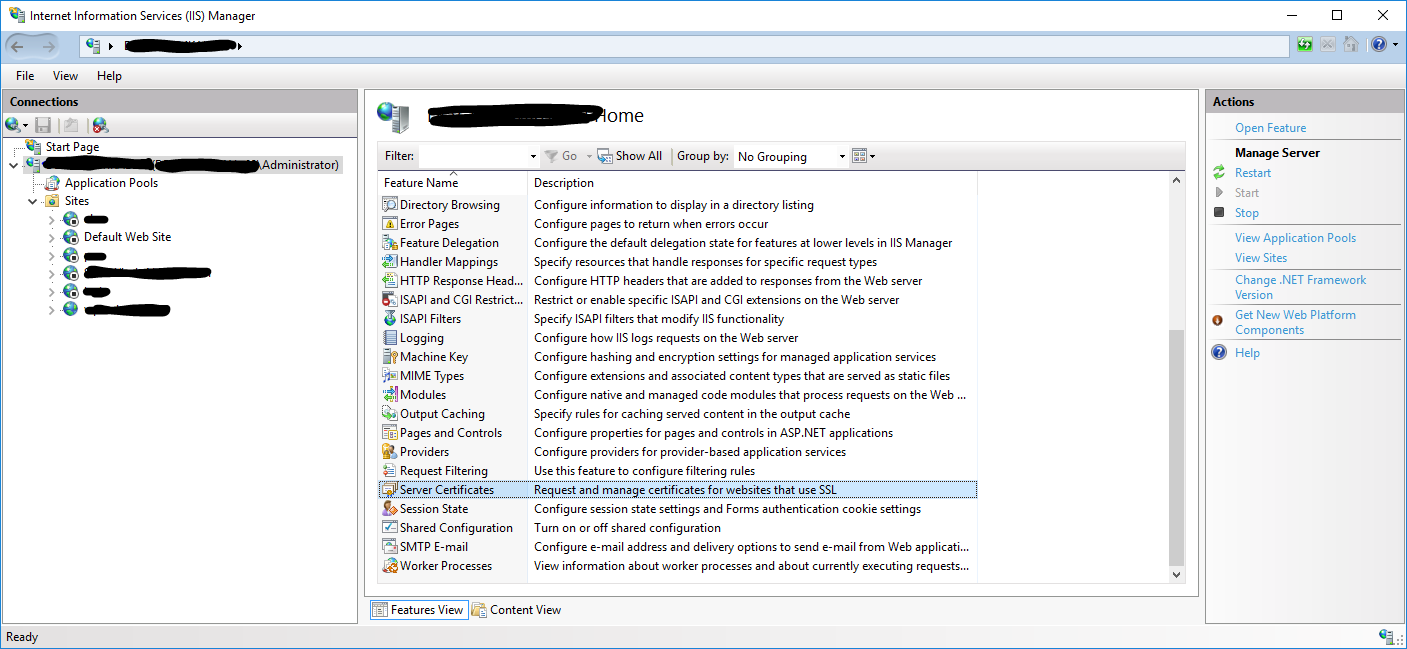
Connectionsmenu, select the server name (host) where you want to install the certificate. - In the center menu, click the Server Certificates icon under the Security section near the bottom.
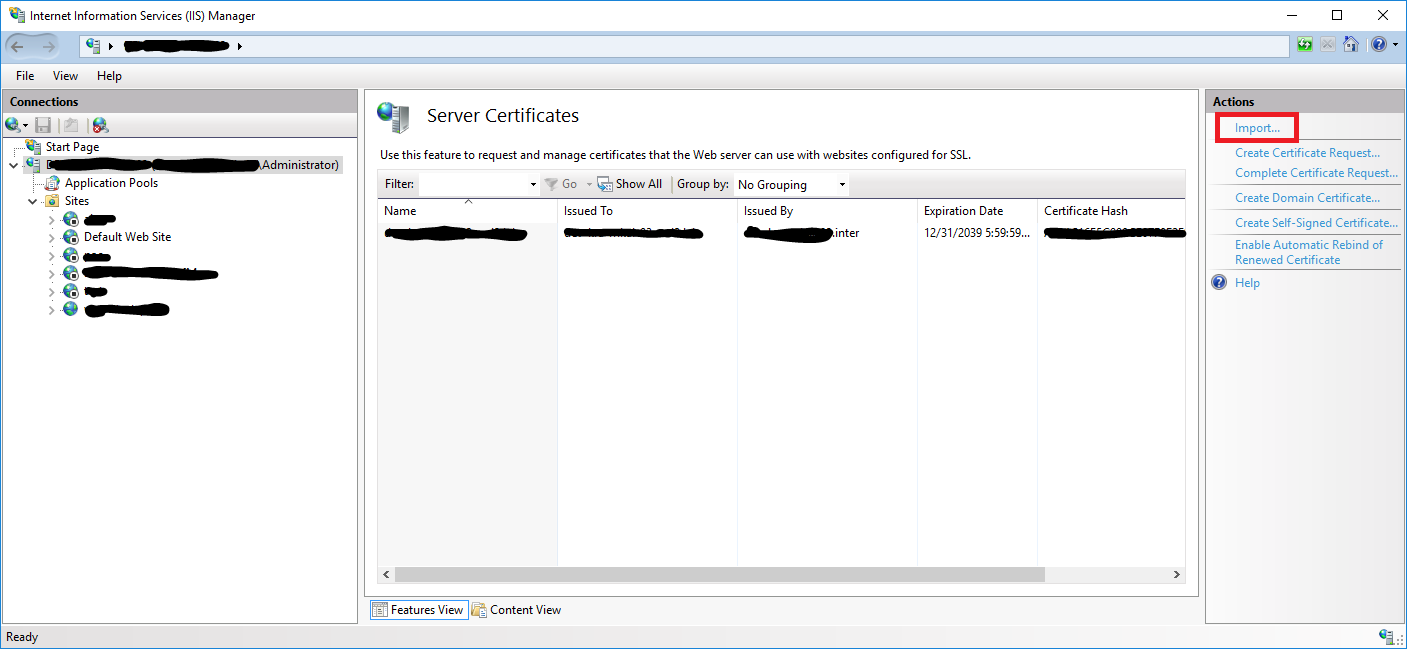
- In the right Actions menu, click
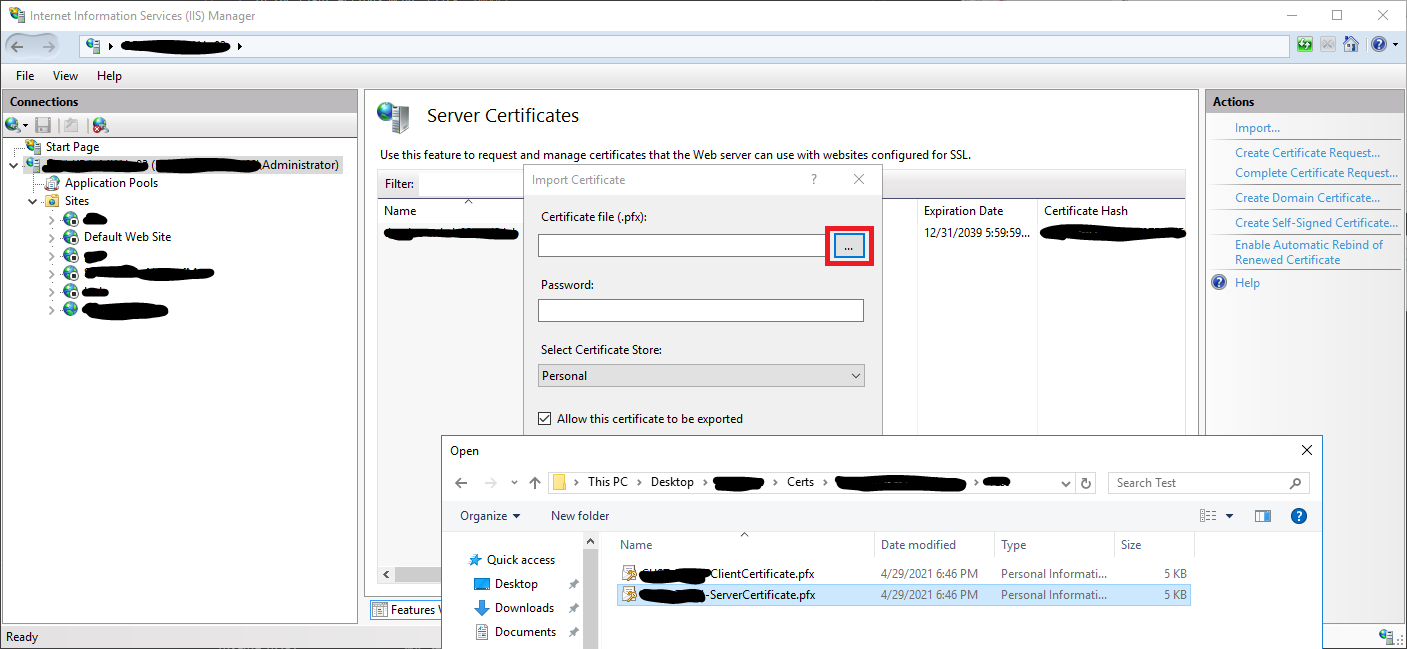
Import.... - In the Import Certificate dialog click
...button to browse Server Certificate private key (*.pfx) file created bygenerate-cert.ps1script. - Enter Private key password - it should be the same as you provided during run of
generate-cert.ps1script. - Leave
PersonalCertificate Store and press OK button.
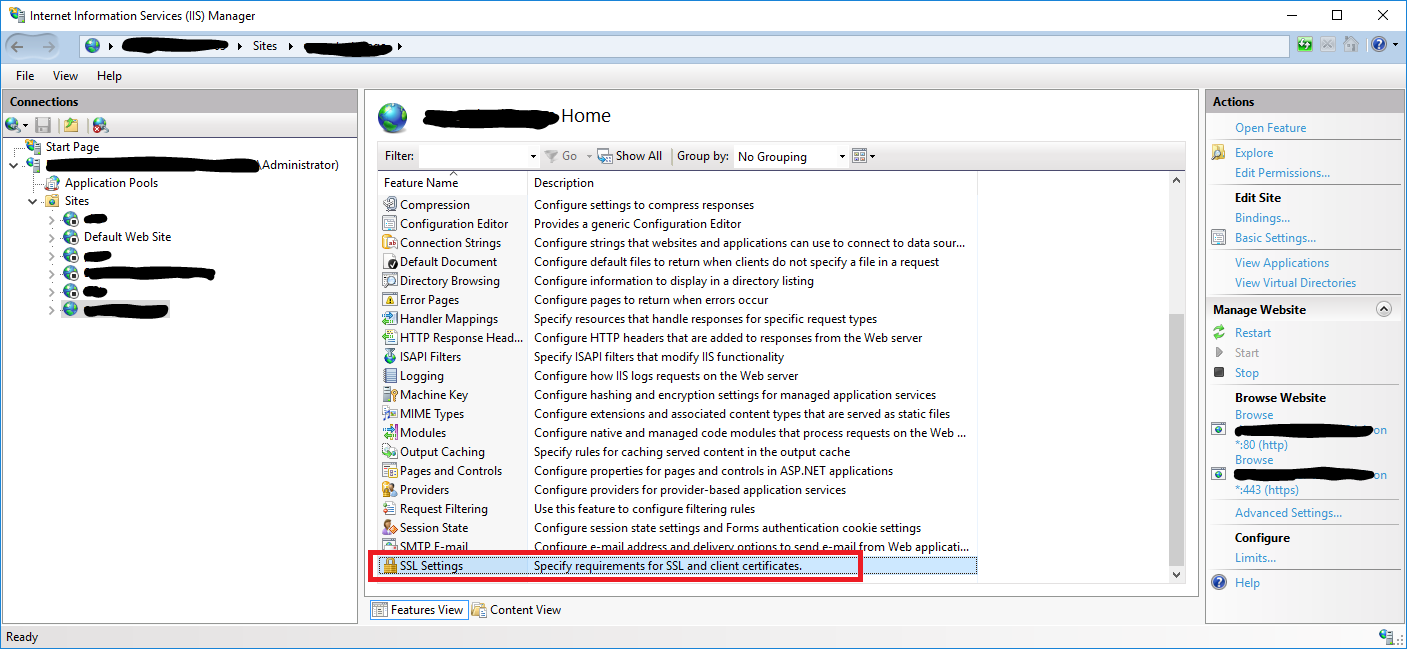
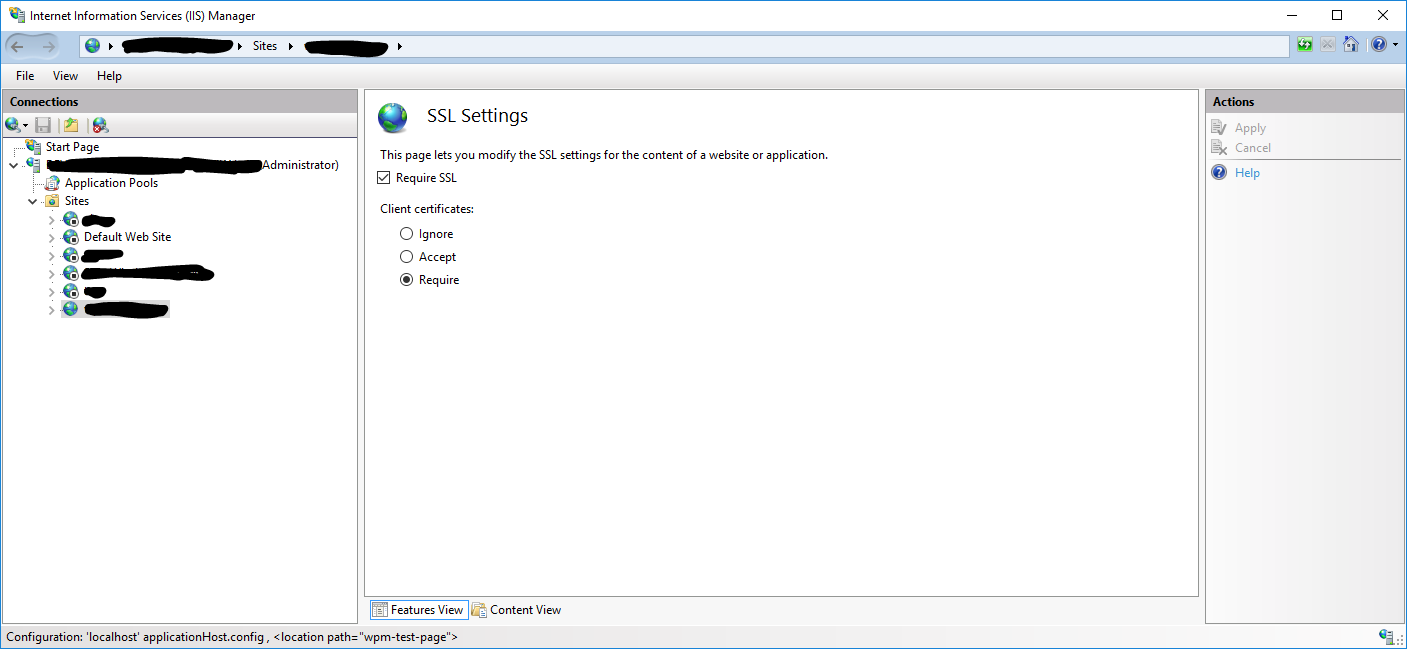
- In IIS Manager in the left
Connectionsmenu, clickSSL Settings. - In opened settings check
Require SSLand under Client Certificate chooseRequire. - To Save click on
Applybutton underActionspanel.
- From the left
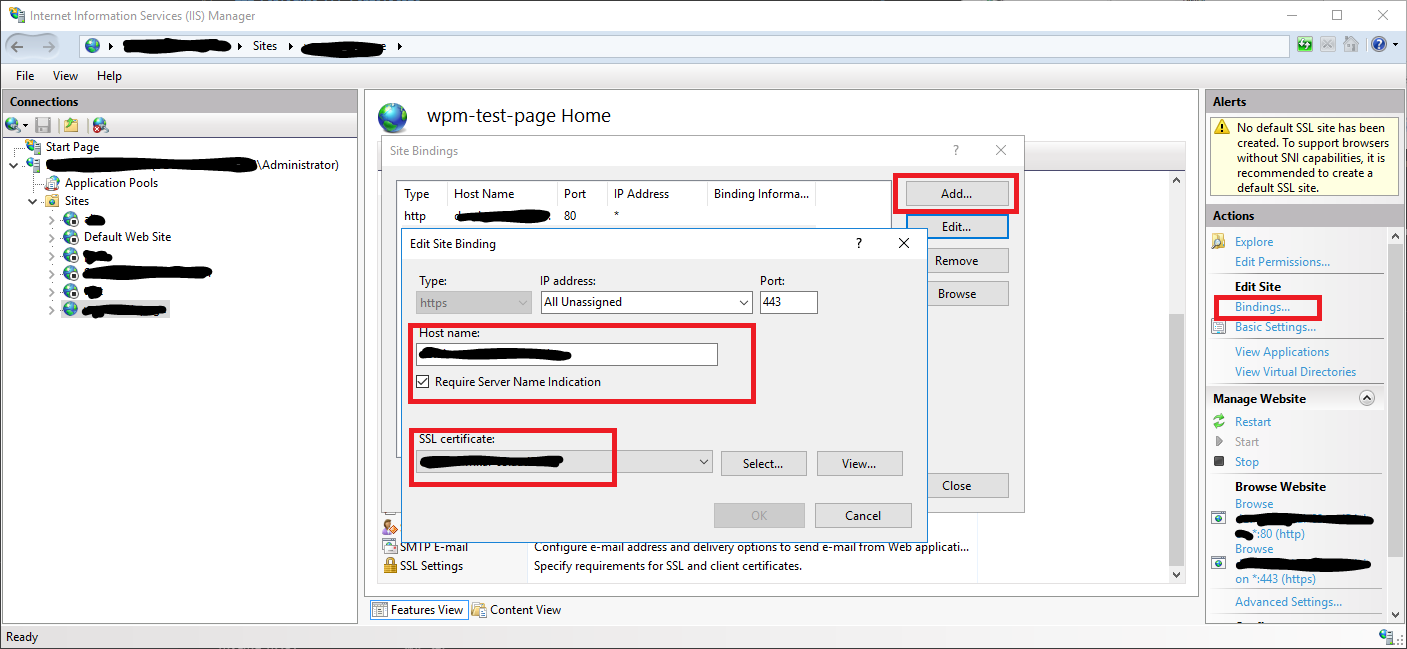
Connectionsmenu, expand your server’s name, expand theSitesfolder, and then select the site (e.g.Default Web Site) that you want to secure. - In the right Actions menu, click
Bindings… - In opened dialog click
Addbutton and enter FQDN (e.g.dev-example.contoso.com) into Hostname filed. - From
SSL Certificatedropdown select installed in the previous section Server Certificate. - Then click OK button and Close.
Run this command to generate base_64 version of a certificate. (assuming that client cert name was CUST-0001-ClientCertificate.crt)
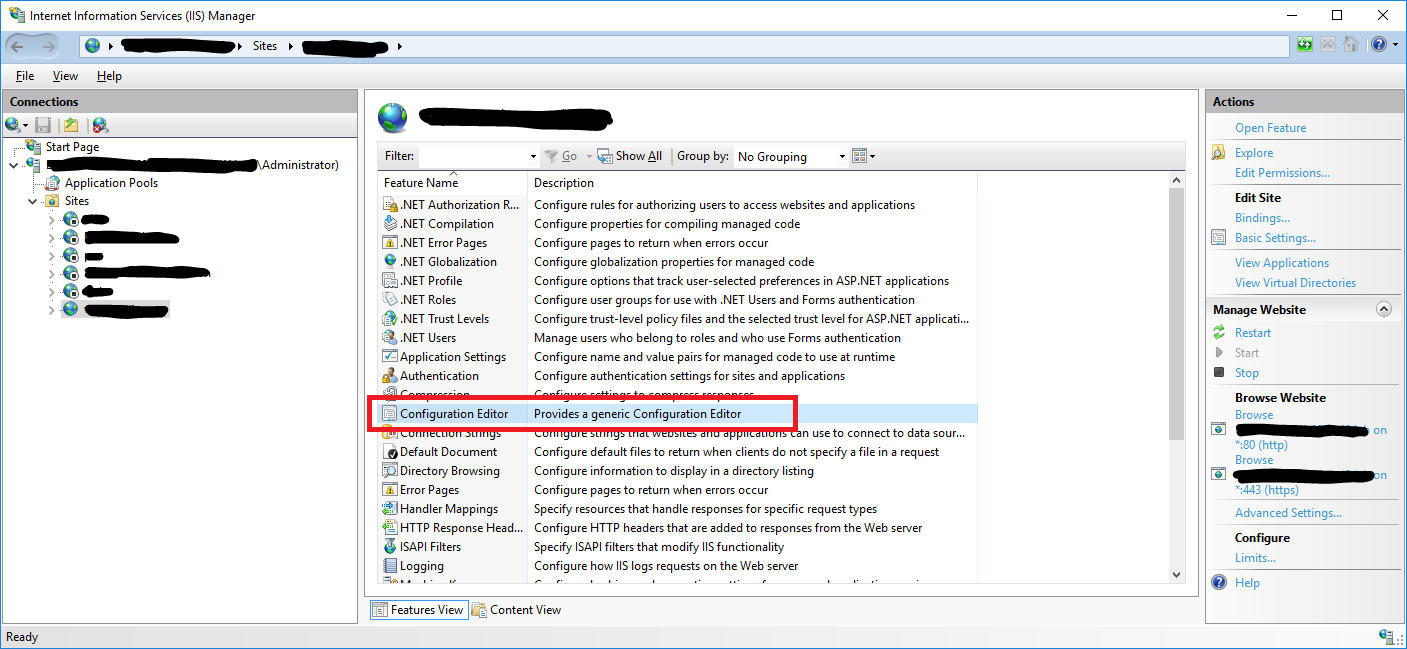
& .\Out\certutil.exe -encode "CUST-0001-ClientCertificate.crt" ".\Out\CUST-0001-ClientCertificate_base64.crt"- In order to configure the server to know which client certificate it needs to validate in IIS Manager in the left
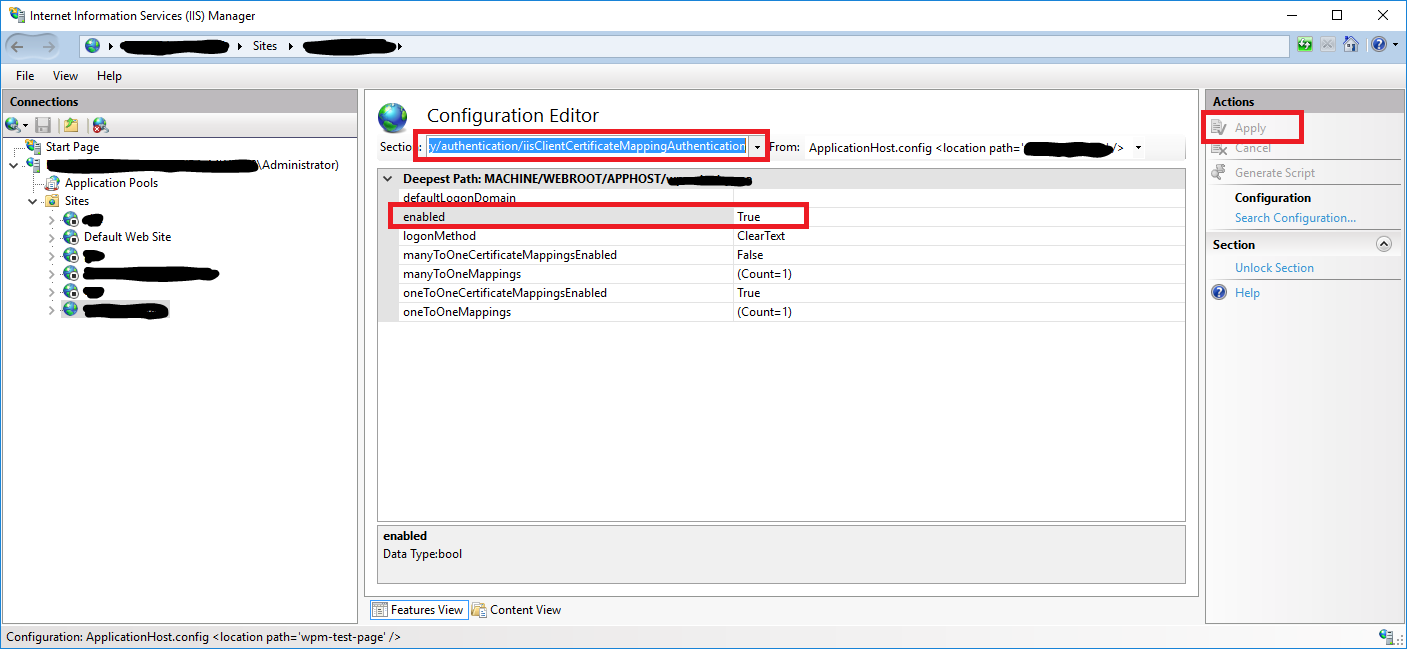
Connectionsmenu, expand your server’s name, expand theSitesfolder, and then select the site (e.g.Default Web Site). - Click on
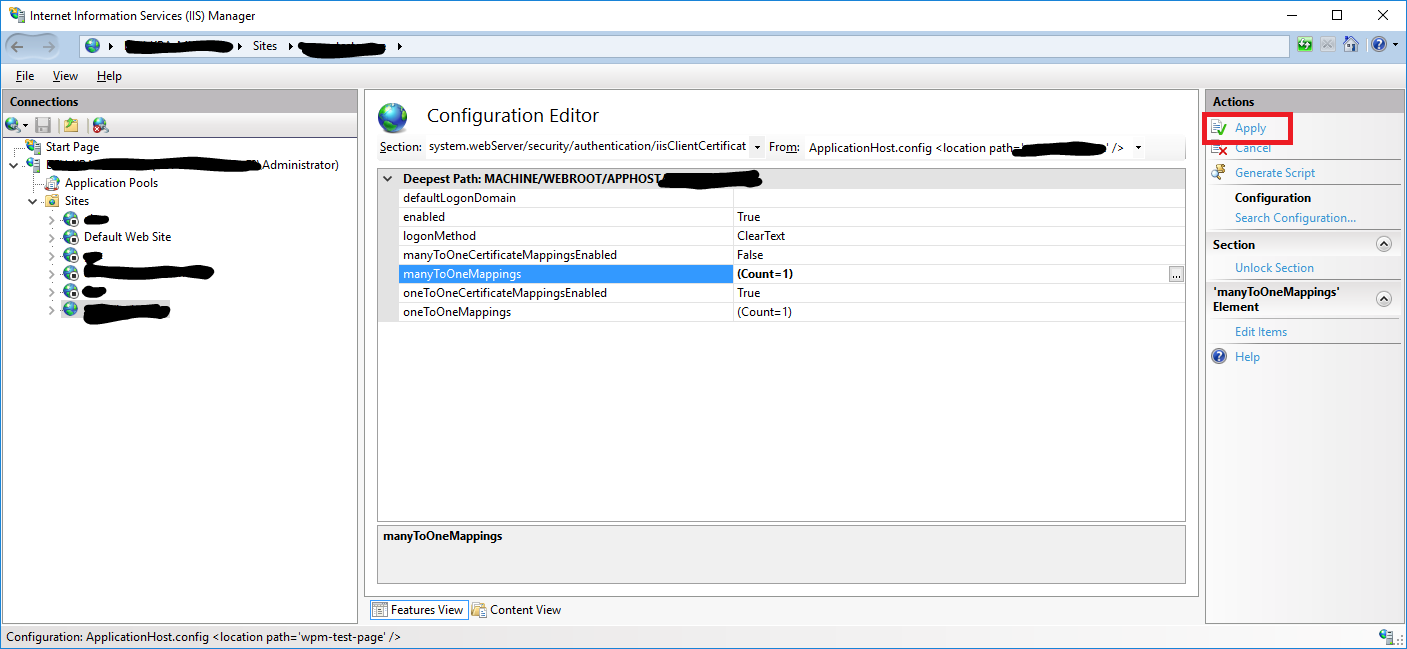
Configuration Editor. - In opened settings from dropdown choose
system.webServer/security/authentication/iisClientCertificateMappingAuthenticationand enable the setting then Apply changes.
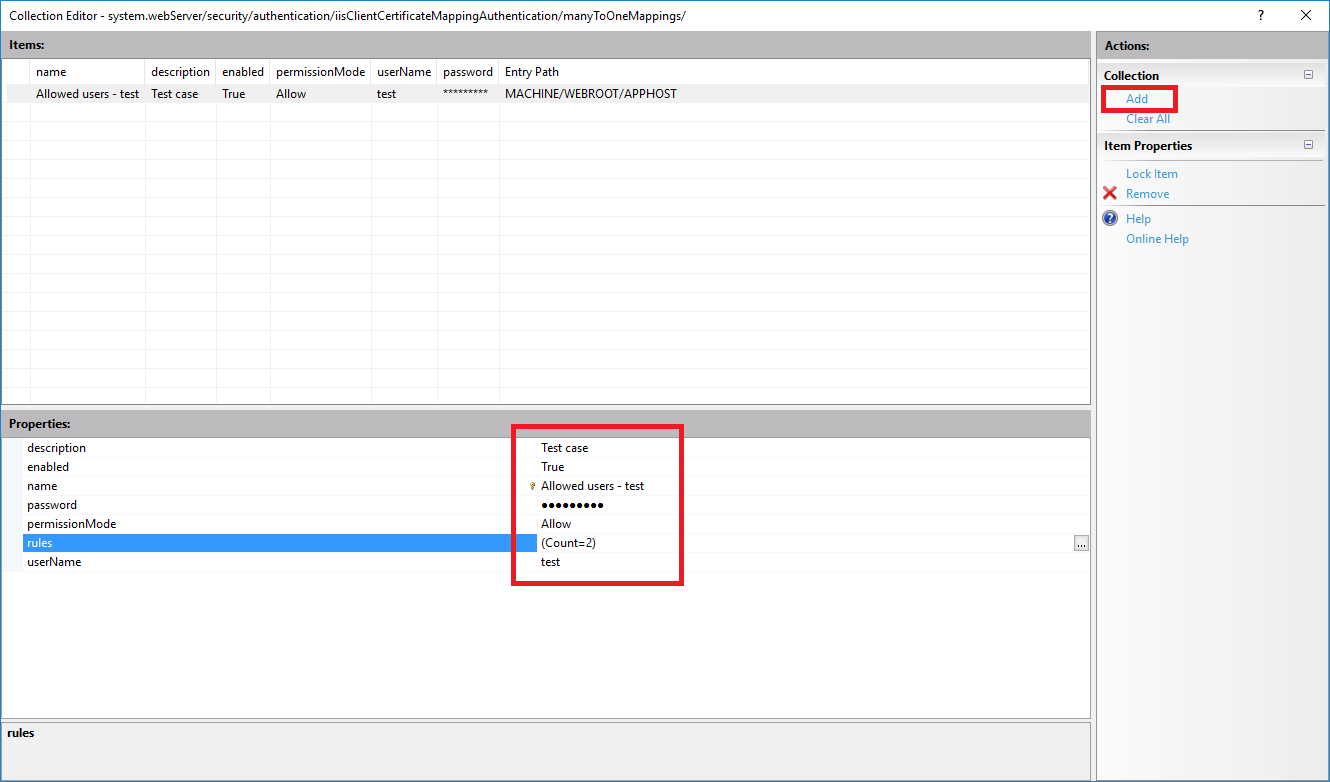
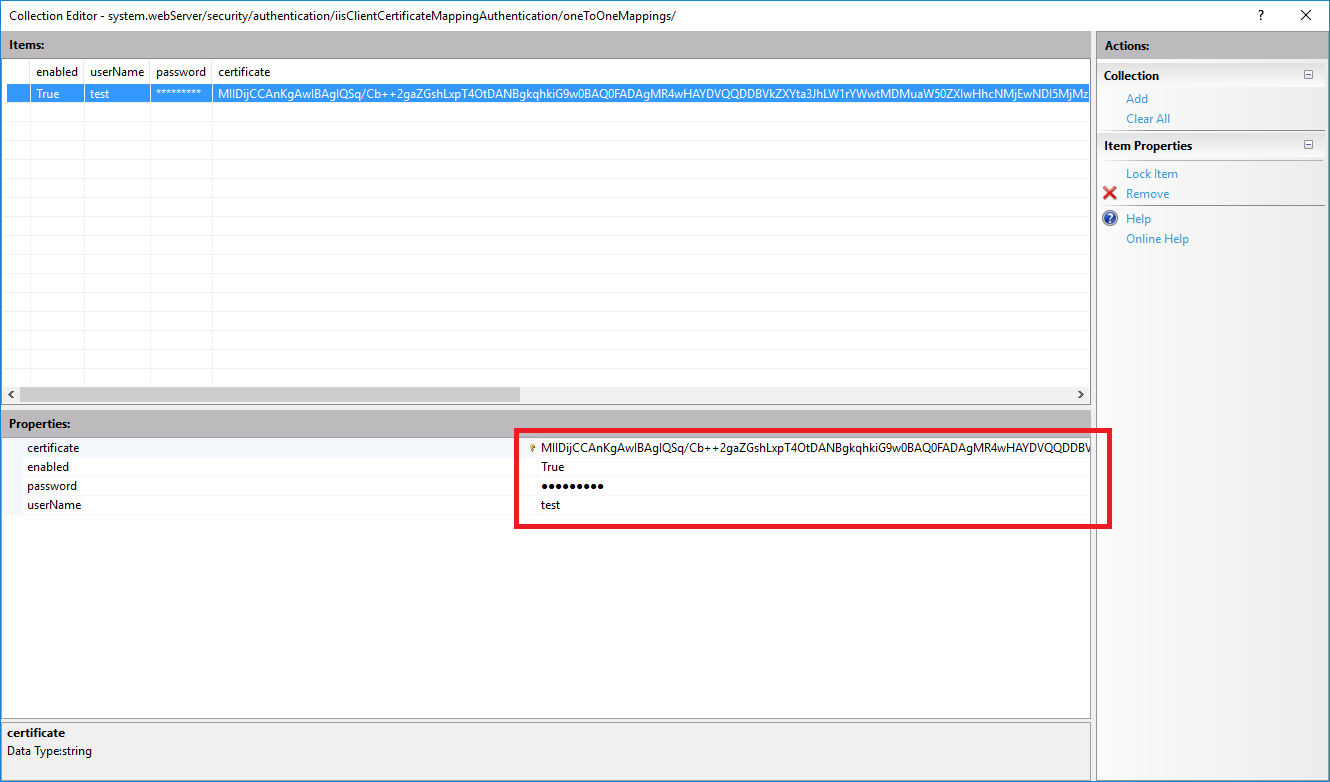
- To add new mapping click
... - Fill out the properties for a mapping and repeat for each user you want to configure for access or denial. Remember that you need the client certificate and root CA certificate installed on all the user’s mmc. (In order for this to work you need to enter a valid username and password)
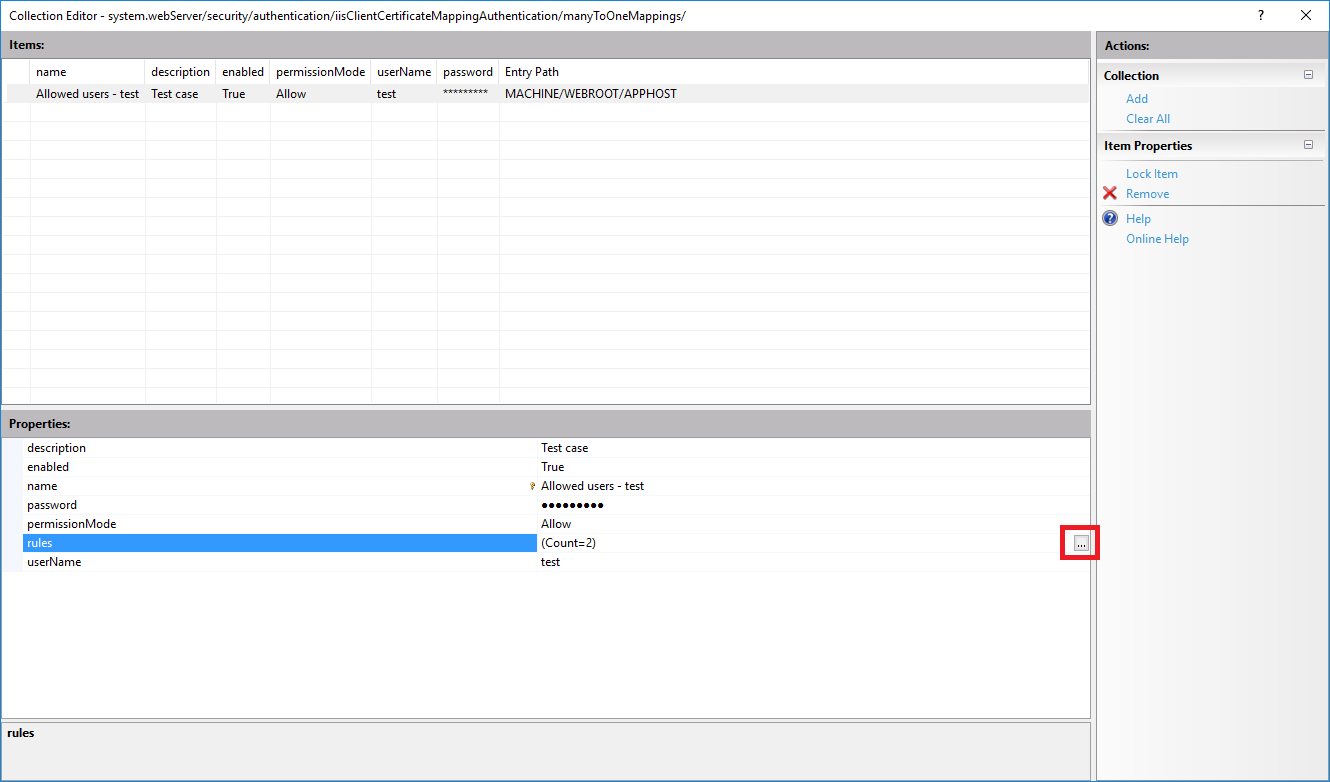
- Now we need to create some rules to go with this mapping so the server can determine if a client is allowed in or not. It’s a so click on the rules property and the
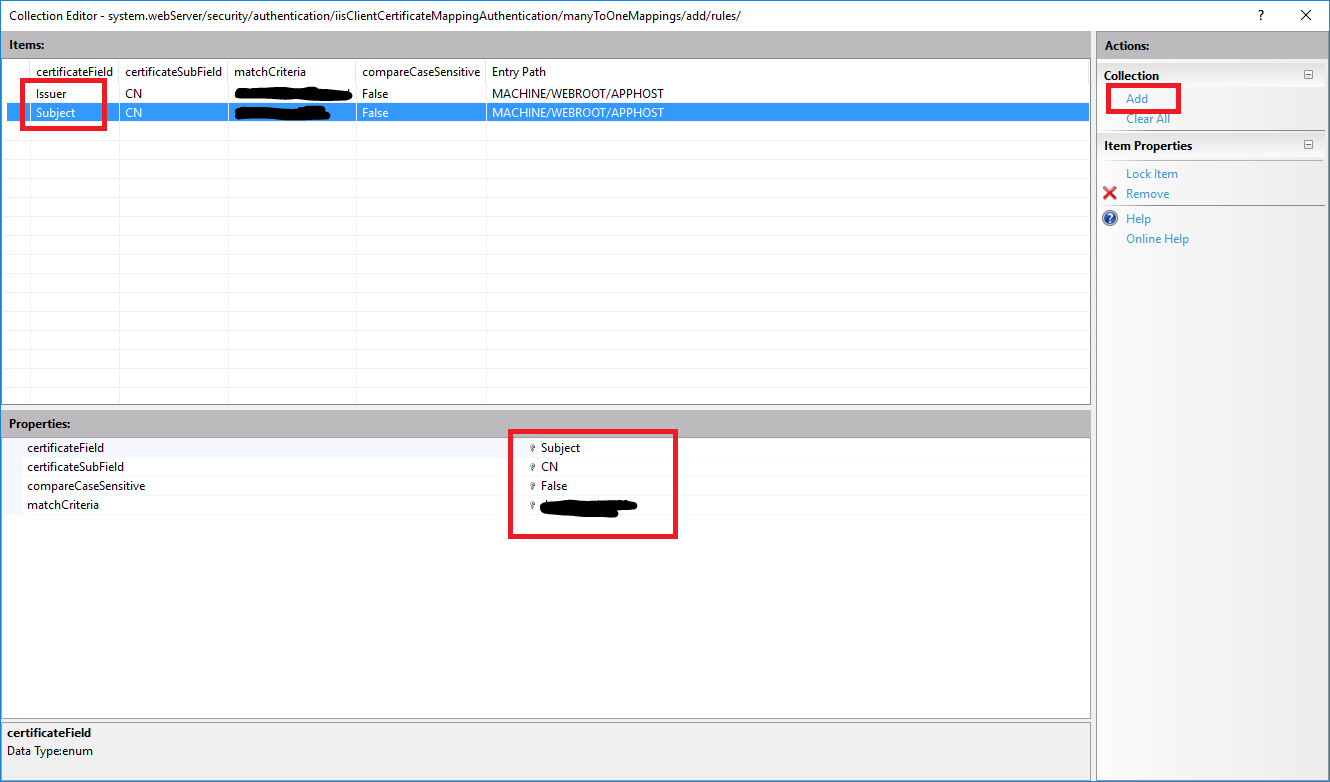
...button. - Add as many rules you like - on below example we have two rules where the server will check the client certificate to see if it’s signed by the correct CA Issuer (e.g.
dev-example.local) and Subject (e.g.dev-example). For more details please visit the IIS Many-To-One Mapping reference for more documentation. - When you don Apply all changes.
This approach means that we need an individual client certificate for each user mapping. You can either disable the many-to-one mapping and use the same certificate and user or create new ones.
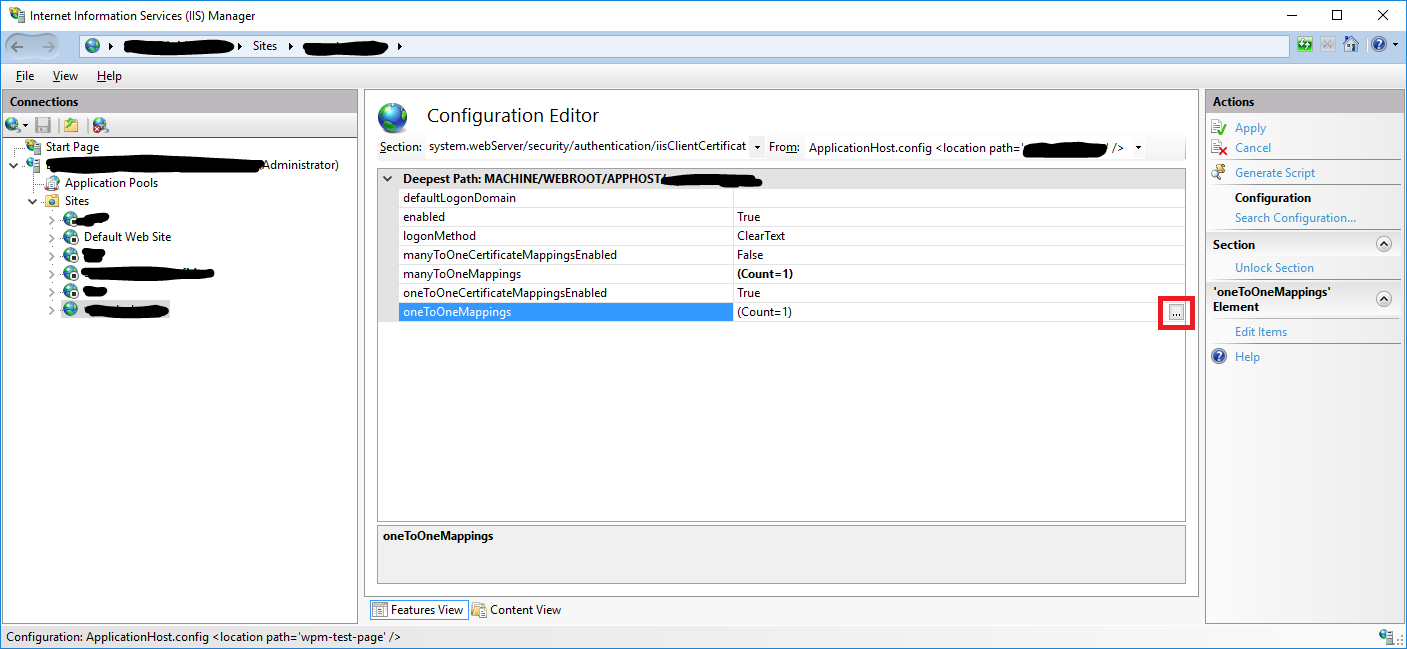
- Go to the
Configuration Editorand open thesystem.webServer/security/authentication/iisClientCertificateMappingAuthenticationsection. - Click the
...button of theoneToOneMappings. - To
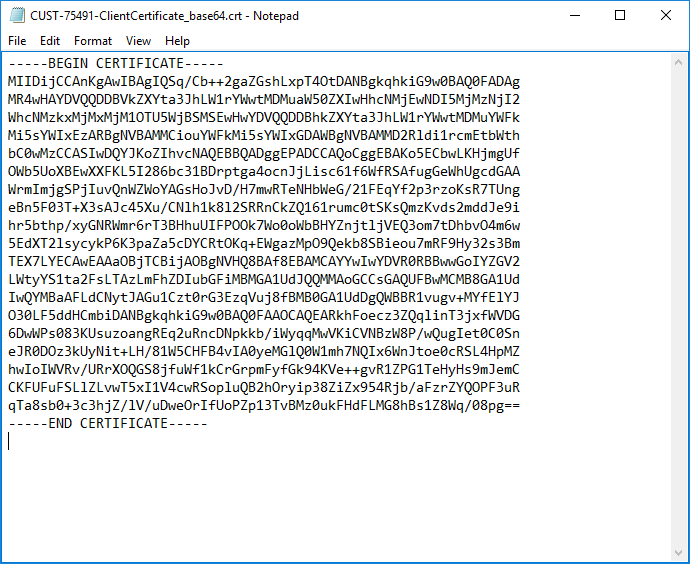
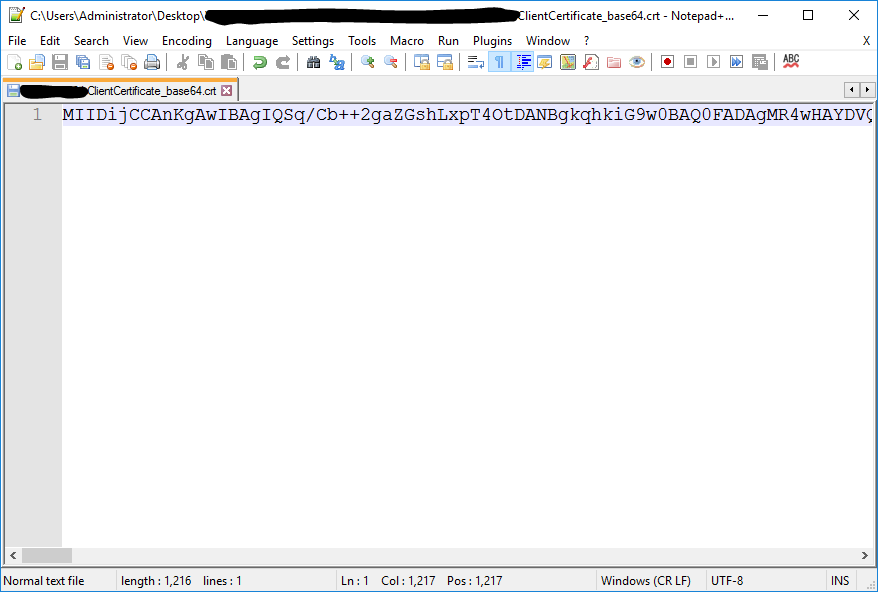
Addnew mapping we need public key of SSL Certificate - we exported it to base64 format already in step Convert Client Certificate to base 64 format. Open a file in notepad.\Out\CUST-0001-ClientCertificate_base64.crt. - Remove opening and closing tags
-----BEGIN CERTIFICATE-----
...
-----END CERTIFICATE------ Replace all new line characters so the certificate could be in a single line.
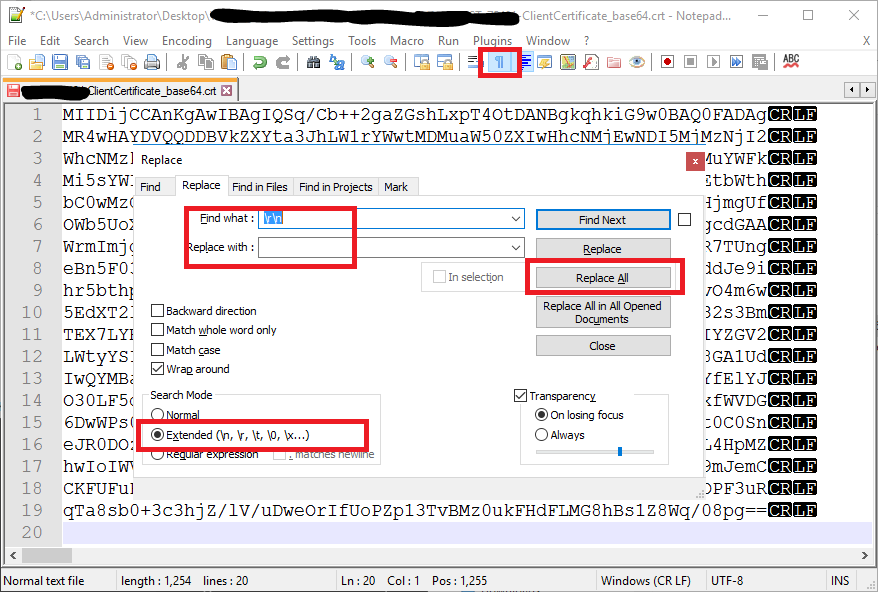
Alternatively you can use
Notepad++and replace all occurrence of\r\n(new line characters) with empty string. - The final result should look like this.
- Now copy the line and fill
oneToManyentires. Paste copied certificate to certificate property of a new entry - provide a user which has required access permission to web application. (You can map this way as many client certificate as you want.) - When you don close the dialog and Apply changes.
Force IIS to require Certificate Request during TLS handshake.
- Run
cmdas Administrator - Assuming that FQDN of your host PC is
dev-example.contoso.comrun commands to getApplication IDandCertificate Hashvalues for a sslcert configuration which Hostname:port equlsdev-example.contoso.com.
netsh http show sslcert hostname=dev-example.contoso.com:443Output should look like this:
SSL Certificate bindings:
-------------------------

    Hostname:port                : dev-example.contoso.com:443
    Certificate Hash             : <your_certificate_hash>
    Application ID               : {<your_web_app_id>}
    Certificate Store Name       : MY
    Verify Client Certificate Revocation : Enabled
    Verify Revocation Using Cached Client Certificate Only : Disabled
    Usage Check                  : Enabled
    Revocation Freshness Time    : 0
    URL Retrieval Timeout        : 0
    Ctl Identifier               : (null)
    Ctl Store Name               : (null)
    DS Mapper Usage              : Disabled
    Negotiate Client Certificate : Disabled <-- We need to enable this one
    Reject Connections           : Disabled
Disable HTTP2 : Not Set- Delete the sslcert configuration.
netsh http delete sslcert hostnameport=dec-example.contoso.com:443- Create the sslcert configuration but this time with enabled
Negotiate Client Certificate.
netsh http add sslcert hostnameport=dec-example.contoso.com:443 certhash=<your_certificate_hash> appid={<your_web_app_id>} certstorename=MY verifyclientcertrevocation=enable VerifyRevocationWithCachedClientCertOnly=disable UsageCheck=enable clientcertnegotiation=enable- Check the result of our work.
netsh http show sslcert hostname=dev-example.contoso.com:443Output should look like this:
SSL Certificate bindings:
-------------------------

    Hostname:port                : dev-example.contoso.com:443
    Certificate Hash             : <your_certificate_hash>
    Application ID               : {<your_web_app_id>}
    Certificate Store Name       : MY
    Verify Client Certificate Revocation : Enabled
    Verify Revocation Using Cached Client Certificate Only : Disabled
    Usage Check                  : Enabled
    Revocation Freshness Time    : 0
    URL Retrieval Timeout        : 0
    Ctl Identifier               : (null)
    Ctl Store Name               : (null)
    DS Mapper Usage              : Disabled
    Negotiate Client Certificate : Enabled
    Reject Connections           : Disabled
Disable HTTP2 : Not Set- How to Install an SSL/TLS Certificate In Microsoft IIS 7
- How to Import and Export SSL Certificates in IIS 7
- Configure IIS to use your self signed certificates with your application including IIS client certificate mapping authentication
- Configuring IIS for Client Certificate Mapping Authentication
- An Introduction to Mutual SSL Authentication
- IIS SSL Certificate Renewal Pain
- An Overview of One-Way SSL and Two-Way SSL
- Troubleshooting SSL related issues (Server Certificate)
- Debugging client certificate issues on IIS
- Require Client Certificates in IIS 7.5
- Checking IIS Client Negotiation Certificate Status for Mutual Authentication
- Client Certificate Authentication (Part 1)
- Client Certificate Authentication (Part 2)
- Self-Signed, Root CA and Intermediate CA Certificates
- Client Certificate Mapping Authentication
- IIS Client Certificate Mapping Authentication
- Client Certificate Authentication
- Configuring SSL and Client Certificate Validation on Windows
- Configuring Client Authentication Certificates in Web Browsers
- SSL Certificate disappears from IIS 1
- SSL Certificate disappears from IIS 2
- SSL Certificate disappears from IIS 3
- MakeCert and 'Subject Alternative Name' field
- NET::ERR_CERT_COMMON_NAME_INVALID 1
- NET::ERR_CERT_COMMON_NAME_INVALID 2
- Connecting to a web server with 2 way SSL enabled doesn't prompt for certificate in any browser and returns 403.7 error
- Self signed certificate no longer valid as of Chrome 58
