This lab will review a handful of techniques to make you more productive in the terminal. These tips should make your homeworks faster, easier, and more enjoyable.
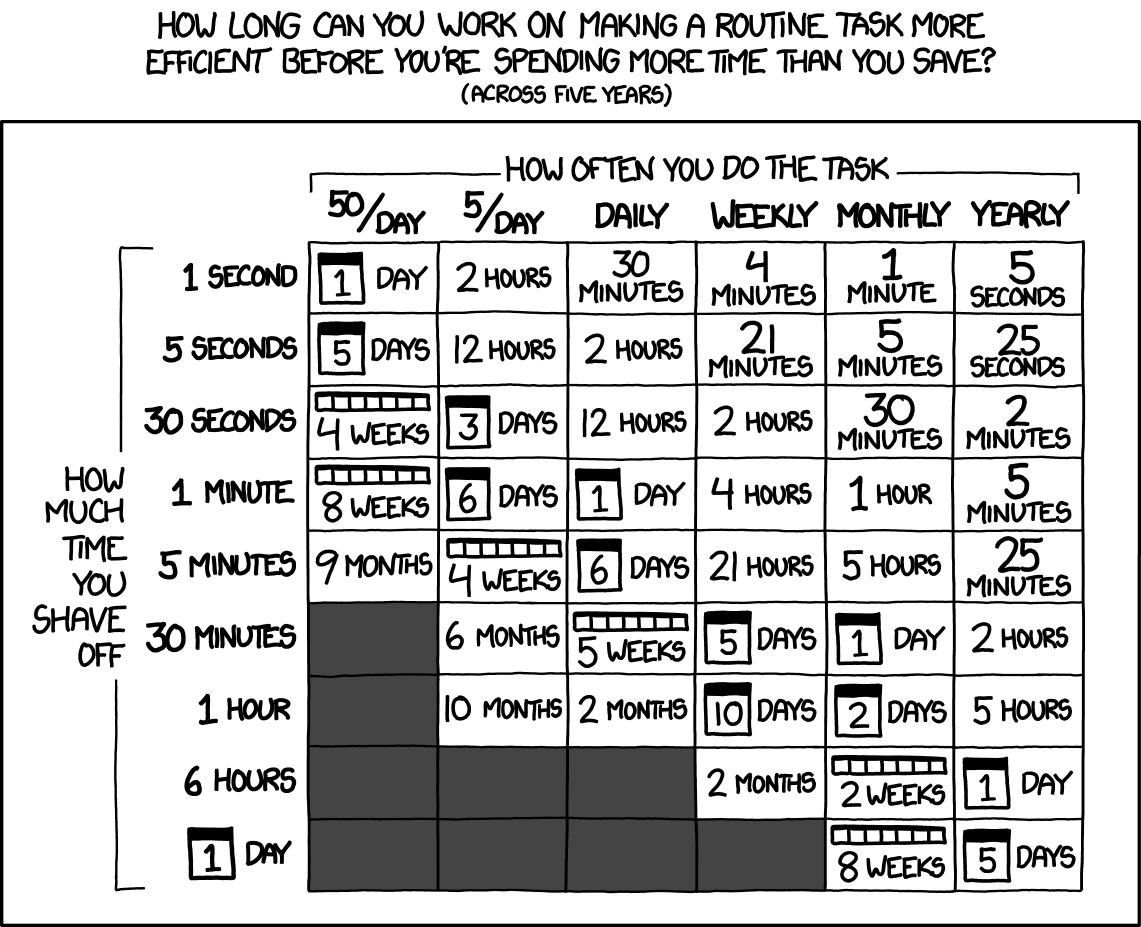
As always, there's an xkcd for that:
In this task you will setup the @p macro for debugging python programs.
-
Clone this repo and cd into the resulting folder.
-
Open the file
p_macroin Vim. You should see contents that look like^y$iprint("^[A=", ^[pa)^[^This is the "source code" for the macro, and is the sequence of key presses that will be sent to Vim whenever you activate the macro. The
^[characters should appear in a slightly different color, and if you move your cursor over them, you'll notice they behave like a single character. This is how theEsckey gets rendered in the terminal, so each of these characters will cause theEsckey to be pressed. -
Copy the line into the
pregister by typing the following sequence of commands in normal mode. (Ensure that you are in normal mode by pressingEscbefore typing the commands.)"pyyThe
yyyanks (Vim's language for copying) the entire line, and the"pindicates that we are yanking into thepregister (Vim's language for clipboard). Your typical muggle text editor has only a single clipboard to copy/paste from, but Vim has a separate register for every key on the keyboard. This lets us copy/paste many different things at the same time. Macros use the same registers as yanking/pasting, so by yanking into thepregister we are also creating thepmacro. -
To ensure that your macro works, open a new tab with the command
:tabeYou can use the commands
gtandgTto switch between tabs.In your new tab, type
python_variable_nameinto the tab. With your cursor anywhere on the line, type
@pto activate the macro. If you've created the macro correctly, you should get the resultprint("python_variable_name=", python_variable_name) -
(optional) For a detailed reference on writing your own Vim macros, see https://vim.fandom.com/wiki/Macros. These are quite useful for automating lots of small repetitive tasks.
Recall that rc stands for "run commands" and files that end in rc will be automatically sourced when the respective program starts.
For example, the .bashrc file will automatically be sourced whenever the bash shell starts
(which happens every time you login to the lambda server).
You can make your environment more comfortable by modifying the .bashrc file.
A simple way to modify .bashrc programmatically is with output redirection.
Run the following command
$ echo 'echo "Have a nice day :)"' >> ~/.bashrc
Note: It is common to write shell code that writes shell code like this. (And even shell code that writes shell code that writes shell code... and so on...) Lots of subtle bugs come about due to incorrect use of quotation marks.
Verify that you've modified the file by running
$ tail ~/.bashrc
Now logout and login again. You should see the welcome message asking you to have a nice day.
There are many routine tasks that we would like automated.
(And your .bashrc file is already very large, automating many of them.)
One task that is not currently being automated is loading up your venv that stores your python programs.
Exercise: Modify your
.bashrcso that: (1) the previous echo command is removed, and (2) your venv is automatically activated. Recall thatGis the Vim command to move to the end of a file,dddeletes the current line, andccchanges the current line.
Note: Notice that the exercise above does not ask you to verify that the changes were successful. Tutorials generally assume that you are self-aware enough as a programmer to verify steps like this. I will begin omitting these "obvious" verification steps in the future.
ANSI escape codes are the standard way to achieve graphical effects in the terminal.
For example the ANSI escape sequence \033[94m means to change the text color to light blue.
Try the following command:
$ echo "hello \\033[94mworld"
Notice that the command above has a double backslash \\.
The ANSI escape sequence contains a literal backslash character,
and so we need to escape the backslash so that the shell doesn't interpret \0 as the null byte.
In class, we created a command groq that allows more efficient access to llm for coding questions:
$ alias groq='llm -s "answer concisely in 5-10 lines"'
The following modification also colors the output in light blue so that it is easy to see where our prompt ends and the llm's output begins.
llm_blue() {
    printf "\033[94m"
    command llm "$@"
    printf "\033[0m"
}
alias groq='llm_blue -s "answer concisely in 5-10 lines" -m groq-llama-3.3-70b'
If you copy/paste it into the terminal, you should see colored output when you run the command groq.
Exercise: Add this code to your
.bashrcfile.
We all sometimes get a crazy error message and be like

This last part of the lab will get you a terminal command wtf for debugging these error messages.
Notice that there is a file .wtf.sh in this folder.
Move it to your home folder and source it:
$ mv .wtf.sh ~
$ source ~/.wtf.sh
You've now enabled the wtf command.
Whenever you encounter an error message in the shell,
you can type wtf to get context-dependent help.
Example 1:
Forgetting to escape the space in a filename can result in weird error messages, but wtf diagnoses that for you:
$ unzip -c /data/Twitter dataset/geoTwitter20-01-01.zip
unzip:  cannot find or open /data/Twitter, /data/Twitter.zip or /data/Twitter.ZIP.
$ wtf
### Error Analysis
The issue lies in the `unzip` command. The error message indicates that the file cannot be found.

### Solution
```bash
unzip -c "/data/Twitter dataset/geoTwitter20-01-01.zip"
```
The correct command uses quotes to handle the space in the directory name.
If you have followup questions you want to ask, you can use the groq -c command to continue the conversation.
For example:
$ groq -c 'how to escape spaces?'
### Escaping in the Shell
Escaping in the shell is used to treat special characters as literal characters.

* The backslash (`\`) is the escape character. It can be used to escape spaces and other special characters.
* Single quotes (`'`) can be used to enclose a string, escaping all characters within.
* Double quotes (`"`) can be used to enclose a string, escaping most characters within, but not escaping `$`, `` ` ``, or `\`.

Example:
```bash
echo "Hello World"
echo 'Hello World'
echo Hello\ World
```
Example 2:
A common mistake is to try to use the wrong program to run a file,
which often results in strange error messages.
wtf can better interpret those error messages.
$ sh example.py
example.py: 3: Syntax error: word unexpected (expecting ")")
$ wtf
### Error Explanation
The error `example.py: 3: Syntax error: word unexpected (expecting ")")` occurs because the `sh` command is used to run a Python script, which is not compatible with shell syntax.

### Solution
```bash
python3 example.py
```
Use the `python3` command to run the Python script instead of `sh`.
Example 3:
wtf builds a moderately complicated prompt to pass to the LLM that includes information about the current working environment and the contents of any source files in your current folder.
This means that the answer that wtf gives will be based on your actual code and not just the error message.
Other tools that you are used to using (like the chatgpt web interface) will not have this extra problem-specific context available.
We saw in class a situation where forgetting to pass in an argument to the map.py resulted in an incomprehensible python traceback,
but wtf automatically parses the python file to figure out the problem.
$ python3 map.py
Traceback (most recent call last):
  File "/home/usertest/proj/cmc-csci143/topic_01_mapreduce/lab2-productivity/map.py", line 13, in <module>
    with zipfile.ZipFile(args.filepath, 'r') as zip_ref:
         ^^^^^^^^^^^^^^^^^^^^^^^^^^^^^^^^^^^
  File "/usr/lib/python3.12/zipfile/__init__.py", line 1349, in __init__
    self._RealGetContents()
  File "/usr/lib/python3.12/zipfile/__init__.py", line 1412, in _RealGetContents
    endrec = _EndRecData(fp)
             ^^^^^^^^^^^^^^^
  File "/usr/lib/python3.12/zipfile/__init__.py", line 288, in _EndRecData
    fpin.seek(0, 2)
    ^^^^^^^^^
$ wtf
### Error Explanation
The error occurs because `args.filepath` is `None`, so `zipfile.ZipFile` cannot open it.

### Solution
```bash
python3 map.py --filepath /path/to/your/file.zip
```
Make sure to provide a valid file path when running the script. The file path should be specified after the `--filepath` argument.
Again, we can continue the conversation with the groq -c command to ask followup questions,
for example about how to modify the code.
$ groq -c 'how to force a filepath to be passed in?'
### Forcing a Filepath Argument
You can modify the `argparse` configuration to make the `filepath` argument required:

```python
parser = argparse.ArgumentParser()
parser.add_argument('--filepath', required=True)
```

This way, if the `--filepath` argument is not provided when running the script, `argparse` will raise an error and display the usage message.
Exercise: Source the
.wtf.shfile in your.bashrcso that thewtfwill be automatically enabled when you login.
Note:
wtfis an experimental tool I wrote this week partly to help myself and partly to help you all. If you all find any bugs, let me know and I'll fix them. (Or if you fix them, then show me the fix and I'll award extra credit.)
Exercise: The source file
.wtf.shuses a few shell tricks that you probably haven't seen before, but it should be relatively accessible. It is still firmly in the realm of what I consider "beginner" shell scripts. Open the file in Vim and view how the prompt is being constructed. This should give you a better sense of the types of problems thatwtfmight be able to help with.Notice that on lines 69/70 I have the given version of
.wtf.shtargeting an "expert" programmer and using <10 lines of code. You may wish to change this to target a beginner programmer and use a longer explanation.
Upload the output of the following terminal session to sakai.
$ lss
$ wtf
The first command should get an error about lss not being found,
and the wtf should provide additional information about the error.